It is Friday, and just for fun and also because I would like to have a watch (one of my passions) in the cover picture, I decided to migrate a subset of an old project of mine: BizTalk MapperExtensions UtilityPack to Azure Functions, in this case, DateTime Conversion Functoids. You never know if they will be handy someday!
This project includes a list of Azure Functions that make data conversions easy to accomplish and that you can use anywhere, but most likely, I was thinking of using them inside Logic Apps if I will have a need to do this kind of task if they are not available out-of-the-box inside Logic Apps – and I know that some of them are not:
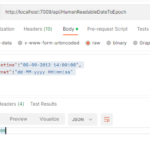
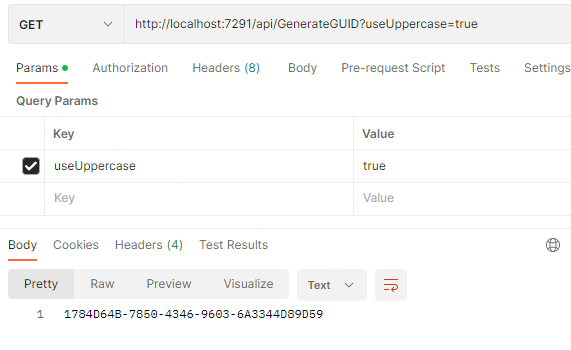
Convert from human-readable to epoch date function.
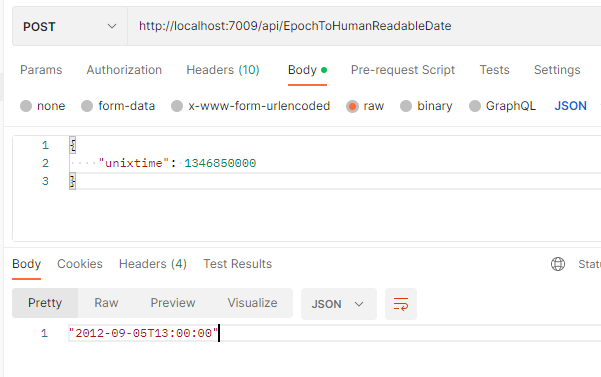
Convert from epoch to human readable date function.
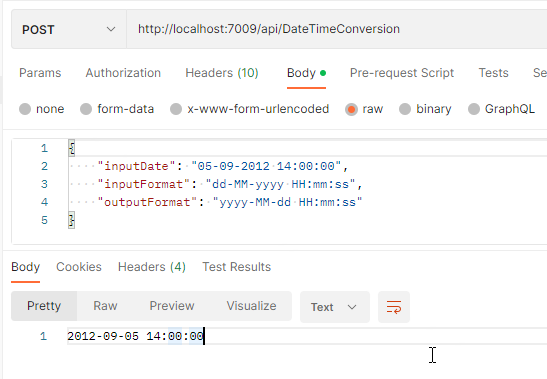
And Convert date time format function.
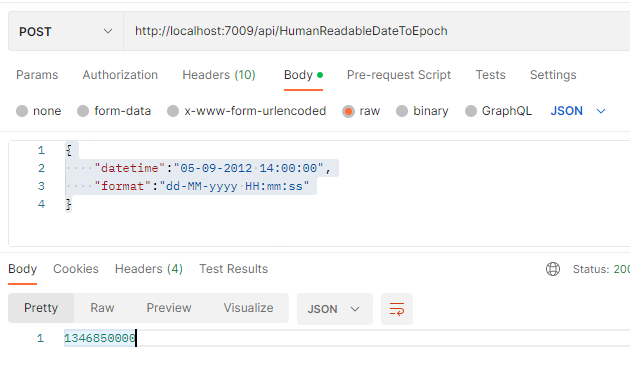
Convert from human-readable to epoch date function.
This function allows you to convert a traditional date (Human Readable Date) into a Unix date (Epoch Date).
What is epoch time?
The Unix epoch (or Unix time or POSIX time or Unix timestamp) is the number of seconds that have elapsed since January 1, 1970 (midnight UTC/GMT), not counting leap seconds (in ISO 8601: 1970-01-01T00:00:00Z). Literally speaking, the epoch is Unix time 0 (midnight 1-1-1970), but ‘epoch’ is often used as a synonym for ‘Unix time’. Many Unix systems store epoch dates as a signed 32-bit integer, which might cause problems on January 19, 2038 (known as the Year 2038 problem or Y2038).
The function receives a JSON payload with two properties:
The input Date or DateTime.
And a string describing the input format of the first parameter
The function’s output is a DateTime string according to the output format specified : “2012-09-05 14:00:00”
Where can I download it
You can download the complete Azure Functions source code here:
Hope you find this helpful! So, if you liked the content or found it helpful and want to help me write more content, you can buy (or help buy) my son a Star Wars Lego!
Author: Sandro Pereira
Sandro Pereira lives in Portugal and works as a consultant at DevScope. In the past years, he has been working on implementing Integration scenarios both on-premises and cloud for various clients, each with different scenarios from a technical point of view, size, and criticality, using Microsoft Azure, Microsoft BizTalk Server and different technologies like AS2, EDI, RosettaNet, SAP, TIBCO etc.
He is a regular blogger, international speaker, and technical reviewer of several BizTalk books all focused on Integration. He is also the author of the book “BizTalk Mapping Patterns & Best Practices”. He has been awarded MVP since 2011 for his contributions to the integration community.
View all posts by Sandro Pereira
There are so many scenarios that I faced in more than 18 years doing integration that required me to generate a unique id that I don’t know how to start explaining all of them. Unique identifiers are handy when an automation process needs to generate a unique reference “number” to identify an object or entity like a Customer account, a document id, and so on. Most of the time, we use GUIDs, which stands for a globally unique identifier, and it is usually a 128-bit text string that represents an identification (ID) that is unlikely ever to repeat or create a collision to address these scenarios unless requirements don’t allow us to use a GUID.
This is a list of 4 Functions that will allow you to generate unique identifiers:
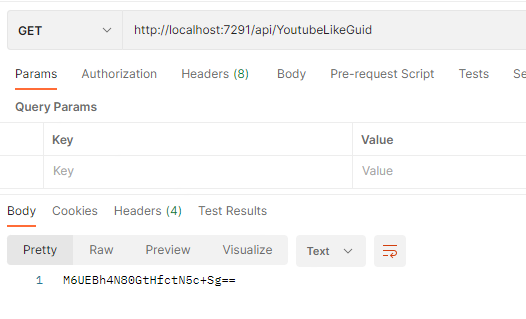
This function is another way that I used in the past, in BizTalk Server projects, to generate a tiny identifier. But looking now that I’m writing this blog post, it looks like a Youtube-like GUID.
Here is a small sample of the code behind this function:
You can download the complete Azure Functions source code here:
Once again, thank my team member Luis Rigueira for testing and helping me develop some of these function with me!
Hope you find this helpful! So, if you liked the content or found it helpful and want to help me write more content, you can buy (or help buy) my son a Star Wars Lego!
Author: Sandro Pereira
Sandro Pereira lives in Portugal and works as a consultant at DevScope. In the past years, he has been working on implementing Integration scenarios both on-premises and cloud for various clients, each with different scenarios from a technical point of view, size, and criticality, using Microsoft Azure, Microsoft BizTalk Server and different technologies like AS2, EDI, RosettaNet, SAP, TIBCO etc.
He is a regular blogger, international speaker, and technical reviewer of several BizTalk books all focused on Integration. He is also the author of the book “BizTalk Mapping Patterns & Best Practices”. He has been awarded MVP since 2011 for his contributions to the integration community.
View all posts by Sandro Pereira
We all must love this Logic App team for engagement with the community over the last few months! Always trying to listen to the client and community feedback in order for them to prioritize investments in Logic Apps based on our real needs.
And once again, the Logic App team wants to listen to our feedback! And this time, on the topic we all developers or consultants were also anxiously waiting for Developer Experience and Tools. At least I was!
Logic Apps Developer Experience and Tools Survey
With this new survey, the Logic App team seeks feedback on how you guys want to have or imagine having XML Support inside Logic Apps. They want to learn about your needs and feedback on the current Logic Apps workflows support for XML and to provide us information about potential scenarios that you want to see covered around XML and SOAP:
Which Logic Apps model(s) are you using today?
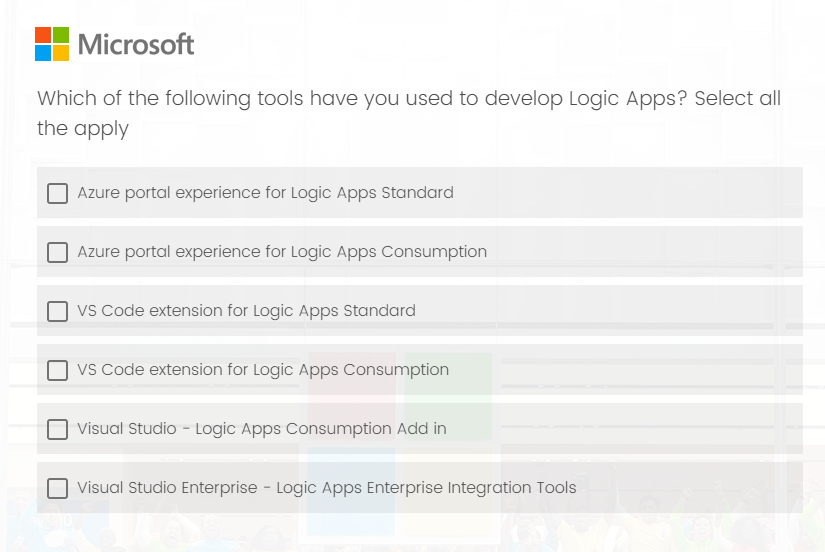
Which tools have you used to develop Logic Apps?
When developing Logic Apps Standard, which environment do you mainly use?
In what scenarios do you use Azure portal more for developing Logic Apps Standard?
Rank the new capabilities of Azure Portal experience for Logic Apps Standard.
If you can choose one IDE for developing Logic Apps Standard locally, which IDE do you want to use? Visual Studio Code or Visual Studio.
Why do you want to use Visual Studio instead of VS Code for developing Logic Apps Standard locally?
Rank the new capabilities of IDE experience for Logic Apps Standard.
THIS IS YOUR OPPORTUNITY! Don’t complain that the developing experience is not that good or you prefer using Visual Studio rather than Visual Studio Code for developing Logic Apps in the future if you don’t fill out this form. The survey does not take long to respond to, and this is your opportunity to try to change and influence the next set of features.
I did my part!
Please fill out the following survey to help Azure Logic Apps:
On a final note, congratulations to the Logic App team for being so engaged with the community!
Author: Sandro Pereira
Sandro Pereira lives in Portugal and works as a consultant at DevScope. In the past years, he has been working on implementing Integration scenarios both on-premises and cloud for various clients, each with different scenarios from a technical point of view, size, and criticality, using Microsoft Azure, Microsoft BizTalk Server and different technologies like AS2, EDI, RosettaNet, SAP, TIBCO etc.
He is a regular blogger, international speaker, and technical reviewer of several BizTalk books all focused on Integration. He is also the author of the book “BizTalk Mapping Patterns & Best Practices”. He has been awarded MVP since 2011 for his contributions to the integration community.
View all posts by Sandro Pereira
In our Integration projects, especially nowadays on Azure Integration Services, sometimes we have the need to work with Base64 strings format. This is very common in some connectors inside Logic App, where the request or response is in Base64, like the Service Bus or the HTTP. And when we need to debug or troubleshoot our solution or business process, we need to understand what is the request and response payload. That means that we need most of the time to decode the Base64 string.
And I know what you guys are thinking… I also was thinking that way! Why do you need a Windows tool if we have plenty of online tools like https://www.base64decode.org/ that can easily do the job simply and fashionably?
And my straightforward and honest answer is privacy/security! The problem with using these online tools is that we never know behind the scenes what they are doing. Are you sure that they are not keeping logs of the inputs we provide and the result outputs? That is the magic question because we often have sensitive (private) information on those Base64 strings, like a connection string or usernames and passwords. And we need to be careful about where we put this information.
I have an amazing Ethical hacking friend, Nino Crudele, and every time I speak with him about security, I’m always more suspicious about how to use specific tools available on the web or, in general, how to secure my personal stuff and my solutions. And even speaking with Michael Stephenson, something that we try to do regularly, we share these concerns, and it was Michael that raised my suspicions about the decode online tools. Since that talk, I have stopped using them and decided to create my personal tool.
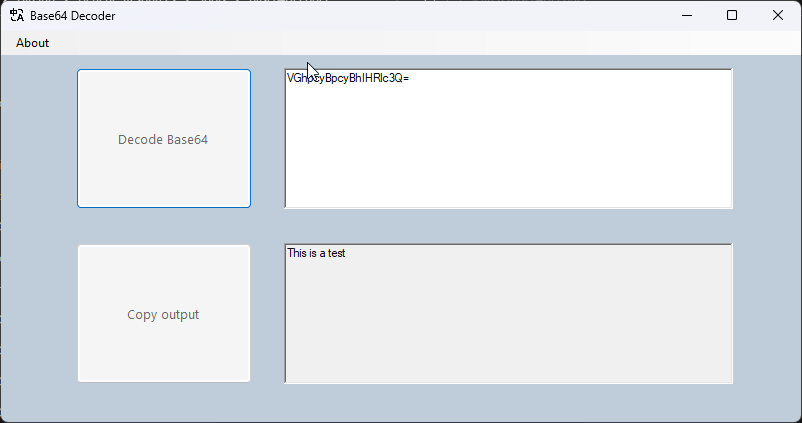
Base64 Decode Windows tool
This is a very simple Windows tool that allows you to decode your data. This is a handy tool if you have to deal with Base64 format.
To not raise the same suspicions about this tool, the source code is available on GitHub!
Download
Hope you find this useful! So, if you liked the content or found it useful and want to help me write more content, you can buy (or help buy) my son a Star Wars Lego!
Credits
Luis Rigueira | Member of my team and one of the people responsible for developing this tool.
Author: Sandro Pereira
Sandro Pereira lives in Portugal and works as a consultant at DevScope. In the past years, he has been working on implementing Integration scenarios both on-premises and cloud for various clients, each with different scenarios from a technical point of view, size, and criticality, using Microsoft Azure, Microsoft BizTalk Server and different technologies like AS2, EDI, RosettaNet, SAP, TIBCO etc.
He is a regular blogger, international speaker, and technical reviewer of several BizTalk books all focused on Integration. He is also the author of the book “BizTalk Mapping Patterns & Best Practices”. He has been awarded MVP since 2011 for his contributions to the integration community.
View all posts by Sandro Pereira
And once again, the Logic App team wants to listen to our feedback! And this time, on the topic we all developers or consultants were anxiously waiting for, specially BizYalk Server developers: XML Support in Logic Apps!
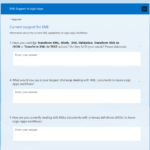
XML Support in Logic Apps Survey
With this new survey, the Logic App team seeks feedback on how you guys want to have or imagine having XML Support inside Logic Apps. They want to learn about your needs and feedback on the current Logic Apps workflows support for XML and to provide us information about potential scenarios that you want to see covered around XML and SOAP:
What industry do you work in?
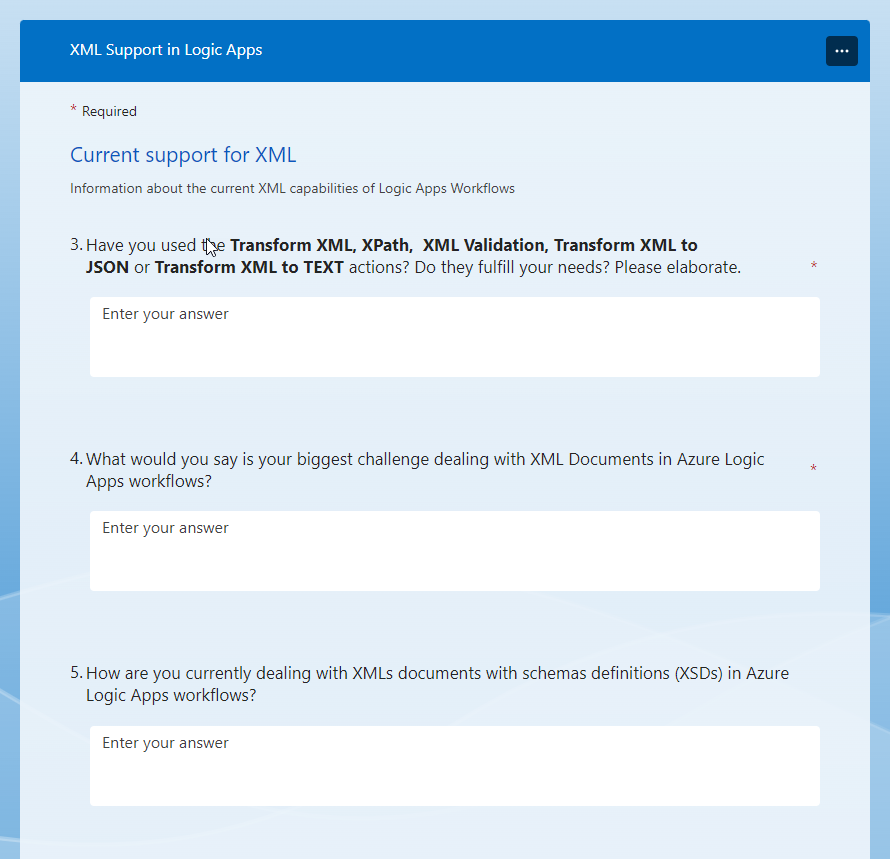
Information about the current XML capabilities of Logic Apps Workflows
Have you used Transform XML, XPath, XML Validation, Transform XML to JSON, or Transform XML to TEXT actions? Do they fulfill your needs?
What is your biggest challenge in dealing with XML Documents in Azure Logic Apps workflows?
How are you currently dealing with XMLs documents with schemas definitions (XSDs) in Azure Logic Apps workflows?
Are you currently converting SOAP to REST services or calling SOAP services from Logic Apps? If so, what procedure do you follow?
Are you familiar with the HTTP connector? Does it address your needs?
Are you familiar with the Custom Connector experience that supports SOAP? Does it address your needs?
How are you retrieving individual data elements from an XML document and then using that value in an action?
Are you migrating schemas from BizTalk or other products to Azure Logic Apps?
(For Consumption Only) How would you rate the XML capabilities of the Enterprise Integration Pack?
Please Rank the areas you feel Azure Logic Apps should include XML native support.
THIS IS YOUR OPPORTUNITY! Don’t complain that the developing experience is not that good or you missing XML capabilities inside Logic App in the future if you don’t fill out this form. The survey does not take long to respond to, and this is your opportunity to try to change and influence the next set of features.
I did my part!
Please fill out the following survey to help Azure Logic Apps:
On a final note, congratulations to the Logic App team for being so engaged with the community over the last few months! Keep this engagement active, and please continue to do a great job!
Author: Sandro Pereira
Sandro Pereira lives in Portugal and works as a consultant at DevScope. In the past years, he has been working on implementing Integration scenarios both on-premises and cloud for various clients, each with different scenarios from a technical point of view, size, and criticality, using Microsoft Azure, Microsoft BizTalk Server and different technologies like AS2, EDI, RosettaNet, SAP, TIBCO etc.
He is a regular blogger, international speaker, and technical reviewer of several BizTalk books all focused on Integration. He is also the author of the book “BizTalk Mapping Patterns & Best Practices”. He has been awarded MVP since 2011 for his contributions to the integration community.
View all posts by Sandro Pereira
Yesterday while troubleshooting a BizTalk Server developer environment at a client, I encountered an unusual error while trying to configure the BizTalk Server Backup job:
Could not find server ‘server name’ in sys.servers.
Based on the error description, and by the fact that I was trying to run a SQL Server job, I knew that the error should be on the SQL Server side, some incorrect configurations,
Cause
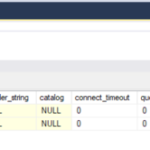
Why this problem start to happen is unclear to me, and at the time I didn’t have all the information available to understand that. However, after investigating a little this error type I realize that we can execute a SQL query to check out what is your linked server:
select * from sys.servers
Or
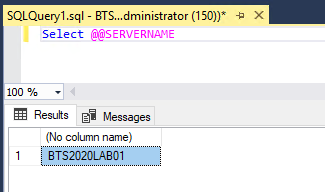
Select @@SERVERNAME
The problem was that once I run these scripts, I realize the server name was not the expected one, it was incorrect! For example:
I was expecting BTS2020LAB01.
But instead, I was seeing VMIMAGE01.
And that was causing the failure on the Backup job and other BizTalk server jobs.
Solution
To solve this issue we need to fix that server name and for that, we can apply the following SQL script:
sp_dropserver 'VMIMAGE01'
GO
sp_addserver  'BTS2020LAB01',local
GO
After applying this script, make sure you restart the SQL Server service.
Once you have done these steps, you can successfully start your BizTalk Backup job.
Author: Sandro Pereira
Sandro Pereira lives in Portugal and works as a consultant at DevScope. In the past years, he has been working on implementing Integration scenarios both on-premises and cloud for various clients, each with different scenarios from a technical point of view, size, and criticality, using Microsoft Azure, Microsoft BizTalk Server and different technologies like AS2, EDI, RosettaNet, SAP, TIBCO etc.
He is a regular blogger, international speaker, and technical reviewer of several BizTalk books all focused on Integration. He is also the author of the book “BizTalk Mapping Patterns & Best Practices”. He has been awarded MVP since 2011 for his contributions to the integration community.
View all posts by Sandro Pereira
If you come from BizTalk and have an integration background like me, you may remember that we had a Loopback Adapter in BizTalk Server.
The Loopback adapter is a two-way send adapter that, in essence, returns a copy of the outbound message back to the caller, in most cases, an orchestration. This capability can be used in several situations or scenarios:
One is to replace the need to call pipelines inside an orchestration. Calling pipelines inside orchestrations is a good option, but it complicates the logic of the orchestrations with loops and expressions. You’ll also end up repeating the “code” for each message type/orchestration.
Or have a way to invoke a party/agreement to get more details in the message.
Using Loopback adapter to subscribe NACKs off Web Services.
And so on.
However, while trying different implementation strategies using Azure Integration Services, I realize that the use of a Loopback API is also very handy.
Are you wondering where you can use this component or strategy?
In many different ways like:
If we need to do a liquid transformation inside Logic App Consumption, we need to have an Integration Account, which is expensive. Instead, we can expose an operation in API Management to perform a liquid transformation. For that, you will need the Loopback API.
Throwing an exception inside Logic Apps. There are many ways to archive these capabilities. One of the options is again exposing an operation in API Management to throw back the exception. For that, you will need the Loopback API.
And so on.
Soon I’m going to publish some of these implementation strategies.
For now, I leave you the Loopback API code for you to try and provide feedback.
Loopback API Azure Function
The Loopback API is simply an Azure Function that, in its essence, returns a copy of the inbound message/request back to the caller. We can say that this Azure Function mimics the Echo API, which comes by default in the API Management,
You can download the complete code for the function from GitHub. The link is below at the bottom of the blog post. Here is a small code snippet:
        public static async Task Run(
            [HttpTrigger(AuthorizationLevel.Function, "post", Route = null)] HttpRequest req,
            ILogger log)
        {
            log.LogInformation("C# HTTP trigger function processed a request.");

            string requestBody = await new StreamReader(req.Body).ReadToEndAsync();
            //dynamic data = JsonConvert.DeserializeObject(requestBody);

            string contentType = req.Headers["Content-Type"];

            return new ContentResult { Content = requestBody, ContentType = req.Headers["Content-Type"] };
Where can I download it
You can download the complete Azure Function source code here:
Once again, thank my team member Luis Rigueira for testing these concepts with me!
Hope you find this helpful! So, if you liked the content or found it helpful and want to help me write more content, you can buy (or help buy) my son a Star Wars Lego!
Author: Sandro Pereira
Sandro Pereira lives in Portugal and works as a consultant at DevScope. In the past years, he has been working on implementing Integration scenarios both on-premises and cloud for various clients, each with different scenarios from a technical point of view, size, and criticality, using Microsoft Azure, Microsoft BizTalk Server and different technologies like AS2, EDI, RosettaNet, SAP, TIBCO etc.
He is a regular blogger, international speaker, and technical reviewer of several BizTalk books all focused on Integration. He is also the author of the book “BizTalk Mapping Patterns & Best Practices”. He has been awarded MVP since 2011 for his contributions to the integration community.
View all posts by Sandro Pereira
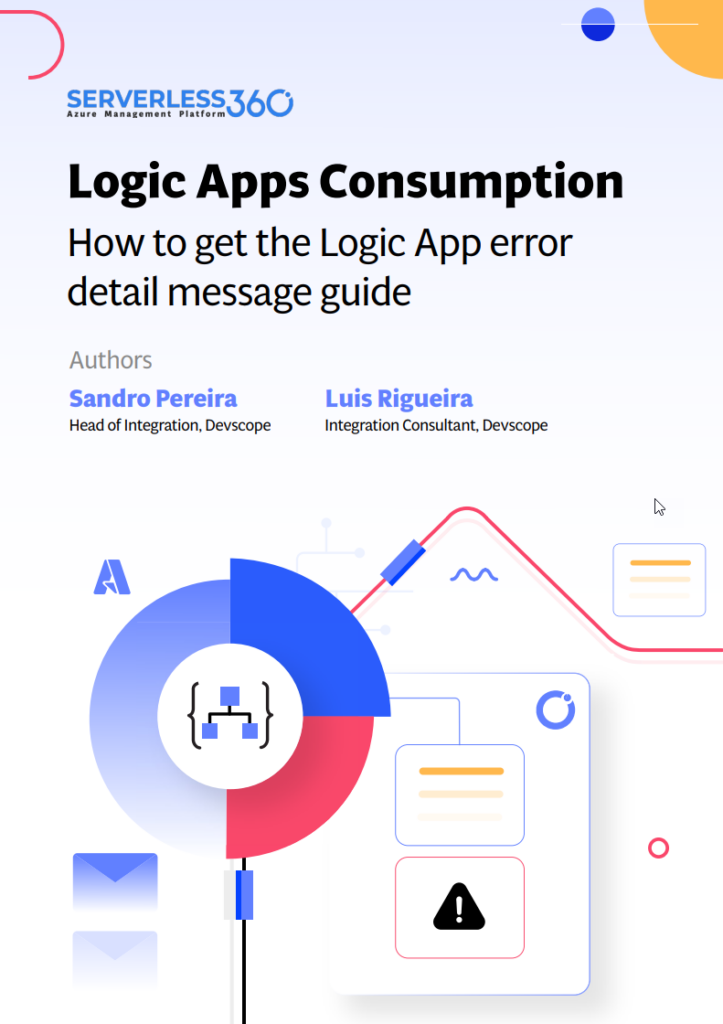
I have often been writing about how to handle exceptions and get the correct and detailed error message describing in an easy and clean matter the failures in our processes:
And the reason why that happens is that we need to accept the fact that at a certain point in time, our process will fail. Or by the fact we did some updates that weren’t tested properly, an external system is down or in intervention, or by issues in Microsoft infrastructure, and so many other reasons. But when that happens, one thing is clear: we want to get the exact error message describing why it failed. But, of course, we can always go to the Logic Apps run history – except if it is a Stateless workflow on Standard – to check where and why it failed. And obviously, we will have all the information necessary to solve the problem. However, most of the time, if not always, we want to log the error in some place like Application Insights, SQL Database, Event Hubs, and so on in an automated way without human intervention. To accomplish that, we need to access this error message in runtime.
By default, Logic App allows handling errors using the Configure run after settings at a per action level. For more complex scenarios, it can be done by setting up Scope action and implementing try-catch/try-catch-finally statements. However, getting a detailed error message can be a bit challenging inside Logic App, and you will find different approaches to implement the same capabilities, each of them with advantages and disadvantages.
In this whitepaper, we will be addressing some of the possible ways to address these needs but also addressing some of the following questions:
How can I implement error handling?
This is an important question and topic because, without proper error handling, we will not be able to send in an automated way access the error message instead, our workflow will finish in that action with a failure state.
What out-of-the-box features do I have to capture and access the error details?
How can I improve these default features in a no-code, low-code way and in a code-first approach?
Where can I download it
You can download the whitepaper here:
Author: Sandro Pereira
Sandro Pereira lives in Portugal and works as a consultant at DevScope. In the past years, he has been working on implementing Integration scenarios both on-premises and cloud for various clients, each with different scenarios from a technical point of view, size, and criticality, using Microsoft Azure, Microsoft BizTalk Server and different technologies like AS2, EDI, RosettaNet, SAP, TIBCO etc.
He is a regular blogger, international speaker, and technical reviewer of several BizTalk books all focused on Integration. He is also the author of the book “BizTalk Mapping Patterns & Best Practices”. He has been awarded MVP since 2011 for his contributions to the integration community.
View all posts by Sandro Pereira
In my last blog post – Logic Apps and DocuSign integration – I explain how you can create and dynamically populate a contract using an HTTP input and then use the DocuSign connector to complete the workflow! Today we are going to see another DocuSign integration capability.
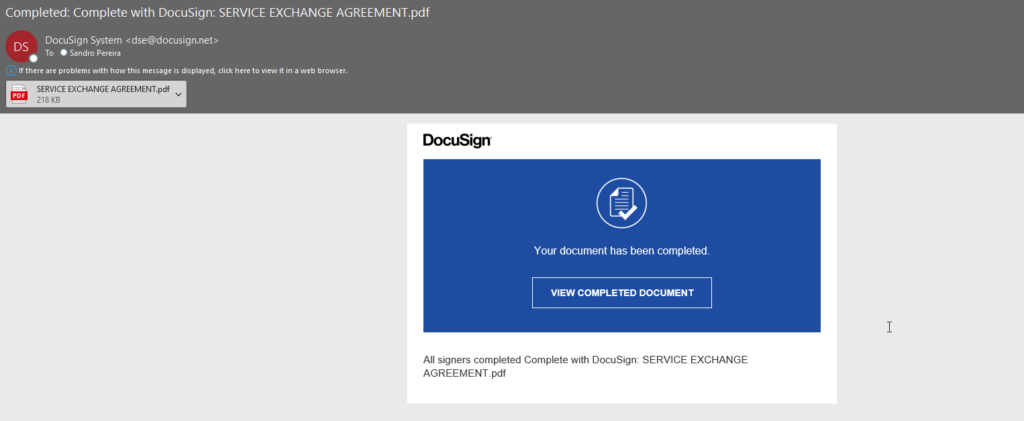
By default, and as I mentioned in my last post, once the document is completed and signed by both parties, all participants will receive an email informing them that All signers completed Complete with DocuSign and with an available link for them to access and view the document.
However, the signed document will live and will be available on the DocuSign platform, which is probably not ideal, typically, we would like to store it internally, if it is personal, in our local drive or dropbox, in an organization inside SharePoint or CRM for example.
So, the main questions are: Is it possible to automate this part of the process? and if yes, how?
And yes, it is possible, and this is what we will address in this blog post! For simplicity, we will be using Dropbox as our archive system.
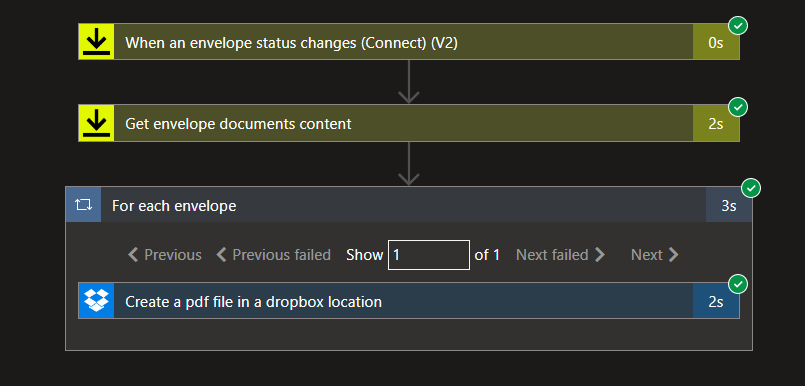
Before we start to explain all the steps you need to do to implement this logic, let me tell you that what you usually expect to see in the Logic App workflow will be typically like this:
Where the:
Logic App will be triggered once the status of the envelope change to Completed.
From there, we will make an additional call to Get the envelope documents’ content.
And then create a file on Dropbox.
That will create a for each action since the structure of the response is an array despite only containing one row.
I don’t like this approach for several reasons:
We are making an unnecessary external call to DocuSign – the Get envelope documents content call.
It is less performant. The processing time of the Logic App can go from 3 to 5 seconds:
We can do way better! and do the same in less than 2 seconds. So here we are going to explain the “intermedium” approach. For simplicity, I won’t implement the “advanced” approach that only contains two actions!
So, to archive a signed document, what we need to do is:
Create a new Logic App, let’s call it: LA-ProcessDocuSignSignedDocuments-POC.
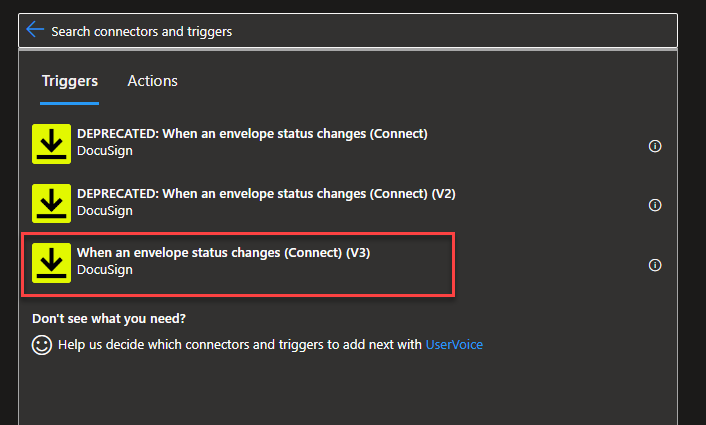
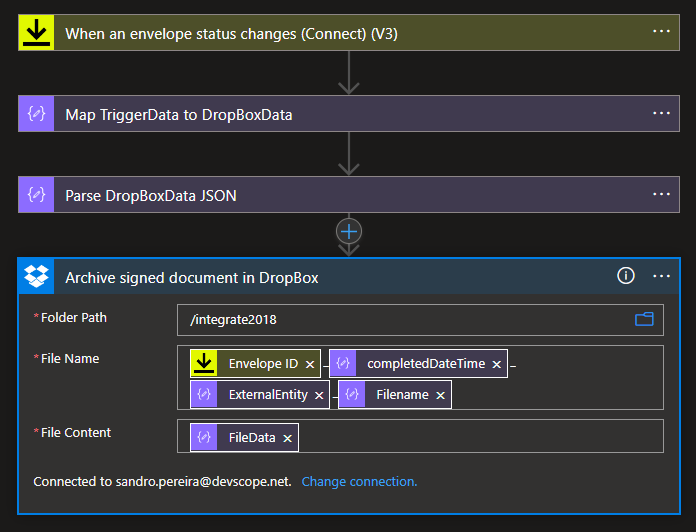
On the Search connectors and triggers box, type DocuSign, select the DocuSign connector, and then select the When an envelope status changes (Connect) (V3) trigger.
On the When an envelope status changes (Connect) (V3) trigger, we need to:
On the Account property from the combo box, select the account to use.
On the Connect name property, type a name that correctly describes your connector, for example, Process Document Signed.
On the Envelope Status property from the combo box, select the envelope-completed option.
Note: if you use V2 of this action, the Envelope event property value will be Completed and not envelope-completed.
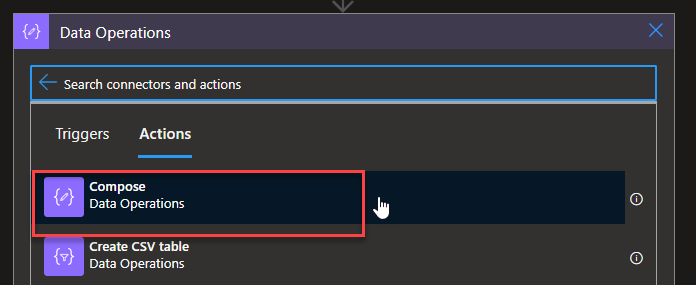
Click on + New step to add a new action. From the search textbox, type Data Operations and then select Data Operations – Compose action.
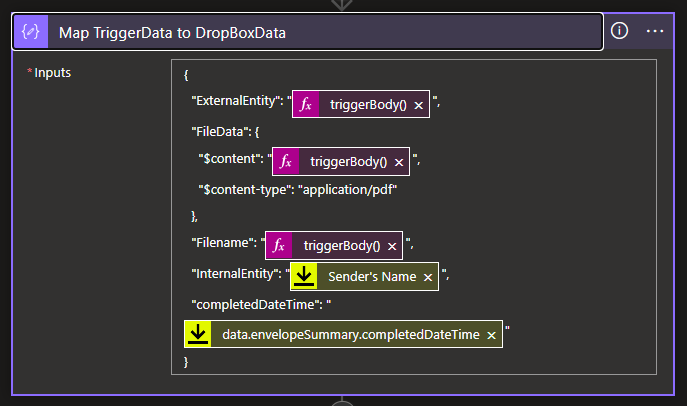
On the Compose action, we need to add the following input value:
Here, we are extracting only the necessary pieces of information that the trigger will provide to us and creating a simple JSON message with all the information we will need to create the file in our Dropbox according to the rules we specify. For example:
The expression triggerBody()?[‘data’]?[‘envelopeSummary’]?[‘recipients’]?[‘signers’][0]?[‘name’] will contain the name external entity/person that signed the document.
The expression triggerBody()?[‘data’]?[‘envelopeSummary’]?[‘sender’]?[‘userName’] will contain the name internal entity/person that signed the document – in this sample, my name.
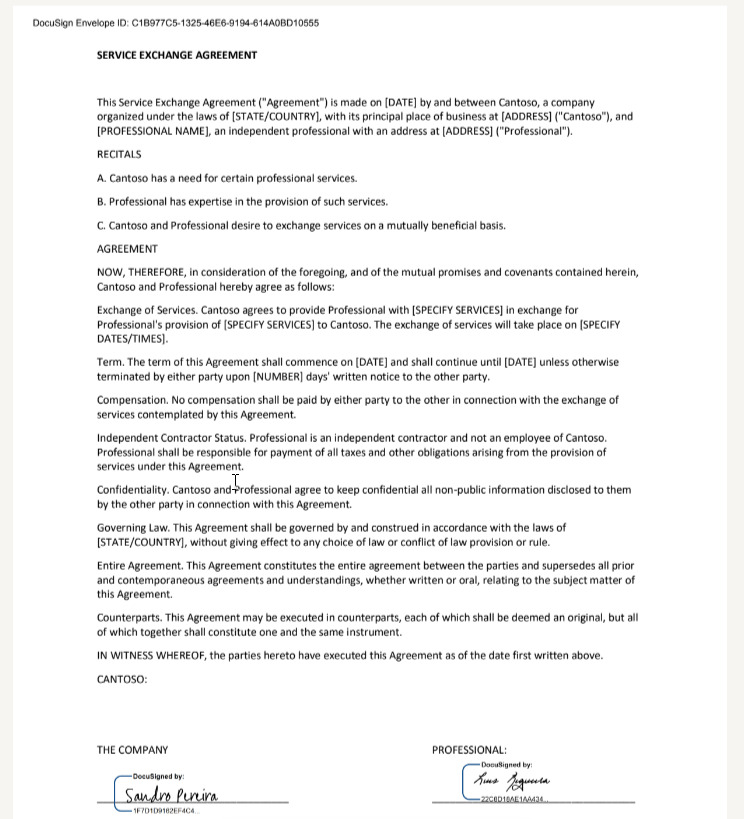
The expression triggerBody()?[‘data’]?[‘envelopeSummary’]?[‘envelopeDocuments’][0]?[‘name’] will contain the original name of the file we add on DocuSign – in our case, SERVICE EXCHANGE AGREEMENT.pdf.
The tricky part was the File data to be added to the Dropbox. If we send only the bytes that are available on the PDFBytes property, a file will be created on our Dropbox, but it will be corrupted, and we cannot open it. So we need to create a structure with content type and content information.
Now, continue our Logic App workflow. Let us:
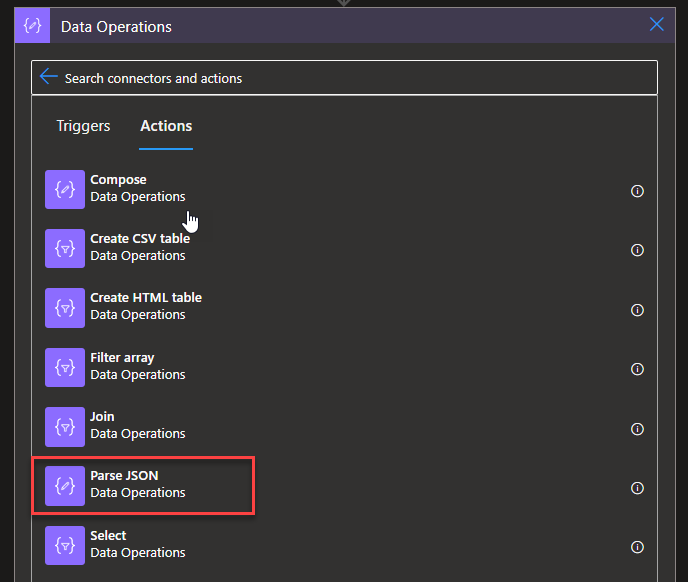
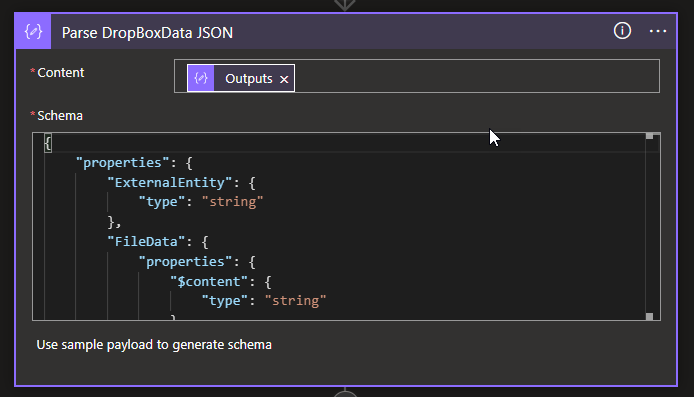
Click on + New step to add a new action. From the search textbox, type Data Operations and then select Data Operations – Parse JSON action.
On the Parse JSON action, we need to:
On the Content property, set the value to the Output property of the previous Compose action, in our case, the Map TriggerData to DropBoxData.
Note: This will tokenize the properties of the JSON message we created earlier, and that will allow us to easily used them in the following action.
Note: these two actions, the Compose, and the Parse JSON, are optional. We could not use them and configure all the properties of the next action with expressions – this will be the “advanced” approach!
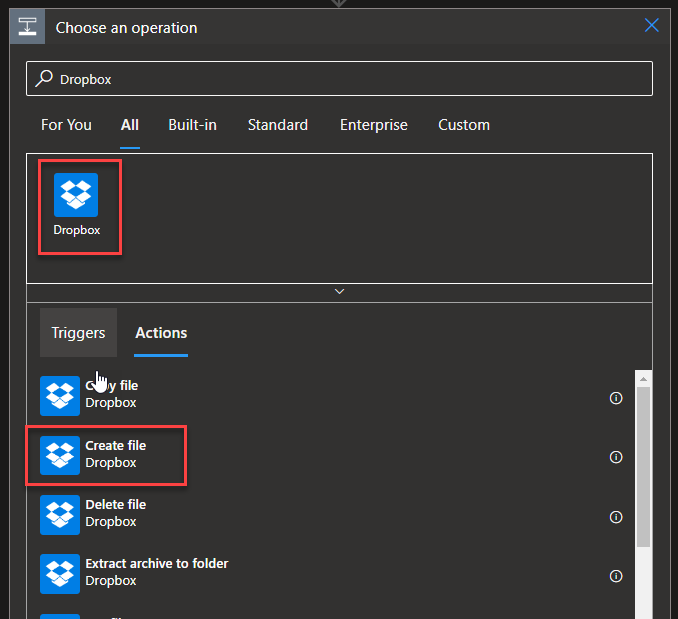
Click on + New step to add a new action. From the search textbox, type DropBox and then select Dropbox – Create file action.
On the Create file action, we need to:
On the Folder Path property, define the path inside dropbox to where to store the file.
On the File Name property, we want the file to have the following naming convention:
___
So for that, we need to define this property with the following expression:
On the File Content property, set the value to the FileData property of the previous Parse JSON action, in our case, the Parse DropBoxData JSON.
Finally, save your Logic App.
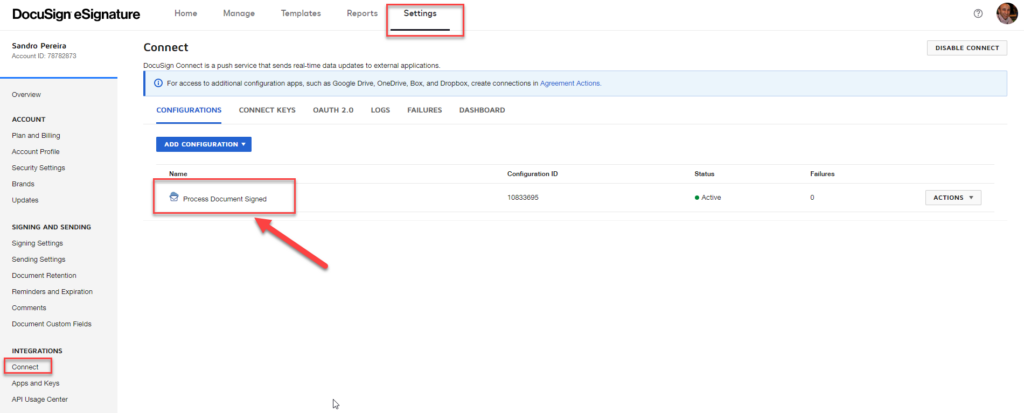
By clicking saving, this will also create in DocuSign platform a Connect configuration with the name you used on the trigger, in our example, Process Document Signed. You can see this by:
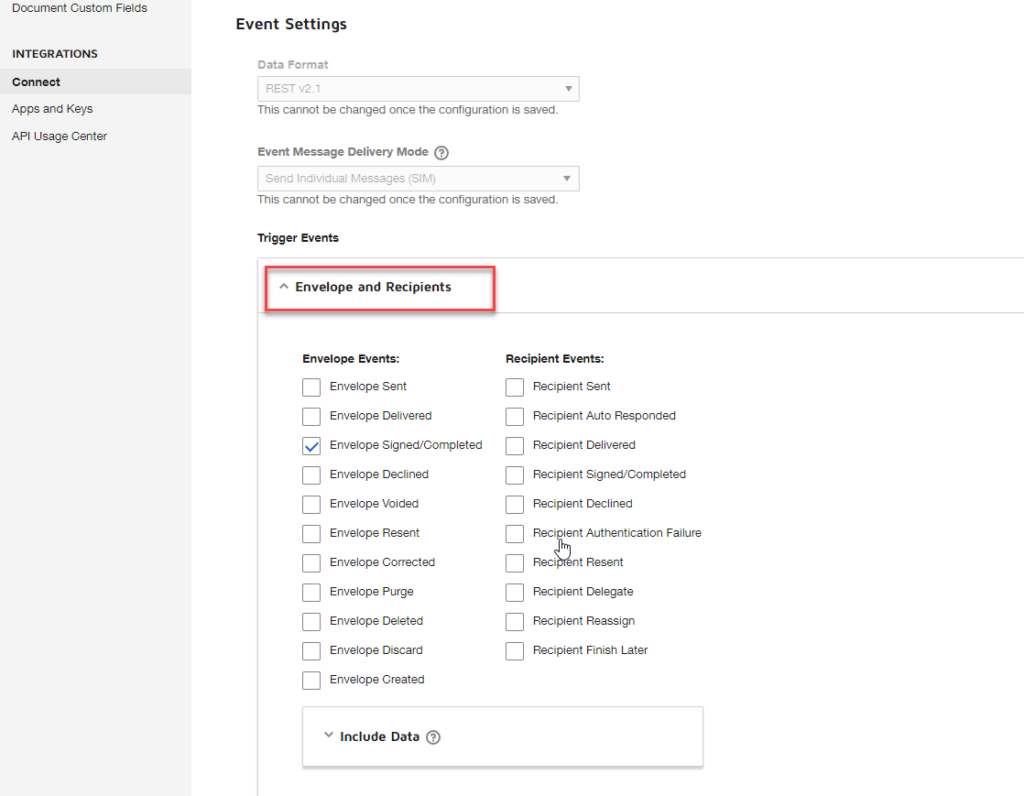
On the top menu, select Settings. From there, in the left tree, select the Connect option under Integrations.
Now, for these “intermedium” and “advanced” approach to work we need to do a small trick on the connection inside DocuSign. To do that, we need to:
Select the Process Document Signed connection.
On the Edit Custom Configuration page, scroll down to the option Trigger Events under Event Settings, and expand the Envelope and Recipients panel.
And then expand the Include Data panel and make sure you select the following options:
Custom Fields
Documents
Extensions (optional)
Recipients
Tabs (optional)
Click Save Configuration in the top right corner on the Edit Custom Configuration page
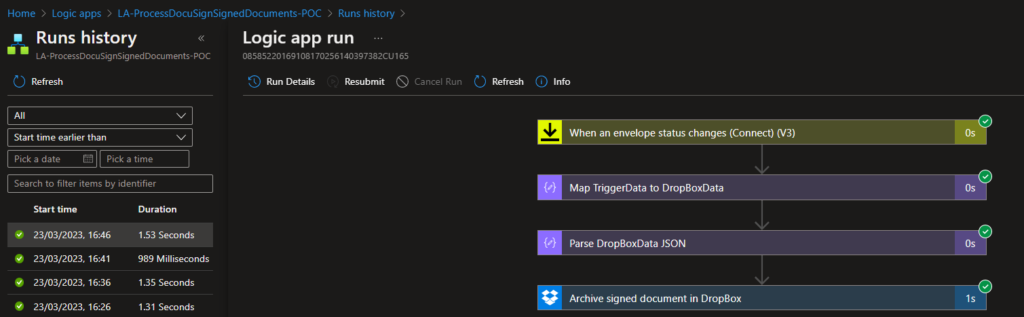
Now to test it, we need to start by executing the Logic App we create yesterday, in order to generate a new document (aka envelope) to be signed.
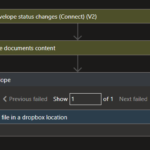
Once both parties sign the document, our Logic App will be triggered:
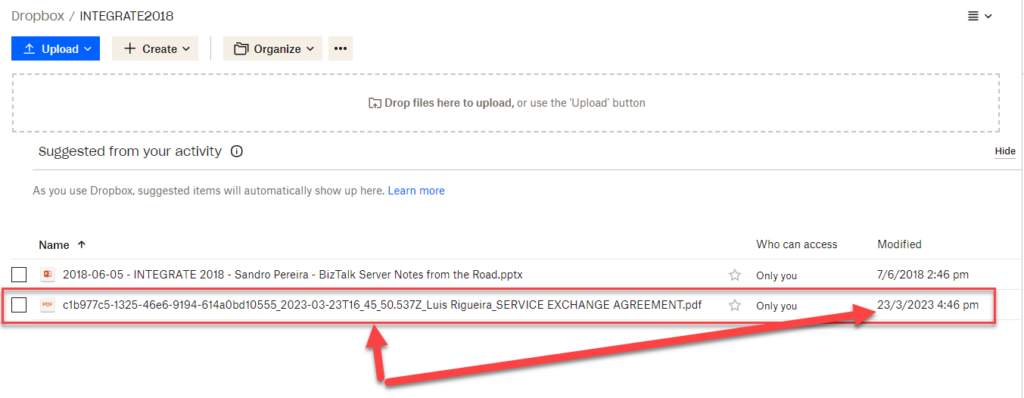
And a file will be added in our Dropbox:
And, to be sure, if you click on it, you will the the document signed by Luis and me.
Now, have you notice on the picture above the execution time of this approach? All of them in less than a 2 seconds!
Credits
Once again, a big thanks to my team member Luis Rigueira for participating in this proof-of-concept!
Hope you find this helpful! So, if you liked the content or found it helpful and want to help me write more content, you can buy (or help buy) my son a Star Wars Lego!
Author: Sandro Pereira
Sandro Pereira lives in Portugal and works as a consultant at DevScope. In the past years, he has been working on implementing Integration scenarios both on-premises and cloud for various clients, each with different scenarios from a technical point of view, size, and criticality, using Microsoft Azure, Microsoft BizTalk Server and different technologies like AS2, EDI, RosettaNet, SAP, TIBCO etc.
He is a regular blogger, international speaker, and technical reviewer of several BizTalk books all focused on Integration. He is also the author of the book “BizTalk Mapping Patterns & Best Practices”. He has been awarded MVP since 2011 for his contributions to the integration community.
View all posts by Sandro Pereira
I’ve been wanting to explore the integration capabilities with DocuSign for some time now, but for some reason, I kept putting it off. Or because I didn’t have free time available or because I was doing other stuff. Until now!
And one of the reasons why I want to explore these capabilities is the fact nowadays, we have people entering at DevScope from all over the place, and we do follow a welcome process where they need to sign some documents like work conduct or work ethic, reception manual and so on. Do these need to be manually signed these days? That means that new remote employees need to print the papers, sign, scan, and send them back? Is there a better way?
But first, what is DocuSign? And how can we use it?
DocuSign is a cloud-based electronic signature platform that allows users to sign, send, and manage electronic documents securely. It is a software service that enables users to sign documents electronically and send them for signature to others quickly and efficiently. The platform is designed to be easy to use and accessible from anywhere, on any device.
DocuSign is used by individuals, businesses, and organizations of all sizes across many industries, including finance, real estate, healthcare, and more. The platform streamlines the document signing process and eliminates the need for physical documents and manual signatures, which can be time-consuming and costly. It also offers additional features like document storage, workflow automation, and advanced analytics. Overall, DocuSign helps to simplify the document signing process, increase efficiency, and reduce costs.
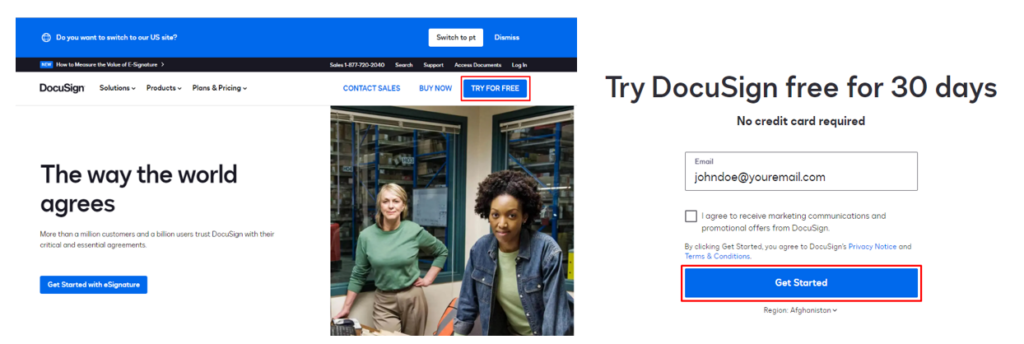
So, what we need to do first is to create a 30-day free account (No credit card required) on DocuSign and understand how DocuSign works.
And then, you just need to follow the steps and create your name and your password.
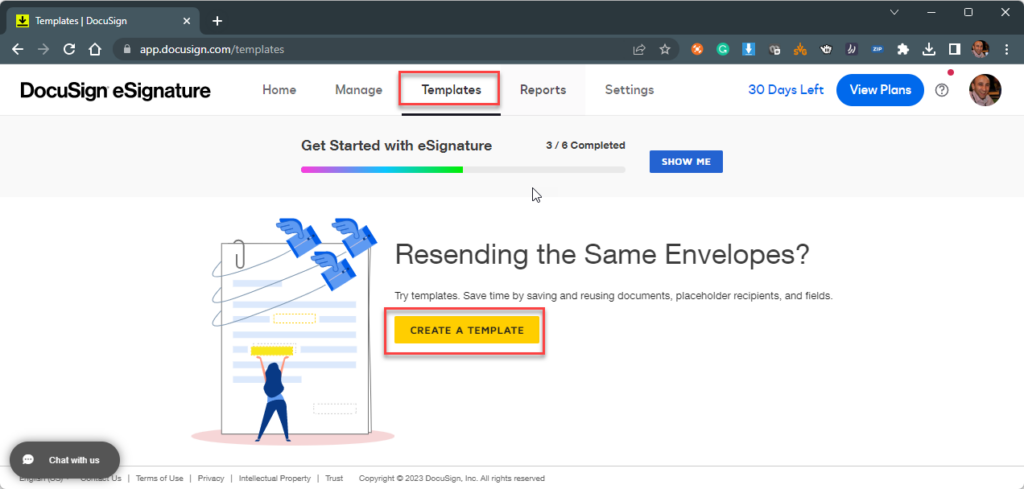
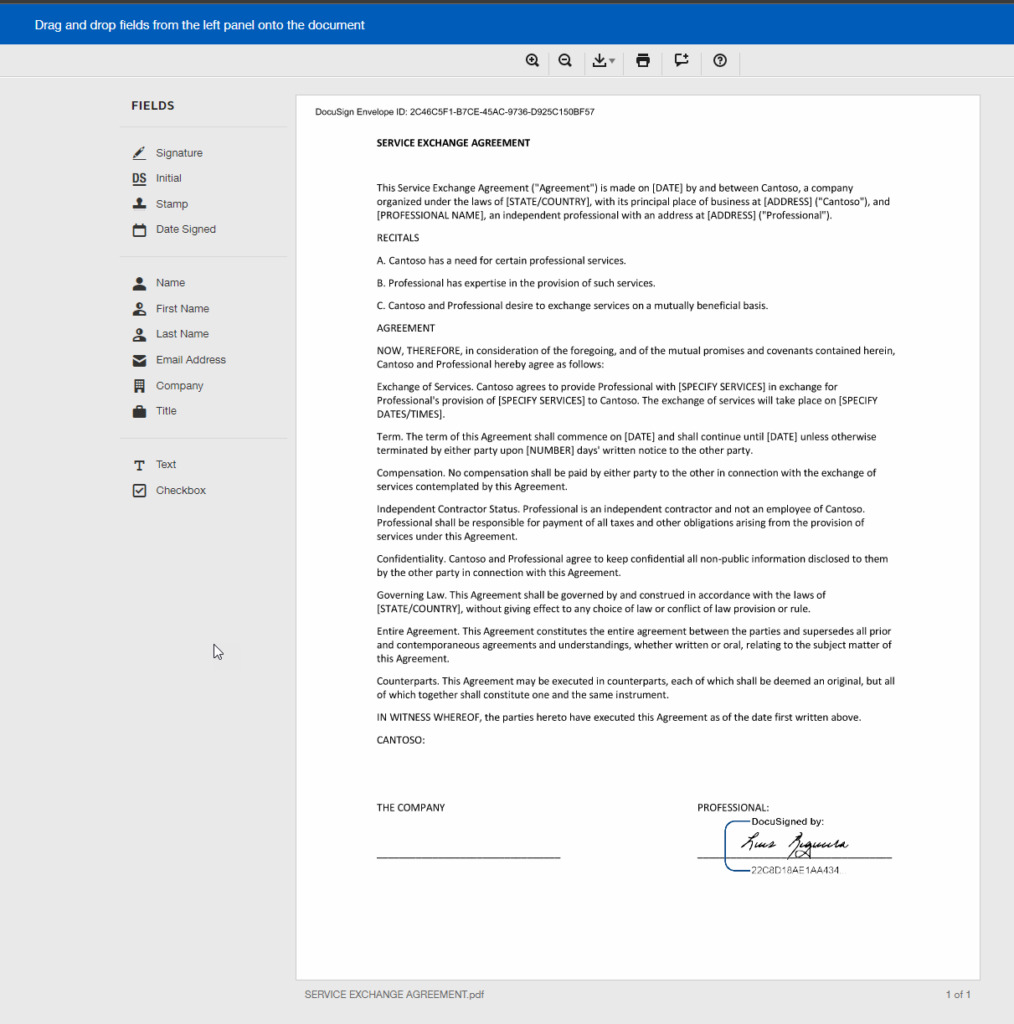
The second thing we will do is create a document template. For that, we need to:
On the top menu, click on the Templates option and then click Create a template.
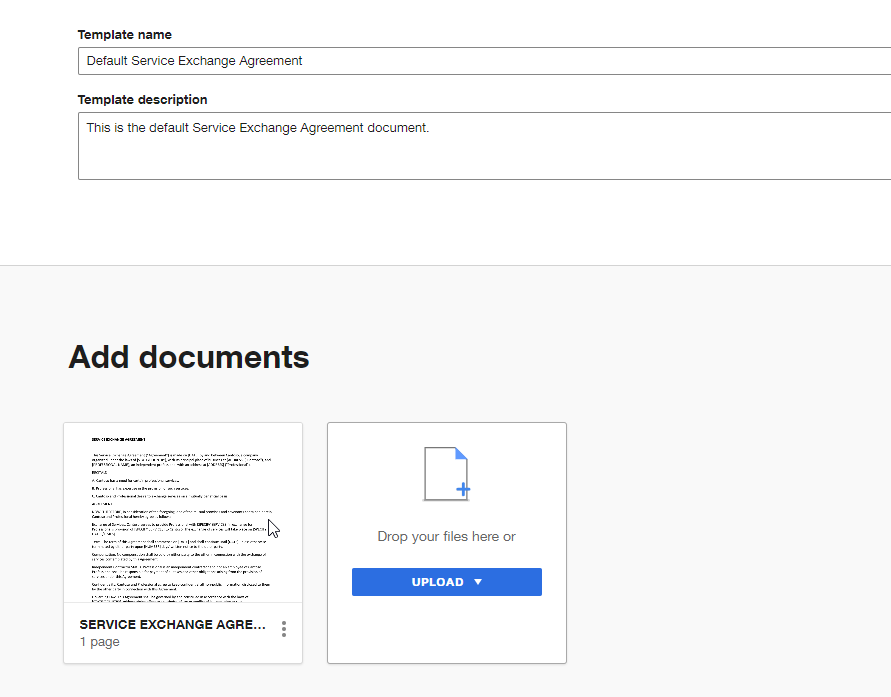
On the Create a template page, we need to:
On the Template name option, provide a name to your template, for example, Default Service Exchange Agreement.
On the Template description option, provide a short description of your document template.
On the Add documents, select Upload or drag and drop the document to that area.
Click Save and Close.
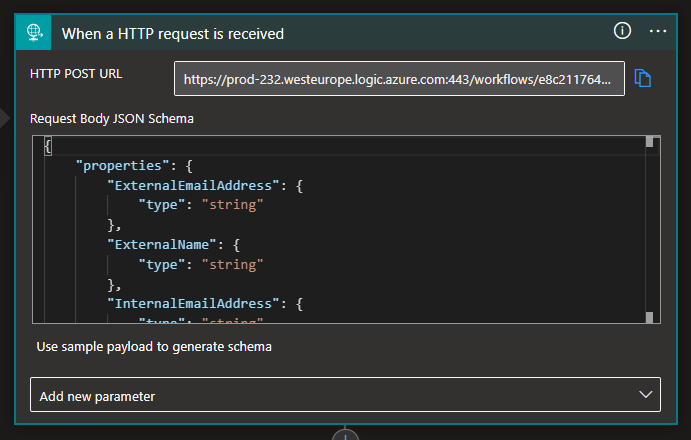
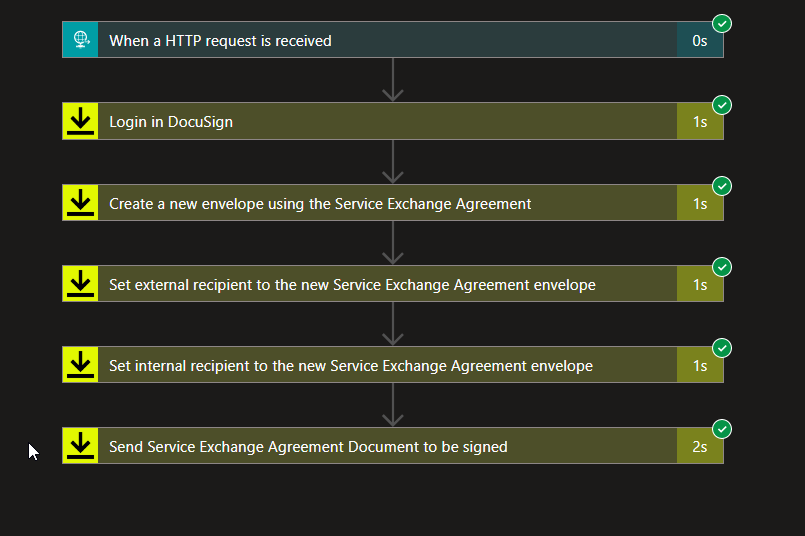
So knowing this, let’s proceed to the Logic App, and here we will be creating a Logic App Consumption with the name LA-SendEmailToSignWithDocuSign-POC. To simplify the process I’m going to abstract the source system or application that will trigger the Logic App to send the document to be signed. That could be anything, but in our case, we will be using a Request – When a HTTP request is received trigger. To do that, we need to:
On the Search connectors and triggers box, select the Built-in and then Request connector, and then the When a HTTP request is received trigger.
On the When a HTTP request is received trigger, provide the following Body JSON Schema.
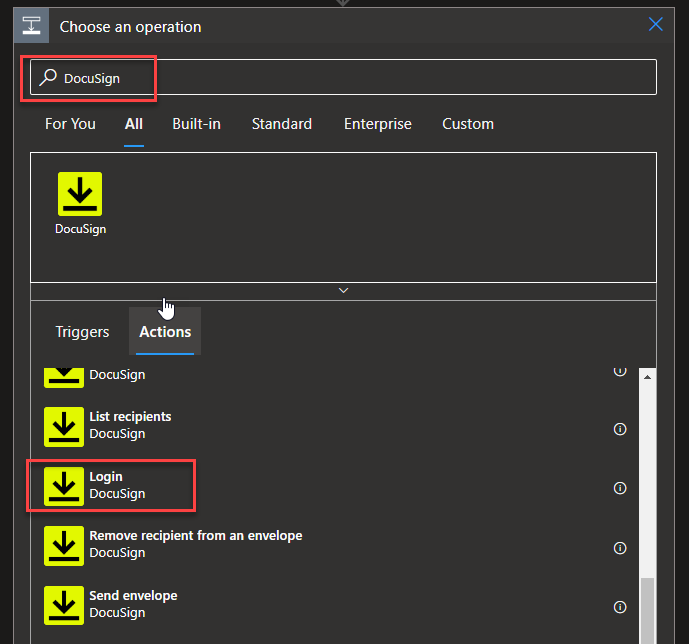
Click on + New step to add a new action. From the search textbox, type DocuSign and then select DocuSign – Logic action.
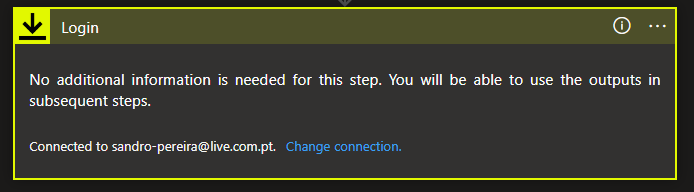
The first action we need to take is to Sign in with the account we create earlier in this tutorial.
Once you sign in, we need to Click on + New step to add a new action. From the search textbox, type DocuSign and then select DocuSign – Create envelope using Template action.
Note: In DocuSign, an “envelope” refers to a single package of one or more documents that are sent for signature to one or more recipients. It is the equivalent of a physical envelope that contains all the necessary documents for signature.
On the Create envelope using Template action, we need to:
On the Account property from the combo box, select the account to use.
On the Account property from the combo box, select the account to use, in our case, Default Service Exchange Agreement.
On the Envelope Status property from the combo box, select the Created option.
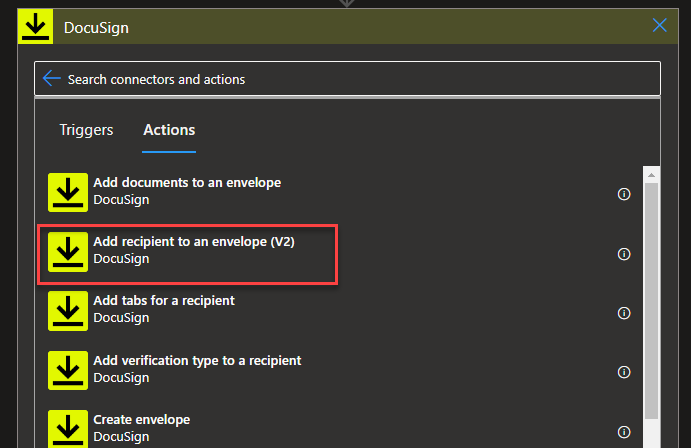
Click on + New step to add a new action. From the search textbox, type DocuSign and then select DocuSign – Add recipient to an envelope (V2) action.
On the Add recipient to an envelope (V2) action, we need to:
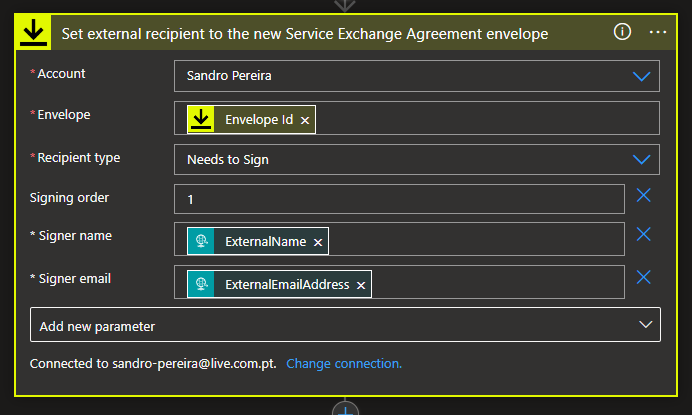
On the Account property from the combo box, select the account to use.
On the Envelope property, select the value to be the Envelope Id from the Create envelope using Template action.
On the Recipient type property from the combo box, select the Needs to Sign option.
Type Add new parameter and select the Signer name, Signer email, and Signing order properties.
On the Signing order property, type 1.
On the Siginer name property, select the value to be the ExternalName from the When a HTTP request is received trigger.
On the Siginer email property, select the value to be the ExternalEmailAddress from the When a HTTP request is received trigger.
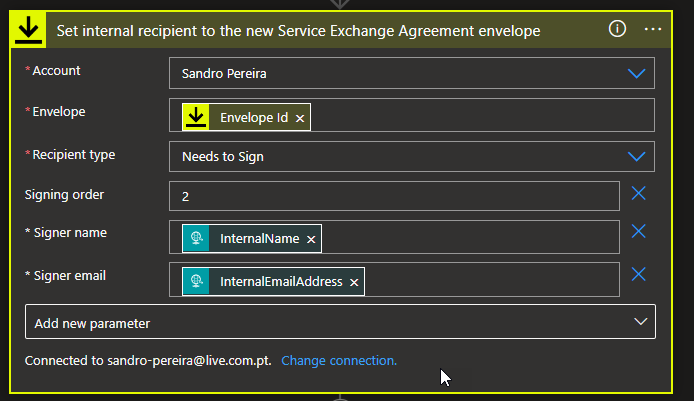
Add the same action once again, but this time with the following configurations:
On the Account property from the combo box, select the account to use.
On the Envelope property, select the value to be the Envelope Id from the Create envelope using Template action.
On the Recipient type property from the combo box, select the Needs to Sign option.
Type Add new parameter and select the Signer name, Signer email, and Signing order properties.
On the Signing order property, type 2.
On the Siginer name property, select the value to be the InternallName from the When a HTTP request is received trigger.
On the Siginer email property, select the value to be the InternalEmailAddress from the When a HTTP request is received trigger.
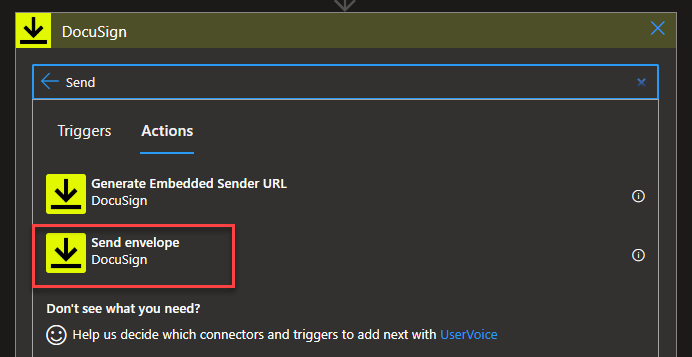
To finalize, we need to click on + New step to add a new action. From the search textbox, type DocuSign and then select DocuSign – Send envelope action.
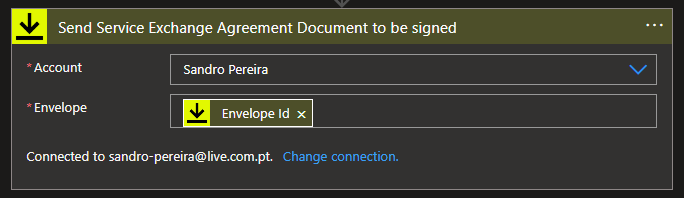
On the Send envelope action, we need to:
On the Account property from the combo box, select the account to use.
On the Envelope property, select the value to be the Envelope Id from the Create envelope using Template action.
And go ahead and Save your workflow.
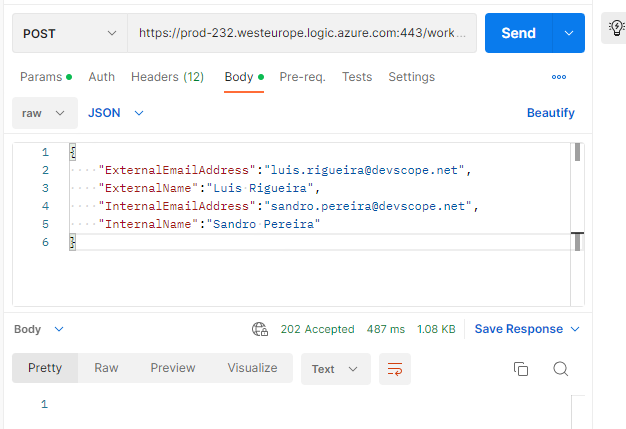
Now if we go ahead and test our Logic App using Postman using the below payload:
We will see that our Logic App was correctly processed.
That means that:
Luis Rigueira, that is the first recipient, got an email from DocuSign with a document to sign.
And only when Luis signs the document, as a second recipient I receive the email to sign.
Note: I don’t need to implement this logic in my Logic App workflow since DocuSign will handle that internal logic.
Once both sign, we will also receive an email notification that the document is signed by both parties.
Note: once again, I do not need to implement that logic since DocuSgign will handle that for me.
Let me say, I was surprised by how excellent and efficient DocuSign is! Quite simple to use, and truly a great experience.
Now, this is the part where I need your imagination because here, we probably not using a real-case scenario we are creating a proof of concept. Nevertheless, I think this can indeed be a good approach for real-case implementation! But probably in most cases, this trigger of the Logic App can occur when a user is created on the Active Directory, or in CRM. From a SharePoint list, from an Onboarding application, well, the sky is the limit for your imagination.
Credits
Once again, a big thanks to my team member Luis Rigueira for participating in this proof-of-concept!
Hope you find this helpful! So, if you liked the content or found it helpful and want to help me write more content, you can buy (or help buy) my son a Star Wars Lego!
Author: Sandro Pereira
Sandro Pereira lives in Portugal and works as a consultant at DevScope. In the past years, he has been working on implementing Integration scenarios both on-premises and cloud for various clients, each with different scenarios from a technical point of view, size, and criticality, using Microsoft Azure, Microsoft BizTalk Server and different technologies like AS2, EDI, RosettaNet, SAP, TIBCO etc.
He is a regular blogger, international speaker, and technical reviewer of several BizTalk books all focused on Integration. He is also the author of the book “BizTalk Mapping Patterns & Best Practices”. He has been awarded MVP since 2011 for his contributions to the integration community.
View all posts by Sandro Pereira