by Rene Brauwers | Mar 23, 2013 | BizTalk Community Blogs via Syndication
As most of you, I downloaded the final pieces of BizTalk Server 2013 as soon as it was available on MSDN. Once I downloaded it, I decided to setup a clean BizTalk 2013 Development Machine. This post will highlight the issues I encountered during installation and configuration and how I resolved them.
First of a brief highlight of my machine (Single-Server) configuration
* Windows Server 2012
* SQL Server 2013
* One instance for BizTalk MessageBoxDb
* One instance for all other BizTalk databases
* Visual Studio 2012
* BizTalk Server 2013
* Server Memory 8GB
* Disk Space 40Gb
Below the issues I encountered and how I resolved them.
Issue #1: Installing BizTalk Server
Error encountered: Missing file ‘MSVCP100.dll’
Resolution
- Download and install Microsoft Visual C++ 2010 Redistributable Package (both x64 as x86)
Issue #2: BizTalk Configuration – BAM Tools
Error encountered: Could not install BAM Tools
Resolution
- install SQL Server 2005 Notification Services
x64 – http://download.microsoft.com/download/4/4/D/44DBDE61-B385-4FC2-A67D-48053B8F9FAD/SQLServer2005_NS_x64.msi
x86 – http://download.microsoft.com/download/4/4/D/44DBDE61-B385-4FC2-A67D-48053B8F9FAD/SQLServer2005_NS.msi
- set up database to use database-mail
- configure BAM Alerts
Issue #3: BizTalk Configuration – BAM Portal
Error encountered: Could not install BAM Portal -> error with regards to “BAM Management Web Service User”
Error thrown: “Attempted to read or write protected memory. This is often an indication that other memory is corrupt.”
Actual exception: Log indicated ‘Cannot alter the role ‘NSSubscriberAdmin’, because it does not exist or you do not have permission.’
Resolution
- Manually Add NSSubscriberAdmin DatabaseRole to BAM Alert Application Database
END Result
Well this was a quick post, but I hope that it might help you out; if you encounter the same issues
Cheers
René

by Rene Brauwers | May 18, 2012 | BizTalk Community Blogs via Syndication
In my previous post I promised that my next blog post would be a follow up on the CRM2011 integration example.
Covering a rewrite of the CRM Workflow Component such that it incorporates functionality which uses the Windows Azure Service Bus Relay Services to send over the CRM data to BizTalk.
Well something kind of, came in between.. But no worries, I am still working on putting it all down in a blogpost and I hope to publish it pretty soon.
But in the meantime, keep on reading, relax, get your mouse or your finger-tips ready to click or swipe a-long as I shamelessly present another blog-post dedicated to another great BizTalk Server book which is a must read…
It has been almost 2 months, since Packt publishing released Steef-Jan Wiggers book “BizTalk Server 2010 Cookbook“.
I had the privilege to review this book together with fellow BizTalk-ers; Randal van Splunteren, Abdul Rafay and Sandro Pereira
Steef-Jan put in a lot of effort writing this book, and well this book deserves all the attention it can get! So that’s the reason I’ve decided to shamelessly plug it.
Like I said, it has been almost 2 months since Packt released this book and I for once could write yet another elaborate review explaining that Steef-Jan’s book is:
unique in its kind, must have, must read, no-nonsense,easy to read, covering almost all aspects ranging from development, architecture, testing to deployment, targets not only developers, architects, administrators and people who don’t work with BizTalk each and every day etc..
however by doing so I would merely repeat what a lot of fellow BizTalk-ers have been blogging about, so without further a due I present a small collection of links pointing to reviews of Steef-Jan Wiggers book “BizTalk Server 2010 Cookbook”
Reviews by (in no particular order)
Tord Glad Nordahl
Lex Hegt
Mikael Sand
Saravana Kumar
Howard S. Edidin
Sandro Pereira
Antonino Crudele
Stephen W. Thomas
Abdul Rafay
Sandro Pereira
Well what’s keeping you here? Click on one of the links to buy this great book.
Cheers and till next time
René
by Rene Brauwers | Jan 17, 2012 | BizTalk Community Blogs via Syndication
First things first, at this point in time I assume
- you’ve read the previous post
- downloaded and installed the CRM2011 SDK
- have a working CRM2011 environment to your proposal.
- you have an account for CRM2011 with sufficient rights (I’d recommend System Administrator)
- have visual studio 2010 installed.
- downloaded and extract my visual studio example solution
So you’ve met all the requirements mentioned above? Good; let’s get started.
Note: all code should be used for Demo/Test purposes only! I did not intent it to be Production Grade. So, if you decide to use it, don’t use it for Production Purposes!
Building your Custom Workflow Activity for CRM2011
Once you’ve downloaded and extracted my visual studio example solution, it is time to open it and fix some issues.
Ensure your references are correct
Go to the Crm2011Entities Project and extend the references folder and remove the following two references
Once done, we are going to re-add these references; so right click on the References folder of the Crm2011Entities Project and click ‘Add Reference’
Now click on the ‘browse’ button, in the add reference dialog window
Now browse to your Windows CRM 2011 SDK BIN folder (in my case: B:InstallMicrosoft CRMSDK CRM 2011bin) and select the following two assemblies:
- microsoft.xrm.sdk
- microsoft.xrm.sdk.workflow
Now repeat the above mentioned steps for the other project
Generate a strongly typed class of all your existing CRM entities.
Open op the “Crm2011Entities Project”, and notice that it does not contain any files except a readme.txt file.
Q&A session
Me: Well let’s add a file to this project, shall we?
You: Hmmm, what file you ask?
Me: Well this project will hold a class file which contains all the definitions of your CRM 2011 Entities.
You: O no, do I need to create this myself?
Me: Well lucky you, there is no need for this.
You: So how do I create this file then?
Me: Well just follow the steps mentioned below
So let’s fix this, and open up a command prompt with administrator privileges.
Now navigate to your CRM 2011 SDK Folder (in my case this would be: B:InstallMicrosoft CRMSDK CRM 2011bin)
Note: Before you proceed, ensure that you know the url of the the CRM2011 OrganizationService. Just test it, by simply browsing to this address, and if everything goes right you should see the following page:
now type in the following command (and replace the values between <….> with your values (see readme.txt)):
Once completed, you should be presented with the following output:
The actual file should be written to the location you set and in my case this is: c:Temp
Once the actual class has been generated, open Visual Studio and right click on the CRM2011Entities project and select ‘Add Existing Item’
Browse to the directory in which the generated class was saved, and select the generated class.
At this point you should be able to compile the complete solution, so go ahead and do so.
Note: The source code; includes comments which should be self-explanatory
Making the custom workflow activity available in CRM2011.
So you’ve successfully compiled the solution, so what’s next? Well now it’s time to import this custom created activity in CRM2011.
In order to do this we will use this nifty application which comes with the CRM2011 SDK. This application is called ‘pluginregistration’ and can be found in the subdirectory tools/pluginregistration of the CRM2011 SDK (in my case the location is
B:InstallMicrosoft CRMSDK CRM 2011toolspluginregistration)
Note: As you will notice, only the source code of the pluginregistration is available; so you need to compile it; in order to use it.
In the pluginregistration folder, browse to the bin folder and either open the debug or release folder and double click the application PluginRegistration.exe
You will be presented with the following GUI:
Now click on “Create New Connection”
Fill out the connection information, consisting of:
- Label: Friendly name of connection
- In my case I named it: CRM2011
- Discovery Url: Base url of CRM
- User Name: Domain Account with sufficient rights in CRM 2011
- In my case I used: LABAdministrator
Once everything is filled in, press Connect and wait until the discovery is finished. Once finished double click on the organization name (in my case: Motion10 Lab Environent ) and wait for the objects to be loaded.
Once the objects have been loaded; you should see a screen similar to the one depicted here below:
Now let’s add our ‘Custom Activity or plugin’. Do this by selecting the ‘Register’ tab and clicking on ‘Register new Assembly’
The ‘Register New Plugin’ screen will popup and click on the ‘Browse (…)’ button.
Now browse to the bin folder of the example project “SendCrmEntityToEndPoint“ (the one you compiled earlier) and select the SendCrmEntityToEndPoint.dll file and click on ‘Open’
Once done, select the option “None“ at step 3 and select the option “Database“ at step 4 and press the button ‘Register Selected Plugins’
Once done you should receive feedback that the plugin was successfully registered.
Creating a workflow in CRM2011 which uses the custom activity.
Now that we have registered our ‘plugin’, it is time to put it to action. In order to do so; we will logon to CRM2011 and create a custom workflow.
Once you’ve logged on to CRM2011, click on ‘Settings’
Now find the ‘Process Center’ section and click on ‘Processes’
In the main window, click on ‘New’
A dialog window will pop up; fill in the following details and once done press OK:
- Process Name: Logical name for this workflow
- I named it: OnAccountProspectStatusExport
- Entity: Entity which could trigger this workflow
- I used the Account Entity
- Category: Select WorkFlow
A new window will pop up; which is used to define the actual workflow. Use the following settings:
- Activate as: Process
- Scope: Organization
- Start When:
- check Record is created
- check Record fields change and select the field RelationShipType
- Now add the following step: Check Condition
- Set the condition to be
- Select “Account”
- Select Field “RelationshipType”
- Select “Equals”
- Select “Prospect”
- Now add our custom activity the following step: SendCrmEntityToEndPoint
- Configure this activity like this:
- Export to disk: True
- EndPoint location: <Path where entity needs to be written>
- In my case I used: c:temp (note this will be written on the c drive on the CRM server!)
- Now once again add our custom activity the following step: SendCrmEntityToEndPoint
- Configure this activity like this:
- Export to disk: False
- EndPoint location: Url path to your BizTalk webservice
- In my case I used: the endpoint which points to my generated BizTalk WebService (which we will cover in our next blogpost)
Well at this point your workflow should look similar to this:
Now click on the ‘Activate’ button
Confirm the ‘Activation’
Save and close the new workflow
Test if everything works
So now it is time to see if everything works; in order to do so we will create a new Account and if everything went ok; we should see
- An Account.xml file somewhere on disk
- An Routing Error in BizTalk (as we send a document which was not recognized by BizTalk)
In CRM2011 click on the ‘Work Place’ button
Subsequently click on ‘Accounts’
And finally add a new ‘Account’, by clicking on ‘NEW’
A new window will pop-up; fill in some basic details
and don’t forget to set the Relationship type to ‘Prospect’
Once done click on the ‘Save & Close’ button
After a few minutes we can check both our output directory and the BizTalk Administrator, and we should notice that in the output directory a file has been written
and we should have an ‘Routing Failure’ error in BizTalk.
Closing Note
So this sums up our first part in which we build our own Workflow activity, imported it into CRM2011, constructed a workflow and last but not least saw that it worked.
Hope you enjoyed the read
Cheers
René
by Rene Brauwers | Jan 13, 2012 | BizTalk Community Blogs via Syndication
Well it has been a while since my last post; however as I stated in my first post. “I’ll only try to blog whenever I have something which in my opinion adds value”, and well the topic I want to discuss today might just add that additional value.
Please note: This post will supply you with background information, the actual implementation of the solution will be covered in the next blog posts. However the sample files which are mentioned in this post can already be downloaded.
Scenario sketch
Let’s say one of your customer’s are considering to replace their current CRM with Microsoft CRM2011.
Now one of the company’s business processes dictates that whenever a new customer or contact has been added to their CRM system, this data has to be send to their ERP system near-real-time. This customer or contact is then added into to ERP system and is assigned an unique account number. This account number then needs to be send back to the CRM system. As an end result the corresponding customer in CRM2011 is updated with the account number from the ERP system.
Their current CRM solution already takes care of this functionality however this has been implemented using a point-to-point solution and therefore replacing their current CRM with Microsoft CRM2011 would break this ‘integration-point’. The customer is aware that in the long-term it would be best to move away from these kind of point-to-point solutions and move more to a Service Oriented Architecture.
At the end of the day it is up to you to convince your customer that it is no problem at all with Microsoft CRM2011 to setup a solution which includes an integration with their ERP system and as you are aware of the fact that the customer wants to move to a Service Oriented Architecture, you see the opportunity fit to introduce the company to BizTalk Server 2010 as well.
So eventually you propose the following Proof of Concept scenario to your customer: ‘You will show to the customer that it is possible with almost no effort to build a solution which connects Microsoft CRM 2011 to their ERP system, whilst adhering to the general known Service Oriented Architecture principles’; once you tell your customer that this POC does not involve any costs for them except time and cooperation; they are more than happy and agree to it.
Preparing your dish
In order to complete the solution discussed in this blog post you will need the following ingredients:
A test environment consisting of:
- 1 Windows Server 2008R2 which acts as Domain Server (Active Directory)
- 1 Windows Server 2008R2 on which Microsoft CRM2011 is installed and configured
- 1 Windows Server 2008R2 on which Microsoft BizTalk Server 2010 is installed and configured.
- One Development Machine with Visual Studio 2010 installed
Step 1: How do I get data out of Microsoft CRM2011?
Well in order to get data (let me rephrase; an entity) out of CRM for our Integration scenario we will need to build a custom activity which can be added as a workflow step within CRM2011.
So which ingredients are required to do this?
- We need to download the CRM2011 SDK; so go and fetch it here
So what are we going to build?
- We will build a custom activity and deploy it to CRM2011 such that it can be used in a workflow, or download my example and install it
Step 2: How do I get data in my custom ERP?
Well for this step I’ve build a custom application which will act as a stub for our custom ERP. This custom ERP system will be exposed by means of a WCF service.
So which ingredients are required to do this?
So what are we going to build?
- Well you could build your own application, or download my example and install it.
Step 3: How do I get data into CRM2011?
Well in order to get data into CRM; we will use the out of the box web services which are exposed by CRM2011.
So which ingredients are required to do this?
- Well if you have not yet downloaded the CRM2011 SDK; go and fetch it here
So what are we going to build?
- Well in order to make our life easier we will build a proxy web service; which will talk directly to CRM2011 this way we will make our integration efforts go smoother.
Step 4: How do I hook it all together?
Well for this part we will use BizTalk, BizTalk will receive the ‘Create Customer’ event from CRM and subsequently logic will be applied such that this data is send to the custom ERP application. Once the insert was successful the ERP system sends back an customer account number and subsequently we will update the corresponding Entity in CRM2011 with the account number obtained from the ERP system.
So which ingredients are required to do this?
- Well if you have not yet downloaded the CRM2011 SDK; go and fetch it here 🙂
So what are we going to build?
- Well we need to make a customization to our Account Entity in CRM2011, to be more specific; we will add a custom field to the Account entity and call it Account Number.
- We will build a BizTalk solution which will hook all the bits together.
Closing Note
So this sums up the introduction part. Be sure to check back soon for the follow up part in which I’ll discuss how to build our CRM Trigger
by Rene Brauwers | Sep 19, 2011 | BizTalk Community Blogs via Syndication
Last week during the BUILD conference a developer preview of Both Windows 8 and Windows Server 8 was released. Once released I’ve decided to give it a go and install and perform a basic configuration (without BAM / EDI) of BizTalk Server 2010 on Windows 8 (note: not Windows Server 8).
Below a list of issues I encountered and how to resolve these issues.
Prerequisites
Obtain the Windows 8 developer preview build
Obtain Microsoft BizTalk Server 2010
Ensure that you have a dedicated server available with SQL Server 2008R2.
Hook up your Windows 8 to machine to your Active Directory (this way you can use your AD BizTalk service accounts etc.)
Environment
Encountered Issues while installing
Well to be perfectly honest the only issue I encountered during installation of BizTalk Server 2010 was the fact that I got about 10+ windows update screens which all prompted me to go and install the .Net Framework 3.5.1 Features; well I closed all the windows except for one and let windows update continue.
Note: For the BizTalk pre-requisites I simple pointed to the cab file , which I already downloaded previously.
Encountered Issues while configuring
Configuring BizTalk Server 2010 was a bit more of a challenge although everything up to ‘Configuring the BizTalk Server Runtime’ went off without any problems.
However once it was time to configure the runtime it gave me a an exception informing me that the server could not communicate with the SSO and that it might have to do with the Distributed Transaction Coordinator; Well this was not the issue, as I had configured it on both servers (on the SQL Server box and on the BizTalk Box).
So next stop was looking into the windows services and then especially the Enterprise Single Sign On Service; well the service was up and running. So I stopped and started it and tried to configure the BizTalk Server Runtime once again; however I still got the same error.
Next stop going back to the windows services and this time
I tried an elevated account on the Enterprise Single Sign On Service; but hey you guessed it; still got the same error.
So; not giving up I went back to the Enterprise Single Sign On service and put everything back to it’s original state (that is use the dedicated sso service account). Well once I tried to start the service again it suddenly gave me an error indicating that there were some RPC issues… Hmmm, so I went and had a look at that particular service and noticed that it was up and running. Restarting it did not throw any other exceptions and that’s when I noticed that the service ‘RpcLocator Service’ was not running. Bingo! Enabling this service resolved the SSO issue and I was able to further configure BizTalk Server 2010.
Conclusion
BizTalk 2010 can be installed and configured on the Windows 8 Developer Preview Release; however before installing and configuring ensure that
You’ve configured the Distributed Transaction Coordinator on both the SQL Server Box as well as the Windows 8 Box
Ensure that the ‘RpcLocator Service’ is up and running.
Please note: So far I’ve only installed and configured BizTalk 2010 on Windows 8. I’ve not actually played around with sample applications etc.
Screenshots:
BizTalk Administrator ‘Pinned’ to Metro
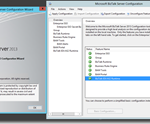
BizTalk Server Configuration
BizTalk Administrator Console
Cheers
René
by Rene Brauwers | Sep 7, 2011 | BizTalk Community Blogs via Syndication
Disclaimer: Yes I am plugging a book 😉
Almost every day new (technical) books are released and each and every day we as developers, administrators, architects, managers and/or mere mortals are burdened with the decision ‘to read or not to read’ a particular book.
Well as of this October we as BizTalk-ers will be facing one of the toughest decisions ever since the release of BizTalk Server 2006 (I simply love exaggerating it a bit) as PACKT publishing will be releasing Dan Rosanova’s book BizTalk Server 2010 Patterns
In order to help you all with deciding wither to (pre)order or not to (pre)order this book I’ve included the below mentioned ‘Decision Tree’
You might be thinking: “Why is he shamelessly promoting a book?”
Well to answer the above question… I am promoting this book as Steef-Jan Wiggers (BizTalk MVP) and Randal van Splunteren (BizTalk MVP) and I had the honor to be part of the Technical Review process of “Dan Rosanova’s book BizTalk Server 2010 Patterns” and honestly this book is a must read even if you consider yourself (or are called by others) a BizTalk Guru/Expert as I am convinced that we all as BizTalk-ers can and will learn from it and after all that’s what we all do and what we all crave “Learning new stuff” and the best part of it: Not only you will benefit by learning new insights your current and future customers will benefit as well…
So what can you expect in this book?
Well my former colleague Steef-Jan Wiggers and BizTalk MVP sums it up pretty neatly in his latest blog-post so I will not repeat it here.
Anyway you can (pre)order the book now! It is currently available for (pre)order at either PACKT publishing or Amazon
by Rene Brauwers | Jul 21, 2011 | BizTalk Community Blogs via Syndication
In our previous post we’ve setup a Network Load Balancing solution for BizTalk Server 2010; this solution ensures that ‘Web Traffic’ is balanced between two dedicated BizTalk Servers.
Well one of the caveats of a software NLB solution is the fact that it’s main role is to balance network traffic to 2 or more servers and it will not check if the ‘Traffic Destination Service (endpoint)’ is available, it will only check that the NLB nodes (servers) are available.
In our case this could mean that if either the BizTalk Application Pool or the BizTalk Website (endpoint) on one or both of the BizTalk NLB nodes are malfunctioning that traffic could still be rerouted to this node; resulting in those specific BizTalk Endpoints no longer being accessible/available. And of course this is something which is not desirable in our High Availability BizTalk Server Environment.
So in order to address above mentioned ‘issue’; I’ve decided to blog about one of the possible solutions which in theory comes down to the following:
- Build a service which monitors if the participating Application Pools and Websites in our NLB node are up and running and in case they are malfunctioning disable that particular node in our NLB Cluster
This post will only covering building the core functionality and I will leave it up to the reader to implement this logic in their own windows service or other monitoring tool.
Let’s start!
Please note; the style of this article will be quite different compared to the previous posts and will consist more of a ‘Challenge –> Solution’ approach using C# Code samples.
Setting up our Visual Studio 2010 Solution
So Start up Visual Studio 2010 and create a new ‘Class Library’ Project and name it ‘WmiMonitor’ and name the solution to be created ‘ServerMonitor’.
Include the following reference to this project: System.Management.
Add a new ‘Class item’ and name it: WmiMonitor.cs
This class will hold all functionality with regards to our WMI Functionality
Add a new ‘Class item’ and name it: WmiMonitorResults.cs
This class will contain our properties used to hold our ‘WMI Query Results
Add a new ‘Class item’ and name it: EventLogManager.cs
This class will contain functionality used for writing any exceptions which might occur to the windows Eventlog
At this point your solution should look as follows:
Completing the project
At this point we’ve set up our solution and defined the artifacts needed for our project. In the next few subchapters we will actually add the code, which completes this project.
EventlogManager
Well in all applications exceptions might occur and as our end result will be a windows service which needs to run continuously (meaning; it should not crash when an error occurs) it would be beneficial if we would have functionality which would allow us to log the exception details to the windows event log, such that we can monitor our monitor 🙂 Below I’ve listed the functionality which does this.
So open up your EventLogmanager.cs file, and replace the default contents with the code below and see the inline comments for a more detailed explanation.
using System;
using System.Collections.Generic;
using System.Linq;
using System.Text;
using System.Diagnostics;

namespace Monitoring
{
    /// <summary>
    /// Static Class which contains functionality to write 'events' to the default Windows Application Log
    /// </summary>
    public static class EventLogManager
    {
        private const string DefaultLog = "Application";

        /// <summary>
        /// Write Warning to EventLog
        /// </summary>
        /// <param name="eventSource">Name of source which will be displayed in the eventlog</param>
        /// <param name="warning">Warning Text which will be the description of the eventlog entry </param>
        public static void WriteWarning(string eventSource, string warning)
        {
            //Call method which actually writes to the eventlog
            WriteToEventlog(eventSource, warning, EventLogEntryType.Warning);
            warning = null;
        }

        /// <summary>
        /// Write Info to EventLog
        /// </summary>
        /// <param name="eventSource">Name of source which will be displayed in the eventlog</param>
        /// <param name="info">Info Text which will be the description of the eventlog entry</param>
        public static void WriteInfo(string eventSource, string info)
        {
            //Call method which actually writes to the eventlog
            WriteToEventlog(eventSource, info, EventLogEntryType.Information);
            info = null;
        }

        /// <summary>
        /// Write Error to EventLog
        /// </summary>
        /// <param name="eventSource">Name of source which will be displayed in the eventlog</param>
        /// <param name="error">Error Text which will be the description of the eventlog entry</param>
        public static void WriteError(string eventSource, string error)
        {
            //Call method which actually writes to the eventlog
            WriteToEventlog(eventSource, error, EventLogEntryType.Error);
            error = null;
        }

        /// <summary>
        /// private Method which actually stores data in the eventlog
        /// </summary>
        /// <param name="source">Name of source which will be displayed in the eventlog</param>
        /// <param name="message">Message which will be the description of the eventlog entry</param>
        /// <param name="entryType">Indication of the eventlog entry type</param>
        private static void WriteToEventlog(string source, string message, EventLogEntryType entryType)
        {

                //Check if the EventSource exists, if not create it and use the default log for this
                if (!EventLog.SourceExists(source))
                {
                    EventLog.CreateEventSource(source, DefaultLog);
                }

                //Write entry to eventlog, if the message exceeds the max allowed size it will be truncated
                EventLog.WriteEntry(source, TruncateEventEntry(message), entryType);
                message = null;
        }

        /// <summary>
        /// Truncates an eventlog entry if it exceeds the maximum available characters
        /// </summary>
        /// <param name="input">String to be checked on length</param>
        /// <returns>input string which will be truncated when exceeding 20000 characters</returns>
        private static string TruncateEventEntry(string input)
        {
            //Check if string is null or empty
            if (!String.IsNullOrEmpty(input))
            {
                //Check length
                if (input.Length > 20000)
                {
                    //return truncated string and add ... at the end indicating a truncated string
                    return input.Substring(0, 19900) + "...";
                }
                else
                {
                    //return original string
                    return input;
                }
            }
            else
            {
                //return string which mentions that there was no infomration
                return "No Information";
            }
        }
    }
}
Note: that it does not include exception handling and if an exceptions are thrown they will have to be caught in the opertation invoking this class
WmiMonitorResult
This class will contain properties which can hold the status information with regards to the monitored objects; in our case (1) Application Pools (2) Websites.
So open up your WmiMontorResult.cs file, and replace the default contents with the code below and see the inline comments for a more detailed explanation.
using System;

namespace Monitoring
{
    /// <summary>
    /// Class used to hold information with regards to the status of the monitored items
    /// </summary>
    public class WmiMonitorResults
    {
        /// <summary>
        /// Server Name
        /// </summary>
        public string ServerName { get; set; }

        /// <summary>
        /// Name of the monitoring object
        /// </summary>
        public string ItemName { get; set; }

        /// <summary>
        /// Status Code which indicates the status of an item
        /// </summary>
        public int Status { get; set; }

        /// <summary>
        /// Friendly description of the Status code
        /// </summary>
        public string FriendlyStatusName { get; set; }

    }
}
WmiMonitor
This class will include all logic required for obtaining a NLB Server Node status with regards to the application pool and websites. Besides this it will include functionality to enable or disable a NLB node if required.
Below I’ve listed the functionality which does this. So open up your WmiMonitor.cs file, and replace the default contents with the code below and see the inline comments for a more detailed explanation.
using System;
using System.Collections.Generic;
using System.Management;
using System.Linq;
using System.Text;
namespace Monitoring
{
/// <summary>
/// Class which includes all functionality to determine a NLB nodes status with regards to Application Pools and Websites
/// as well as stopping and starting a NLB node. All of this is done by means of WMI events and thus requires elevated rights
/// to be executed succesfully
/// </summary>
public class WmiMonitor
{
#region properties
//Private properties
private string UserName { get; set; }
private string Password { get; set; }
private string Domain {get;set;}
private string RemoteComputer { get; set; }
/// <summary>
/// Determines if WMI requests need to be performed using Impersonation
/// </summary>
private bool PerformImpersonation
{
get
{
//In case UserName/password is null or empty or the Remote Computer Name equals the current servername return true else false
return ((String.IsNullOrEmpty(UserName) || String.IsNullOrEmpty(Password) || RemoteComputer.ToUpper() == Environment.MachineName.ToUpper()) ? true : false);
}
}
/// <summary>
/// Object used to hold settings which are required to set up a WMI connection
/// </summary>
private ConnectionOptions WmiConnectionOption
{
get
{
//initialize
ConnectionOptions conOption = new ConnectionOptions();
//Set settings according to the choice of impersonation or not
if (this.PerformImpersonation)
{
conOption.Impersonation = ImpersonationLevel.Impersonate;
/*IF WE DONT SET THE AUTHENTICATIONLEVEL TO PACKETPRIVACY WE'LL RECEIVE THE FOLLOWING ERROR
* The rootWebAdministration namespace is marked with the RequiresEncryption flag.
* Access to this namespace might be denied if the script or application does not have the appropriate authentication level.
* Change the authentication level to Pkt_Privacy and run the script or application again.
*/
conOption.Authentication = AuthenticationLevel.PacketPrivacy;
}
else
{
conOption.Username = UserName;
conOption.Password = Password;
/*IF WE DONT SET THE AUTHENTICATIONLEVEL TO PACKETPRIVACY WE'LL RECEIVE THE FOLLOWING ERROR
* The rootWebAdministration namespace is marked with the RequiresEncryption flag.
* Access to this namespace might be denied if the script or application does not have the appropriate authentication level.
* Change the authentication level to Pkt_Privacy and run the script or application again.
*/
conOption.Authentication = AuthenticationLevel.PacketPrivacy;
}
return conOption;
}
}
#endregion
#region constructors
/// <summary>
/// Default constructor which is used when we need to use the callers credentials when executing WMI events
/// </summary>
public WmiMonitor()
{
}
/// <summary>
/// Constructor used in case we want to override the used credentials to execute WMI events
/// </summary>
/// <param name="userName">Username</param>
/// <param name="passWord">Password</param>
public WmiMonitor(string userName, string passWord, string domain)
{
UserName = userName;
Password = passWord;
Domain = domain;
}
#endregion
#region Public Methods
/// <summary>
/// Function which returns the application pool state
/// </summary>
/// <param name="applicationPoolNames">Name of application pool to check</param>
/// <param name="computer">Name of Computer</param>
public WmiMonitorResults GetApplicationPoolStatus(string applicationPoolName, string computer)
{
//Set RemoteComputer
RemoteComputer = computer;
//prefill our mwi result class, which contains the state of the application pools
WmiMonitorResults results = new WmiMonitorResults()
{
ServerName = computer,
ItemName = applicationPoolName,
FriendlyStatusName = "Not Found",
Status = -1
};
try
{
//WMI Connection and Scope
ManagementScope WmiScope = new ManagementScope(String.Format(@"{0}rootWebAdministration", computer),WmiConnectionOption);
//WMI Query
ObjectQuery WmiQuery = new ObjectQuery(String.Format("SELECT * FROM ApplicationPool WHERE Name ='{0}'", applicationPoolName));
//Actual 'wmi worker'
ManagementObjectSearcher searcher = new ManagementObjectSearcher(WmiScope,WmiQuery);
//Execute query and process the results which are stored as WmiMonitorResults object
foreach (ManagementObject queryObj in searcher.Get())
{
//Get State
int StateValue = -1;
if (int.TryParse(queryObj.InvokeMethod("GetState", null).ToString(), out StateValue))
{
//Store state status in return class
results.Status = StateValue;
//Determine friendly name of state and store this in the return class
results.FriendlyStatusName = GetFriendlyApplicationPoolState(StateValue);
}
}
}
catch (ManagementException e)
{
results.Status = -2;
results.FriendlyStatusName = e.Message;
//log exception
EventLogManager.WriteError("WmiMonitor", String.Format("[GetApplicationPoolStatus] {0}", e.Message));
}
catch (Exception gex)
{
results.Status = -3;
results.FriendlyStatusName = gex.Message;
//log exception
EventLogManager.WriteError("WmiMonitor", String.Format("[GetApplicationPoolStatus] {0}", gex.Message));
}
return results;
}
/// <summary>
/// Method which returns the state of the websites
/// </summary>
/// <param name="WebSiteName">Name of website to check</param>
/// <param name="computer">Name of Computer</param>
/// <returns></returns>
public WmiMonitorResults GetWebSiteStatus(string WebSiteName, string computer)
{
//Set RemoteComputer
RemoteComputer = computer;
//prefill our mwi result class, which contains the state of the application pools
WmiMonitorResults results = new WmiMonitorResults()
{
ServerName = computer,
ItemName = WebSiteName,
FriendlyStatusName = "Not Found",
Status = -1
};
try
{
//WMI Connection and Scope
ManagementScope WmiScope = new ManagementScope(String.Format(@"{0}rootWebAdministration", computer), WmiConnectionOption);
//WMI Query
ObjectQuery WmiQuery = new ObjectQuery(String.Format("SELECT * FROM Site WHERE Name ='{0}'", WebSiteName));
//Actual 'wmi worker'
ManagementObjectSearcher searcher = new ManagementObjectSearcher(WmiScope, WmiQuery);
//Execute query and process the results which are stored as WmiMonitorResults object
foreach (ManagementObject queryObj in searcher.Get())
{
int StateValue = -1;
//Get State
if (int.TryParse(queryObj.InvokeMethod("GetState", null).ToString(), out StateValue))
{
//Store state status in return class
results.Status = StateValue;
//Determine friendly name of state and store this in the return class
results.FriendlyStatusName = GetFriendlyApplicationPoolState(StateValue);
}
}
}
catch (ManagementException e)
{
results.Status = -2;
results.FriendlyStatusName = e.Message;
//log exception
EventLogManager.WriteError("WmiMonitor", String.Format("[GetWebSiteStatus] {0}", e.Message));
}
catch (Exception gex)
{
results.Status = -3;
results.FriendlyStatusName = gex.Message;
//log exception
EventLogManager.WriteError("WmiMonitor", String.Format("[GetWebSiteStatus] {0}", gex.Message));
}
return results;
}
/// <summary>
/// Method which returns the nodes which are part of the NLB Server
/// </summary>
/// <param name="nlbServer">Server Name containing the NLB Feature</param>
/// <returns>String list of nodes which are part of the NLB Server</returns>
public List<string> GetNLBComputers(string nlbServer)
{
//Set RemoteComputer
RemoteComputer = nlbServer;
//prefill our mwi result class, which contains the state of the application pools
List<string> returnValue = new List<string>();
try
{
//WMI Connection and Scope
ManagementScope WmiScope = new ManagementScope(String.Format(@"{0}rootMicrosoftNLB", nlbServer), WmiConnectionOption);
//WMI Query
ObjectQuery WmiQuery = new ObjectQuery("SELECT * FROM MicrosoftNLB_Node");
//Actual 'wmi worker'
ManagementObjectSearcher searcher = new ManagementObjectSearcher(WmiScope, WmiQuery);
//Execute Query and Get NLB Nodes
foreach (ManagementObject queryObj in searcher.Get())
{
returnValue.Add(queryObj["ComputerName"].ToString());
}
}
catch (ManagementException e)
{
//log exception
EventLogManager.WriteError("WmiMonitor", String.Format("[GetNLBComputers] {0}", e.Message));
return null;
}
catch (Exception gex)
{
//log exception
EventLogManager.WriteError("WmiMonitor", String.Format("[GetNLBComputers] {0}", gex.Message));
return null;
}
return returnValue;
}
/// <summary>
/// Method which actually stops or starts a NLB Node; if stateStopped paramaters is true, the node will be started and vica versa
/// </summary>
/// <param name="serverNode">Node to perform action on</param>
/// <param name="stateStopped">True if current state is stopped</param>
/// <returns>True if node was succesfully stopped/started</returns>
public bool SetNlbNodeState (string serverNode, bool stateStopped)
{
//Set RemoteComputer
RemoteComputer = serverNode;
bool ReturnValue = false;
try
{
//WMI Connection and Scope
ManagementScope WmiScope = new ManagementScope(String.Format(@"{0}rootMicrosoftNLB", serverNode), WmiConnectionOption);
//WMI Query
ObjectQuery WmiQuery = new ObjectQuery(String.Format("SELECT * FROM MicrosoftNLB_Node WHERE ComputerName ='{0}'", serverNode));
//Actual 'wmi worker'
ManagementObjectSearcher searcher = new ManagementObjectSearcher(WmiScope, WmiQuery);
foreach (ManagementObject queryObj in searcher.Get())
{
int StateValue = -1;
int NodeStatusCode = 0;
string FriendeNodeStatus = string.Empty;
//Get NLB Node State
if(int.TryParse(queryObj["StatusCode"].ToString(),out NodeStatusCode))
{
//Determine friendly name of NLB Node State
FriendeNodeStatus = GetFriendlyNlbNodeStatusCode(NodeStatusCode);
}
if (stateStopped)
{
//Only stop if started
if(FriendeNodeStatus.ToUpper() != "STOPPED")
{
if (int.TryParse(queryObj.InvokeMethod("Stop", null).ToString(), out StateValue))
{
ReturnValue = true;
}
}
}
else
{
//Only start if STOPPED
if (FriendeNodeStatus.ToUpper() == "STOPPED")
{
if (int.TryParse(queryObj.InvokeMethod("Start", null).ToString(), out StateValue))
{
ReturnValue = true;
}
}
}
}
}
catch (ManagementException e)
{
//log exception
EventLogManager.WriteError("WmiMonitor", String.Format("[SetNlbNodeState] {0}", e.Message));
}
catch (Exception gex)
{
//log exception
EventLogManager.WriteError("WmiMonitor", String.Format("[SetNlbNodeState] {0}", gex.Message));
}
return ReturnValue;
}
#endregion
#region Private Methods
/// <summary>
/// Method which performs a friendly lookup of possible NLB States
/// </summary>
/// <param name="statusCode">Original status code</param>
/// <returns>Friendly status code description</returns>
private string GetFriendlyNlbNodeStatusCode(int statusCode)
{
switch (statusCode)
{
case 0:
return "Node is remote. The StatusCode value cannot be retrieved.";
case 1005:
return "STOPPED";
case 1006:
return "CONVERGING";
case 1007:
return "CONVERGED";
case 1008:
return "CONVERGED DEFAULT HOST";
case 1009:
return "DRAINING";
case 1013:
return "SUSPENDED";
default:
return "UNKNOWN";
}
}
/// <summary>
/// Method which performs a friendly lookup of possible ApplicationPool States
/// </summary>
/// <param name="stateCode">Original state code</param>
/// <returns>Friendly state code description</returns>
private string GetFriendlyApplicationPoolState(int stateCode)
{
switch(stateCode)
{
case 0:
return "Starting";
case 1:
return "Started";
case 2:
return "Stopping";
case 3:
return "Stopped";
case 4:
return "Unknown";
default:
return "Undefined value";
}
}
#endregion
}
}
Closing Note
So this sums up tackling our nagging problem on how to ensure that a NLB node is disabled in case a website or application pool is malfunctioning.
In case you are interested in the source code including a sample windows service application please feel free to send me an email ([email protected]) and I’ll send it to you
Well I hope you enjoyed this read until the next time.
Kind regards
René
by Rene Brauwers | Jun 21, 2011 | BizTalk Community Blogs via Syndication
In the previous parts we set up our BizTalk High Availability environment; using an Active <-> Passive scenario. Well in this post I’ll describe how to extend our High Availability environment with NLB functionality. In order to so so we will need to add one additional server which will function as Network Load Balancer.
Our end result will be a mix between active <-> active and active <–> passive. Huh? You might think, well okay let me try to explain what I mean 🙂
In our current server environment this would not be possible as we clustered our IIS’s on the BizTalk Servers and added a custom response header to each ‘BizTalk’ Web Site, which would redirected all IIS traffic to our BizTalk Cluster’s active node (see this post) thus ensuring that whenever a party sends a message to our ‘webserver’ the actual IIS installed on our active BizTalk Server node would be hit and process the request. However we want to accomplish that we have two dedicated IIS servers which can be utilized such that both can receive requests and send them for processing to BizTalk. So this is where NLB functionality can save the day as a NLB will act as an entry-point for Network Traffic (in our case traffic intended for IIS) and the NLB will then decide to which server to route this traffic (this can be 2 or more servers)
So how do we start utilizing this NLB functionality within our server environment; well read on…
Server Preparation
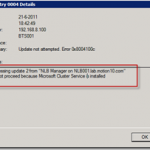
In order to utilize the power of a NLB we will need two additional BizTalk Servers, which in contrast to our initial two BizTalk Servers will not be installed in a Failover Cluster but they will be installed in a NLB Cluster. You might wonder; is it not possible to simply add the NLB functionality to our existing BizTalk Servers, well no; if you try to do so you will receive the following error once you try to setup your NLB Cluster “ Processing update n from “NLB Manager on XXX” Cannot proceed because Microsoft Cluster Service is installed”
So this only leaves us with installing two additional BizTalk servers with a NLB cluster and as a nice side effect we will have in addition the availability of a ‘backup’ BizTalk IIS
In case our NLB Cluster fails we could always let our original BizTalk Cluster take over the IIS processing; we could do this by simple adding a round-robin DNS entry which would forward requests send to the NLB to the BizTalk Cluster or inform the customers that they should send webrequests to a different address.
Adding the NLB to our environment
At this point we’ve concluded that we will need two additional BizTalk servers which need to be installed and configured and will solemnly be used for receiving and processing messages received by IIS.
We will not configure these servers to receive or send messages other than through out Isolated Host (read IIS), although theoretically this can be easily done; but you might run into problems if you use adapters with a polling mechanism (risk of picking up duplicate messages for processing)
Before we start we will need to perform the following actions.
- Manually Add a DNS entry for our NLB CLuster
- Install BizTalk Server 2010 on our new servers
- Configure BizTalk Server 2010 on our new servers (they will join our existing BizTalk Group)
- Add the NLB Feature on our dedicated Windows Server 2008
Adding a DNS entry for our NLB
In order for a client to access our BizTalk webservices we need to create an actual endpoint to connect to, and in order to do this we need to add a DNS entry. So let’s get started.
Logon to your Domain Server (in my case SCHIPHOL) and click on ‘Start’ –> ‘Administrative Tools’ and select ‘DNS’
The DNS Manager window will appear. Now expand your DNS Server node –> Expand ‘Forward Lookup Zones’ and select your Domain Name (my case lab.motion10.com)
In the main pane ‘right-click’ and select ‘New Host (A or AAAA)’
Fill out the following details, consisting of Name and an available IP Address; I’ve used the following values
Name: BTSWEB
IP Address: 192.168.8.100
Once done press ‘Add Host’. You should receive a confirmation that the DNS entry was successfully created.
Install and configure BizTalk Server 2010 on our ‘new’ servers
At this point I assume you will have prepped two new servers which runs under Windows Server 2008 R2. For future reference purposes I’ve named my servers BTS003 en BTS004
Important: Before you proceed;
ensure that your hyper-v configuration with regards to your internal network adapter has the option ‘Allow spoofing of MAC Address enabled.
ensure the required roles and features are installed (Application Server, Web Server, MSMQ) If in doubt see part 4 section ‘Prepping your BizTalk Servers’
ensure that you’ve configured your local DTC. If in doubt see part 6 section ‘Configure the local Microsoft Distributed Transaction Coordinator’
Install BizTalk Server 2010
Once your servers are prepped you’re ready to install BizTalk Server 2010; if you need a walkthrough with regards to the installation, please read part 7 section ‘Configuring BizTalk on the Second Node’
Configure BizTalk Server 2010
At this point you’ve installed BizTalk Server and now it’s time to configure BizTalk such that we can use it. (for detailed instructions with regards to configuring BizTalk, please read part 7 section ‘Configuring BizTalk Server’
Note: The following steps need to be performed on both servers
So logon and start the BizTalk Server Configuration Tool and on the main configuration screen fill out the default details. Once done press ‘Configure’
Configure Enterprise SSO, once done press ‘Apply Configuration’
Before you continue with configuring, perform the following steps:
go to start –> All Programs –> Microsoft Enterprise Single Sign-On and select ‘SSO Administration’
Once the ENTSSO window pops up, extend the main node and subsequently expand the servers node. Right click on System and select ‘Properties’
Now connect to your master SSO Server (in my case BTS2010) and select Apply
Configure ‘Group’. Once done press ‘Apply Configuration’
Configure ‘BizTalk Runtime’, but only select the option ‘Create Isolated Host and Instances’. Once done press ‘apply configuration’
Skip the configure ‘Business Rule Engine’ and proceed with the configure ‘Bam Tools’. Once done press ‘Apply Configuration’
Configure the ‘BAM Portal’ and once done press ‘Apply Configuration’
Configure ‘BizTalk EDI/AS2 Runtime’ once done press ‘Apply Configuration’
Once you’ve finished configuring the BizTalk Servers, open up the BizTalk Administrator console and go to ‘PlatForm Settings –> Host Instances’ and you should notice that all host instances in the BizTalk group are visible and as you can see they all either run on BTS001 or BTS002 with exception of the Isolated_Host they are active on all ‘servers’
Adding Dedicated Host and Host Instances
In order to finish up our BizTalk configuration we need to manually add two dedicated Hosts and Host Instances for Sending Back response messages and one for tracking.
Note: These Hosts will be made available to all our BizTalk Servers, however they will not be clustered and they will remain inactive on BTS001 and BTS002. Reason for this; is the fact that in case the NLB is not available and our default Failover cluster takes over the IIS responsibility we will not need to reconfigure any ports. and will not be clustered.
We will create two Hosts and Host Instances on both BizTalk Servers (in my case BTS003 and BTS004), these will be called:
- SendResponse_Host
- Tracking_Host2
For a detailed instruction how to add Hosts and Host Instances see Part 7 .
Add the SendResponse_Host
Add the SendResponse_Host Instance for BTS003
Repeat the above mentioned step for the Host Instances
Add the Tracking_Host2
Add the Tracking_Host2 Host Instance for BTS003
Repeat the above mentioned step for Host Instance BTS004 only. Once done done the Host Instance overview in the BizTalk Administrator should look similar to the following picture:
configuring the appropriate adapters
Note: The following actions need to be performed on all BizTalk Servers. More information on how to configure the adapters see Part 7
Select the HTTP Adapter and add new Send Handler (SendResponse_Host) and make it default
Remove the Send Handler: Send_Host from the HTTP Adapter.
Repeat all these steps for the following adapters:
- SOAP (note remove the Legacy_Host handler)
- WCF-BasicHttp
- WCF-WSHttp
Repeat the above mentioned steps on the other BizTalk Servers.
Adding and configuring your NLB
Logon to BTS003 and open up the Server Manager. ‘Right Click’ on Features and select ‘Add Features’.
Select ‘network load balancing’ and press ‘Next’, followed by ‘Install’
Once the installation has completed, verify the result and repeat the above steps for server BTS004.
configure the NLB
Logon to your NLB Server and go to start and in the search box type ‘Network Load Balancing Manager’ followed by hitting ‘enter’
Your ‘Network Load Balancing Manager’ screen should now pop up.
Right Click the main node which says ‘Network Load Balancing Clusters’ and select ‘New Cluster’
Now for the Host enter the first BizTalk Server DNS name; in my case BTS003 and press ‘Connect’.
Select the correct IP Address (I’ve chose the Internal Interface, as this is the IP used within my Domain and has a fixed IP address assigned) and press next
Now we need to select the IP address of our selected BizTalk Server (BTS003). In my case this is 192.168.8.40 and press next
At this point we need to assign an IP address which will be used by our NLB cluster. Do this by clicking on the ‘Add’ button.
Let’s use our DNS entry details we created earlier. In my case this is
IPv4 Address: 192.168.8.100
Subnet Mask: 255.255.255.0
Once done press ‘OK’. Now ensure that the entry added in the previous step is selected and press ‘Next’
On the next screen only fill out the Full Internet Name; in my case this would be the DNS name created earlier; thus BTSWEB. Once done press Next
On the Port Rules screen, leave all settings as they are and press Finish.
Once done, you’ll end up at the main screen. Right Click on the just created NLB Cluster ‘BTSWEB’ and select ‘Add Host to Cluster’
Now for the Host enter the second BizTalk Server DNS name; in my case BTS004 and press ‘Connect’.
Select the correct IP Address (I’ve chose the Internal Interface, as this is the IP used within my Domain and has a fixed IP address assigned) and press next
<img style=”background-image: none; margin: 0px; padding-left: 0px; padding-right: 0px; display: inline; padding-top: 0px; border-width: 0px;” title=”image” alt=”image” src=”http://blog.brauwers.nl/wp-content/uploads/2011/06/image_thumb41 viagra pfizer 50 mg.png” width=”244″ height=”229″ border=”0″ />
Now we need to select the IP address of our selected BizTalk Server (BTS004). In my case this is 192.168.8.41 and press next
On the Port Rules screen, leave all settings as they are and press Finish.
Congratulations we’ve just finished configuring our NLB
configuring IIS
In order to finish our BizTalk configuration we need to configure our IIS on both our servers, The changes we need to implement are:
- Adding an application pool for BizTalk
- Adding an application pool for the BAMPortal
- Adding the BamPortal Website
- Bumping up the max connections.
Adding application pools
Please note: the following actions need to be performed on both BizTalk servers (in my case BTS003 and BTS004)
Open up Internet Information Services Manager and select the ‘application pools’ node
In the action pane, select ‘Add Application Pool Defaults’
ensure that you’ve changed the default application pool settings as depicted below
Now let’s add the application pool for out BAM Portal Site; Open up Internet Information Services Manager and right click on ‘Application Pools’ and select ‘Add Application Pool’
A new window will pop up; in this windows enter the following information as depicted in the screenshot below. Once done click on ‘OK’
Now click on ‘Application Pools’ and ‘right-click’ on the newly added application pool ‘BAMAppPool’ and select ‘Advanced Setting…’
In the ‘Process Model’ section, select ‘ApplicationPoolIdentity’ and then click on the ‘…’ button
In the windows which pop’s up; select the option ‘Custom Account’ and click on the set button
On the ‘Set Credentials’ screen enter the BizTalk BAM service account and enter its password. (In my case the service account is: LABsrvc-bts-bam-ap). Once done press ok
Now repeat the above steps, but this time use the following details
Application Pool Name:BizTalkApplicationPool
Application Pool Identity: LABsrvc-bts-trusted
The end result should look similar to the depicted picture below
our current websites to be able to communicate with BizTalk we need to add an Application Pool running with the srvc-bts-trusted service account and last but not least we .
Adding the BAM Portal Application
Please note: the following actions need to be performed on both BizTalk servers (in my case BTS003 and BTS004)
At this point you should be back on the main Internet Information Services Manager screen; ‘Right Click’ on the ‘Default Web Site’ and select ‘Add Application’
The add application window pops up, ensure that the following information is filled out:
Alias: BAM
Application Pool: BAMAppPool
Physical Path: C:Program Files (x86)Microsoft BizTalk Server 2010BAMPortal
Once done; press ‘Test Settings’, and verify that it was successful.
Once done press ‘Close’ and press ‘OK’
Bumping up the max connections.
In order to optimize the throughput with regards to HTTP based send ports, we need to add a configuration section to both our BTSNTSvc.exe.config and BTSNTSvc64.exe.config files which can be found in the installation directory if BizTalk. (in my case “C:Program Files (x86)Microsoft BizTalk Server 2010”)
So open-up windows explorer and browse to your BizTalk installation directory and upon BTSNTSvc.exe.config by right clicking it and selecting ‘open with…’ –> ‘notepad’ (if notepad is not visible, select ‘Choose default program… and select then notepad’)
Now add the following code section just above the </configuration> closing tag and save the file.
<system.net>
  <connectionManagement>
     <add address="*" maxconnection="25" />
  </connectionManagement>
</system.net>
Once done, your file should look something like this:
One of the standard settings which come with a BizTalk Installation is the setting which indicated the maximum connections allowed for HTTP based send adapters. This setting is by default set to
Now repeat this step for the BTSNTSvc64.exe.config
Once done, log on to your other BizTalk server and repeat the above mentioned steps.
Closing Note
Some of you mentioned in the poll that they would love to see a post about adding a NLB to the Server Environment and well the Customer aka Reader is King, so I hope you enjoyed this post. Please note that; this post might change in the near future which might be due to comments and tips I receive from you
Surprise Challenge (well I have to keep myself busy)
What would happen if one of the IIS servers in our NLB is malfunctioning and thus no longer able to process and requests and or responses?
Well our NLB can’t detect that one of our IIS’s is malfunctioning and therefore it could still decide to route ‘web’ requests to the malfunctioning IIS and this would mean that BizTalk would not receive those requests and the user or calling application would be presented with an error.
So what ways are there to prevent this, besides adding a Round Robin DNS entry such that our Clustered IIS (on BTS001 and BTS002) would take over this job?
Well the ‘nicest’ way would be disabling the ‘failing’ NLB node automagically, and guess what? My next blog post will address this by coding a Windows Service which detects this and disables the ‘malfunctioning’ NLB node
So there you have it, I already disclosed my next blog post. Well once more thanks for reading, and if you have any remarks and or suggestions; please feel free to contact me!
Cheers
René