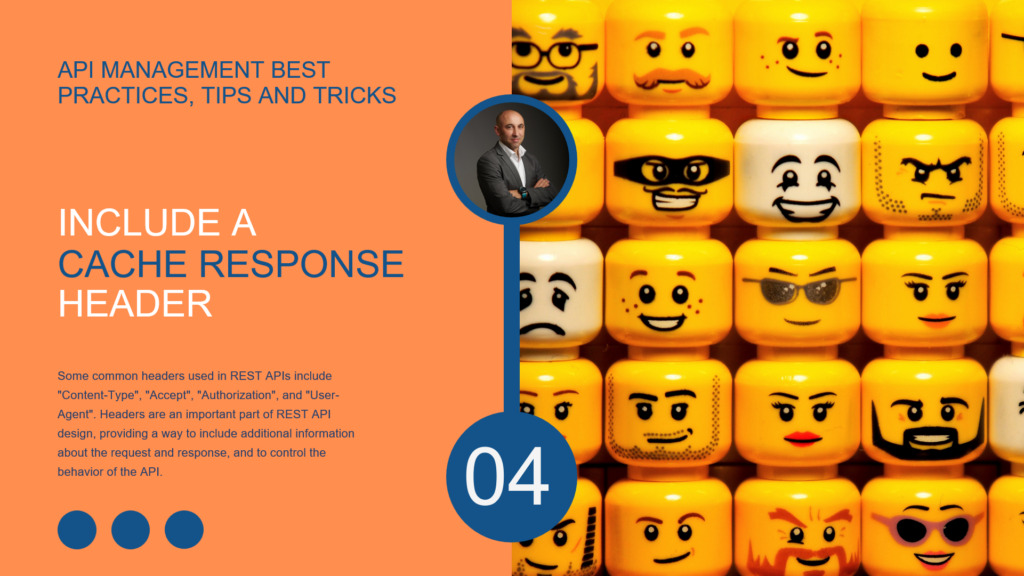
Here we are, ready for another edition of API Management Best Practices, Tips, and Tricks. Until now, I have been addressing some tips to apply to your Azure API Management policies. However, today I will address a good Best practice that you must consider while implementing cache on your operations: Including a Cache Response Header on your API responses.
#2 Include a Cache Response Header
In my previous article, I briefly mentioned this topic, but I think it should have its own individual highlight. Headers are an essential part of REST API design, providing a way to include additional information about the request and response. They are a key peace to allow us to control the behavior of the API. Some typical headers used in REST APIs include Content-Type, Accept, Authorization, and User-Agent.
One good best practice while applying cache responses on our APIs – which has the advantage of significantly reducing latency for API callers – is to inform API users when they are receiving a cached response or not. This way, users or systems know if they are working with live-fresh data or not, and provide actions according. Sometimes we cannot rely on a cached version of the resource, sometimes it doesn’t matter. However, by having this strategy, you will be enriching and improving your APIs.
And once again, this is quite simple to accomplish:
I hope you enjoy this tip and stay tuned for the following Azure API Management Best practices, Tips, and Tricks.
If you liked the content or found it helpful and want to help me write more content, you can buy (or help buy) my son a Star Wars Lego!
Author: Sandro Pereira
Sandro Pereira lives in Portugal and works as a consultant at DevScope. In the past years, he has been working on implementing Integration scenarios both on-premises and cloud for various clients, each with different scenarios from a technical point of view, size, and criticality, using Microsoft Azure, Microsoft BizTalk Server and different technologies like AS2, EDI, RosettaNet, SAP, TIBCO etc.
He is a regular blogger, international speaker, and technical reviewer of several BizTalk books all focused on Integration. He is also the author of the book “BizTalk Mapping Patterns & Best Practices”. He has been awarded MVP since 2011 for his contributions to the integration community.
View all posts by Sandro Pereira
Here we are, ready for another edition of API Management Best Practices, Tips, and Tricks.Today, we will address another helpful Best practice, Tips, and Tricks that you must consider while implementing your API policies: How to implement a cache refresh policy.
#2 How to implement a cache refresh policy?
As Microsoft documentation references, APIs and operations in API Management (APIM) can be configured with response caching. Response caching can significantly reduce latency for API callers and backend load for API providers. APIM provides an out-of-the-box Internal cache, but this built-in cache is volatile and is shared by all units in the same region in the same API Management service. However, if you desire more robustness and additional capabilities, you can use an external Azure Cache for Redis, for example.
An excellent example of using cache capabilities is to store access tokens. Usually, API tokens have a “time-to-live” (TTL), which is the maximum time that the access token will be valid for use within the application. That means we don’t need to regenerate a token each time we call our API. Instead, we can cache that value in APIM, specifying the cache duration.
When working with cache inside APIM, there are at least two policies you need to know:
cache-store-value: The cache-store-value performs cache storage by key. The key can have an arbitrary string value and is typically provided using a policy expression.
cache-lookup-value: Use the cache-lookup-value policy to perform cache lookup by key and return a cached value. The key can have an arbitrary string value and is typically provided using a policy expression.
cache-store-value
Policy statement:
This is a practical sample of this policy:
cache-lookup-value
Policy statement:
This is a practical sample of this policy:
Cache is quite simple to implement and use inside APIM. However, and this is the reason for this blog post, in many situations, we have the need to refresh or force a refresh on our cache or in our cache value. Let’s say that while developing our operation policy, we made a mistake, like caching an incorrect value or setting the duration incorrectly. Now we need to refresh the value that is cached, but we don’t want to wait for the cache duration to expire – that can be 30 min – or modify the operation policy to add a cache removed statement and then modify that policy again to remove that “workaround”.
So, how can we easily handle these requirements or capabilities?
Well, the best way is to always address this requirement by design and implement a cache refresh mechanism.
Taking the token example, this can easily be implemented by:
Adding an optional header on your API methods, let’s say:
skip-cache header that “allows” a true or false value
If it is true, you need to force to refresh the value that is cached.
Otherwise – if the value is false – you use the cached value.
In the inbound policy of your operation, add the following statements:
Read the value of the skip-cache header. If it doesn’t exist, the default value is false.
Check if the skip-cache header value is false:
If the condition is true:
Try to read the value from the cache:
If it is present in the cache, return the cached value.
If it is not present, call the token renewal API.
Otherwise, perform a call to the token renewal API.
							application/json


							true

						@((string)context.Variables["varTokenValue"])


    ... implement the call to the token renewal API
Note: It is a good practice to add a response header stating the response is cached.
In the outbound policy of your operation, add the following statements:
I hope you enjoy this tip and stay tuned for the following Azure API Management Best practices, Tips, and Tricks.
If you liked the content or found it helpful and want to help me write more content, you can buy (or help buy) my son a Star Wars Lego!
Author: Sandro Pereira
Sandro Pereira lives in Portugal and works as a consultant at DevScope. In the past years, he has been working on implementing Integration scenarios both on-premises and cloud for various clients, each with different scenarios from a technical point of view, size, and criticality, using Microsoft Azure, Microsoft BizTalk Server and different technologies like AS2, EDI, RosettaNet, SAP, TIBCO etc.
He is a regular blogger, international speaker, and technical reviewer of several BizTalk books all focused on Integration. He is also the author of the book “BizTalk Mapping Patterns & Best Practices”. He has been awarded MVP since 2011 for his contributions to the integration community.
View all posts by Sandro Pereira
Here we are, ready for another edition of API Management Best Practices, Tips, and Tricks. In my prior blog post, I inaugurated this series by addressing the first best practices, tips, and tricks—How to validate if a Header is an empty string. Today, I will speak about another helpful Best practice, Tips, and Tricks that you must consider while implementing your policies: How to access a context variable on body transformation using liquid.
#2 How to access a context variable on body transformation using liquid
Liquid is an open-source template language created by Shopify and written in Ruby. It is the backbone of Shopify themes and is used to load dynamic content on storefronts.
Azure API Management uses the Liquid templating language (DotLiquid) to transform the body of a request or response. This can be effective if you need to reshape the format of your message completely. That can be accomplished using the set-body policy inside inbound, backend, outbound, or on-error policies. For example:
On the other side, inside API Management policies, users will always have the availability to create context variables or, in this particular case, User-Defined Variables or Policy Variables (whatever you want to call them) to store and manipulate data specific to your API’s needs. These variables are often used in policies to make decisions or modify requests and responses.
Creating or reading a value of a context variable inside an APIM policy is a straightforward operation. Once again, Microsoft documentation will explain that simple operation very well. To declare a context variable and assign it a value, we utilize the set-variable policy, specifying the value through an expression or a string literal. For example:
Or
To read a context variable and assign it a value, we utilize the following expression:
(string)context.Variables["myVar"]
Or using the GetValueOrDefault function:
context.Variables.GetValueOrDefault("myVAr", "This is the default value")
What is more difficult is to find a good documentation that explains how to read the value of a context variable on body transformation (set-body policy) using the liquid template. I won’t be wrong to say that 98% of the information I looked up online was wrong because most of them say that is using the same way – (string)context.Variables[“myVar”] – what is incorrect. We should use a dot (.) notation inside the liquid to access the variables, similar to many programming languages used to access properties deep within the structure. So, in this case, we should use the following:
				Sandro Pereira
				{{context.Variables.myVar}}
I hope you enjoy this tip and stay tuned for the following Azure API Management Best practices, Tips, and Tricks.
If you liked the content or found it helpful and want to help me write more content, you can buy (or help buy) my son a Star Wars Lego!
Author: Sandro Pereira
Sandro Pereira lives in Portugal and works as a consultant at DevScope. In the past years, he has been working on implementing Integration scenarios both on-premises and cloud for various clients, each with different scenarios from a technical point of view, size, and criticality, using Microsoft Azure, Microsoft BizTalk Server and different technologies like AS2, EDI, RosettaNet, SAP, TIBCO etc.
He is a regular blogger, international speaker, and technical reviewer of several BizTalk books all focused on Integration. He is also the author of the book “BizTalk Mapping Patterns & Best Practices”. He has been awarded MVP since 2011 for his contributions to the integration community.
View all posts by Sandro Pereira
If you follow my blog posts, you will not be surprised that I love to speak about Best Practices, Tips, and Tricks. I wrote in the past Power Automate Best Practices, BizTalk Server, and often about Logic Apps Best Practices, Tips, and Tricks. So it’s not surprising that I would address other Azure Integration Services sooner or later, this time Azure API Management!
Let’s embark on a new journey as we begin a series of blog posts dedicated to API Management Best Practices, Tips, and Tricks. To start this series, I chose a topic that I found very useful in many situations: How to validate if a Header is an empty string?
#1 How to validate if a Header is an empty string?
Verifying whether the header contains a specific value(s) is straightforward. In fact, Microsoft’s documentation covers this as the very first topic on their page. To accomplish that, we can use the check-header policy to enforce that a request has a specified HTTP header.
	application/json
	plain/text
In this case, our request needs to have the Content-Type header, and the accepted values are:
application/json
or plain/text
If you exclude this header or opt for an alternative value for it, you’ll trigger a 401 error due to the missing Content-Type header:
Now, checking only if it exists without any value restriction is poorly explained in MSFT documentation. However, it is still very simple to implement since values are options on the check-header policy. To accomplish that, we just need a simple instruction line:
What you may find less commonplace is the technique for confirming the existence of a Header that isn’t empty. To clarify:
The header needs to exist;
The header can contain any value except being null, an empty string, or a string containing only blank spaces.
Well, of course, you may find multiple ways to accomplish this task, even using the check-header policy to validate the existence of the header and another strategy to validate if the value was not empty. I decided in my approach to suppress the use of the check-header policy, and instead, I will use the following approach:
Read the Header using the context.Request.Headers.GetValueOrDefault(“my-header”) expression.
And then using a condition to see if the value is empty or not
You can accomplish that by using the following policy:
I hope you enjoy this tip and stay tuned for the following Azure API Management Best practices, Tips, and Tricks.
If you liked the content or found it helpful and want to help me write more content, you can buy (or help buying) my son a Star Wars Lego!
Author: Sandro Pereira
Sandro Pereira lives in Portugal and works as a consultant at DevScope. In the past years, he has been working on implementing Integration scenarios both on-premises and cloud for various clients, each with different scenarios from a technical point of view, size, and criticality, using Microsoft Azure, Microsoft BizTalk Server and different technologies like AS2, EDI, RosettaNet, SAP, TIBCO etc.
He is a regular blogger, international speaker, and technical reviewer of several BizTalk books all focused on Integration. He is also the author of the book “BizTalk Mapping Patterns & Best Practices”. He has been awarded MVP since 2011 for his contributions to the integration community.
View all posts by Sandro Pereira
Errors rarely appear alone; from time to time, it’s as if a project is determined to challenge you. But I find it rather enjoyable. It offers me inspiration and creative material for writing! Today’s U found an unfamiliar (or rare) problem that happened while I was migrating an old BizTalk Server 2013 solution into a recent version of the BizTalk Server.
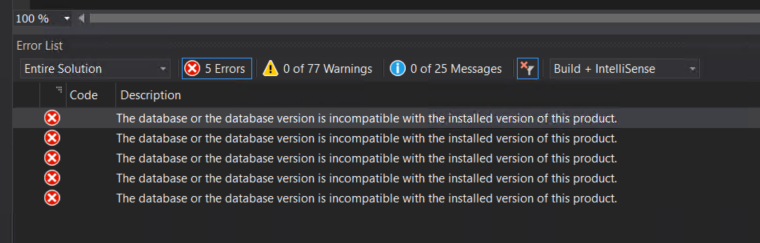
Following the migration of the Visual Studio solution to a newer version, which also involved changing the target .NET framework, I encountered the following error when attempting to deploy the BizTalk Server Visual Studio solution:
The database or the database version is incompatible with the installed version of this product.
Causes
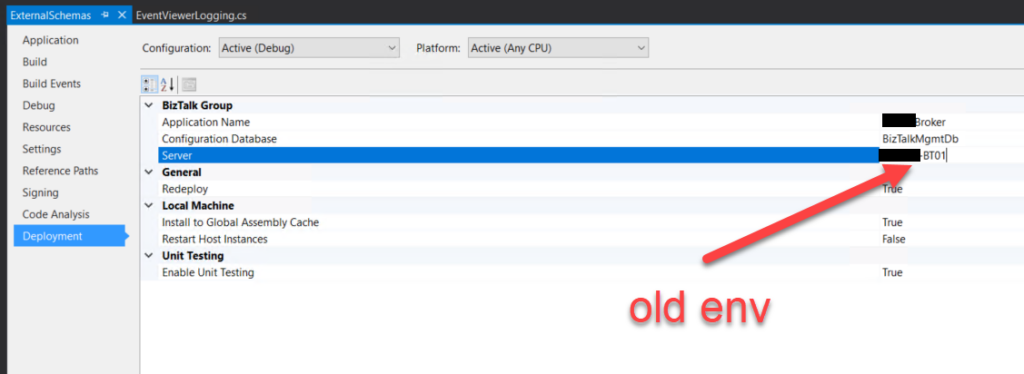
Normally, when we are migrating side-by-side BizTalk Server solutions, that means that we are creating a new BizTalk Server developer environment that, most of the time, does not have access to the previous environment. But you must know that if you copy a BizTalk Server Visual Studio folder solution from the old environment to the new one, it will also copy the *.btproj.user files. This is an XML file that contains not only the BizTalk deployment Settings but also several personal user settings like References path, test file names, and so on.
Regarding BizTalk deployment properties, all this setting are stored in the “*.btproj.user” file:
Application Name (ApplicationName): This is the name of the BizTalk application that we want to deploy the assemblies in this project. If the application already exists, the assemblies will be added to it when you deploy the project. If the application does not exist, the application will be created. If this field is blank, the assemblies will be deployed to the default BizTalk application in the current group (“BizTalk Application 1”). Names that include spaces must be enclosed in double quotation marks (“).
Configuration Database (ConfigurationDatabase): This is the name of the BizTalk Management database for the group. The default value is “BizTalkMgmtDb”.
Server (Server): This is the name of the SQL Server instance that hosts the BizTalk Management database on the local computer. By default, this is usually the name of the local computer.
Redeploy (Redeploy): Boolean property that indicates if you want to allow redeployments from within Visual Studio. Setting this to “True” (the default) enables you to redeploy the BizTalk assemblies without changing the version number.
Install to Global Assembly Cache (Register): Setting this to “True” (the default) installs the assemblies to the Global Assembly Cache (GAC) on the local computer when you install the application. Set this to False only if you plan to use other tools for this installation, such as gacutil.
Restart Host Instances (RestartHostInstance): Setting this to “True” automatically restarts all host instances running on the local computer when the assembly is redeployed. If set to False (the default), you must manually restart the host instances when redeploying an assembly.
Well, if you do not change, it will contain the previous SQL Server name and instance.
So, if this SQL Server is accessible by this machine and if you try to deploy the solution, you will get an error saying that the database version is incompatible because now you are using a higher version of the product.
Solutions
The solution is quite simple to accomplish:
Access the Deployment tab of the Properties of each BizTalk Server project inside the solution.
And make sure that you set correctly at least the Server name (or name and instance)
If you want to play safe, it will give you a little bit of more work, but you can:
Close the solution.
2Open Explorer and delete *.btproj.user files.
Reopen the solution, reconfigure the Deployment properties – this time mainly the Application name, because the rest will be properly configured by default – rebuild and deploy the solution.
Both these options will fix this problem.
Hope you find this helpful! So, if you liked the content or found it helpful and want to help me write more content, you can buy (or help buy) my son a Star Wars Lego!
Author: Sandro Pereira
Sandro Pereira lives in Portugal and works as a consultant at DevScope. In the past years, he has been working on implementing Integration scenarios both on-premises and cloud for various clients, each with different scenarios from a technical point of view, size, and criticality, using Microsoft Azure, Microsoft BizTalk Server and different technologies like AS2, EDI, RosettaNet, SAP, TIBCO etc.
He is a regular blogger, international speaker, and technical reviewer of several BizTalk books all focused on Integration. He is also the author of the book “BizTalk Mapping Patterns & Best Practices”. He has been awarded MVP since 2011 for his contributions to the integration community.
View all posts by Sandro Pereira
It is always fun to return to one of my favorite topics: Errors and warnings, causes and solutions – aka Troubleshooting! Regardless of the technology, language, or service we are using. Today’s problem was another classic (and annoying) issue that happened while I was migrating an old BizTalk Server 2013 solution into a recent version of the BizTalk Server.
While trying to deploy a BizTalk Server Visual Studio solution that I copied from the old developer server environment into the new environment using, of course, Visual Studio, I got the following error message:
Access to the path is denied.
Causes
As the error clearly mentions, Visual Studio is trying to access somewhere that it does not have access to, even if you are an admin and you open in admin mode. The reason for that is that many times, when we copy the files between servers, they may become read-only for various reasons/situations. Maybe the files already were in read-only mode before we copied them.
Solutions
The solution is quite simple to accomplish:
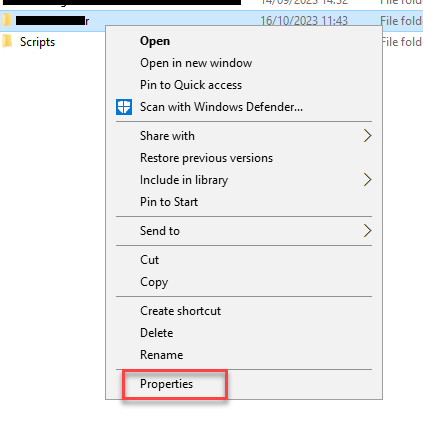
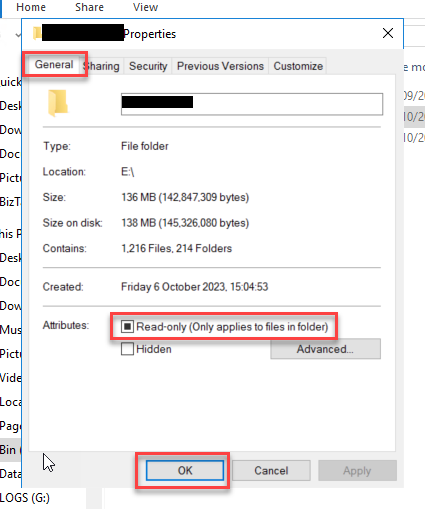
Go to the project folder of your solution.
Right-click on the project folder and choose Properties from the menu.
Now, On the Properties window, go to the Attributes panel under the General tab and turn off the Read-only option. Click on the OK to apply the changes.
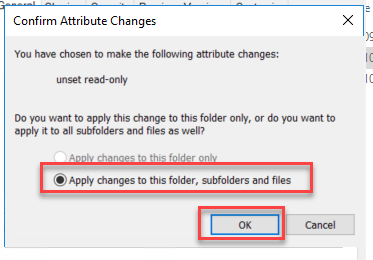
A new Confirm Attribute Changes window may rise, asking if you to confirm. Make sure you select the option Apply changes to this folder, subfolders and files and click OK.
After that, if you go to your BizTalk Server Visual Studio solution you will be able to successfully deploy it to the new environment.
Hope you find this helpful! So, if you liked the content or found it helpful and want to help me write more content, you can buy (or help buy) my son a Star Wars Lego!
Author: Sandro Pereira
Sandro Pereira lives in Portugal and works as a consultant at DevScope. In the past years, he has been working on implementing Integration scenarios both on-premises and cloud for various clients, each with different scenarios from a technical point of view, size, and criticality, using Microsoft Azure, Microsoft BizTalk Server and different technologies like AS2, EDI, RosettaNet, SAP, TIBCO etc.
He is a regular blogger, international speaker, and technical reviewer of several BizTalk books all focused on Integration. He is also the author of the book “BizTalk Mapping Patterns & Best Practices”. He has been awarded MVP since 2011 for his contributions to the integration community.
View all posts by Sandro Pereira
This is just another post for the sake of my mental sanity because I’m always tired of looking up for this over and over again. While working on BizTalk Server projects and in many other scenarios, like optimizing the BizTalk Server environment, I want to check how many SQL Server Jobs I have in my SQL Server Instance in order to optimize and properly configure the maximum job history log. This way, I know that none of the jobs is going to be without execution history on the logs, and I can easily monitor and troubleshoot them.
Normally, I have a few SQL Server Jobs, and it is easy to count them manually, nevertheless annoying! But sometimes I get SQL Server Instances hosting applications databases used by BizTalk Server with more than 60 jobs… and counting them manually is not an annoying task but instead an insane task!
So the million dollar question is, How to easily count the number of Jobs in SQL Server Agent Jobs?
To easily count the number of SQL Server Agent Jobs in your SQL Server instance, you can use a simple SQL query. Here’s how you can do it:
SELECT COUNT(*) AS NumberOfJobs
FROM msdb.dbo.sysjobs;
This query counts the number of rows in the msdb.dbo.sysjobs table, which contains information about SQL Server Agent Jobs. The result will be the total number of jobs.
Keep in mind that you need the necessary permissions to query the msdbdatabase, which is where SQL Server Agent Jobs are stored. Typically, users with administrative roles or appropriate permissions can access this information.
Author: Sandro Pereira
Sandro Pereira lives in Portugal and works as a consultant at DevScope. In the past years, he has been working on implementing Integration scenarios both on-premises and cloud for various clients, each with different scenarios from a technical point of view, size, and criticality, using Microsoft Azure, Microsoft BizTalk Server and different technologies like AS2, EDI, RosettaNet, SAP, TIBCO etc.
He is a regular blogger, international speaker, and technical reviewer of several BizTalk books all focused on Integration. He is also the author of the book “BizTalk Mapping Patterns & Best Practices”. He has been awarded MVP since 2011 for his contributions to the integration community.
View all posts by Sandro Pereira
Last September 28, I had the pleasure of speaking at the BizTalk To Azure event, which focused on ‘The Migration Journey‘ and was organized by Contica in Gothenburg, Sweden. I’d like, once again, to take this opportunity to thank Contica for the kind invitation and express my appreciation to all the attendees for their warm reception and valuable feedback.
My second presentation at the event (see my first presentation here), which I’m bringing you today, was entitled: Azure Integration in Action – BizTalk to Azure Transition Case Studies.
BizTalk To Azure The Migration Journey: Azure Integration in Action – BizTalk to Azure Transition Case Studies
In this session, we bring Azure Integration Services to life by migrating simple real-world BizTalk Server case samples like:
Through these exercises, you’ll gain practical insights, strategies, and tips to ensure a smooth BizTalk Server migration while embracing Azure’s agility, scalability, and cost-efficiency. Take advantage of this opportunity to see Azure Integration Services in action, guiding your path toward a seamless and future-ready integration landscape.
Hope you find this helpful! So, if you liked the content or found it helpful and want to help me write more content, you can buy (or help buy) my son a Star Wars Lego!
Author: Sandro Pereira
Sandro Pereira lives in Portugal and works as a consultant at DevScope. In the past years, he has been working on implementing Integration scenarios both on-premises and cloud for various clients, each with different scenarios from a technical point of view, size, and criticality, using Microsoft Azure, Microsoft BizTalk Server and different technologies like AS2, EDI, RosettaNet, SAP, TIBCO etc.
He is a regular blogger, international speaker, and technical reviewer of several BizTalk books all focused on Integration. He is also the author of the book “BizTalk Mapping Patterns & Best Practices”. He has been awarded MVP since 2011 for his contributions to the integration community.
View all posts by Sandro Pereira
Last September 28, I had the pleasure of speaking at the BizTalk To Azure event, which focused on ‘The Migration Journey‘ and was organized by Contica in Gothenburg, Sweden. I’d like to take this opportunity to thank Contica for the kind invitation and express my appreciation to all the attendees for their warm reception and valuable feedback.
My first presentation at the event, which I’m bringing you today, was entitled: Elevating Integration – The Roadmap from BizTalk Server.
BizTalk Server to Azure, The Migration Journey: Elevating Integration – Roadmap from BizTalk Server to Azure
If you are embracing the journey to move your current BizTalk Server environment to the cloud, in this session, we’ll guide you through the steps, strategies, and best practices needed to successfully transition your integration solutions to the cloud.
On this talk we will address topics like:
What phases in your migration journey are crucial?
Which tools and technologies should you use?
What to do in this migration journey
And what not to do in this migration journey!
After this session, you’ll know about the dos and don’ts, as well as the key considerations that will empower the agility and scalability of Azure Integration Services.
Hope you find this helpful! So, if you liked the content or found it helpful and want to help me write more content, you can buy (or help buy) my son a Star Wars Lego!
Author: Sandro Pereira
Sandro Pereira lives in Portugal and works as a consultant at DevScope. In the past years, he has been working on implementing Integration scenarios both on-premises and cloud for various clients, each with different scenarios from a technical point of view, size, and criticality, using Microsoft Azure, Microsoft BizTalk Server and different technologies like AS2, EDI, RosettaNet, SAP, TIBCO etc.
He is a regular blogger, international speaker, and technical reviewer of several BizTalk books all focused on Integration. He is also the author of the book “BizTalk Mapping Patterns & Best Practices”. He has been awarded MVP since 2011 for his contributions to the integration community.
View all posts by Sandro Pereira
Before we focus on the goal of this blog post topic, let’s first understand the distinction between Query Parameters and URI Parameters in API Design, this is crucial for you to know. URI Parameters, also known as Path Parameters, are primarily used to identify specific resources, while Query Parameters are utilized for the sorting and filtering of these resources.
For instance, imagine a scenario where you need to identify a book by its ISBN (also known as the book ID); in this case, you’d make use of the URI parameter, something like:
GET /books/{book_id}
An example of this call should be GET /books/978-1-3999-0861-0
However, if your aim is to retrieve all the books categorized by genre, such as novels, then we should use a Query parameter, something like:
GET /books?gender={type}
An example of this call should be GET /books?gender=novels
Now that we know the key difference between Query Parameters and URI Parameters, let’s see how we can read these parameters inside Azure API Management policies.
How to read URI parameters inside Azure API Management policies
Taking the sample above, for us to read the URI parameter, we have to use the following expression:
Hope you find this helpful! So, if you liked the content or found it helpful and want to help me write more content, you can buy (or help buy) my son a Star Wars Lego!
Author: Sandro Pereira
Sandro Pereira lives in Portugal and works as a consultant at DevScope. In the past years, he has been working on implementing Integration scenarios both on-premises and cloud for various clients, each with different scenarios from a technical point of view, size, and criticality, using Microsoft Azure, Microsoft BizTalk Server and different technologies like AS2, EDI, RosettaNet, SAP, TIBCO etc.
He is a regular blogger, international speaker, and technical reviewer of several BizTalk books all focused on Integration. He is also the author of the book “BizTalk Mapping Patterns & Best Practices”. He has been awarded MVP since 2011 for his contributions to the integration community.
View all posts by Sandro Pereira