Christmas is just around the corner, which means that here at home, it’s a crazy and funny period for the kids (actually for the whole family since we love Christmas!). They started asking for us to put up the Christmas decorations really early, and they already wrote a letter to Santa with their requests.
I don’t know about you, but here, Santa exists! I love playing with this idea, and although my oldest daughter is no longer a believer, the younger ones are… even though they say that Santa Claus last year was their father :). I tell them that there are many children around the world and Santa Claus cannot be everywhere at the same time, and in order for no child to be without present, they ask for the help of all fathers. We are Santa’s helpers, like the elves!
Because they are always asking if Santa had already received the letters, if he understood the requests, if he needed some help… and I always told them that Santa would send magic SMSs to all fathers (modern technology) if he had any problem or when he was able to read the letter. That worked for a while (2 years :))… but now they are asking to see the SMSs. No matter how much I say they are magical SMS that only Dad can see, they beg to see… To solve this problem, I activated my geek side and thought, why not create a Logic App that sends me SMSs with personalized messages from Santa Claus!
Azure has a service called Azure Communication Services that allows you to send SMS (along with other functionalities). Still, unfortunately, this service was not eligible for my MVP subscription, nor was it available for free accounts with credits. It has to be on an enterprise or pay-per-use subscription. This way, I was not able to test these services. However, there is another third-party connector that you can connect inside Logic Apps and use to send SMSs: the Twilio Connector.
Before you start creating the Logic App, you need to :
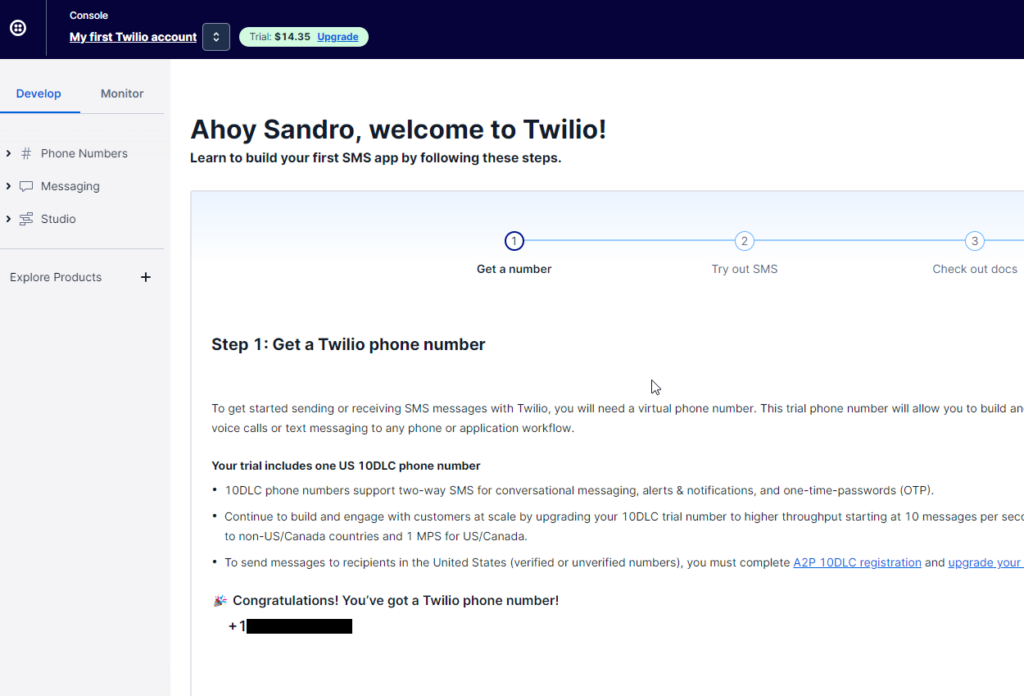
You have the option to Start for free (you will have $15 to test this service)
After you register, you will have access to your Twilio Console, where you can get a number.
This is a US number, but that is perfect for me. If my kids see a foreign number, it will be more credible. Santa Claus lives on the North Pole.
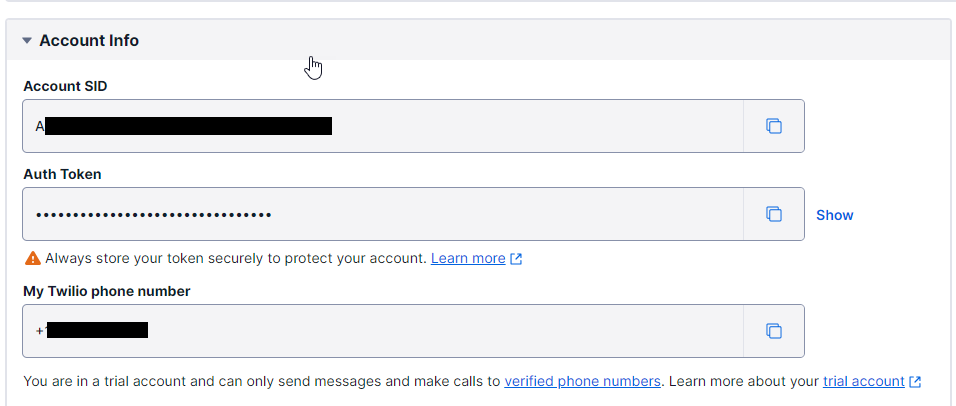
You also have access to your Account info. You will need this information to configure the connector inside the Logic App.
Now that we have configured our Twilio account let us create our Santa Claus Logic App. To do that, you need to:
Access the Azure Portal and create a Logic App.
For simplicity, we will use a Logic App Consumption and name it LA-Santa-Claus-POC
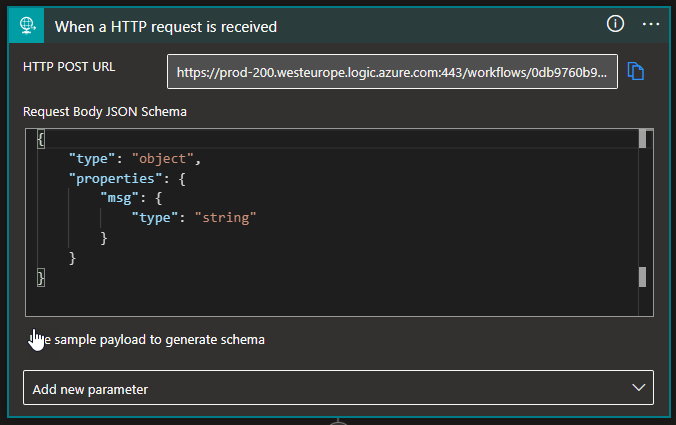
For the trigger, we will use a Request > When a HTTP request is received. The Logic App will receive the following payload:
{
    "msg": "This is the SMS"
}
In order to be easier to map these values in the Twilio connector, on the Request > When a HTTP request is received trigger:
Click on Use sample payload to generate schema
Copy the JSON above and click Done.
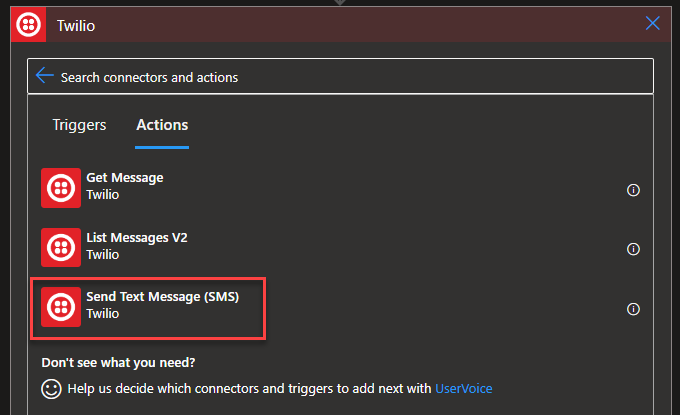
Click on the + New step, and from the search text box, type Twilio and select the Twilio connector followed by the Send Text Message (SMS) action.
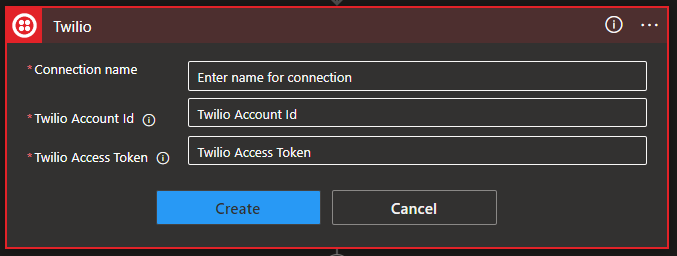
The first thing you need to do is to configure the Twilio connector by setting the:
Connection name
Twilio Account Id and Access Token > These two you can be then on your Twilio Console.
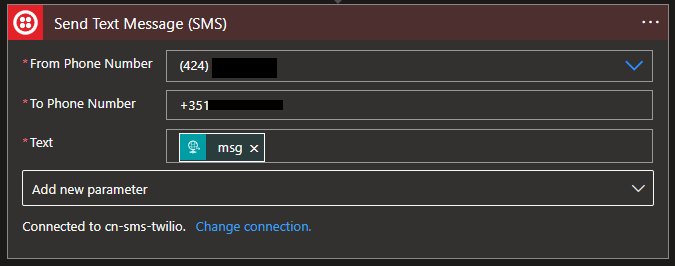
Once you configure the connector, then we need to:
From the combo box From Phone Number property, select the Twilio number.
On the To Phone Number, add your phone number.
And on the Text property, map the message from the request: triggerBody()?[‘msg’]
And Save your Logic App.
Simple as that!
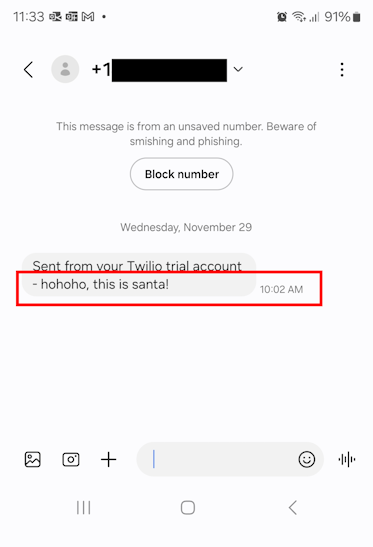
Now, if you test your Logic App you will notice that you will have a new SMS from Santa Claus!
I don’t know about you, but I will have fun with my kids tonight!
Hope you find this helpful! So, if you liked the content or found it helpful and want to help me write more content, you can buy (or help buy) my son a Star Wars Lego!
Author: Sandro Pereira
Sandro Pereira lives in Portugal and works as a consultant at DevScope. In the past years, he has been working on implementing Integration scenarios both on-premises and cloud for various clients, each with different scenarios from a technical point of view, size, and criticality, using Microsoft Azure, Microsoft BizTalk Server and different technologies like AS2, EDI, RosettaNet, SAP, TIBCO etc.
He is a regular blogger, international speaker, and technical reviewer of several BizTalk books all focused on Integration. He is also the author of the book “BizTalk Mapping Patterns & Best Practices”. He has been awarded MVP since 2011 for his contributions to the integration community.
View all posts by Sandro Pereira
This is not the first time I have worked with the FTP adapter. Almost all my clients have a File transfer solution, and FTP is used in many of them. But today was probably the first time I had the need to configure an After Put command on the FTP channel. Basically, we need to upload the file as .tmp, and after it is uploaded to the FTP we need to rename it to .xml.
The BizTalk Server FTP adapter contains an After Put property that allows you to specify the FTP commands to run after the file PUT. You can provide a chain of commands by separating each one with a semicolon (;).
So, yes, this is what I want to use. On the first approach, I try to add the following command:
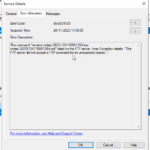
The command “rename orders.20231124115951.054.tmp orders.20231124115951.054.xml” failed on the FTP server. Inner Exception details: “The FTP server did not accept a FTP command for an unexpected reason. “.
To troubleshoot the adapter, I defined a log file and tried it again, and I got the following traces:
> CWD /inbox
 PWD
 TYPE I
 PORT 10,0,0,224,228,205
 STOR orders.20231124115951.054.tmp
< 150 Opening BINARY mode data connection for orders.20231124115951.054.tmp
 rename orders.20231124115951.054.tmp orders.20231124115951.054.xml
 QUIT
< 221 Goodbye.
After a quick look at this error, I saw a post saying that mv command instead of the rename:
> PWD
 TYPE I
 PORT 10,0,0,224,229,79
 STOR orders.20231124120624.055.tmp
< 150 Opening BINARY mode data connection for orders.20231124120624.055.tmp
 mv -- -orders.20231124120624.055.tmp orders.20231124120624.055.xml
 QUIT
< 221 Goodbye.
Causes
While using and troubleshooting the FTP adapter, it is always good to set the Log file. This will contain all the instructions made by the adapter. By doing so, I realized that the traditional commands we use, like dir, delete, or rename, are not supported in the FTP adapter.
The logs show that the commands used are CWD and STOR, which are the equivalent of dir and put or PWD to display the current directory.
CWD is the Net::FTP method name; CD is the standard FTP and shell command for changing directories. That means that the BizTalk Server FTP adapter uses Net::FTP commands.
Solutions
The solution is quite simple to accomplish:
Replace the rename command with the equivalent in Net::FTP that is:
RNFR FTP command: The RNFR command is issued when an FTP client wants to rename a file on the server. The client specifies the name of the file to be renamed along with the command. After issuing an RNFR command, an RNTO command must immediately follow.
RNTO FTP command: The RNTO command is used to specify the new name of a file specified in a preceding RNFR (Rename From) command.
So that means that the After Put property needs to be set as:
Hope you find this helpful! So, if you liked the content or found it helpful and want to help me write more content, you can buy (or help buy) my son a Star Wars Lego!
Author: Sandro Pereira
Sandro Pereira lives in Portugal and works as a consultant at DevScope. In the past years, he has been working on implementing Integration scenarios both on-premises and cloud for various clients, each with different scenarios from a technical point of view, size, and criticality, using Microsoft Azure, Microsoft BizTalk Server and different technologies like AS2, EDI, RosettaNet, SAP, TIBCO etc.
He is a regular blogger, international speaker, and technical reviewer of several BizTalk books all focused on Integration. He is also the author of the book “BizTalk Mapping Patterns & Best Practices”. He has been awarded MVP since 2011 for his contributions to the integration community.
View all posts by Sandro Pereira
Unfortunately, there are no out-of-the-box capabilities inside Logic Apps, Consumption or Standard, to zip (or compress) files. You may be wondering why we need this type of capability. Well, there are legacy systems or integrations that require these capabilities, especially when the communication channel is email.
And yes, still happens today! It is not uncommon that some partners require that messages (or files) be sent by email, and to minimize the impact (to avoid reaching the attachment size limit or filling the mailbox), to zip the attachment.
This is also very useful to migrate AS IS BizTalk Server solutions into Azure (in this case, AS-IS means without changing the solution requirements).
And what does this Azure Function do?
The ZipFile Azure Function is simply an Azure Function that zips an inbound file. This can later be sent in an attachment of an email, sent to a folder or storage account.
Where can I download it?
You can download the complete Azure Functions source code here:
Hope you find this helpful! So, if you liked the content or found it useful and want to help me write more, you can buy (or help me buy) my son a Star Wars Lego!
Thanks to my team member Luís Rigueira for helping me realize and implement this idea.
Author: Sandro Pereira
Sandro Pereira lives in Portugal and works as a consultant at DevScope. In the past years, he has been working on implementing Integration scenarios both on-premises and cloud for various clients, each with different scenarios from a technical point of view, size, and criticality, using Microsoft Azure, Microsoft BizTalk Server and different technologies like AS2, EDI, RosettaNet, SAP, TIBCO etc.
He is a regular blogger, international speaker, and technical reviewer of several BizTalk books all focused on Integration. He is also the author of the book “BizTalk Mapping Patterns & Best Practices”. He has been awarded MVP since 2011 for his contributions to the integration community.
View all posts by Sandro Pereira
When we work with multiple clients and, in some cases, with restricted access to their servers or environments, sometimes we have the need to copy the source code from our machines into their developer environment. This happened recently when I needed to transfer some modifications I made in a BizTalk Server Visual Studio solution into the client developer environment. I couldn’t connect a USB device for security reasons, so I decided to copy it to OneDrive and download it from the server.
However, by doing this, some of the files, especially the project and solution files, got marked as Mark of the Web (MOTW). By default, the mark of the web is added to files only from the Internet or restricted site zones. (you can know more about it here: Mark of the Web and zones) By the way, according to MSFT documentation, Mark of the Web only applies to files saved on an NTFS file system, not files saved to FAT32 formatted devices.
The main problem with MotW is that it will cause problems while trying to compile your Visual Studio solutions:
Error Couldn't process file .resx due to its being in the Internet or Restricted zone or having the mark of the web on the file. Remove the mark of the web if you want to process these files.
There are many ways to remove the Mark of the Web (MOTW) flag. Ideally, this needs to be done with Visual Studio closed. Here are two options:
Option 1: Using the File Properties
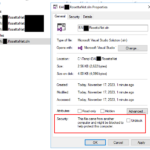
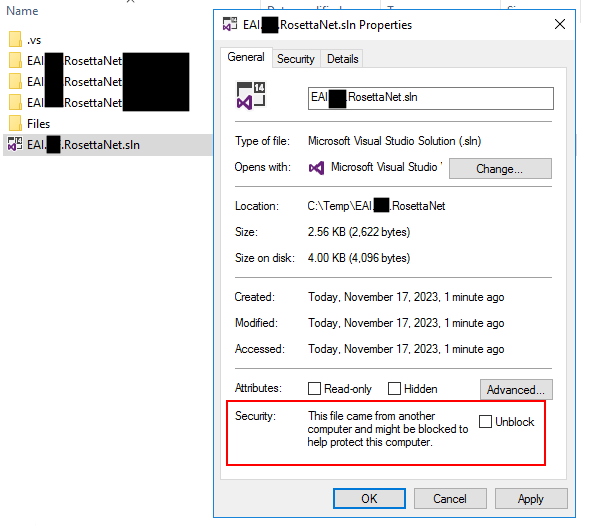
Right-click on the file in Windows Explorer and select properties.
On the properties window, on the bottom, select the check box Unblock and click OK.
Note: The problem with this solution is that you need to do it manually for all the marked files.
Option 2: Using PowerShell
Using a simple PowerShell to go through all the files and unblock them. You can accomplish that, for example, by using the following script:
Get-ChildItem -Path . -Recurse | Unblock-File
Download
THIS POWERSHELL SCRIPT IS PROVIDED “AS IS” WITHOUT WARRANTY OF ANY KIND.
You can download PowerShell scripts to unblock files from GitHub here:
If you liked the content or found it helpful and want to help me write more content, you can buy (or help buy) my son a Star Wars Lego!
Author: Sandro Pereira
Sandro Pereira lives in Portugal and works as a consultant at DevScope. In the past years, he has been working on implementing Integration scenarios both on-premises and cloud for various clients, each with different scenarios from a technical point of view, size, and criticality, using Microsoft Azure, Microsoft BizTalk Server and different technologies like AS2, EDI, RosettaNet, SAP, TIBCO etc.
He is a regular blogger, international speaker, and technical reviewer of several BizTalk books all focused on Integration. He is also the author of the book “BizTalk Mapping Patterns & Best Practices”. He has been awarded MVP since 2011 for his contributions to the integration community.
View all posts by Sandro Pereira
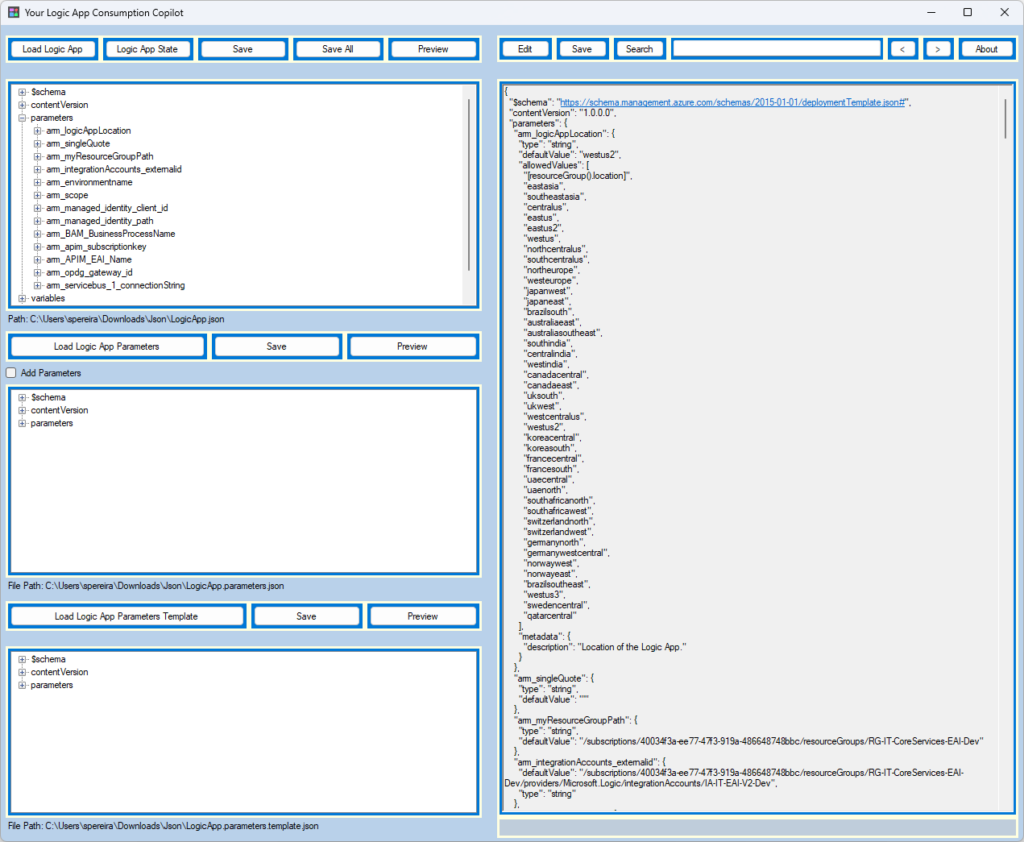
I initially called this tool Logic App Consumption DevBuddy, but then my dear friend Mike Stephenson told me that I should call it Copilot, and I liked the idea.
Copilot is a term that these days is generally bound to Microsoft AI that is present on almost all of Microsoft’s applications and experiences, including Microsoft 365, Windows 11, Edge, or Bing, and that can assist users and optimize their work, such as generating text and tables in Word, summarizing and drafting emails in Outlook. However, the primary definition of a Copilot is a qualified pilot who assists or relieves the pilot but is not in command.
Well, Logic App Consumption Copilot doesn’t have AI involved behind the scenes but is able to optimize and expedite the developers’ work while building Logic Apps Consumption.
While developing Logic Apps Consumption with Visual Studio, there are certain tasks, mainly tasks related to the ARM template configuration and CI/CD, that are very annoying and time-consuming, such as:
Add new ARM parameters.
Add new Logic App (workflow) parameters.
Configure ARM parameters for CI/CD and Visual Studio deployment.
Add new Logic Apps to our ARM template.
And many more.
The reason these tasks are time-consuming is that most of them cannot be done inside the Logic App design, and they need to be performed manually in the JSON definition, which leads us, at least to me, to remember all the time to:
Where to put them (place)?
ARM parameters are easy to know, but Logic App (workflow) parameters are more tricky.
What is the correct code definition?
The code for ARM parameters and Logic App (workflow) parameters is the same, but Variables are different, such as defining the Logic App’s initial state.
Does it already exist? And so on.
These are basically the reasons I decided, with the help of my team at DevScope, to create the Logic App Consumption Copilot tool. This is a .NET Windows application assistant named Copilot, designed to enhance productivity for developers who frequently create Logic Apps Consumptions. This tool can help automate routine tasks such as creating new ARM or Logic App (workflow) parameters, setting ARM parameters for CI/CD and Visual Studio deployment, and many more.
On this first version, Logic App Consumption Copilot has the following capabilities:
Create new ARM parameters and automatically propagate them to the following files:
LogicApp.parameters.json (for Visual Studio Deployment).
LogicApp.parameters.template.json (for CI/CD).
Enforce ARM parameters naming convention.
Create new Logic App (workflow) parameters in a specific Logic App.
Add new black Logic Apps or a new Logic App based on an existing template.
Enforce Logic App (workflow) naming convention.
Search inside the ARM template definition.
Define the Initial Status of a Logic App.
What’s next?
We just released V1, but we are already working on the next version of the tool, and these are the items already on the backlog:
Adjust some UI functionalities.
Edit values in a better way.
Add Logic App (workflow) parameters referring to ARM parameters.
Improve the Logic App Initial Status functionality.
Please go ahead and provide us feedback or submit a GitHub change request.
Download
You can download the Logic App Consumption Copilot tool from GitHub here:
If you liked the content or found it helpful and want to help me write more content, you can buy (or help buy) my son a Star Wars Lego!
Author: Sandro Pereira
Sandro Pereira lives in Portugal and works as a consultant at DevScope. In the past years, he has been working on implementing Integration scenarios both on-premises and cloud for various clients, each with different scenarios from a technical point of view, size, and criticality, using Microsoft Azure, Microsoft BizTalk Server and different technologies like AS2, EDI, RosettaNet, SAP, TIBCO etc.
He is a regular blogger, international speaker, and technical reviewer of several BizTalk books all focused on Integration. He is also the author of the book “BizTalk Mapping Patterns & Best Practices”. He has been awarded MVP since 2011 for his contributions to the integration community.
View all posts by Sandro Pereira
CONNECTED Conference 2023 (formerly called Microsoft Integrate Conference DACH) is one of the most important events on Microsoft Integration in German-speaking countries. I’m honored to be invited again to this event.
As always, I’m super excited about presenting at this event alongside great speakers and well-known Microsoft names like Harold Campos and Kent Weare and my long-time friends Nino Crudele and Matthias Lögdberg.
This will be a two-day virtual event, and I will be there on the second day to present a session about API Management. The title of my session will be API Management: Best Practices, Tips and Tricks.
API Management: Best Practices, Tips and Tricks.
As I mentioned before, my session will be all about best practices and small tips and tricks that we can apply to our Azure Integration projects. For those reasons, I would like to invite you to join me at the CONNECTED Conference 2023 virtual event tomorrow, November 15, 2023.
Session name: API Management: Best Practices, Tips and Tricks.
Abstract:
Unleash the full potential of Azure API Management with this session focused on efficient integration building. Discover tips and tricks that empower developers to be more productive while adhering to best practices, resulting in reliable and effective integrations.
Join us and reserve your presence at the CONNECTED Connected 2023 virtual event!
Author: Sandro Pereira
Sandro Pereira lives in Portugal and works as a consultant at DevScope. In the past years, he has been working on implementing Integration scenarios both on-premises and cloud for various clients, each with different scenarios from a technical point of view, size, and criticality, using Microsoft Azure, Microsoft BizTalk Server and different technologies like AS2, EDI, RosettaNet, SAP, TIBCO etc.
He is a regular blogger, international speaker, and technical reviewer of several BizTalk books all focused on Integration. He is also the author of the book “BizTalk Mapping Patterns & Best Practices”. He has been awarded MVP since 2011 for his contributions to the integration community.
View all posts by Sandro Pereira
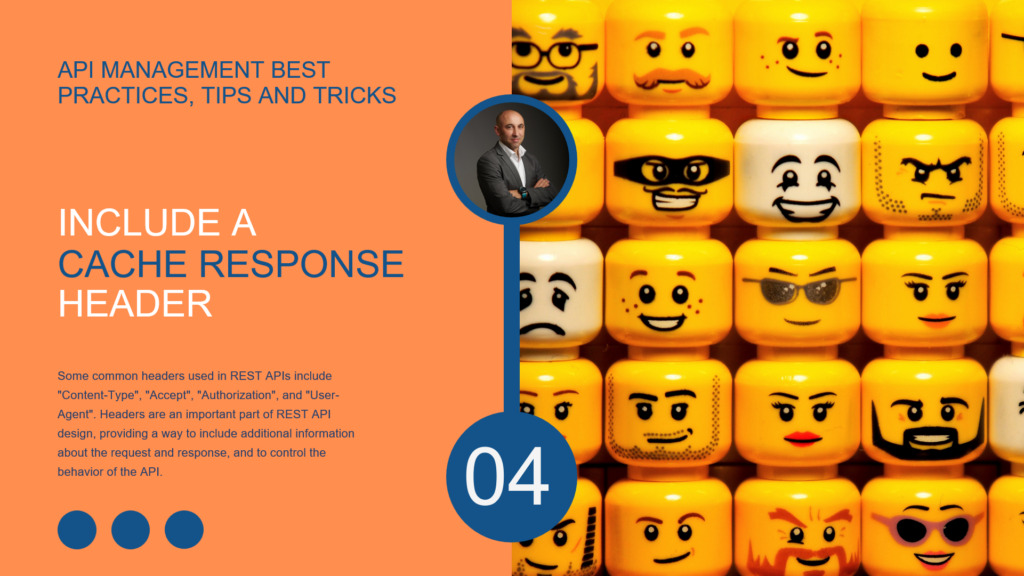
Here we are, ready for another edition of API Management Best Practices, Tips, and Tricks. Until now, I have been addressing some tips to apply to your Azure API Management policies. However, today I will address a good Best practice that you must consider while implementing cache on your operations: Including a Cache Response Header on your API responses.
#2 Include a Cache Response Header
In my previous article, I briefly mentioned this topic, but I think it should have its own individual highlight. Headers are an essential part of REST API design, providing a way to include additional information about the request and response. They are a key peace to allow us to control the behavior of the API. Some typical headers used in REST APIs include Content-Type, Accept, Authorization, and User-Agent.
One good best practice while applying cache responses on our APIs – which has the advantage of significantly reducing latency for API callers – is to inform API users when they are receiving a cached response or not. This way, users or systems know if they are working with live-fresh data or not, and provide actions according. Sometimes we cannot rely on a cached version of the resource, sometimes it doesn’t matter. However, by having this strategy, you will be enriching and improving your APIs.
And once again, this is quite simple to accomplish:
I hope you enjoy this tip and stay tuned for the following Azure API Management Best practices, Tips, and Tricks.
If you liked the content or found it helpful and want to help me write more content, you can buy (or help buy) my son a Star Wars Lego!
Author: Sandro Pereira
Sandro Pereira lives in Portugal and works as a consultant at DevScope. In the past years, he has been working on implementing Integration scenarios both on-premises and cloud for various clients, each with different scenarios from a technical point of view, size, and criticality, using Microsoft Azure, Microsoft BizTalk Server and different technologies like AS2, EDI, RosettaNet, SAP, TIBCO etc.
He is a regular blogger, international speaker, and technical reviewer of several BizTalk books all focused on Integration. He is also the author of the book “BizTalk Mapping Patterns & Best Practices”. He has been awarded MVP since 2011 for his contributions to the integration community.
View all posts by Sandro Pereira
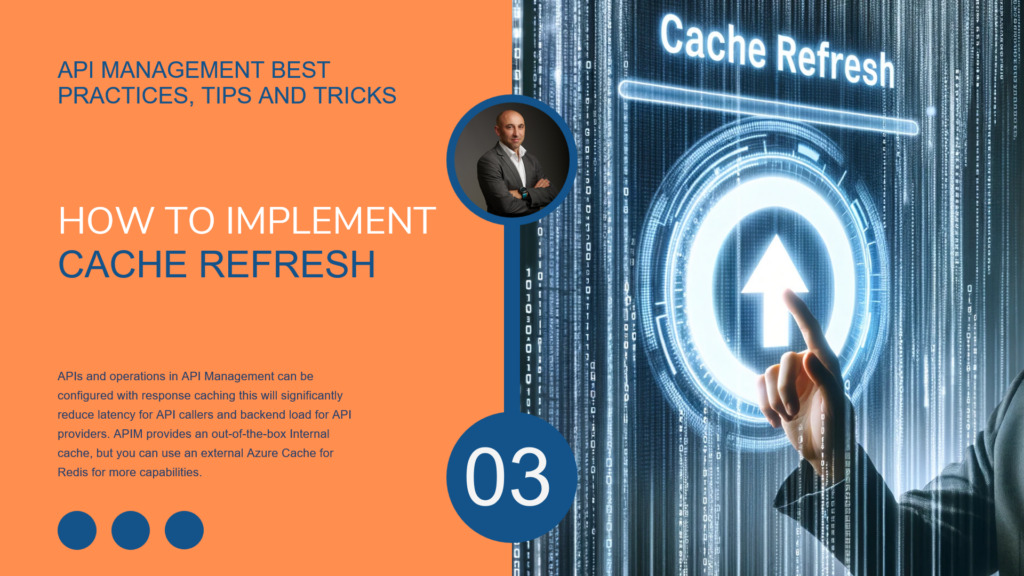
Here we are, ready for another edition of API Management Best Practices, Tips, and Tricks.Today, we will address another helpful Best practice, Tips, and Tricks that you must consider while implementing your API policies: How to implement a cache refresh policy.
#2 How to implement a cache refresh policy?
As Microsoft documentation references, APIs and operations in API Management (APIM) can be configured with response caching. Response caching can significantly reduce latency for API callers and backend load for API providers. APIM provides an out-of-the-box Internal cache, but this built-in cache is volatile and is shared by all units in the same region in the same API Management service. However, if you desire more robustness and additional capabilities, you can use an external Azure Cache for Redis, for example.
An excellent example of using cache capabilities is to store access tokens. Usually, API tokens have a “time-to-live” (TTL), which is the maximum time that the access token will be valid for use within the application. That means we don’t need to regenerate a token each time we call our API. Instead, we can cache that value in APIM, specifying the cache duration.
When working with cache inside APIM, there are at least two policies you need to know:
cache-store-value: The cache-store-value performs cache storage by key. The key can have an arbitrary string value and is typically provided using a policy expression.
cache-lookup-value: Use the cache-lookup-value policy to perform cache lookup by key and return a cached value. The key can have an arbitrary string value and is typically provided using a policy expression.
cache-store-value
Policy statement:
This is a practical sample of this policy:
cache-lookup-value
Policy statement:
This is a practical sample of this policy:
Cache is quite simple to implement and use inside APIM. However, and this is the reason for this blog post, in many situations, we have the need to refresh or force a refresh on our cache or in our cache value. Let’s say that while developing our operation policy, we made a mistake, like caching an incorrect value or setting the duration incorrectly. Now we need to refresh the value that is cached, but we don’t want to wait for the cache duration to expire – that can be 30 min – or modify the operation policy to add a cache removed statement and then modify that policy again to remove that “workaround”.
So, how can we easily handle these requirements or capabilities?
Well, the best way is to always address this requirement by design and implement a cache refresh mechanism.
Taking the token example, this can easily be implemented by:
Adding an optional header on your API methods, let’s say:
skip-cache header that “allows” a true or false value
If it is true, you need to force to refresh the value that is cached.
Otherwise – if the value is false – you use the cached value.
In the inbound policy of your operation, add the following statements:
Read the value of the skip-cache header. If it doesn’t exist, the default value is false.
Check if the skip-cache header value is false:
If the condition is true:
Try to read the value from the cache:
If it is present in the cache, return the cached value.
If it is not present, call the token renewal API.
Otherwise, perform a call to the token renewal API.
							application/json


							true

						@((string)context.Variables["varTokenValue"])


    ... implement the call to the token renewal API
Note: It is a good practice to add a response header stating the response is cached.
In the outbound policy of your operation, add the following statements:
I hope you enjoy this tip and stay tuned for the following Azure API Management Best practices, Tips, and Tricks.
If you liked the content or found it helpful and want to help me write more content, you can buy (or help buy) my son a Star Wars Lego!
Author: Sandro Pereira
Sandro Pereira lives in Portugal and works as a consultant at DevScope. In the past years, he has been working on implementing Integration scenarios both on-premises and cloud for various clients, each with different scenarios from a technical point of view, size, and criticality, using Microsoft Azure, Microsoft BizTalk Server and different technologies like AS2, EDI, RosettaNet, SAP, TIBCO etc.
He is a regular blogger, international speaker, and technical reviewer of several BizTalk books all focused on Integration. He is also the author of the book “BizTalk Mapping Patterns & Best Practices”. He has been awarded MVP since 2011 for his contributions to the integration community.
View all posts by Sandro Pereira