In my last blog post – Logic Apps and DocuSign integration – I explain how you can create and dynamically populate a contract using an HTTP input and then use the DocuSign connector to complete the workflow! Today we are going to see another DocuSign integration capability.
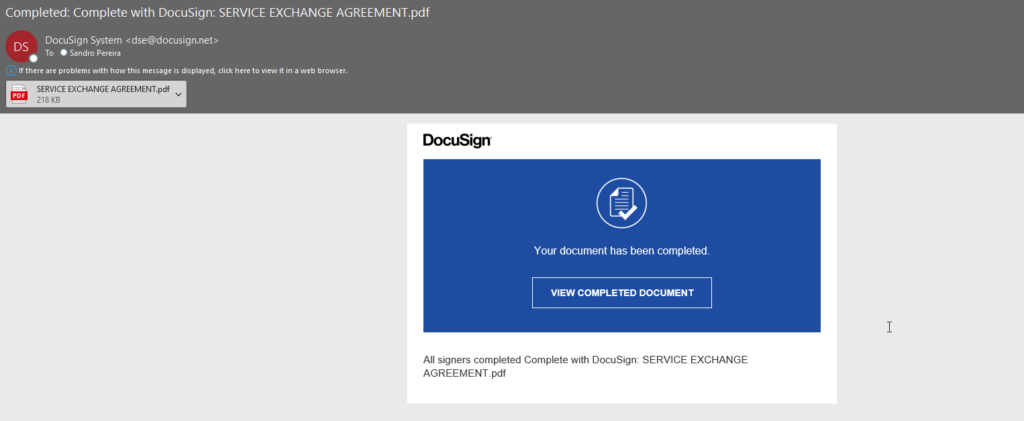
By default, and as I mentioned in my last post, once the document is completed and signed by both parties, all participants will receive an email informing them that All signers completed Complete with DocuSign and with an available link for them to access and view the document.
However, the signed document will live and will be available on the DocuSign platform, which is probably not ideal, typically, we would like to store it internally, if it is personal, in our local drive or dropbox, in an organization inside SharePoint or CRM for example.
So, the main questions are: Is it possible to automate this part of the process? and if yes, how?
And yes, it is possible, and this is what we will address in this blog post! For simplicity, we will be using Dropbox as our archive system.
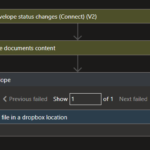
Before we start to explain all the steps you need to do to implement this logic, let me tell you that what you usually expect to see in the Logic App workflow will be typically like this:
Where the:
Logic App will be triggered once the status of the envelope change to Completed.
From there, we will make an additional call to Get the envelope documents’ content.
And then create a file on Dropbox.
That will create a for each action since the structure of the response is an array despite only containing one row.
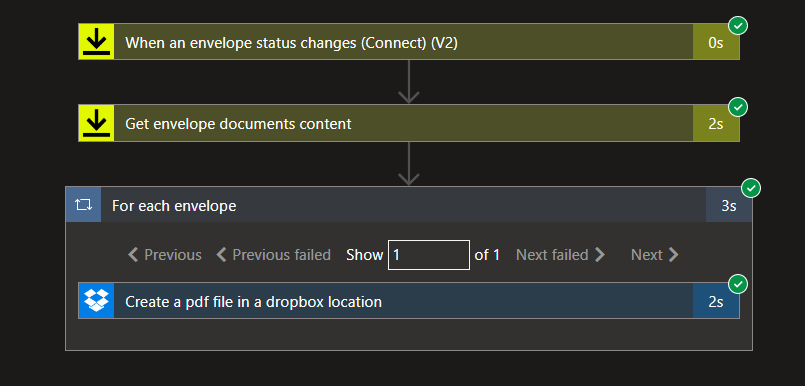
I don’t like this approach for several reasons:
We are making an unnecessary external call to DocuSign – the Get envelope documents content call.
It is less performant. The processing time of the Logic App can go from 3 to 5 seconds:
We can do way better! and do the same in less than 2 seconds. So here we are going to explain the “intermedium” approach. For simplicity, I won’t implement the “advanced” approach that only contains two actions!
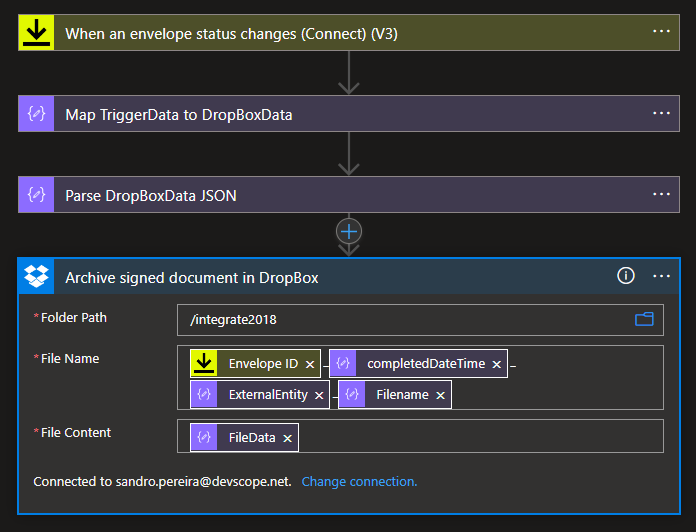
So, to archive a signed document, what we need to do is:
Create a new Logic App, let’s call it: LA-ProcessDocuSignSignedDocuments-POC.
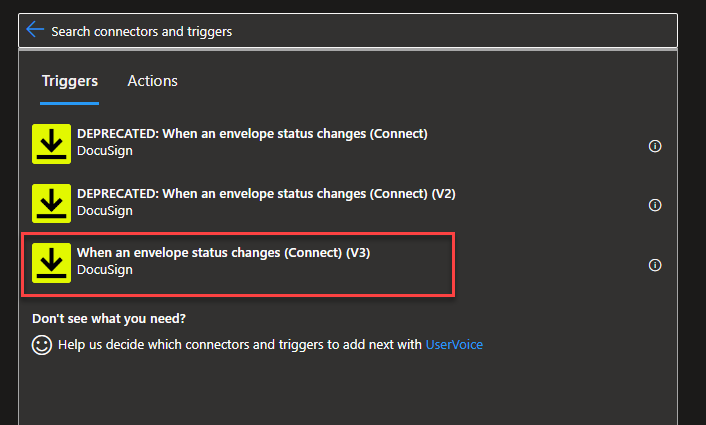
On the Search connectors and triggers box, type DocuSign, select the DocuSign connector, and then select the When an envelope status changes (Connect) (V3) trigger.
On the When an envelope status changes (Connect) (V3) trigger, we need to:
On the Account property from the combo box, select the account to use.
On the Connect name property, type a name that correctly describes your connector, for example, Process Document Signed.
On the Envelope Status property from the combo box, select the envelope-completed option.
Note: if you use V2 of this action, the Envelope event property value will be Completed and not envelope-completed.
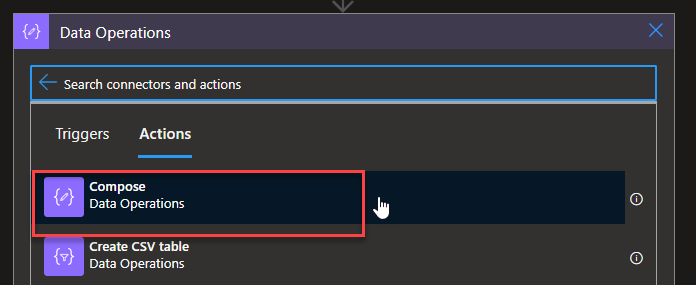
Click on + New step to add a new action. From the search textbox, type Data Operations and then select Data Operations – Compose action.
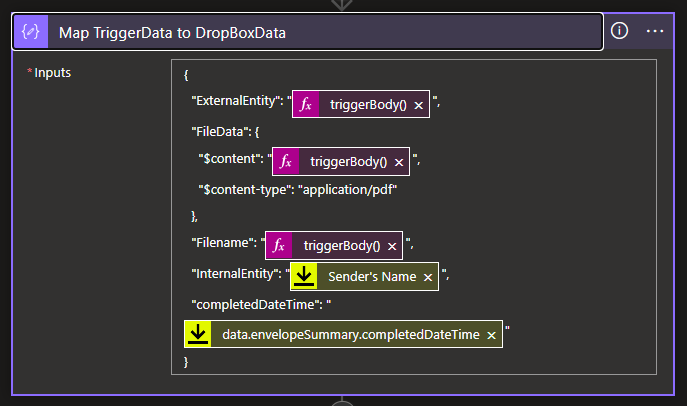
On the Compose action, we need to add the following input value:
Here, we are extracting only the necessary pieces of information that the trigger will provide to us and creating a simple JSON message with all the information we will need to create the file in our Dropbox according to the rules we specify. For example:
The expression triggerBody()?[‘data’]?[‘envelopeSummary’]?[‘recipients’]?[‘signers’][0]?[‘name’] will contain the name external entity/person that signed the document.
The expression triggerBody()?[‘data’]?[‘envelopeSummary’]?[‘sender’]?[‘userName’] will contain the name internal entity/person that signed the document – in this sample, my name.
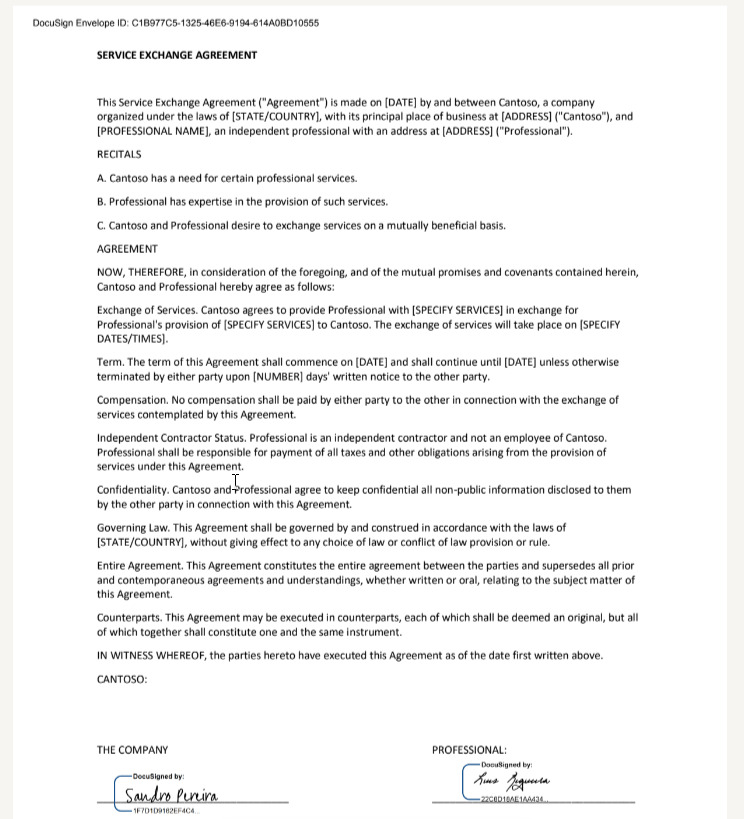
The expression triggerBody()?[‘data’]?[‘envelopeSummary’]?[‘envelopeDocuments’][0]?[‘name’] will contain the original name of the file we add on DocuSign – in our case, SERVICE EXCHANGE AGREEMENT.pdf.
The tricky part was the File data to be added to the Dropbox. If we send only the bytes that are available on the PDFBytes property, a file will be created on our Dropbox, but it will be corrupted, and we cannot open it. So we need to create a structure with content type and content information.
Now, continue our Logic App workflow. Let us:
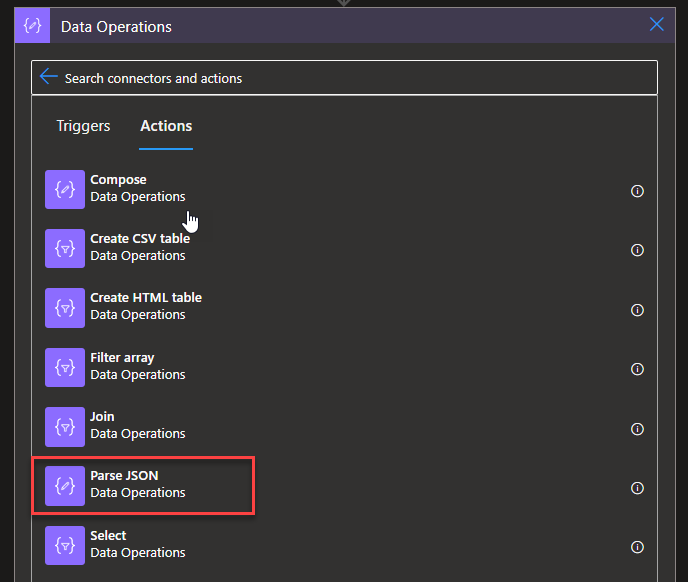
Click on + New step to add a new action. From the search textbox, type Data Operations and then select Data Operations – Parse JSON action.
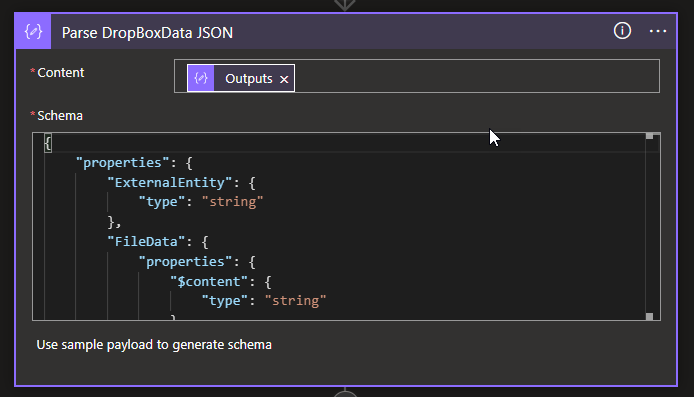
On the Parse JSON action, we need to:
On the Content property, set the value to the Output property of the previous Compose action, in our case, the Map TriggerData to DropBoxData.
Note: This will tokenize the properties of the JSON message we created earlier, and that will allow us to easily used them in the following action.
Note: these two actions, the Compose, and the Parse JSON, are optional. We could not use them and configure all the properties of the next action with expressions – this will be the “advanced” approach!
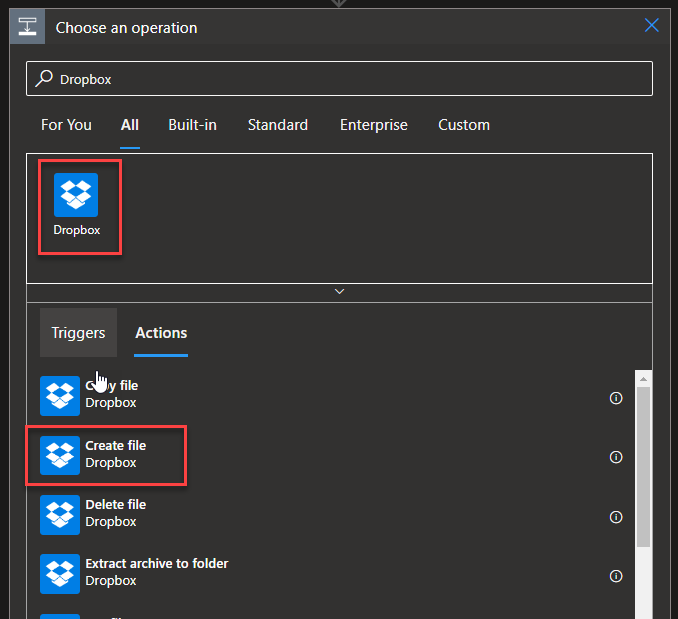
Click on + New step to add a new action. From the search textbox, type DropBox and then select Dropbox – Create file action.
On the Create file action, we need to:
On the Folder Path property, define the path inside dropbox to where to store the file.
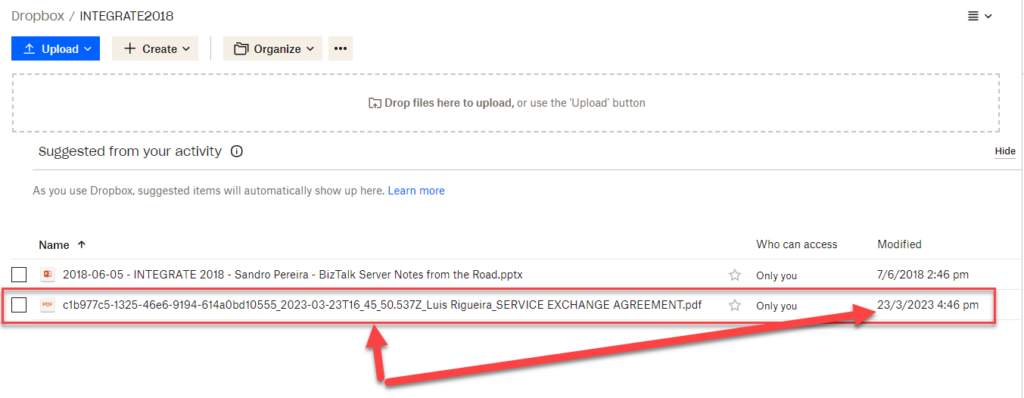
On the File Name property, we want the file to have the following naming convention:
___
So for that, we need to define this property with the following expression:
On the File Content property, set the value to the FileData property of the previous Parse JSON action, in our case, the Parse DropBoxData JSON.
Finally, save your Logic App.
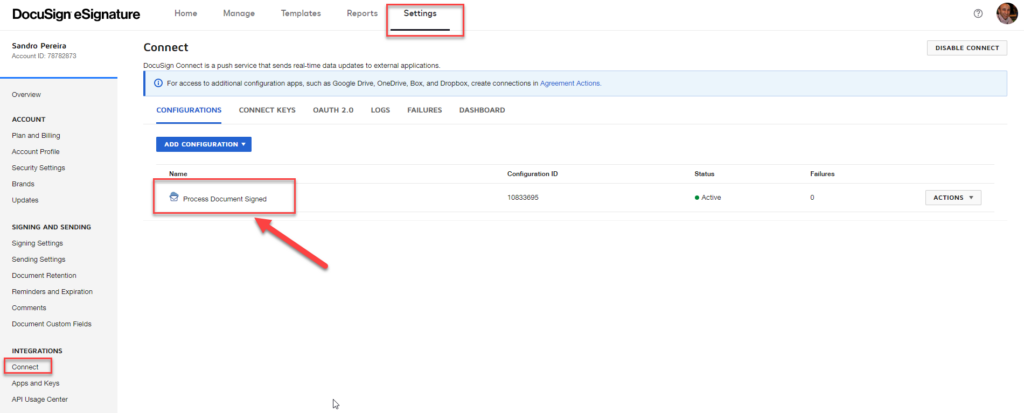
By clicking saving, this will also create in DocuSign platform a Connect configuration with the name you used on the trigger, in our example, Process Document Signed. You can see this by:
On the top menu, select Settings. From there, in the left tree, select the Connect option under Integrations.
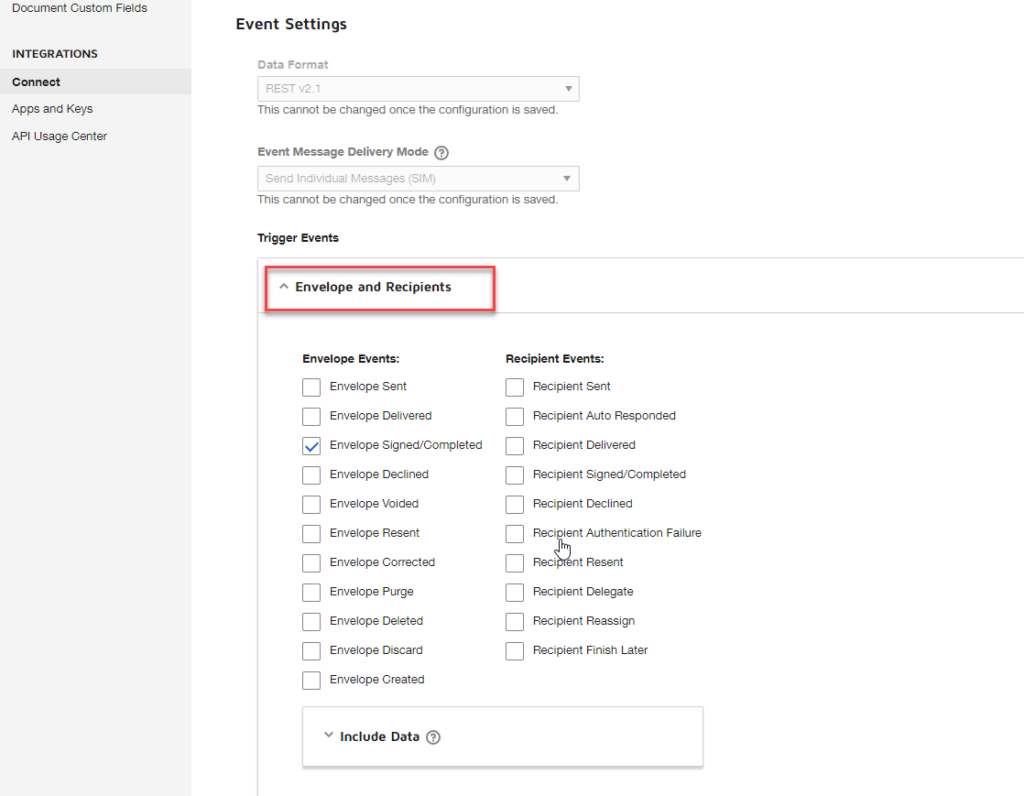
Now, for these “intermedium” and “advanced” approach to work we need to do a small trick on the connection inside DocuSign. To do that, we need to:
Select the Process Document Signed connection.
On the Edit Custom Configuration page, scroll down to the option Trigger Events under Event Settings, and expand the Envelope and Recipients panel.
And then expand the Include Data panel and make sure you select the following options:
Custom Fields
Documents
Extensions (optional)
Recipients
Tabs (optional)
Click Save Configuration in the top right corner on the Edit Custom Configuration page
Now to test it, we need to start by executing the Logic App we create yesterday, in order to generate a new document (aka envelope) to be signed.
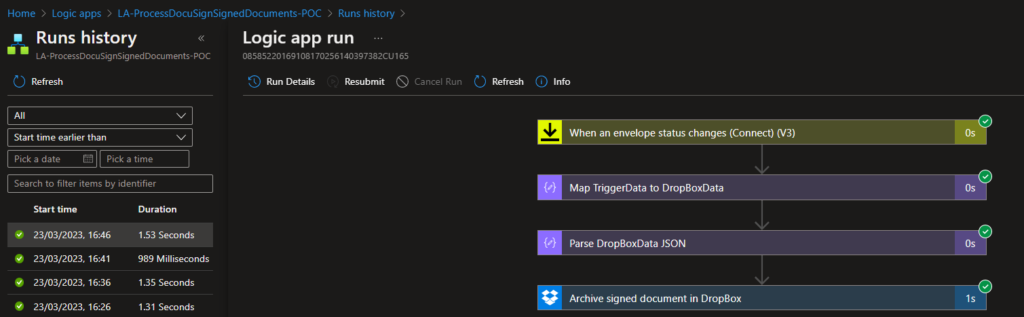
Once both parties sign the document, our Logic App will be triggered:
And a file will be added in our Dropbox:
And, to be sure, if you click on it, you will the the document signed by Luis and me.
Now, have you notice on the picture above the execution time of this approach? All of them in less than a 2 seconds!
Credits
Once again, a big thanks to my team member Luis Rigueira for participating in this proof-of-concept!
Hope you find this helpful! So, if you liked the content or found it helpful and want to help me write more content, you can buy (or help buy) my son a Star Wars Lego!
Author: Sandro Pereira
Sandro Pereira lives in Portugal and works as a consultant at DevScope. In the past years, he has been working on implementing Integration scenarios both on-premises and cloud for various clients, each with different scenarios from a technical point of view, size, and criticality, using Microsoft Azure, Microsoft BizTalk Server and different technologies like AS2, EDI, RosettaNet, SAP, TIBCO etc.
He is a regular blogger, international speaker, and technical reviewer of several BizTalk books all focused on Integration. He is also the author of the book “BizTalk Mapping Patterns & Best Practices”. He has been awarded MVP since 2011 for his contributions to the integration community.
View all posts by Sandro Pereira
I’ve been wanting to explore the integration capabilities with DocuSign for some time now, but for some reason, I kept putting it off. Or because I didn’t have free time available or because I was doing other stuff. Until now!
And one of the reasons why I want to explore these capabilities is the fact nowadays, we have people entering at DevScope from all over the place, and we do follow a welcome process where they need to sign some documents like work conduct or work ethic, reception manual and so on. Do these need to be manually signed these days? That means that new remote employees need to print the papers, sign, scan, and send them back? Is there a better way?
But first, what is DocuSign? And how can we use it?
DocuSign is a cloud-based electronic signature platform that allows users to sign, send, and manage electronic documents securely. It is a software service that enables users to sign documents electronically and send them for signature to others quickly and efficiently. The platform is designed to be easy to use and accessible from anywhere, on any device.
DocuSign is used by individuals, businesses, and organizations of all sizes across many industries, including finance, real estate, healthcare, and more. The platform streamlines the document signing process and eliminates the need for physical documents and manual signatures, which can be time-consuming and costly. It also offers additional features like document storage, workflow automation, and advanced analytics. Overall, DocuSign helps to simplify the document signing process, increase efficiency, and reduce costs.
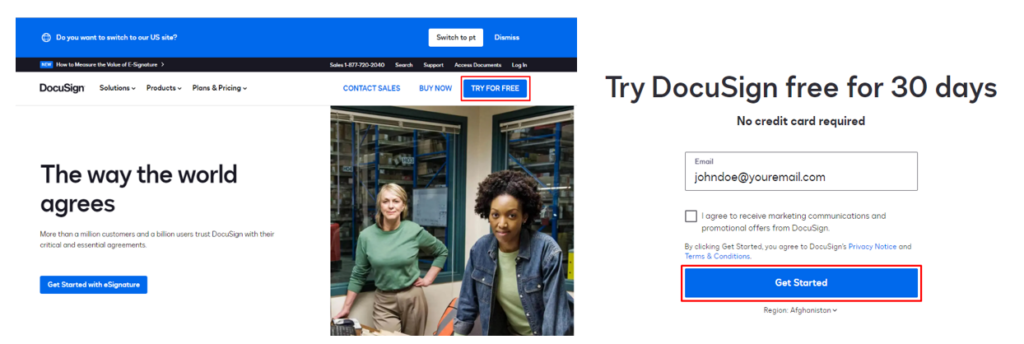
So, what we need to do first is to create a 30-day free account (No credit card required) on DocuSign and understand how DocuSign works.
And then, you just need to follow the steps and create your name and your password.
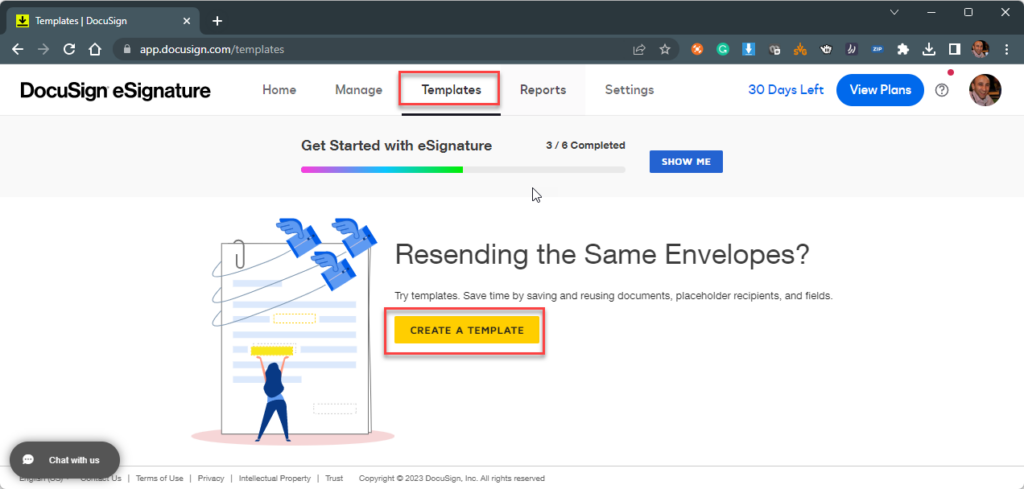
The second thing we will do is create a document template. For that, we need to:
On the top menu, click on the Templates option and then click Create a template.
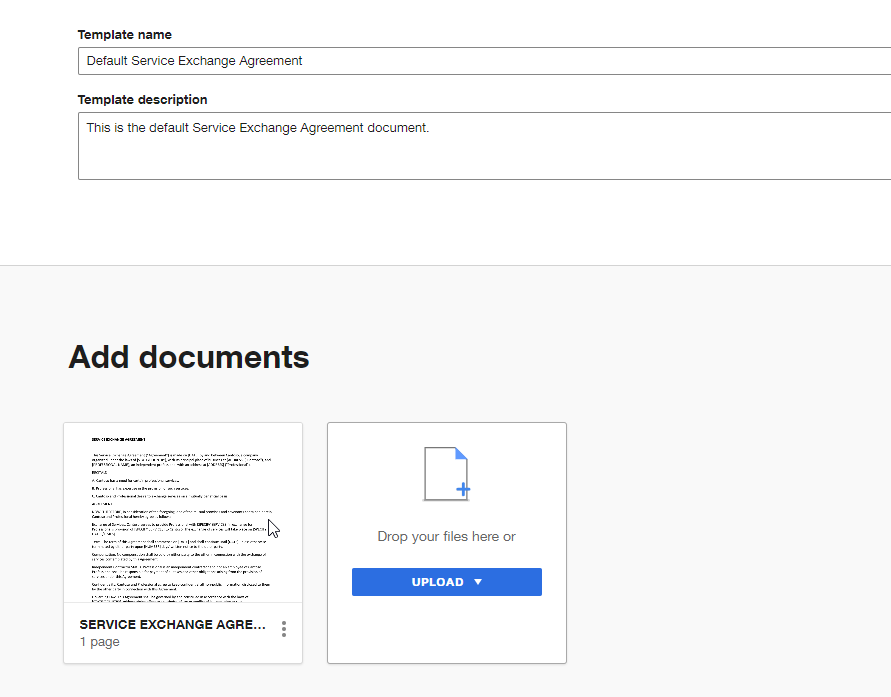
On the Create a template page, we need to:
On the Template name option, provide a name to your template, for example, Default Service Exchange Agreement.
On the Template description option, provide a short description of your document template.
On the Add documents, select Upload or drag and drop the document to that area.
Click Save and Close.
So knowing this, let’s proceed to the Logic App, and here we will be creating a Logic App Consumption with the name LA-SendEmailToSignWithDocuSign-POC. To simplify the process I’m going to abstract the source system or application that will trigger the Logic App to send the document to be signed. That could be anything, but in our case, we will be using a Request – When a HTTP request is received trigger. To do that, we need to:
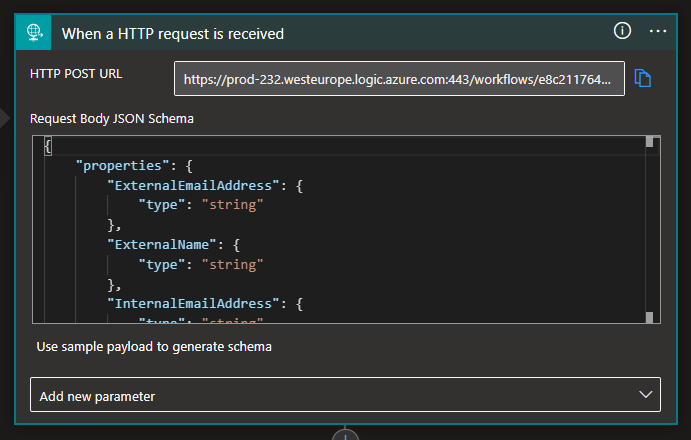
On the Search connectors and triggers box, select the Built-in and then Request connector, and then the When a HTTP request is received trigger.
On the When a HTTP request is received trigger, provide the following Body JSON Schema.
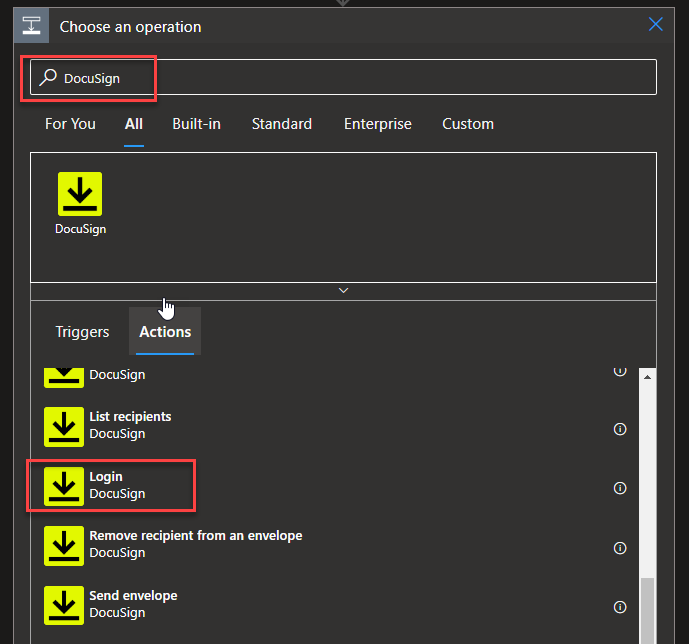
Click on + New step to add a new action. From the search textbox, type DocuSign and then select DocuSign – Logic action.
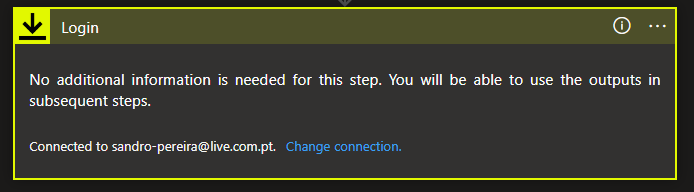
The first action we need to take is to Sign in with the account we create earlier in this tutorial.
Once you sign in, we need to Click on + New step to add a new action. From the search textbox, type DocuSign and then select DocuSign – Create envelope using Template action.
Note: In DocuSign, an “envelope” refers to a single package of one or more documents that are sent for signature to one or more recipients. It is the equivalent of a physical envelope that contains all the necessary documents for signature.
On the Create envelope using Template action, we need to:
On the Account property from the combo box, select the account to use.
On the Account property from the combo box, select the account to use, in our case, Default Service Exchange Agreement.
On the Envelope Status property from the combo box, select the Created option.
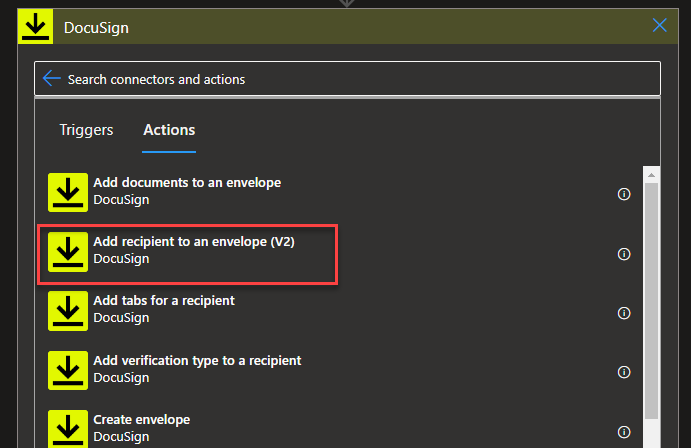
Click on + New step to add a new action. From the search textbox, type DocuSign and then select DocuSign – Add recipient to an envelope (V2) action.
On the Add recipient to an envelope (V2) action, we need to:
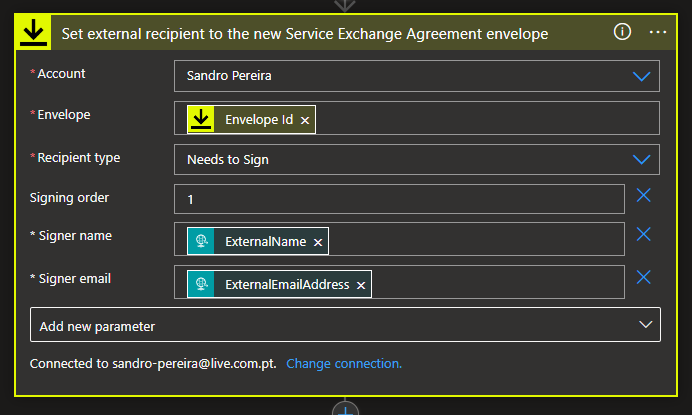
On the Account property from the combo box, select the account to use.
On the Envelope property, select the value to be the Envelope Id from the Create envelope using Template action.
On the Recipient type property from the combo box, select the Needs to Sign option.
Type Add new parameter and select the Signer name, Signer email, and Signing order properties.
On the Signing order property, type 1.
On the Siginer name property, select the value to be the ExternalName from the When a HTTP request is received trigger.
On the Siginer email property, select the value to be the ExternalEmailAddress from the When a HTTP request is received trigger.
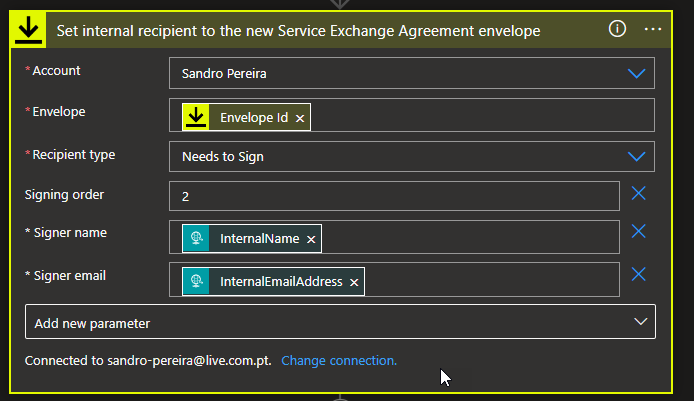
Add the same action once again, but this time with the following configurations:
On the Account property from the combo box, select the account to use.
On the Envelope property, select the value to be the Envelope Id from the Create envelope using Template action.
On the Recipient type property from the combo box, select the Needs to Sign option.
Type Add new parameter and select the Signer name, Signer email, and Signing order properties.
On the Signing order property, type 2.
On the Siginer name property, select the value to be the InternallName from the When a HTTP request is received trigger.
On the Siginer email property, select the value to be the InternalEmailAddress from the When a HTTP request is received trigger.
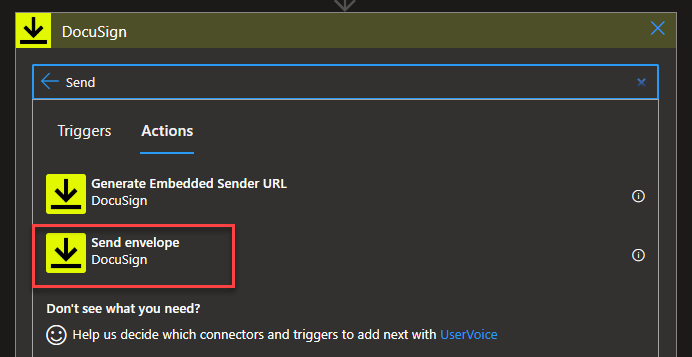
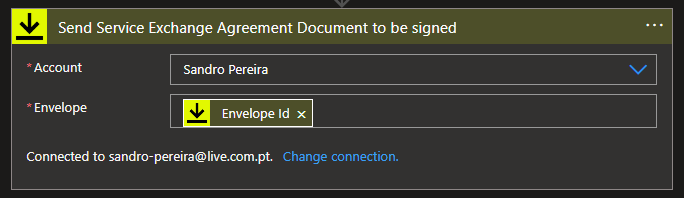
To finalize, we need to click on + New step to add a new action. From the search textbox, type DocuSign and then select DocuSign – Send envelope action.
On the Send envelope action, we need to:
On the Account property from the combo box, select the account to use.
On the Envelope property, select the value to be the Envelope Id from the Create envelope using Template action.
And go ahead and Save your workflow.
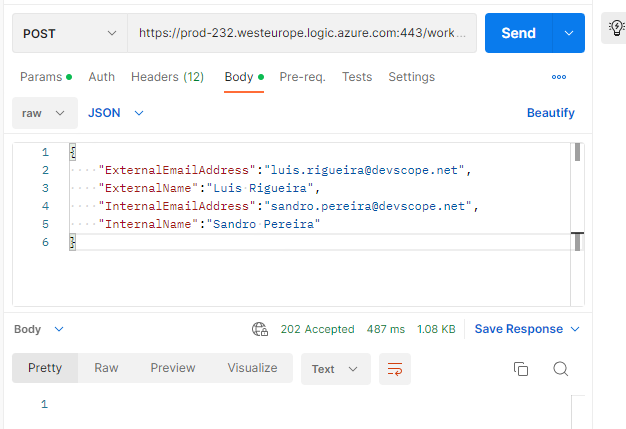
Now if we go ahead and test our Logic App using Postman using the below payload:
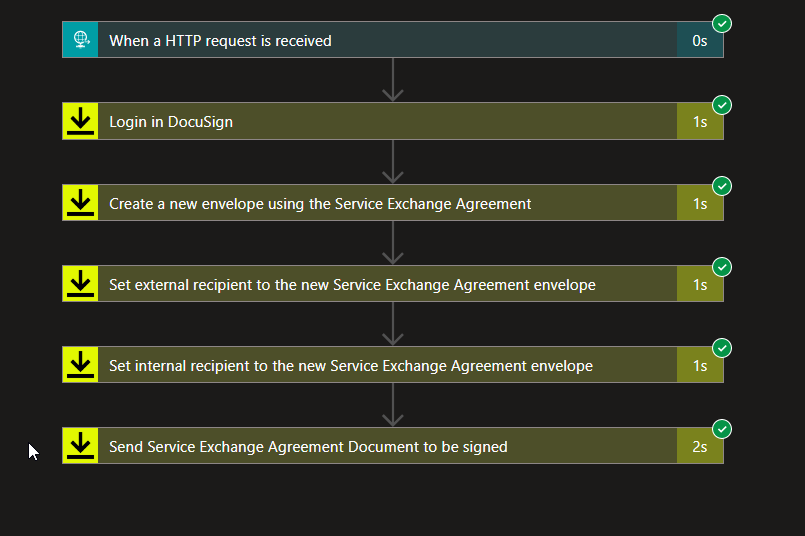
We will see that our Logic App was correctly processed.
That means that:
Luis Rigueira, that is the first recipient, got an email from DocuSign with a document to sign.
And only when Luis signs the document, as a second recipient I receive the email to sign.
Note: I don’t need to implement this logic in my Logic App workflow since DocuSign will handle that internal logic.
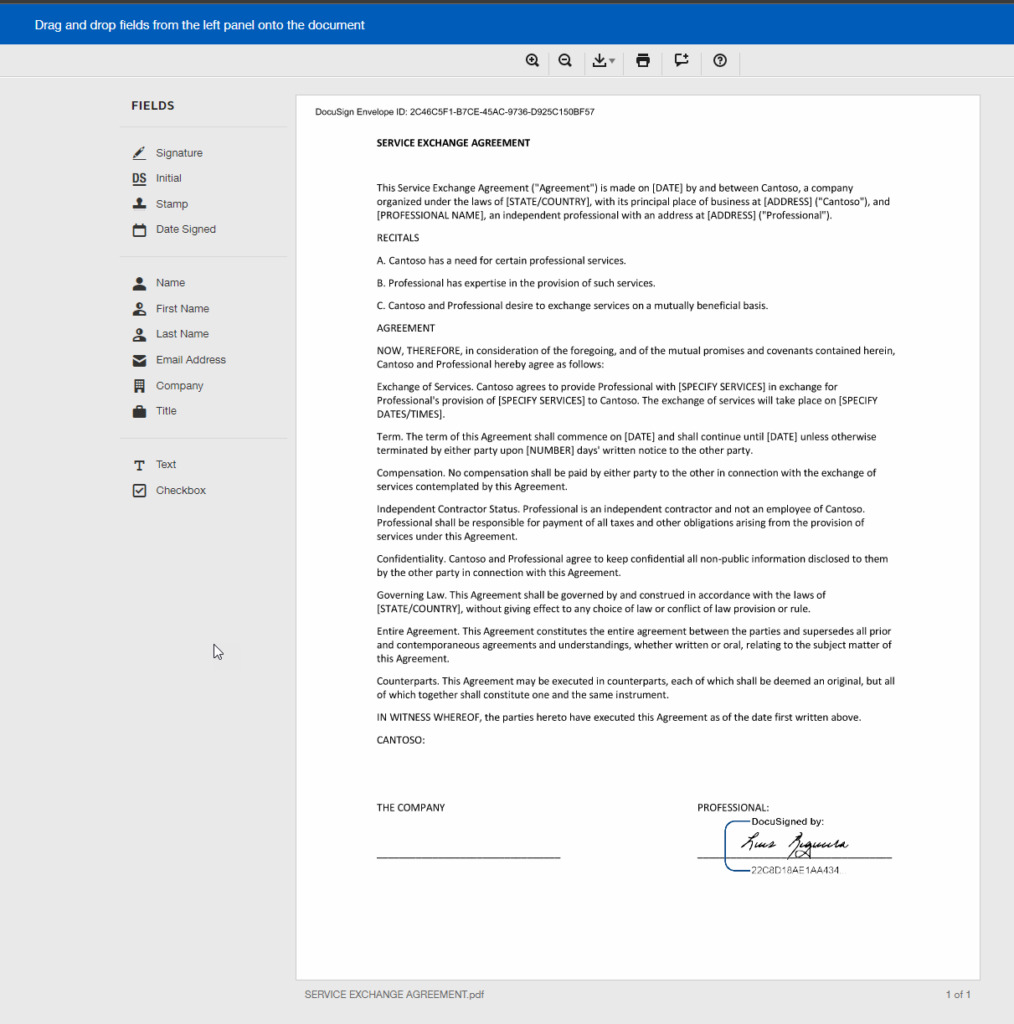
Once both sign, we will also receive an email notification that the document is signed by both parties.
Note: once again, I do not need to implement that logic since DocuSgign will handle that for me.
Let me say, I was surprised by how excellent and efficient DocuSign is! Quite simple to use, and truly a great experience.
Now, this is the part where I need your imagination because here, we probably not using a real-case scenario we are creating a proof of concept. Nevertheless, I think this can indeed be a good approach for real-case implementation! But probably in most cases, this trigger of the Logic App can occur when a user is created on the Active Directory, or in CRM. From a SharePoint list, from an Onboarding application, well, the sky is the limit for your imagination.
Credits
Once again, a big thanks to my team member Luis Rigueira for participating in this proof-of-concept!
Hope you find this helpful! So, if you liked the content or found it helpful and want to help me write more content, you can buy (or help buy) my son a Star Wars Lego!
Author: Sandro Pereira
Sandro Pereira lives in Portugal and works as a consultant at DevScope. In the past years, he has been working on implementing Integration scenarios both on-premises and cloud for various clients, each with different scenarios from a technical point of view, size, and criticality, using Microsoft Azure, Microsoft BizTalk Server and different technologies like AS2, EDI, RosettaNet, SAP, TIBCO etc.
He is a regular blogger, international speaker, and technical reviewer of several BizTalk books all focused on Integration. He is also the author of the book “BizTalk Mapping Patterns & Best Practices”. He has been awarded MVP since 2011 for his contributions to the integration community.
View all posts by Sandro Pereira
Azure REST APIs are service endpoints that support sets of HTTP operations (methods), which provide create, retrieve, update, or delete access to all Azure service’s resources. You may know, and many of you may be familiar with Logic Apps Consumption REST APIs that are very well documented by Microsoft here: Azure Logic Apps.
However, for those who didn’t know about this, I recommend you go there and have a look. You may find them very useful for achieving many things and automating certain tasks. One of these cases is the strategy I documented to get the error message from a particular failure inside Logic App Consumption, where I invoke the Get Workflow Run method to get the run history of a particular run in order to extract the correct error message. You can read more about it here: How to get the Error Message with Logic App Try-Catch (Part II) – Using an Azure Function.
Another great thing about this Microsoft REST APIs documentation is the availability to try them directly from the documentation page. But unfortunately, these REST APIs can be applied only to Logic Apps Consumption. There isn’t any official REST APIs documentation available for Logic Apps Standard, and yes, they are different. A few months ago I decided to start documenting the new Logic Apps Standard REST APIs publishing three blog posts:
But that were only a few parts of the existing RESP APIs.
This whitepaper will give you a detailed understanding of the following:
A short introduction to Logic App Consumption REST APIs.
Comprehensive details about Logic Apps Standard REST APIs:
Workflow operations: For example, it provides operations for creating and managing workflows.
Workflow Runs operations: For example, it provides operations for listing and canceling workflow runs.
Workflow Run Actions operations: For example, it provides operations for lists of workflow run actions.
Workflow Versions operations: For example, it provides operations for lists of workflow versions.
Workflow Triggers operations: For example, it provides operations for listing and running workflow triggers.
Workflow Trigger Histories operations: For example, it provides operations for listening workflow trigger histories.
Logic App operations: For example, it provides that you can apply at the Logic App Standard App level.
App Service Plans: For example, it lists App Service Plan REST APIs operations that are interested in using bind with Logic App Standard.
Where can I download it?
You can download the whitepaper here:
I hope you enjoy reading this paper and any comments or suggestions are welcome.
Big thanks to my team member Luis Rigueira for contributing to this whitepaper as a Co-Author!
Author: Sandro Pereira
Sandro Pereira lives in Portugal and works as a consultant at DevScope. In the past years, he has been working on implementing Integration scenarios both on-premises and cloud for various clients, each with different scenarios from a technical point of view, size, and criticality, using Microsoft Azure, Microsoft BizTalk Server and different technologies like AS2, EDI, RosettaNet, SAP, TIBCO etc.
He is a regular blogger, international speaker, and technical reviewer of several BizTalk books all focused on Integration. He is also the author of the book “BizTalk Mapping Patterns & Best Practices”. He has been awarded MVP since 2011 for his contributions to the integration community.
View all posts by Sandro Pereira
Have you noticed that the default BizTalk Health Monitor Dashboard doesn’t monitor/report the status of the BizTalk Server Host Instances?
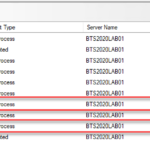
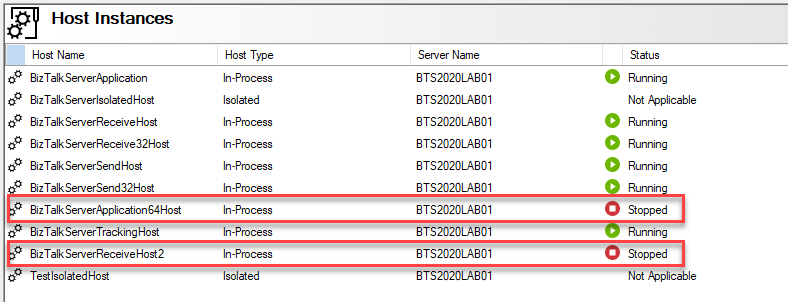
A few weeks ago, while delivering a BizTalk Server training course, I was presenting and playing around with the BizTalk Health Monitor with my “students” and explaining the importance of actively monitoring your BizTalk Server platform. Because my developer environment is a machine that doesn’t have many errors and is properly configured, like a production environment, it is difficult to show the BizTalk Health Monitor presenting problems, so I decided to stop some of the Host Instances! It is an easy way to “emulate” a problem:
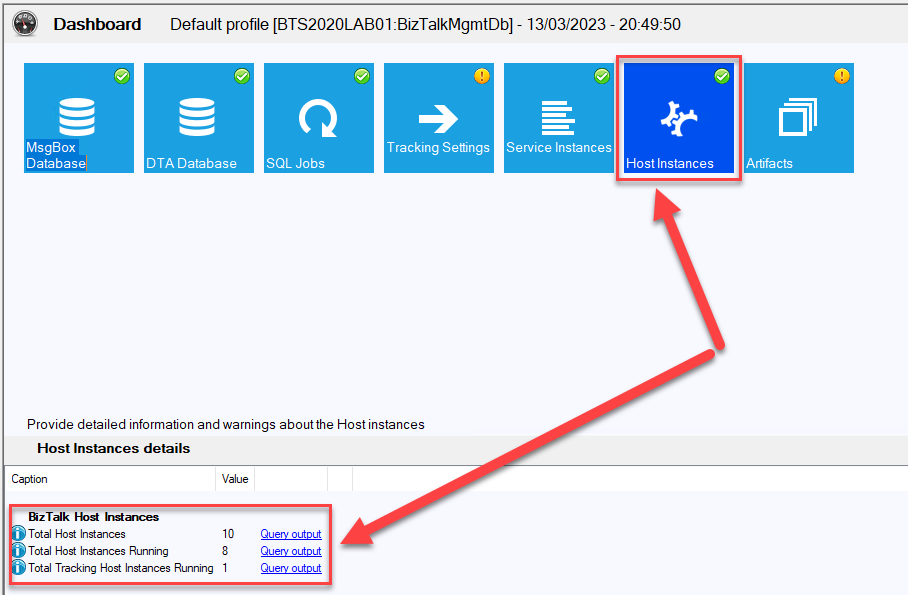
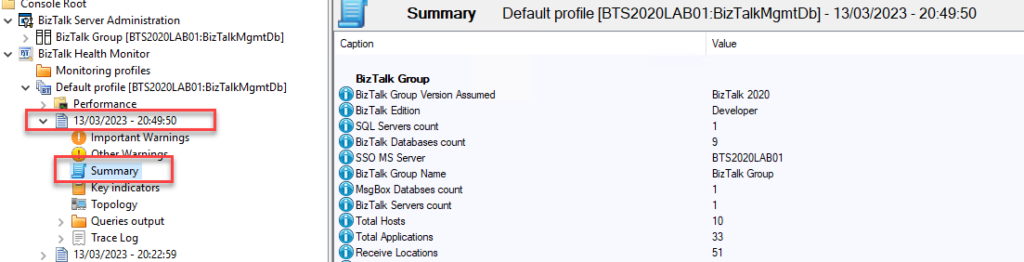
However, when I ran the BizTalk Health Monitor, I realized the Host Instance tile was green!
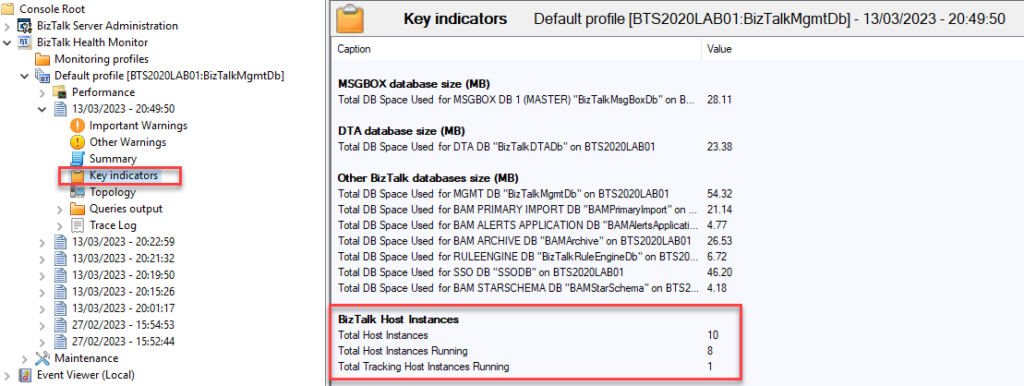
Notice also that the information provided states that I have 10 Host Instances, and only 8 were running. I was surprised by that behavior. I confirmed with the Microsoft Engineering team, and this is not a bug. Actually, by default, the Host Instances dashboard tile is NOT supposed to report a warning if some Host Instances are stopped. this tile reports, in fact, what MSFT has in the category “BizTalk Host Instance” of the KPI view:
Each default Dashboard tile normally reports the content of one or more categories of different views (Warnings, Summary, Key indicators, Queries Output…); However, the choice of content of these tiles cannot be changed by us.
Now the main question is: Can we put the BizTalk Server Health Monitor “watching” the status of the Host Instances and raising some alerts?
Luckily for us, the answer is yes, and it is not that difficult. The tool allows us to:
Add custom rules that will allow us to query the environment.
And add our own custom tiles in our profile Dashboard view.
That also means that each profile can have there own monitoring customizations.
To create some custom rules to monitor the status of the Host Instances, assuming that you have the BizTalk Health monitor tool open, we need to:
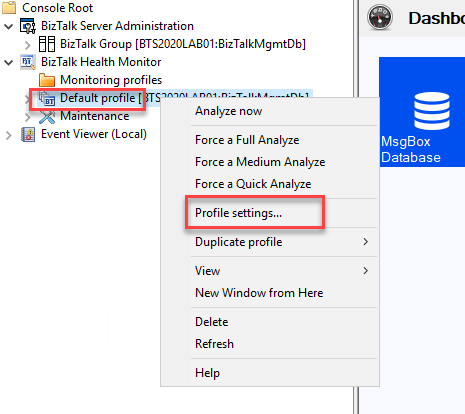
Right-click over the Default profile, and select the Profile settings… option from the context menu.
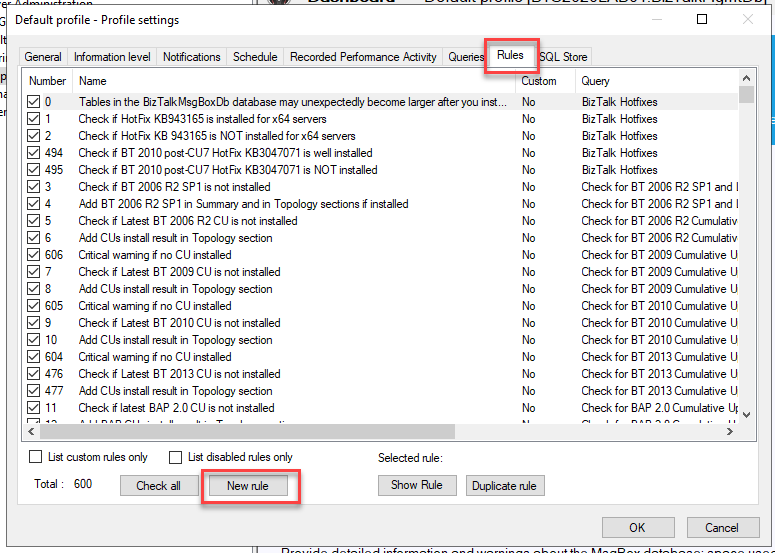
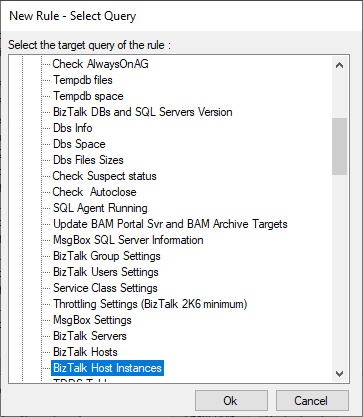
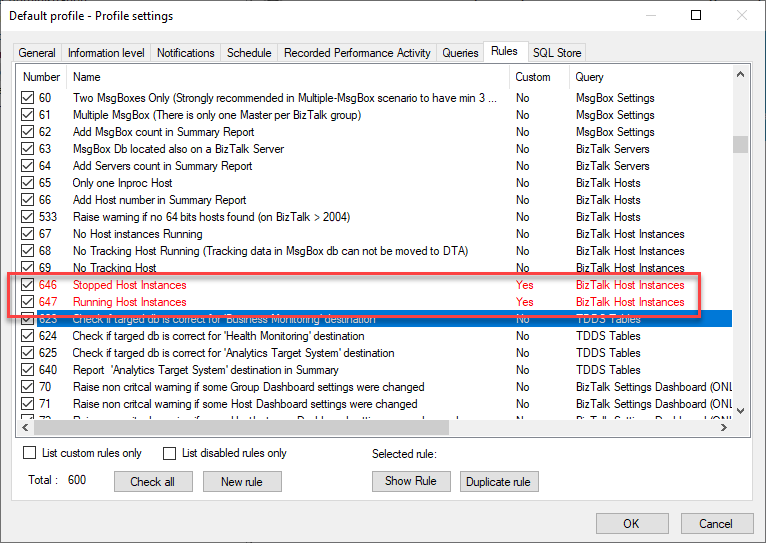
From the Default profile – Profile settings window, select the Rules tab and then click on New rule.
From the New Rule – Select Query window, expand the Important target category, then select the BizTalk Host Instances sub-category, and click Ok.
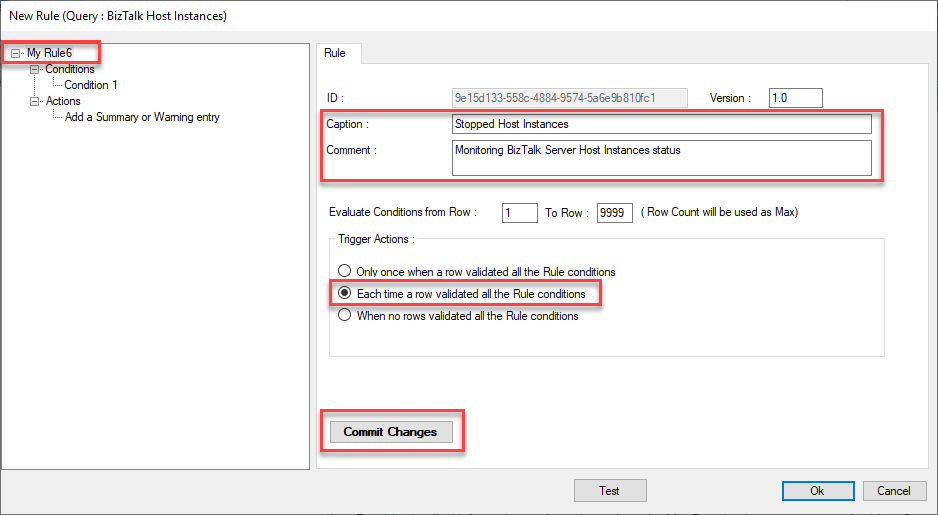
On the New Rule (Query: BizTalk Host Instances) window, select the My Rule option from the left tree and:
On the Caption property, give a name to the rule: Stopped Host Instances.
On the Comment property, provide a small description: Monitoring BizTalk Server Host Instances status.
On the Trigger Actions panel, select the Each time a row validated all the Rule conditions option.
And click Commit changes.
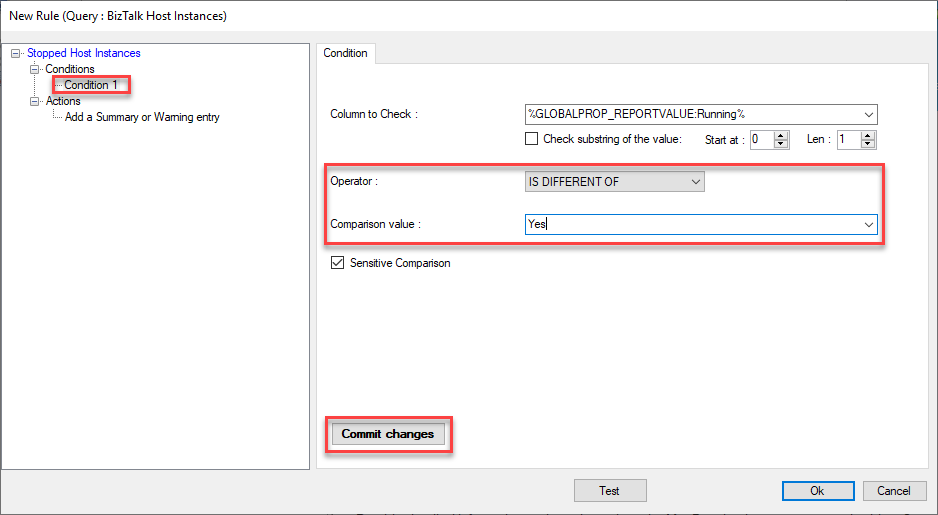
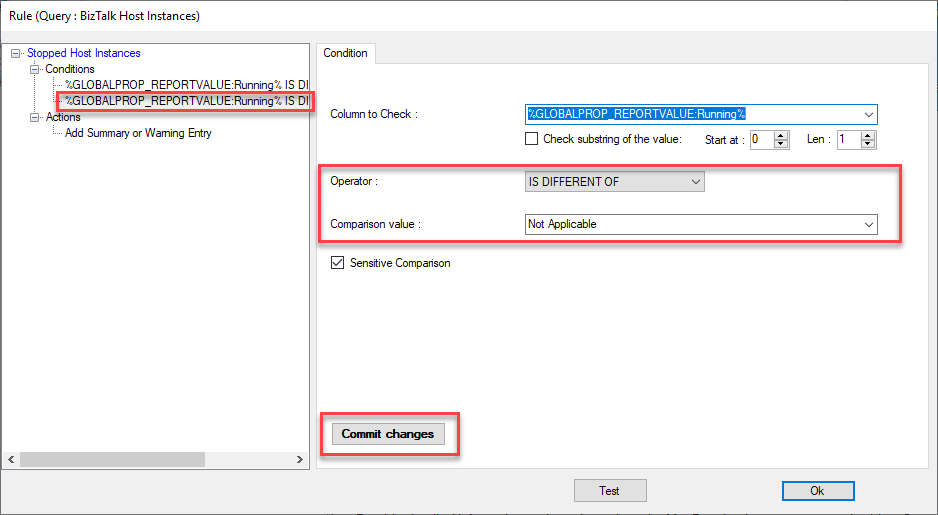
On the New Rule (Query: BizTalk Host Instances) window, select the Condition 1 option from the left tree and:
On the Column to Check property, leave the default value: %GLOBALPROP_REPORTVALUE:Running%.
On the Operator property, from dropbox, select the option: IS DIFFERENT OF.
On the Comparison value property, type Yes.
And click Commit changes.
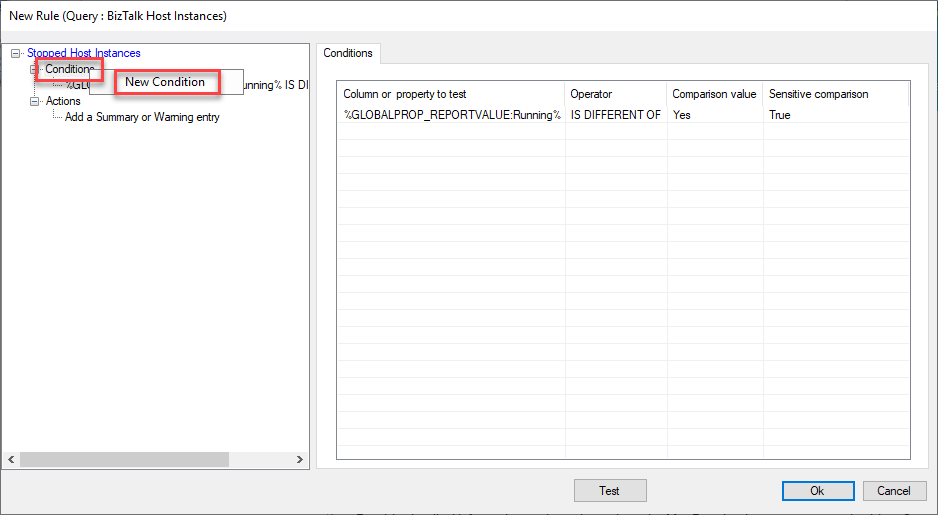
On the New Rule (Query: BizTalk Host Instances) window, on the Condition option from the left tree, right-click and select the option New Condition:
On the New Rule (Query: BizTalk Host Instances) window, select the Condition 2 option from the left tree and:
On the Column to Check property, leave the default value: %GLOBALPROP_REPORTVALUE:Running%.
On the Operator property, from dropbox, select the option: IS DIFFERENT OF.
On the Comparison value property, type Not Applicable.
And click Commit changes.
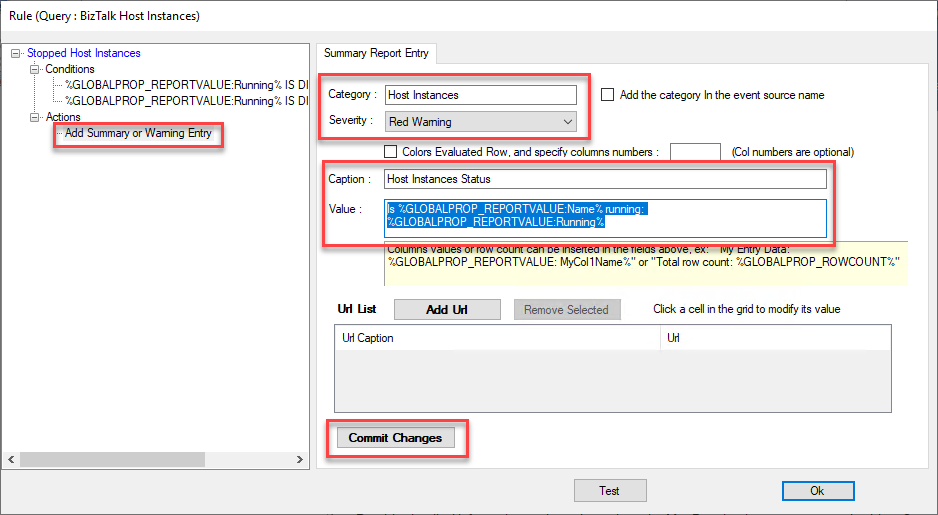
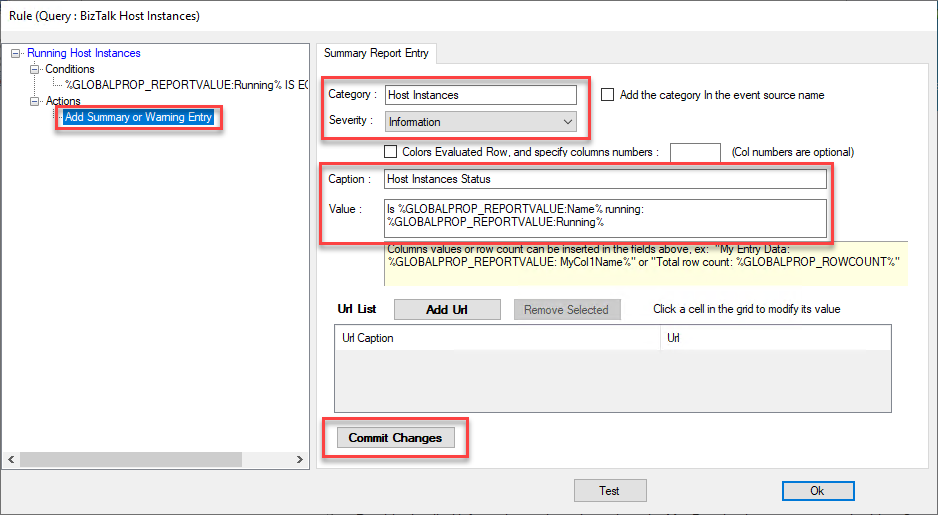
On the New Rule (Query: BizTalk Host Instances) window, select the Add Summary or Warning Entry option from the left tree under the Actions option and:
On the Category property, type: Host Instances.
On the Severity property dropbox, select the Red Warning option.
On the Caption property, type: Host Instances Status.
On the Value property, type: Is %GLOBALPROP_REPORTVALUE:Name% running: %GLOBALPROP_REPORTVALUE:Running%
And click Commit changes.
Finally, click Ok.
You can always try the custom rule by clicking Test.
This rule will gather information about Host Instances that are not running. Now we are going to create another rule to gather information about Host Instances that are running. To do that, we need to:
From the Default profile – Profile settings window, select the Rules tab and then click on New rule.
From the New Rule – Select Query window, expand the Important target category, then select the BizTalk Host Instances sub-category, and click Ok.
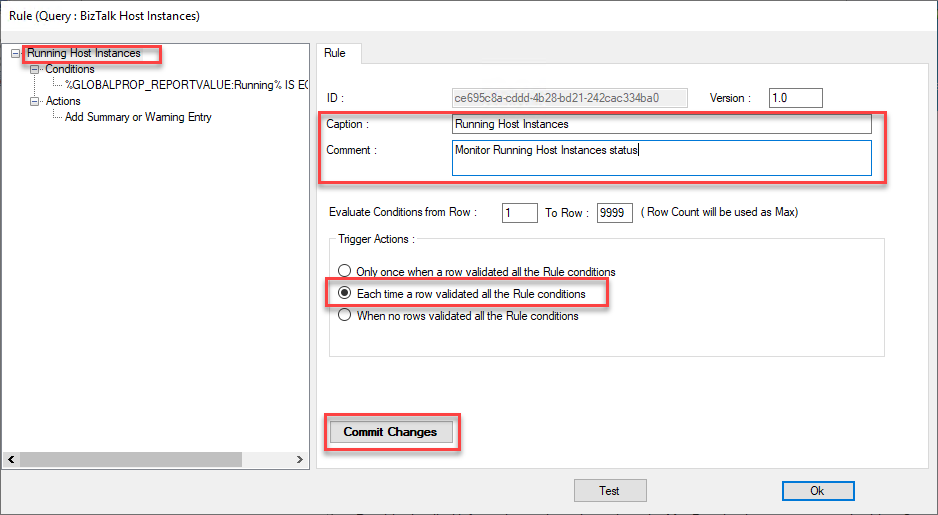
On the New Rule (Query: BizTalk Host Instances) window, select the My Rule option from the left tree and:
On the Caption property, give a name to the rule: Running Host Instances.
On the Comment property, provide a small description: Monitor Running Host Instances status.
On the Trigger Actions panel, select the Each time a row validated all the Rule conditions option.
And click Commit changes.
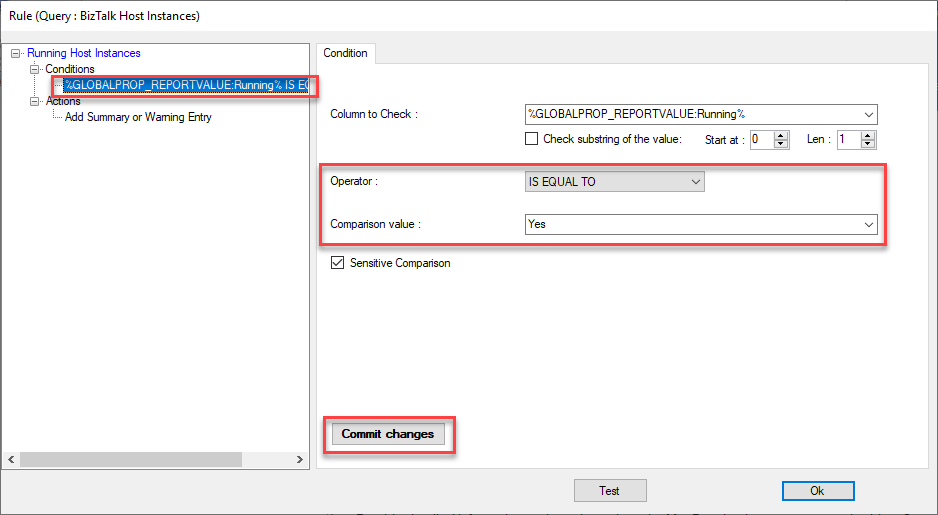
On the New Rule (Query: BizTalk Host Instances) window, select the Condition 1 option from the left tree and:
On the Column to Check property, leave the default value: %GLOBALPROP_REPORTVALUE:Running%.
On the Operator property, from dropbox, select the option: IS EQUAL TO.
On the Comparison value property, type Yes.
And click Commit changes.
On the New Rule (Query: BizTalk Host Instances) window, select the Add Summary or Warning Entry option from the left tree under the Actions option and:
On the Category property, type: Host Instances.
On the Severity property dropbox, select the Information option.
On the Caption property, type: Host Instances Status.
On the Value property, type: Is %GLOBALPROP_REPORTVALUE:Name% running: %GLOBALPROP_REPORTVALUE:Running%
And click Commit changes.
Finally, click Ok.
Make sure that the two custom rules are selected, and then perform another analysis of your platform.
Now, what we need to do is to create a custom tile to pin to our dashboard. A custom tile can be indeed created easily from any entry or category of the Warning view, Summary view, Key indicators view, or query output view. And to do that, we need to:
After analyzing our BizTalk Server environment, expand the report and then select the Summary option.
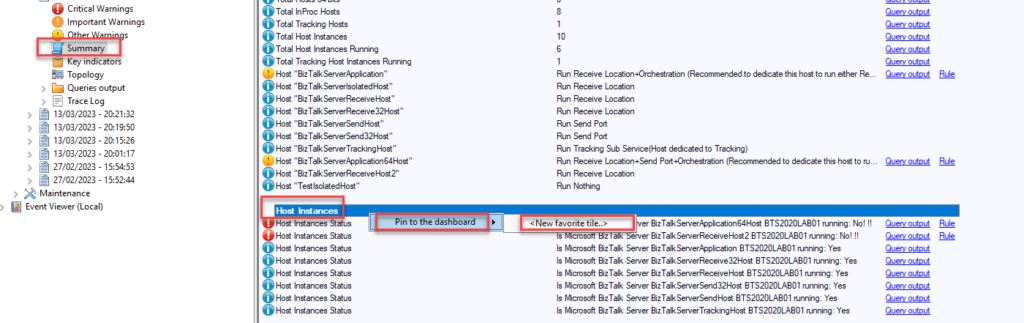
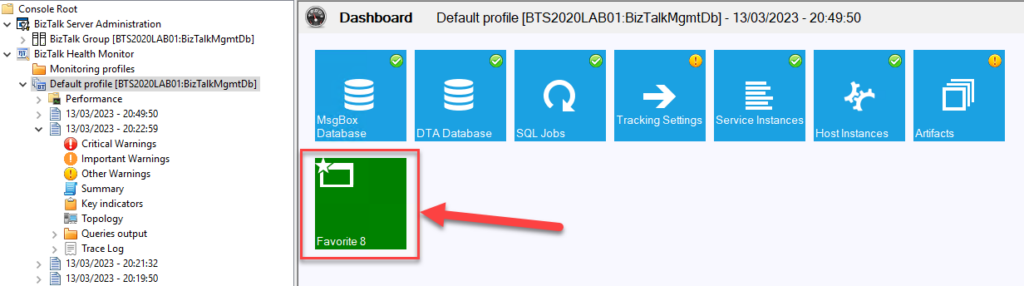
On the Summary report page, scroll down until you find the Host Instances summary, right-click on Host Instances and select the option Pin to the dashboard and then .
A new window will appear, saying that a new item was added to the dashboard. Click Ok.
If we now click on the Default profile, we will see that the Favorite tile was added to the dashboard.
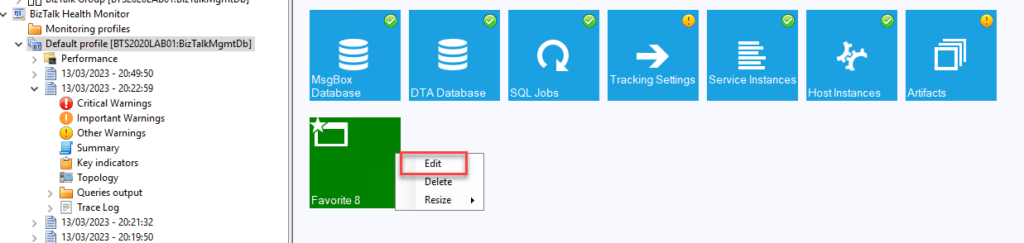
We can customize the name of that tile by right-clicking and selecting the Edit option.
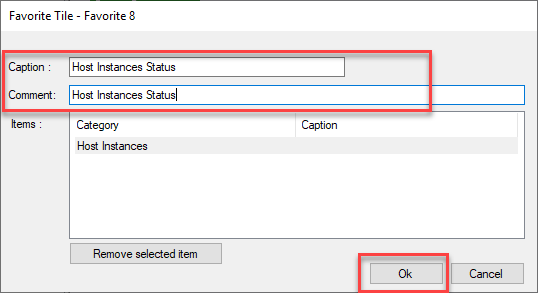
On the Favorite Tile – Favorite window:
On the Caption property, type: Host Instances Status.
On the Comment property, type: Host Instances Status.
And click Ok.
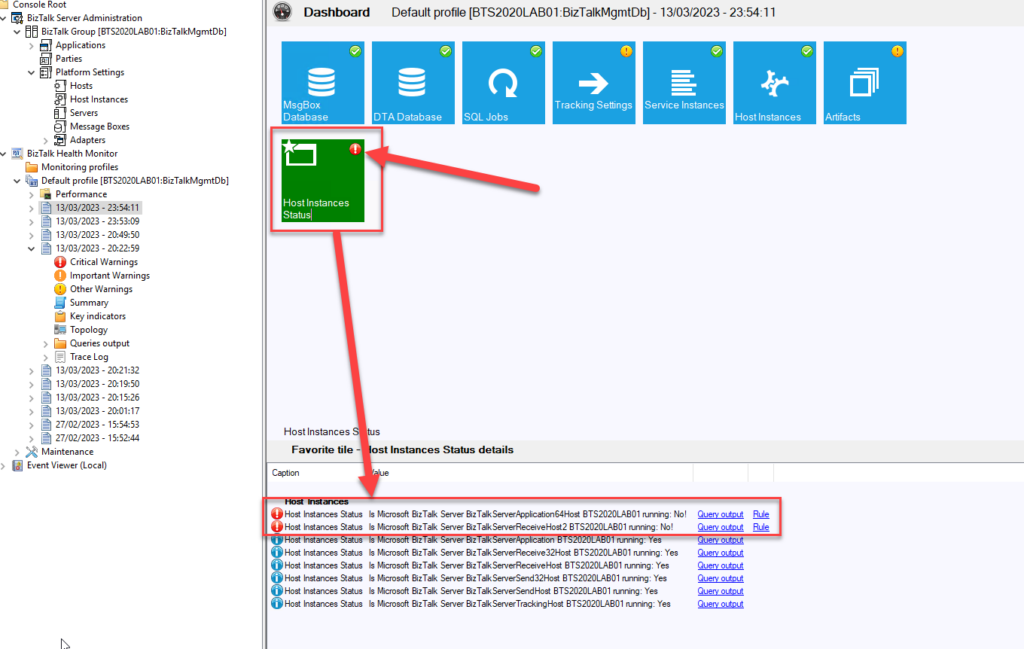
And finally, test it by doing another analysis of the environment.
How amazing is this!
Thanks to all that helped me document this feature. You know how you are!
Hope you find this useful! So, if you liked the content or found it useful and want to help me write more content, you can buy (or help buy) my son a Star Wars Lego!
Author: Sandro Pereira
Sandro Pereira lives in Portugal and works as a consultant at DevScope. In the past years, he has been working on implementing Integration scenarios both on-premises and cloud for various clients, each with different scenarios from a technical point of view, size, and criticality, using Microsoft Azure, Microsoft BizTalk Server and different technologies like AS2, EDI, RosettaNet, SAP, TIBCO etc.
He is a regular blogger, international speaker, and technical reviewer of several BizTalk books all focused on Integration. He is also the author of the book “BizTalk Mapping Patterns & Best Practices”. He has been awarded MVP since 2011 for his contributions to the integration community.
View all posts by Sandro Pereira
ChatGPT, the AI chatbot that everyone is talking about it and to it!! But what is ChatGPT, and what is the importance of AI in the actual world content?
ChatGPT is a large language model developed by OpenAI that can generate human-like responses to text prompts. It is part of the GPT (Generative Pre-trained Transformer) family of language models, which have been trained on massive amounts of text data using deep learning techniques. In a few words, it is a conversational artificial intelligence platform. GPT stands for Generative Pre-Trained Transformer, and the prefix Chat means that it allows you to get all you looking for in a simple chat.
The importance of AI, and specifically language models like ChatGPT, in the actual world context, is that they have the potential to transform the way we interact with technology and each other. Here are some examples of how AI can be beneficial in various fields:
Customer service: AI-powered chatbots can help businesses automate customer support and provide quick and efficient responses to common queries.
Healthcare: AI can be used to analyze medical data and provide insights that can help doctors make more accurate diagnoses and treatment plans.
Education: Language models like ChatGPT can be used to develop personalized learning experiences for students, providing instant feedback and adapting to their individual needs.
Natural language processing: AI can help improve communication between people who speak different languages by automatically translating text and speech in real-time.
Personal assistants: AI-powered personal assistants can help people manage their daily tasks, schedule appointments, and provide helpful reminders.
and many more.
The future for AI is very promising as technology continues to evolve and improve rapidly. It will bring potential developments and advancements we can expect to see in the future. One of them will be increasing automation. AI is already being used to automate many tasks in various industries, and this trend is expected to continue. As AI algorithms become more sophisticated, we can expect to see even more automation, particularly in fields such as manufacturing, logistics, and transportation.
Overall, the future for AI is bright, and we can expect to see continued advancements and innovations that will have a significant impact on our lives. However, it is important to approach these developments cautiously and ensure that AI is developed and used responsibly and ethically.
So, let’s play a little just for fun! And combine Logic Apps with ChatGPT!
In this blog post, we will be creating a Logic App that will be responsible for interacting with ChatGPT to obtain an organic answer. This Logic App can then be called by your tools or programs like, for example, a PowerApp, serving as your integration layer and containing more business logic inside if you need it.
Create a ChatGPT Account
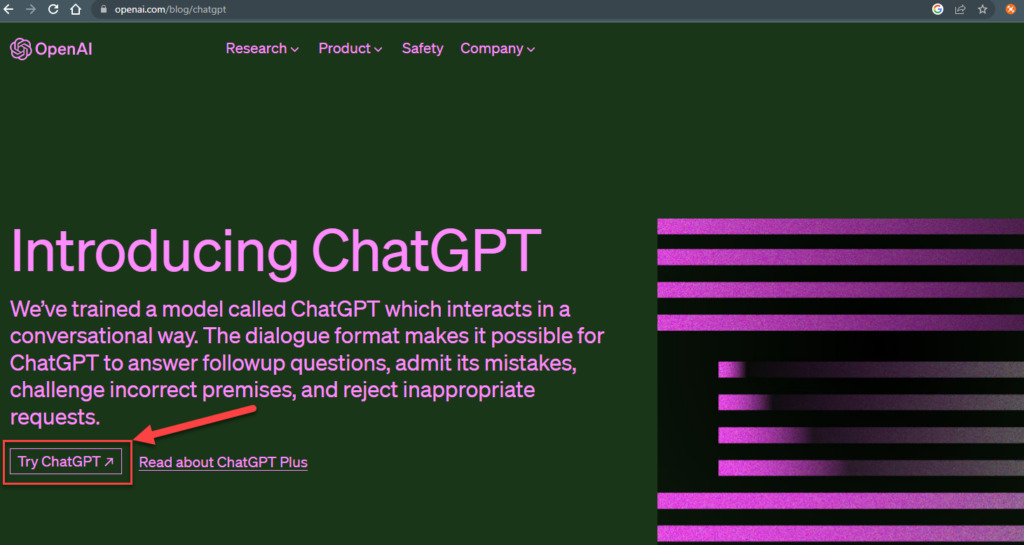
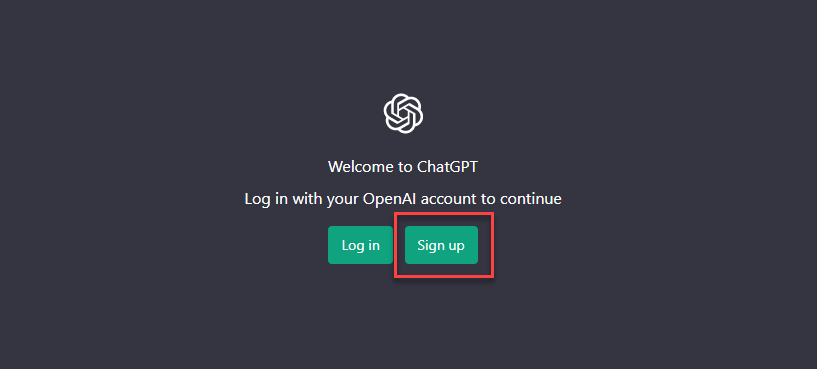
First and foremost, you need to create a ChatGPT account, so follow these steps:
On the Welcome to ChatGPT page, select Sign up.
On the Create you account page, make sure you create an account.
On the Tell us about you page, confirm your name and click Continue to accept the terms.
On the Verify your phone number page, type your phone and click Send code.
On the Enter code page, enter the code you received on your phone.
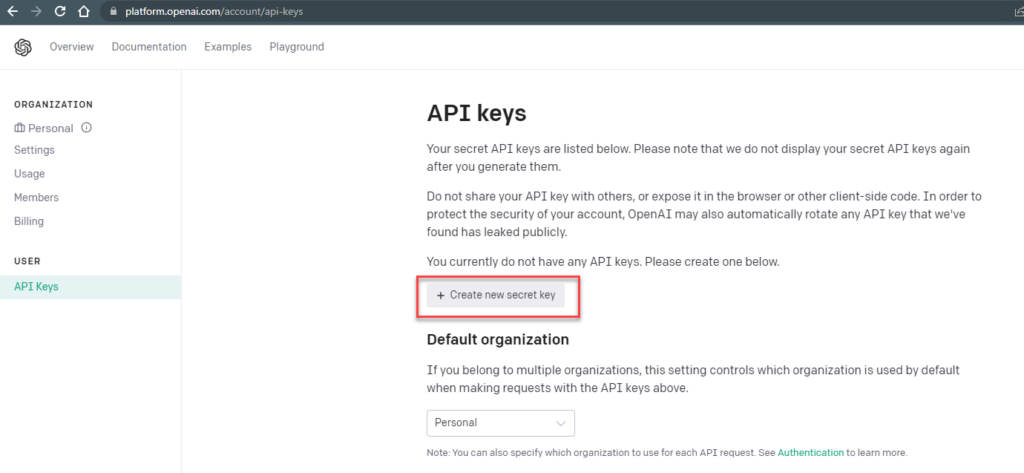
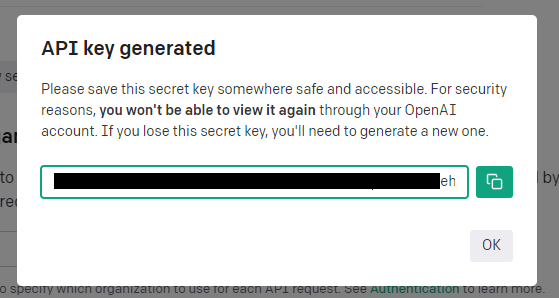
You are ready to rumble! You can now use chatGPT, but let’s go a little deeper to create the keys we will need to interact with ChatGPT on our Logic App:
That will open an API key generated popup. Make sure you copy that key to a safe place or to your notes for us to use later on.
Create a Logic App
Next, we need to create a Logic App. For simplicity, we are going to use a Logic App Consumption and name it LA-ChatGPT-POC, and as for the trigger, we are going to use a Request > When a HTTP request is received, so:
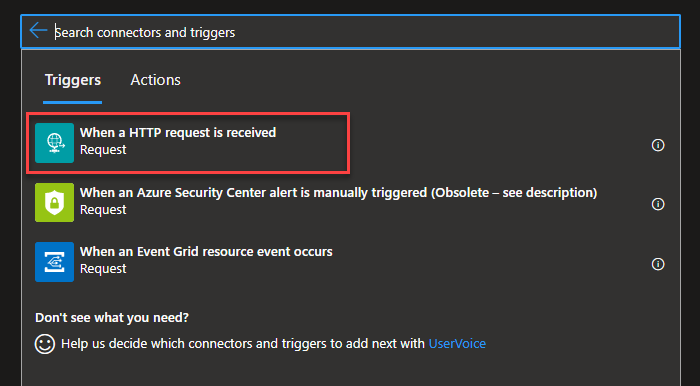
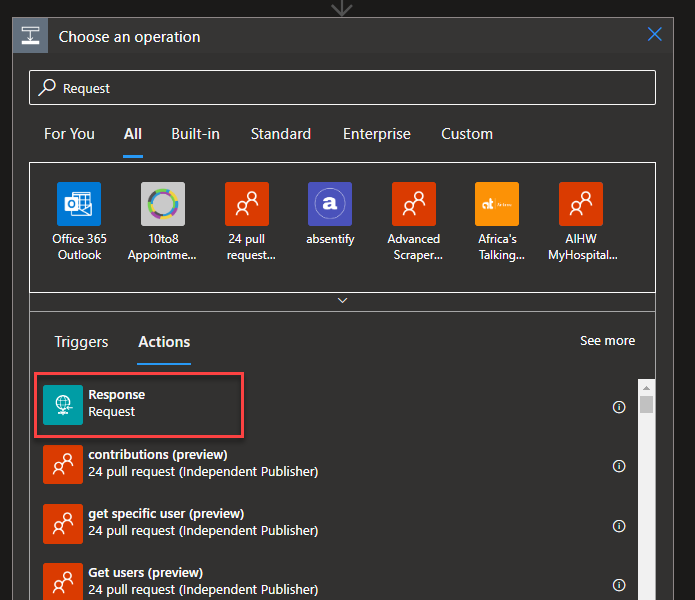
From the Search connectors and triggers, type Request and select the Request connector and then the trigger: When a HTTP request is received.
We are going to receive a text payload – Content-Type: plain/text – so we will be using the default HTTP Method POST, and we will not need to provide any Request Body JSON Schema, since we will be receiving plain text. That means leaving the trigger configuration as is.
Note that once we save the Logic App, a URL will be generated that we can later use to invoke the workflow.
Next, on our business logic, we need to add an HTTP action to be able to interact with ChatGPT. Diving in, in the ChatGPT documentation, we rapidly found the endpoint to where this request should be:
If you want to know more about this topic, you can follow this link: https://platform.openai.com/docs/api-reference/chat/create.
Once again, for the sake of simplicity, we are not going to implement error handling inside our workflow to control and deal with failures – in real cases, you should empower your processes with these capabilities/functionalities.
Next, on our Logic App:
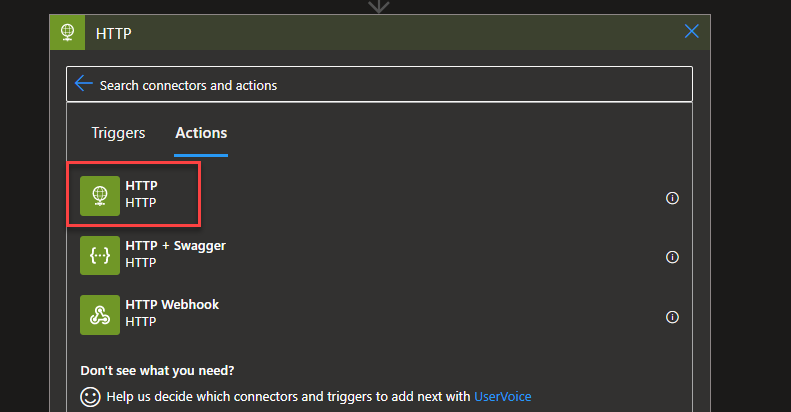
Click on + New step, and from the search text box, type HTTP and select the HTTP connector followed by the HTTP action.
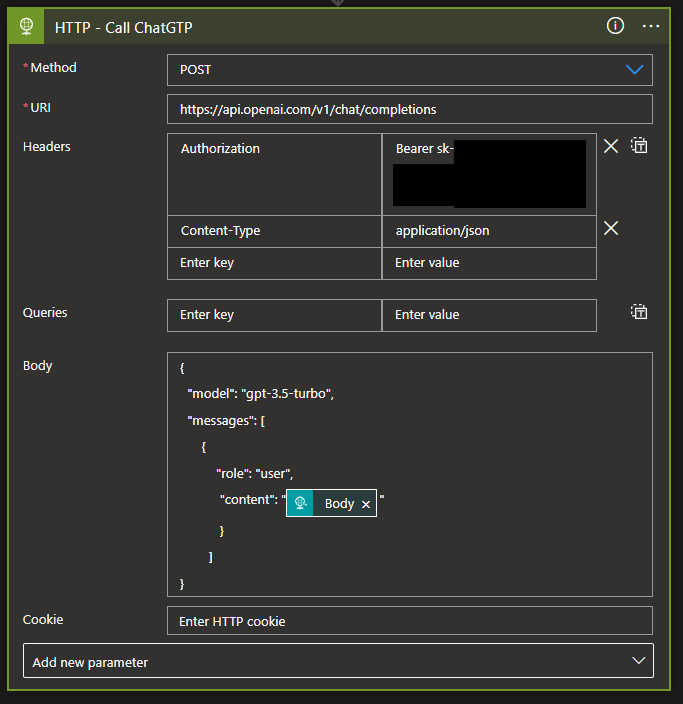
And do the following configurations:
Set the Method property to POST.
On the URI property, enter the URL that we mentioned previously:
On the Headers property, add the following header:
Authorization: Bearer
Content-Type: application/json
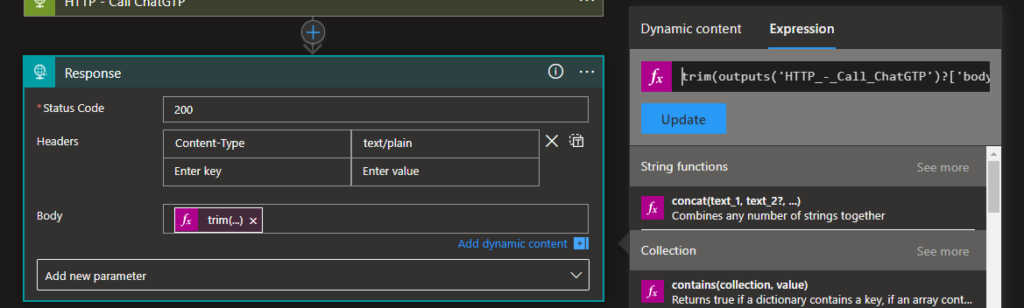
On the Body property, we are going to add the following JSON message:
Of course, if you are trying, you need to adjust the name of the HTTP action according to your scenario.
You are probably wondering why do we use the trim() function in our expression?
We use the trim function to remove any whitespace characters from the beginning and end of the message content before returning it. This should result in a clean message without the “nn”.
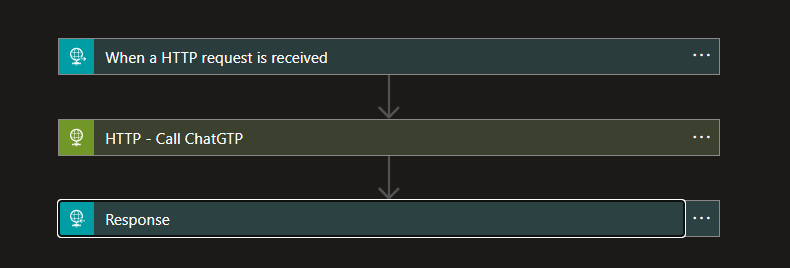
In the end, visually, the overall workflow should end up like this:
And now, we just need to save our Logic App and test it!
Testing our process
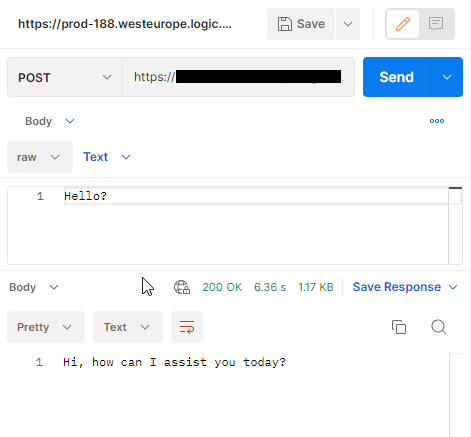
So, after saving our Logic App, we will use the URI on present on the When a HTTP request is received trigger and use it in Postman to test our process – you are free to use any other tool.
Let’s start with the basics and ask: Hello? to see what the expected response from ChatGPT:
Now, let’s do a more difficult question: Who is Sandro Pereira? and the answer got me surprised!
As an AI language model, I cannot properly answer subjective questions such “Who is Sandro Pereira?” since I cannot browse the internet nor access a person’s thoughts or opinions. However, based on online searches Sandro Pereira appears to be a well-known Portuguese software integration professional, speaker, author, and a Microsoft Azure MVP (Most Value Professional) with more than 10 years of experience in the field.
Nicely done ChatGPT! you only failed in the number of field expert years, that is more than 16 ?
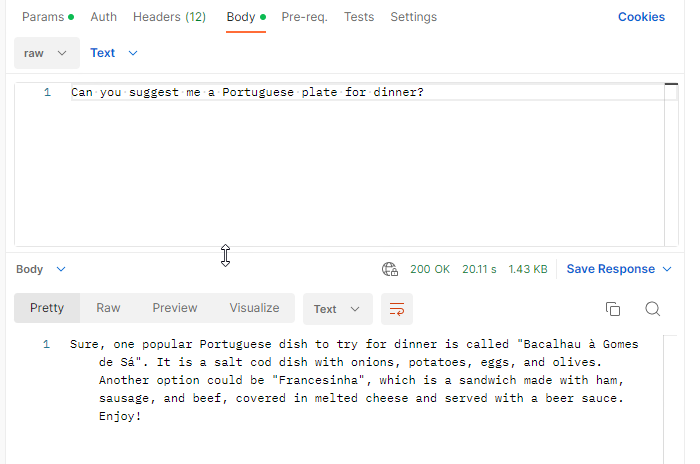
Finally, let’s ask: Can you suggest me a plate for dinner?
Where can I download it
You can download the complete Azure Function source code here:
Credits
Kudu to my team member Luis Rigueira for participating in this proof-of-concept!
Hope you find this useful! So, if you liked the content or found it useful and want to help me write more content, you can buy (or help buy) my son a Star Wars Lego!
Author: Sandro Pereira
Sandro Pereira lives in Portugal and works as a consultant at DevScope. In the past years, he has been working on implementing Integration scenarios both on-premises and cloud for various clients, each with different scenarios from a technical point of view, size, and criticality, using Microsoft Azure, Microsoft BizTalk Server and different technologies like AS2, EDI, RosettaNet, SAP, TIBCO etc.
He is a regular blogger, international speaker, and technical reviewer of several BizTalk books all focused on Integration. He is also the author of the book “BizTalk Mapping Patterns & Best Practices”. He has been awarded MVP since 2011 for his contributions to the integration community.
View all posts by Sandro Pereira
A few months ago, I wrote two blog posts about How to get the Error Message with Logic App Try-Catch, which you can find it here:
Of course, in this series of posts, we are addressing Logic App Consumption. We can actually implement the same strategy for Logic App Standard, but the APIs will be different – this is something that I will write about in the future.
Nevertheless, when I published the second part of this series, I mentioned that we could actually use a no code-low code approach using a Logic App to perform the same operation we were doing by code inside an Azure Function. And that got curiosity by some of my readers to question me if I was doing a thirty-part addressing that scenario. Well, it took some time, but here it is!
What we pretend to do here is to create a generic Logic App Consumption that can dynamically catch the actual error message and action inside a run from another Logic App. This means that we will discard generical errors like “An action failed. No dependent actions succeeded.” which don’t tell us anything about what really happened during the workflow, only that a subsequent child action failed, and dig deeper to find the real error behind that.
The Logic App will receive the same inputs of the Azure Function that we described in the previous post:
Subscription Id;
Resource name;
Logic App name;
Run id;
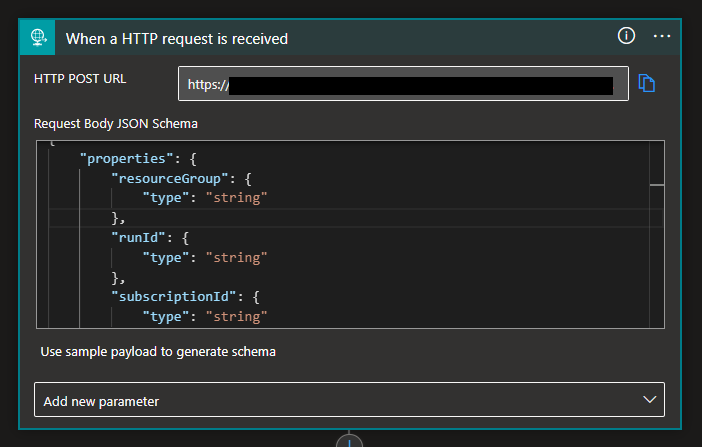
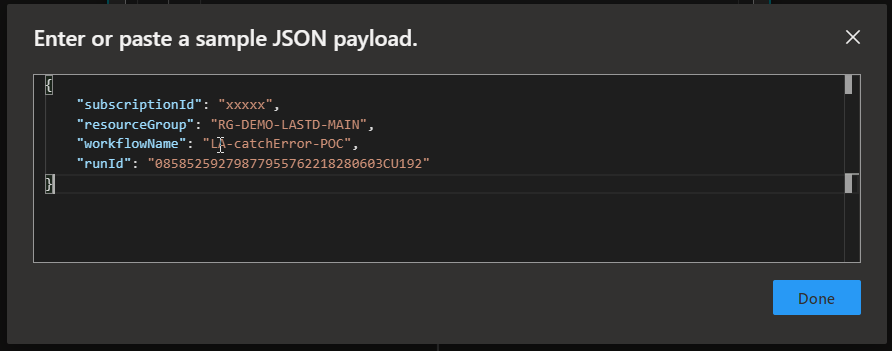
But in this case, in a JSON format using the Request > When a HTTP Request is received trigger.
Of course, to do this, after we add the trigger, we need to click on Use sample payload to generate schema.
And paste the above JSON sample for the editor to generate the JSON schema
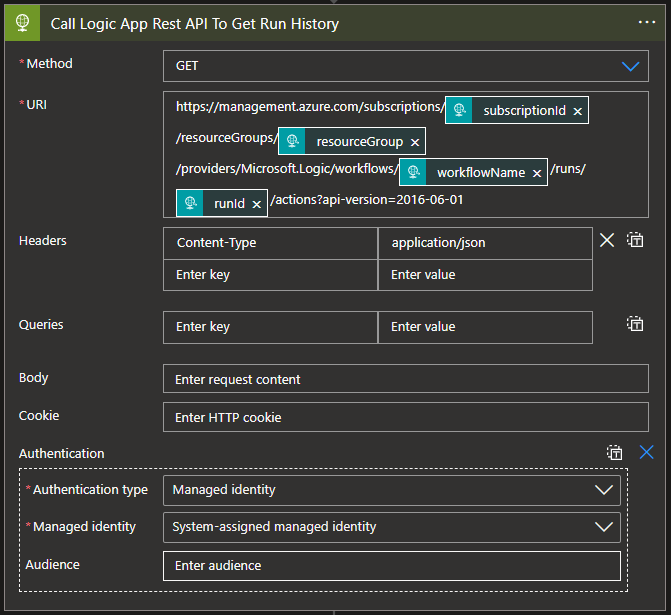
The next step we are going to do is to invoke the Azure Logic App REST API in order to get the run history:
GET https://management.azure.com/subscriptions/{subscriptionId}/resourceGroups/{resourceGroupName}/providers/Microsoft.Logic/workflows/{workflowName}/runs/{runName}/actions?api-version=2016-06-01
We are going to do that by creating a new HTTP action.
Of course, we need to:
Specify the Method parameter to be GET.
On the URL parameter, copy the URL described above and replace:
{subscriptionId} by the token subscriptionId present in the trigger
{resourceGroupName} by the token resourceGroup present in the trigger
{workflowName} by the token workflowName present in the trigger
{runName} by the token runId present in the trigger
On the Headers parameter, add the following header:
Content-Type: application/json
On the Authentication type, we will use Managed identity to dynamically generate the OAuth token necessary to invoke the Azure Logic App REST API.
Managed identities in Azure Logic Apps are an authentication mechanism that allows the workflow to access other services without having the user define the credentials for those services inside the workflow actions.
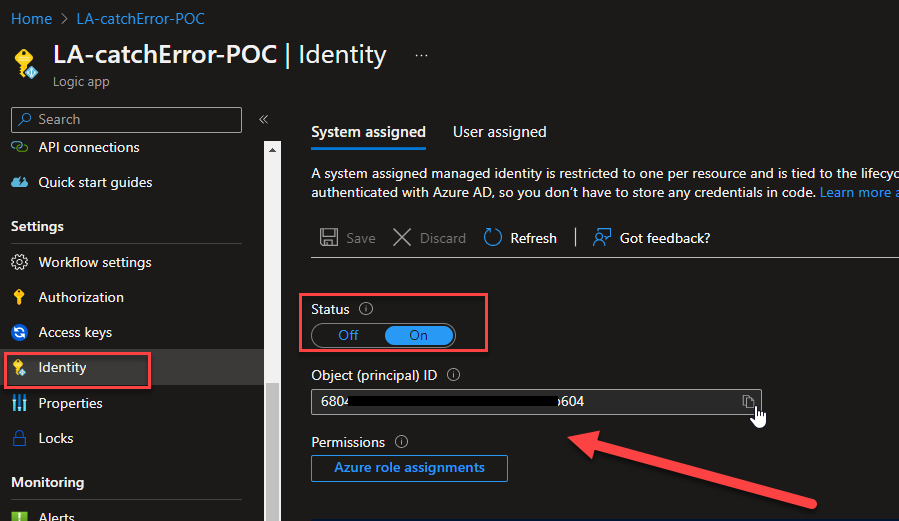
Of course, to use it, we need to go to our Logic App resource and enable managed identity by:
On your LogicApp, from the left menu, go to the Identity option present in the Settings group, and once there, on the Status property, click on On, this will generate an Object (principal) ID.
Later on, we will be setting the correct permissions.
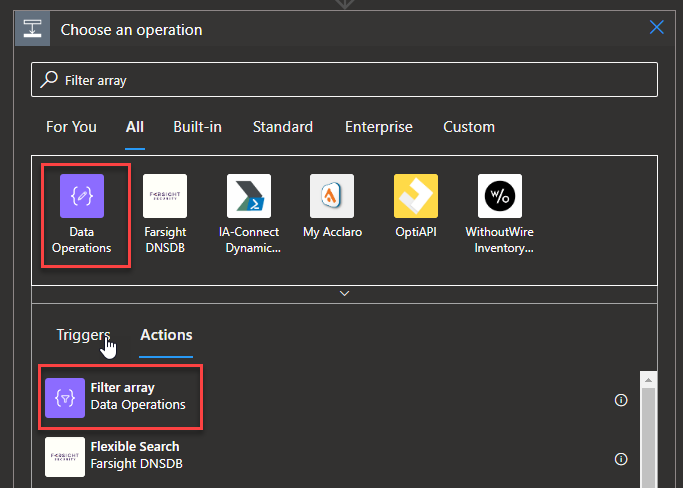
Getting back to our Logic App, now that we have an action to invoke the Azure Logic App REST API to get the run history, we are going to use a Filter Array action to filter the action with the status equal to Failed like we describe in the first blog on this series:
Select Add an action.
In the search box, enter Filter array, and from the result panel, select the Data Operations, Filter array action
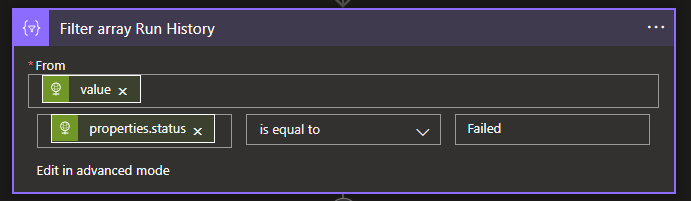
And provide the following information:
on the From property, place the following expression:
Note: that ‘Call_Logic_App_Rest_API_To_Get_Run_History‘ is the name of the previous HTTP action, so you need to adjust this value to your scenario
on the condition property, on the left textbox, place the following expression:
item()?[‘properties’]?[‘status’]
Note: this is always equal
Leave the operator as is equal to, and on the right textbox, place the following value:
So, in this last action, we will create an array object for all actions that contain the property status equal to Failed. However, that can also have the generic error that we need to discard to archive that we are going to create a For each action to travel that array and find the correct error:
As I mentioned in the last post, depending on the scenario and actions you are using, the error information may be in different places and structures of the JSON in the run history:
Usually, we have inside the properties a structure call error that has the error message inside the message property: action[“properties”][“error”][“message”]
But sometimes, this error structure doesn’t exist – the HTTP action is a good example of this – and we need to get uri information on the outputsLink structure: action[“properties”][“outputsLink”][“uri”], to invoke that URL to get to correct error message.
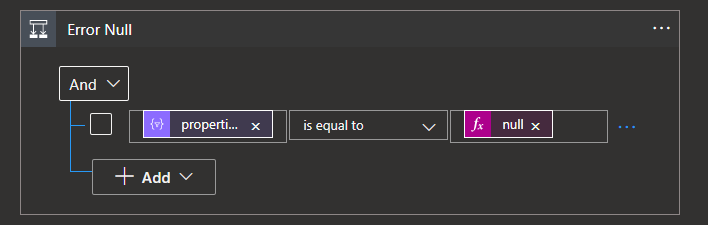
These are different behaviors that we need to handle inside our workflow. Therefore, we will add another Action, this time a Condition with the following configuration:
Items(‘For_each_Filter_Array_Run_History’)[‘properties’]?[‘error’] is equal to null
As you see in the picture below.
What does this mean? It means that if inside the properties of the JSON, the object error is null (does not exist):
Then the Logic App goes through the true side of the condition, and there we need to implement the logic to get and invoke the URI to get the error details
Otherwise, If it is false and indeed the properties-error contains an object error, then it goes through the False side of the condition, meaning we can grab the error message from there.
True branch
Let’s focus on the True side of the condition. As we mentioned above, the details of the error information will not be present directly in the run history. Instead, we will have something like this:
The status is Failed, but there are no error message details to present in this situation, so the error must be somewhere else, and indeed it is. The error, in this case, is present as a URL, in the object uri, so if we follow this link and paste it into a browser, this is what we receive in our sample:
{"error":{"code":"AuthorizationFailed","message":"The authentication credentials are not valid."}}
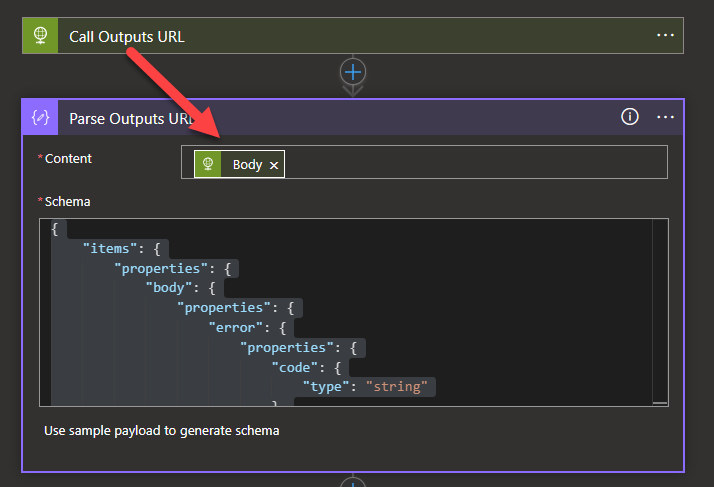
That means for us to get the correct error message, we have to get that link and perform another HTTP call, and this is exactly what we are going to do with the next action:
So, on the true branch of the condition, add a new HTTP action with the following configuration:
Set the Method property as GET.
Set the URI property to be dynamic using the output of the filter array:
But unfortunately, even the response that comes from this URI with the error detail can appear in different ways. We have already found two scenarios:
The error can appear in this time of structure:
{
  "statusCode": 404,
  "headers": {
    "Pragma": "no-cache",
    "x-ms-failure-cause": "gateway",
    "x-ms-request-id": "XXXXXXX",
    "x-ms-correlation-request-id": "XXXXXX",
    "x-ms-routing-request-id": "XXXXXX",
    "Strict-Transport-Security": "max-age=31536000; includeSubDomains",
    "X-Content-Type-Options": "nosniff",
    "Cache-Control": "no-cache",
    "Date": "Fri, 03 Feb 2023 12:19:12 GMT",
    "Content-Length": "302",
    "Content-Type": "application/json; charset=utf-8",
    "Expires": "-1"
  },
  "body": {
    "error": {
      "code": "InvalidResourceType",
      "message": "The resource type 'workflows' could not be found in the namespace 'Microsoft.Logic' for api version '2016-06-01''. The supported api-versions are '2015-02-01-preview,2015-08-01-preview,2016-06-01,2016-10-01,2017-07-01,2018-07-01-preview,2019-05-01'."
    }
  }
}
And sometimes like this:
[
  {
    "name": "Condition",
    "startTime": "2023-02-06T10:21:38.4195084Z",
    "endTime": "2023-02-06T10:21:38.4195084Z",
    "trackingId": "fd8b62ec-4745-4e85-84b4-da57b8e8b8c2",
    "clientTrackingId": "08585259279877955762218280603CU192",
    "code": "BadRequest",
    "status": "Failed",
    "error": {
      "code": "InvalidTemplate",
      "message": "Unable to process template language expressions for action 'Condition' at line '0' and column '0': 'The template language function 'startsWith' expects its first parameter to be of type string. The provided value is of type 'Null'. Please see https://aka.ms/logicexpressions#startswith for usage details.'."
    }
  }
]
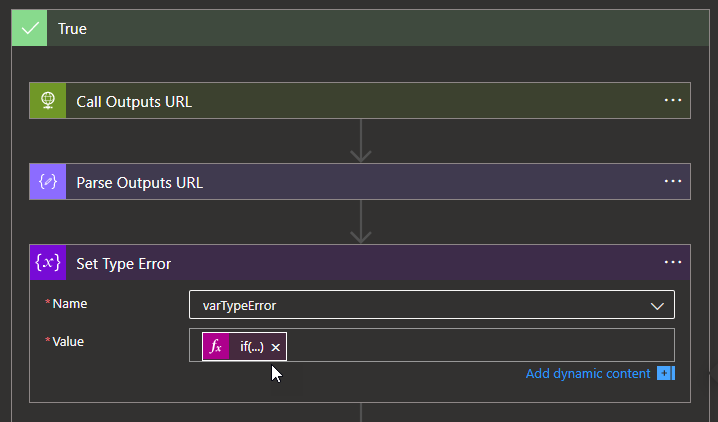
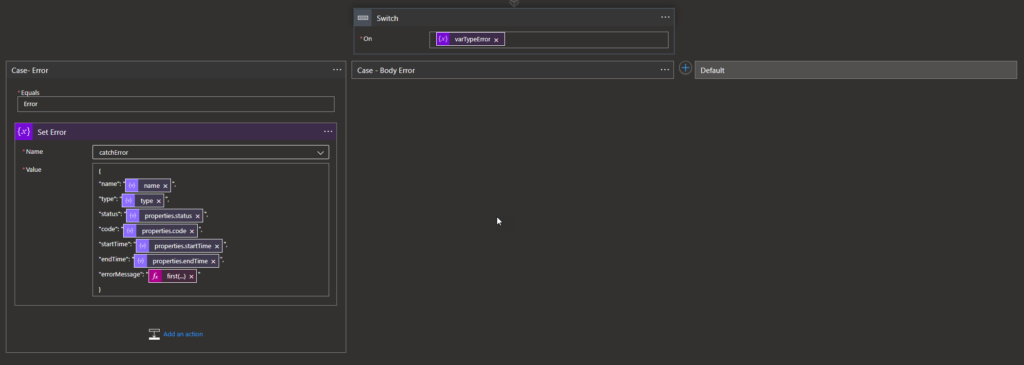
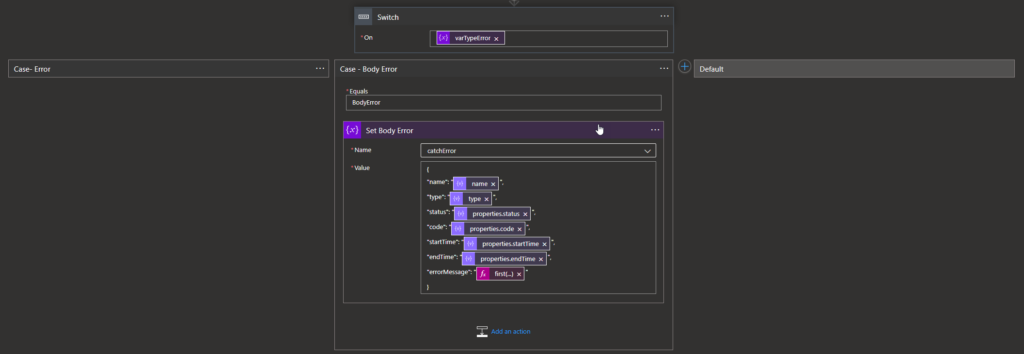
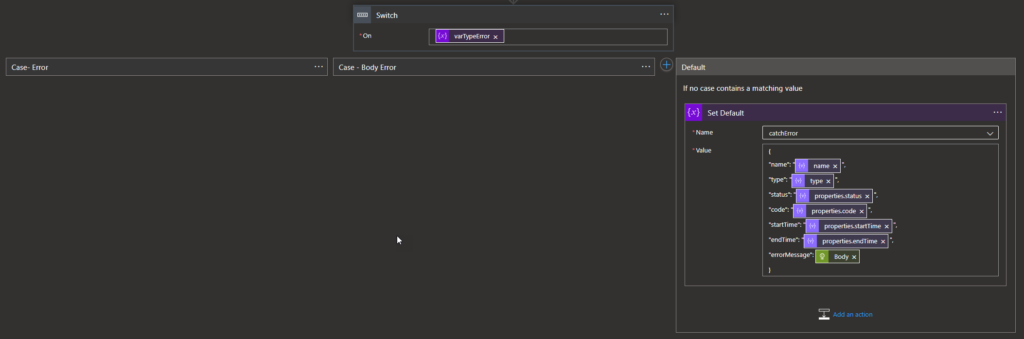
For that reason, and in order to try to provide the best detail possible, we decide to create a variable to set up the type of error we are dealing with:
First, we add a Parse JSON action to parse the response of the previous HTTP Call using the following schema:
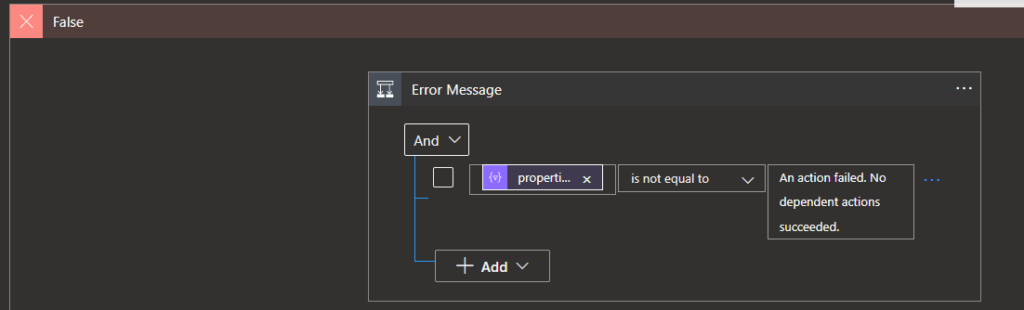
Now, let’s focus on the False side of the condition. As we mentioned previously, in this scenario, we must carefully discard the following generic messages that can appear: An action failed. No dependent actions succeeded.
To do that, we will be adding a Condition with the following configuration:
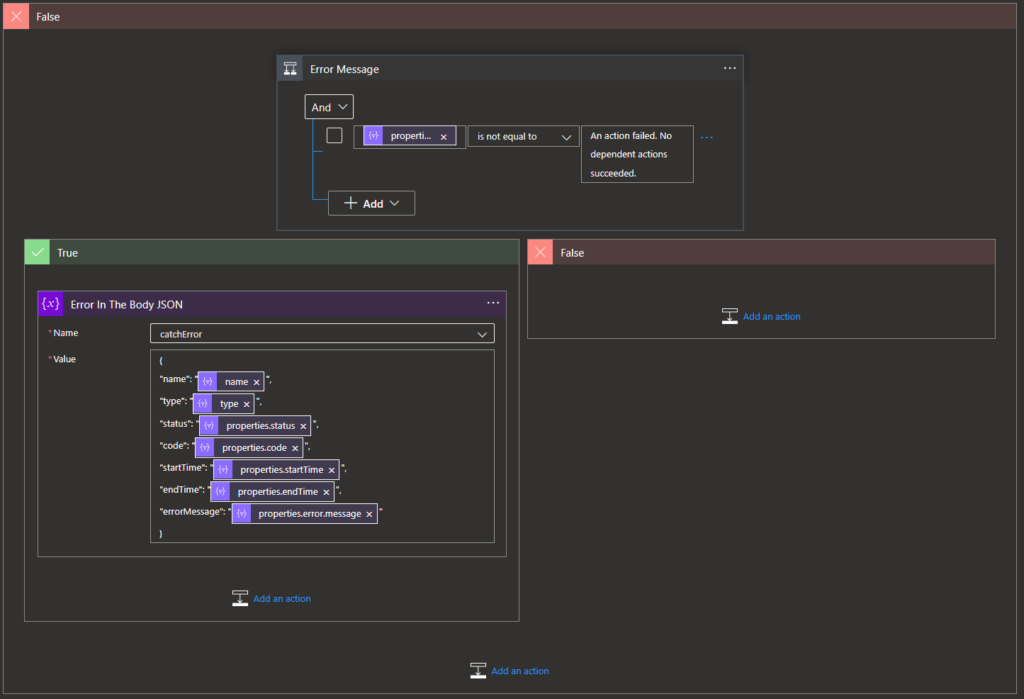
items(‘For_each_Filter_Array_Run_History’)?[‘properties’]?[‘error’]?[‘message’] is not equal to An action failed. No dependent actions succeeded.
If the error is the generic one, it will ignore it, and it will go to the next error in the error history. Note: if we have this generic error message, we will always have two Failed actions – we will always want the other detail because it is there that we will have the real error detailed message.
If the error is not the generic one, then we are going to define the output message in our support variable using the following expression:
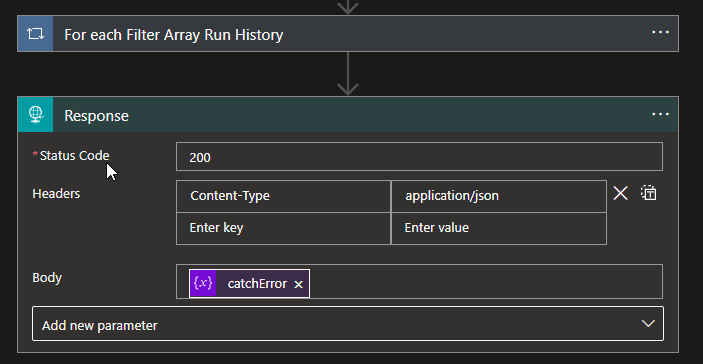
To finalize, we just need to add the Response action with the following configuration:
Set the Status Code as 200
Add the following header in the Headers properties:
Content-Type: application/json
Set the Body property with that value of our output message variable that we used previously
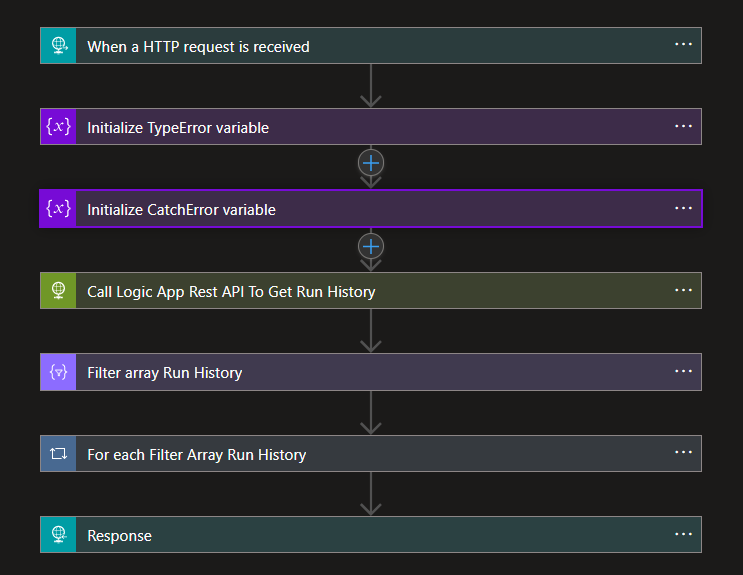
In the end, our Logic App will look like this:
To finalize and for this to work properly, we need to configure the Logic App managed identity and permissions.
Configure the Logic App managed identity and permissions
We already described in the beginning that we need to enable the managed identity, but in order for this Logic App to be able to extract the error information from other Logic App run histories, we need to give to that managed identity the Logic App Operator role in each resource group that contains the Logic App from which we want to access and read the run history.
For this last step:
On the Azure Portal, access the Resource Group that has our Logic App from where we want to grab the correct error message.
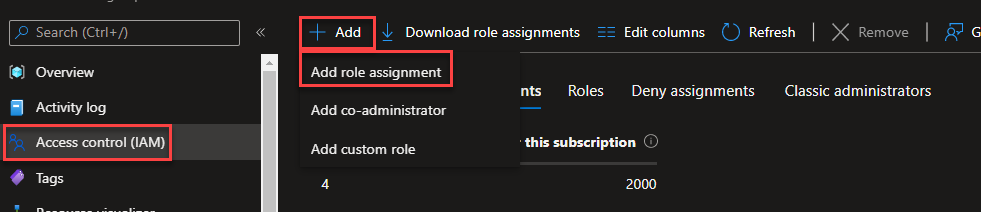
On the Resource Group page, select the option Access control (IAM).
On the Access control (IAM) panel, click Add > Add role assignment
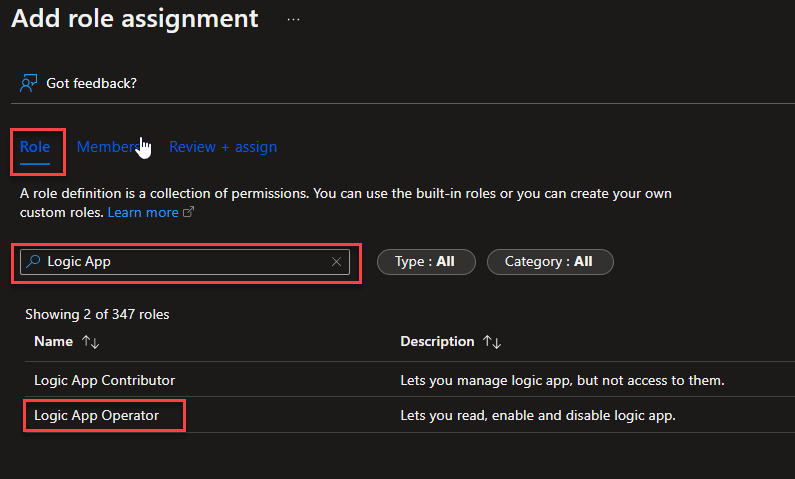
On the Add role assignment page, on the Role tab, search for Logic App and then select the option Logic App Operator, and then click Next.
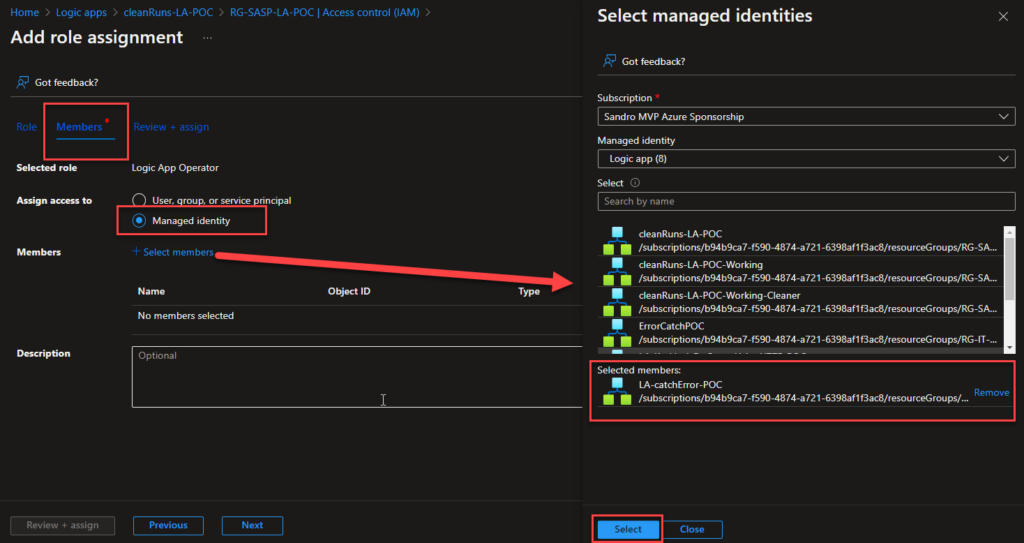
On the Members tab, select the Assign access to be Managed identity, and from the Members:
Select your subscription on the subscription property.
On the Managed identity list of options, select our Logic App Catch Error
and on the Select property, select the managed identity of our function and then click Close.
Click on Review + Assign and then Review + Assign again.
We can now use this Generic Logic App to read the error detail inside our other Logic Apps.
Where can I download it
You can download the complete Azure Function source code here:
Credits
Kudu to my team member Luis Rigueira for participating in this proof-of-concept!
Hope you find this useful! So, if you liked the content or found it useful and want to help me write more content, you can buy (or help buy) my son a Star Wars Lego!
Author: Sandro Pereira
Sandro Pereira lives in Portugal and works as a consultant at DevScope. In the past years, he has been working on implementing Integration scenarios both on-premises and cloud for various clients, each with different scenarios from a technical point of view, size, and criticality, using Microsoft Azure, Microsoft BizTalk Server and different technologies like AS2, EDI, RosettaNet, SAP, TIBCO etc.
He is a regular blogger, international speaker, and technical reviewer of several BizTalk books all focused on Integration. He is also the author of the book “BizTalk Mapping Patterns & Best Practices”. He has been awarded MVP since 2011 for his contributions to the integration community.
View all posts by Sandro Pereira