Do you feel difficult to keep up to date on all the frequent updates and announcements in the Microsoft Integration platform and Azure iPaaS?
Integration weekly updates can be your solution. It’s a weekly update on the topics related to Integration – enterprise integration, robust & scalable messaging capabilities and Citizen Integration capabilities empowered by Microsoft platform to deliver value to the business.
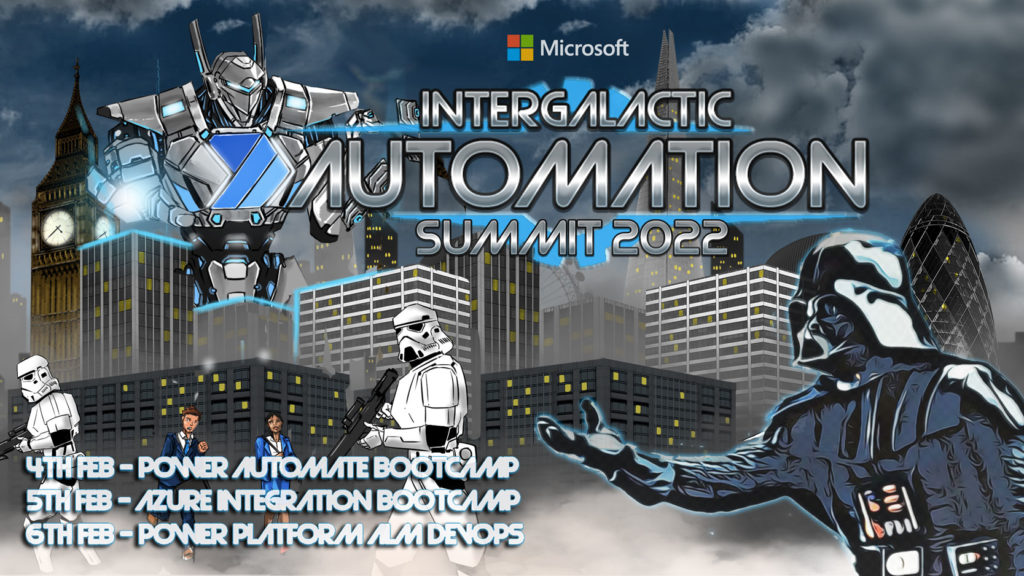
As part of the Intergalactic Automation Summit 2022 online event organized by the Power Community that is taking place between 4-6th February 2022:
4th Feb- Power Automate Bootcamp
5th Feb- Azure Integration Bootcamp
6th Feb- Power Platform ALM DevOps
All of these events are free! And you can register here.
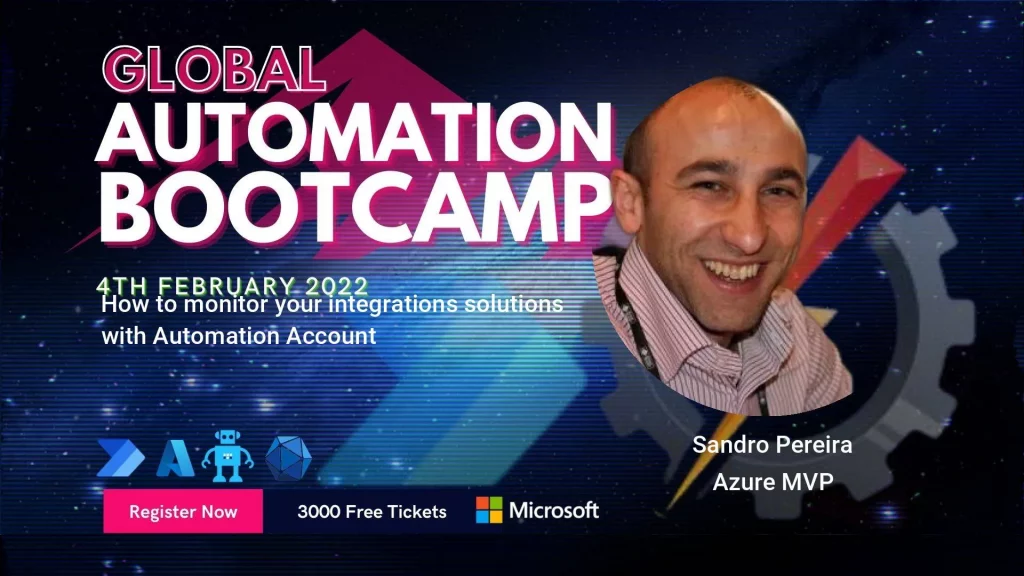
I choose to submit a session to the Global Automation Bootcamp, and I’m honored to be accepted as a guest speaker on a session about How to monitor your integrations solutions with Automation Account. My session will take place at 05:00 pm according to GMT/UTC.
How to monitor your integrations solutions with Automation Account
In this session, we will address how you can monitor your integrations solutions using Azure Integration Account running PowerShell Runbooks and Logic Apps to notify inconsistencies in your solutions. For those reasons, I would like to invite you to join me at the Global Automation Bootcamp virtual event on Friday, February 4, 2022.
Session name: How to monitor your integrations solutions with Automation Account
Abstract: In this session, we will address how you can monitor your integrations solutions using Azure Integration Account running PowerShell Runbooks and Logic Apps to notify inconsistencies in your solutions.
Join us and reserve your presence at the Global Automation Bootcamp virtual event on Friday, February 4, 2022, it is free!
As part of the Intergalactic Automation Summit 2022 online event organized by the Power Community that is taking place between 4-6th February 2022:
4th Feb- Power Automate Bootcamp
5th Feb- Azure Integration Bootcamp
6th Feb- Power Platform ALM DevOps
All of these events are free! And you can register here.
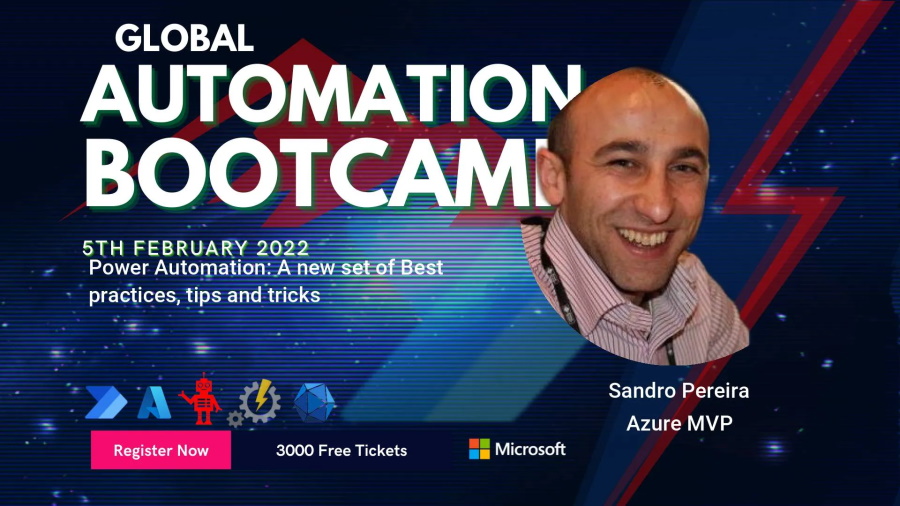
I choose to submit a session to the Power Automate Bootcamp, and I’m honored to be accepted as a guest speaker on a session about Power Automation: A new set of Best practices, tips and tricks. My session will take place at 05:00 pm according to GMT/UTC.
Power Automation: A new set of Best practices, tips and tricks
As I mentioned before, my session will be all about best practices and small tips and tricks that we can apply to our Power Automate flows. For those reasons, I would like to invite you to join me at the Power Automate Bootcamp virtual event on Friday, February 4, 2022.
Session name: Power Automation: A new set of Best practices, tips and tricks
Abstract: A brand new set of tips and tricks and best practices that you should know for being more productive and building more reliable and effective Power Automate flows. This is not an introduction session anymore. Instead, this session will go through a list of 10 new best practices, tips, and tricks addressing advanced topics like deployment, dynamic connectors configurations, etc.
Join us and reserve your presence at the Power Automate Bootcamp virtual event on Friday, February 4, 2022, it is free!
Today, we are going over another real scenario, this time from one of our PowerBI Robots clients. For those unfamiliar with it, PowerBI Robots is part of DevScope’s suite of products for Microsoft Power BI. It automatically takes high-resolution screenshots of your reports and dashboards and sends them anywhere to an unlimited number of recipients (any users and any devices), regardless of being in your organization or even having a Power BI account.
Challenge
The COVID-19 pandemic massified remote work, and one of our PowerBI Robots clients asked us for a way to start receiving high-resolution screenshots of their reports and dashboards. On top of the devices at the client’s facilities (mainly TVs), these screenshots should also be available on a Microsoft Teams Channel where they could be seen by all users with access to it. PowerBI Robots allows users to “share” high-resolution screenshots of Power BI reports and dashboards in many ways, but it didn’t have this capability out-of-the-box, so we proactively introduced it using Azure Integration Services
This proof-of-concept will explain how you can extend the product’s features by making use of PowerBI Robots’ out-of-the-box ability to send a JSON message to an HTTP endpoint and then using Azure Integration Services such as Azure Blog Storage, Azure File Storage, Logic Apps, or even Power Platform features like Power Automate to share these report or dashboard images on platforms like Teams, SharePoint or virtually everywhere.
Create Blob Storage
In theory, we could send an image in base64 directly to Teams, but the problem is that messages on Teams have a size limit of approximately 28KB. This encompasses all HTML elements such as text, images, links, tables, mentions, and so on. If the message exceeds 28KB, the action will fail with an error stating: “Request Entity too large“.
To avoid and bypass this limitation, we have to use an additional Azure component to store the Power BI report images provided by PowerBI Robots. And to do that, we can choose from among resources such as:
Azure Blob Storage: Azure Blob storage is a feature of Microsoft Azure. It allows users to store large amounts of unstructured data on Microsoft’s data storage platform. In this case, Blob stands for Binary Large Object, which includes objects such as images and multimedia files.
Azure File Storage: Azure Files is an Azure File Storage service you can use to create file-sharing in the cloud. It is based on the Server Message Block (SMB) protocol and enables you to access files remotely or on-premises via API through encrypted communications.
Or even a SharePoint library, where you can store images and many other types of files.
We chose to use blob storage for its simplicity and low cost for this POC.
To start, let’s explain the structure of Azure Blob storage. It has three types of resources:
The storage Account
A container in the storage account
A blob
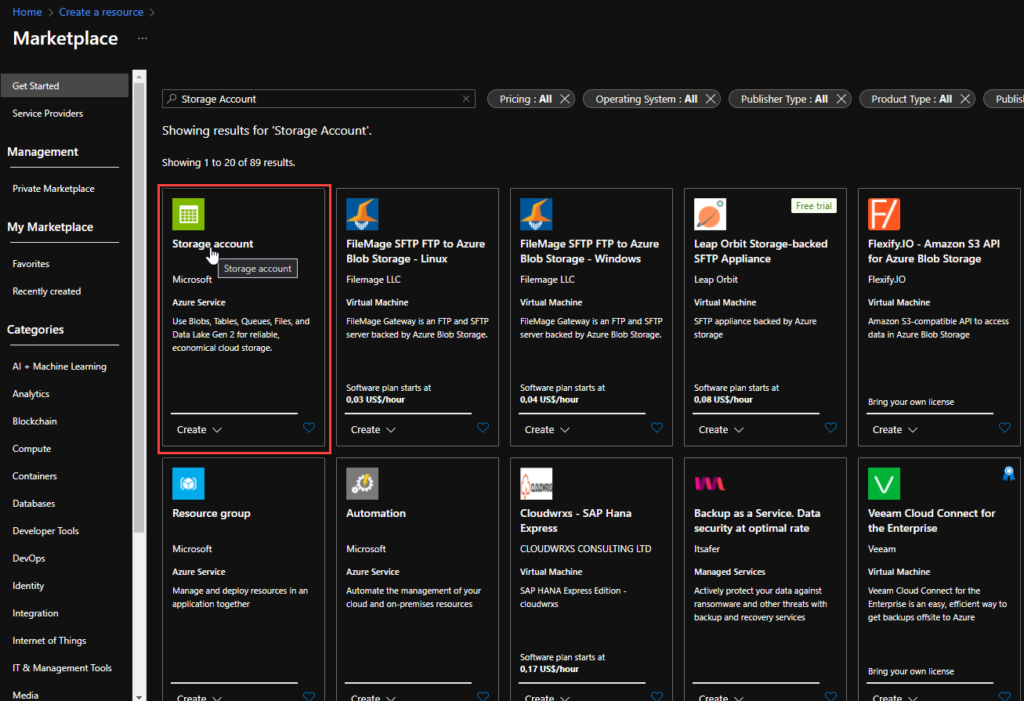
If you don’t have a Storage Account yet, the first step is to create one, and for that, you need to:
From the Azure portal menu or the Home page, select Create a resource.
On the Create a resource page, on the search type Storage account and from the list, select Storage account and click Create.
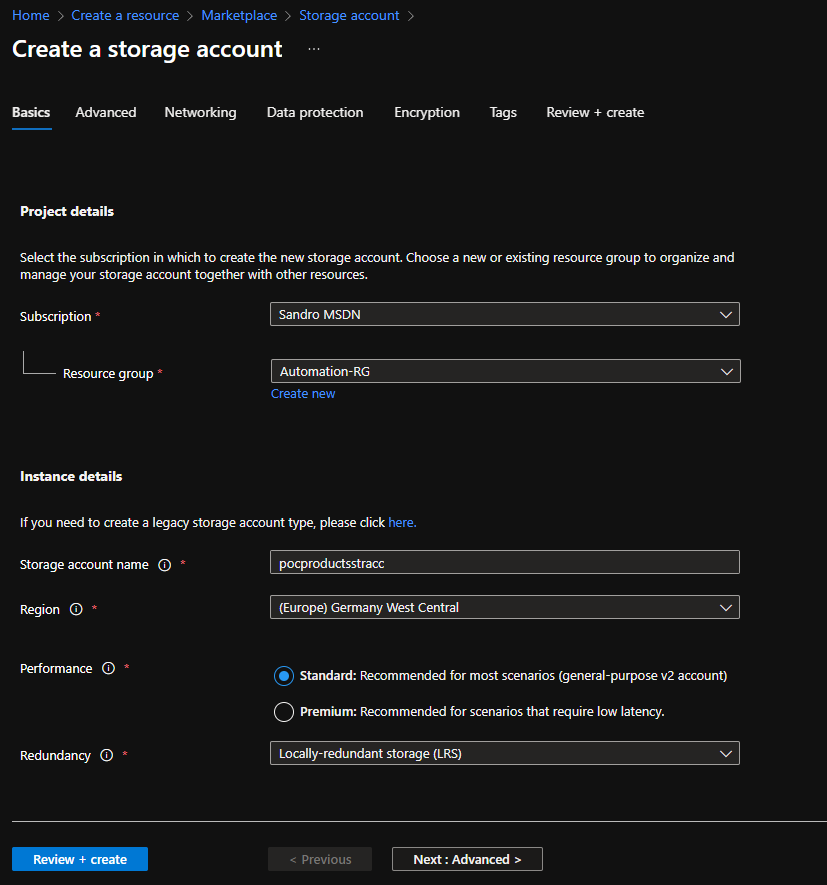
On the Create a storage account Basics page, you should provide the essential information for your storage account. After you complete the Basics tab, you can choose to further customize your new storage account by setting options on the other tabs, or you can select Review + create to accept the default options and proceed to validate and create the account:
Project details
Subscription: Select the subscription under which this new function app is created.
Resource Group: Select an existing Resource Group or create a new one in which your function app will be created.
Instance details
Storage account name: Choose a unique name for your storage account.
Storage account names must be between 3 and 24 characters in length and may contain numbers and lowercase letters only.
Region: Choose a region near you or near other services your functions access.
Note: Not all regions are supported for all types of storage accounts or redundancy configurations
Performance: Standard or Premium Select
Standard performance for general-purpose v2 storage accounts (default). This type of account is recommended by Microsoft for most scenarios.
Select Premium for scenarios requiring low latency.
Redundancy: Select your desired redundancy configuration.
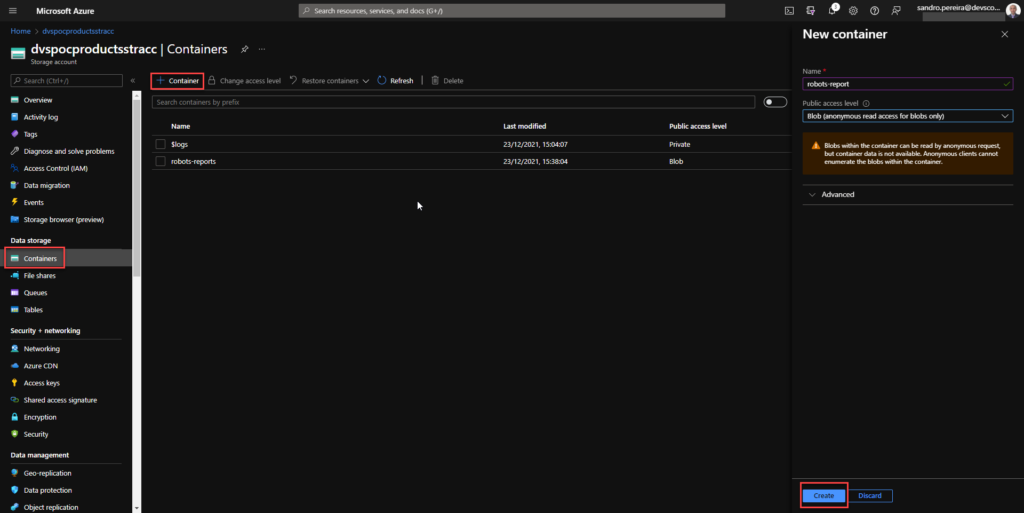
Now that we have the storage account created, we need to create our Blob Container. And for that we need:
In the left menu for the storage account, scroll to the Data storage section, then select Containers.
On the Containers page, click on + Container button.
From the New Container window:
Enter a name for your new container. You can use numbers, lowercase letters, and dash (-) characters.
Select the public access level to Blob (anonymous read access for blobs only).
Blobs within the container can be read by anonymous request, but container data is not available. Anonymous clients cannot enumerate the blobs within the container.
Click Create to create the container.
Create a Logic App
PowerBI Robots is capable of sending a JSON request with all the information regarding a configured playlist:
To receive and process requests from PowerBI Robots, we decided to use and create a Logic App, which is a cloud-based platform for creating and running automated workflows that integrate your apps, data, services, and systems. To simplify the solution, we will also use the Azure Portal to create the Logic App.
From the Azure portal menu or the Home page, select Create a resource.
In the Create a resource page, select Integration > Logic App.
On the Create Logic App Basics page, use the following Logic App settings:
Subscription: Select the subscription under which this new Logic App is created.
Resource Group: Select an existing Resource Group or create a new one in which your Logic app will be created.
Type: The logic app resource type and billing model for your resource. In this case, we will be using Consumption.
Consumption: This logic app resource type runs in global, multi-tenant Azure Logic Apps and uses the Consumption billing model.
Standard: This logic app resource type runs in single-tenant Azure Logic Apps and uses the Standard billing model.
Logic App name: Your Logic App resource name. The name must be unique across regions.
Region: The Azure datacenter region where to store your app’s information. Choose a region near you or near other services your Logic app access.
Enable log analytics: Change this option only when you want to enable diagnostic logging. The default value in No.
When you’re ready, select Review + Create. Then, on the validation page, confirm the details you provided, and select Create.
After Azure successfully deploys your app, select Go to resource. Or, find and choose your Logic App resource by typing the name in the Azure search box.
Under Templates, select Blank Logic App. After selecting the template, the designer now shows an empty workflow surface.
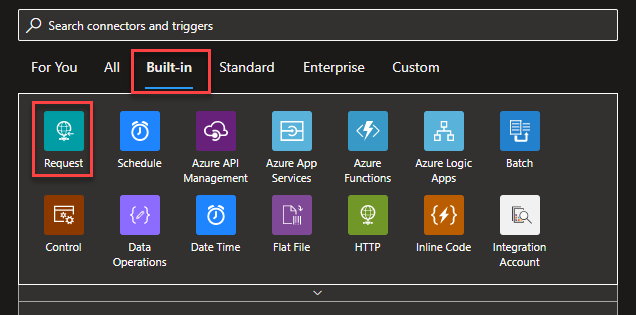
In the workflow designer, under the search box, select Built-In. Then, from the Triggers list, select the Request trigger, When a HTTP request is received.
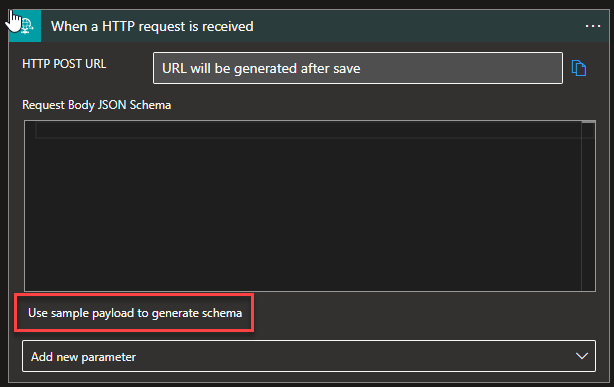
For us to tokenize the values of the message we are receiving from the PowerBI Robots, we can, on the Request trigger, click on Use sample payload to generate schema
And copy the JSON message provided earlier to the Enter or paste a sample JSON payload window and then click Done.
Under the Request trigger, select New step.
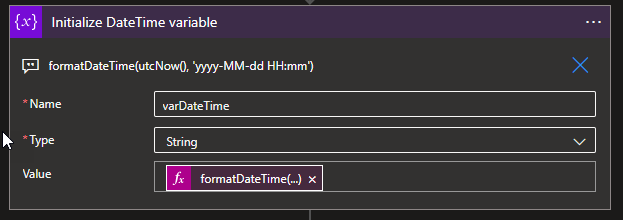
Select New step. In the search box, enter Variables, and from the result panel select the Variables, and choose the Initialize variable action and provide the following information:
Name: varDateTime
Type: String
Value: Select Expression and add the following expression formatDateTime(utcNow(), ‘yyyy-MM-dd HH:mm’)
Note: this variable will be used later in the business process to provide the data in a clear format on the message to be sent to the Teams channel.
Under the Request trigger, select New step.
Select New step. In the search box, enter Variables, and from the result panel select the Variables, and choose the Initialize variable action and provide the following information:
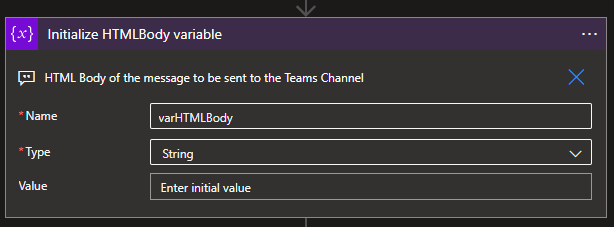
Name: varHTMLBody
Type: String
Value: (Empty)
Note: this variable will be used later in the business process to dynamically generate the message to be sent to the Teams channel in an HTML format.
Select New step. In the search box, enter Blob, and from the result panel select the Azure Blob Storage and choose the Create blob (v2)action.
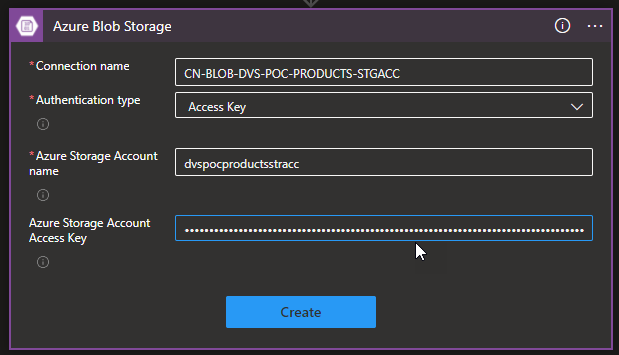
If you don’t have yet a connection create you first need to create the connection by setting the following configurations and then click Create:
Connection name: Display connection name
Authentication type: the connector supports a variety of authentication types. In this POC, we will be using Access Key.
Azure Storage Account name: Name of the storage account the connector we create above. We will be using dvspocproductsstracc.
Azure Storage Account Access Key: Specify a valid primary/secondary storage account access key. You can get these values on the Access keys option under the Security + networking section on your storage account.
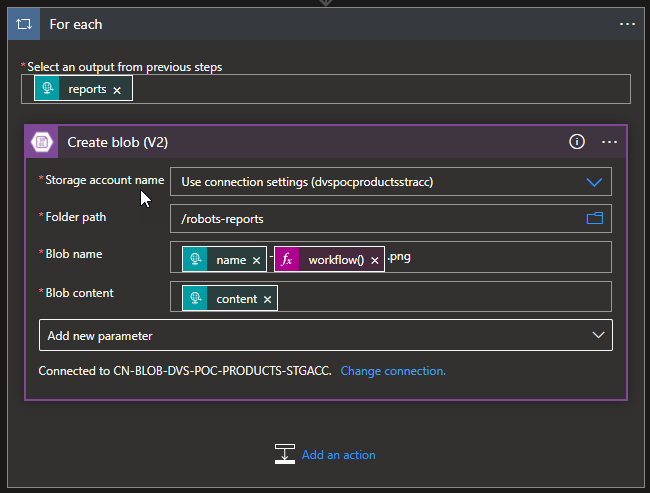
Then provide the following information:
Storage account name: Select from the dropdown list the storage account. The default should be Use connection settings (dvspocproductsrracc)
Folder path: navigate to the folder /robots-reports
Blob name: Dynamic set the name of the file to be created. To avoid overlap we decide to use the unique workflow id of the message as part of the name of the report we receive on the source message:
Blob content: the Base64 content we receive on the source message.
Note: by setting the name or the content on the Create blob action, this will automatically add a For Each loop statement on our business flow since these fields can occur multiple times inside the source message. And this is correct and what we want.
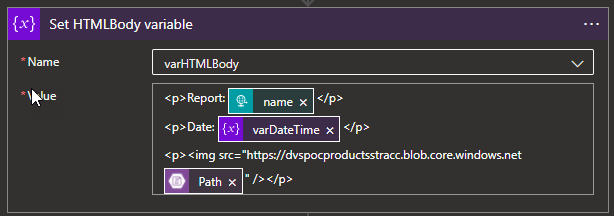
Select New step. In the search box, enter Variables, and from the result panel select the Variables, and choose the Set variable action and provide the following information:
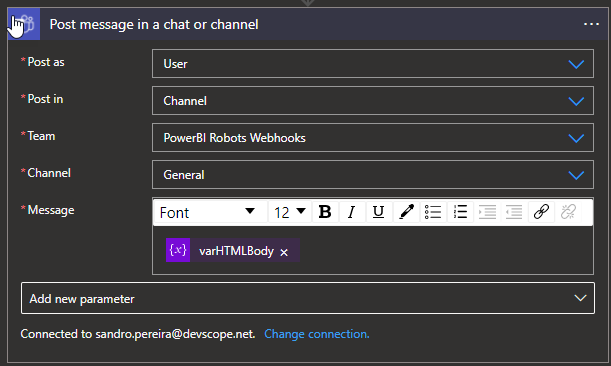
And finally, select New step. In the search box, enter Teams, and choose from the result panel the Microsoft Teams, choose the Post message in a chat or channel action and provide the following information:
Post as: Select User
Post in: Select Channel
Team: Select the Team, in our case PowerBI Robots Webhooks
Channel: Select the Team channel, in our case General
Message: place the message we create above by using the varHTMLBody
Note: if you don’t have yet created a Teams Connector, you need to Sign in using the account that will be making these notifications.
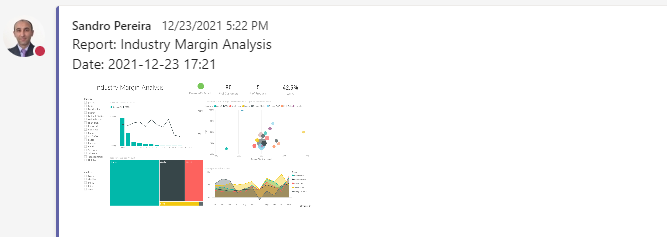
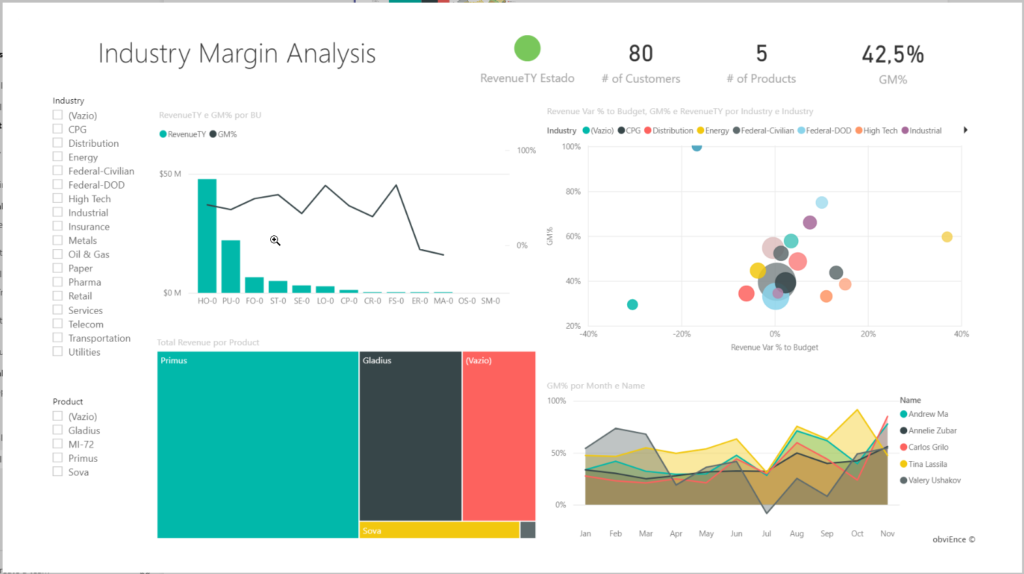
As a result, once we receive a new request from the PowerBI Robots, will be a fancy message on teams with a thumbnail of the report:
You can click on it and see it in full size:
More About PowerBI Robots?
PowerBI Robots automatically takes screenshots of your Microsoft Power BI dashboards and reports and sends them anywhere, to an unlimited number of recipients. Simply tell PowerBI when and where you want your BI data, and it will take care of delivering it on time.
Do you feel difficult to keep up to date on all the frequent updates and announcements in the Microsoft Integration platform and Azure iPaaS?
Integration weekly updates can be your solution. It’s a weekly update on the topics related to Integration – enterprise integration, robust & scalable messaging capabilities and Citizen Integration capabilities empowered by Microsoft platform to deliver value to the business.
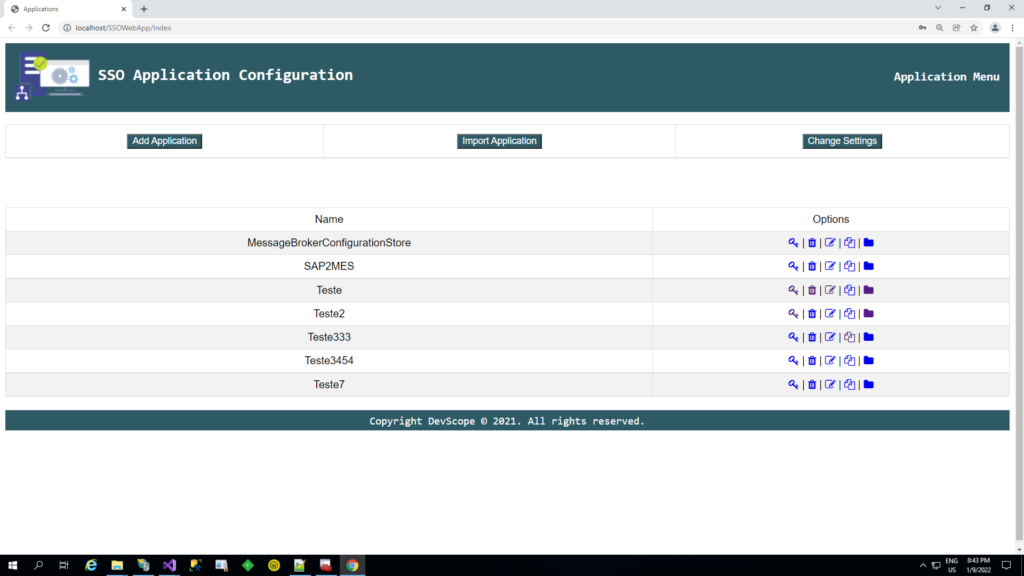
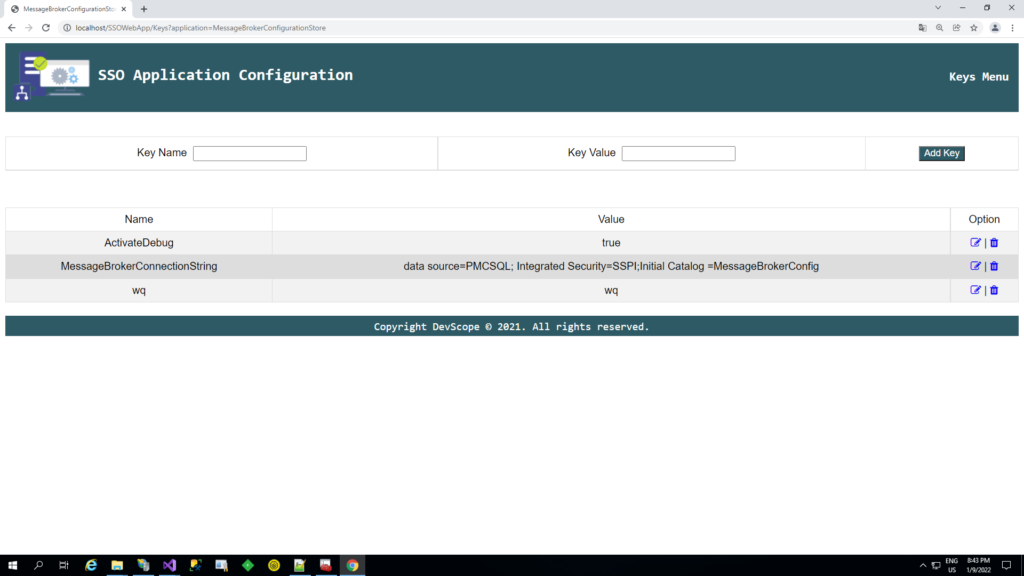
It’s been some time since I created the BizTalk ServerSSO Application Configuration tool. The tool is available for several versions of BizTalk Server. It provides the ability to add and manage applications, add and manage key-value pairs in the SSO database, and import and export configuration applications to be deployed to different environments.
However, and although I love this tool, there is a significant limitation. It is a Windows application tool. So, most of the time, we need remote access to the BizTalk Server machines to access the tool to be able to read or change these values inside the SSO Applications.
To bypass this limitation, we create a Web version of this tool. The tool has almost the same features available as the traditional windows tool:
You can securely export and import Application configurations and it is compatible with MSFT SSO snap-in;
You can duplicate Applications (copy and past);
You can rename Applications;
You can easily add new key-values;
You can edit key-values;
Other versions
This tool is also available in the format of Windows Application for the following BizTalk Server versions:
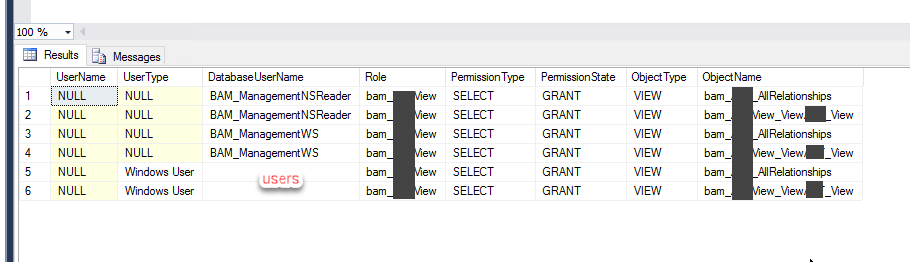
While organizing my vast resources in my hard drive, I recently found out, polished, and improved two SQL Server queries that allow us to check the users and groups with access to BAM resources.
These are simple SQL Queries, but they are essential for maintaining your environment under control, security, and privacy standards compliance.
Generally, BizTalk Server is compatible with all the privacy standards-compliant like GDPR or FIPS. BizTalk Server is a messaging broker that doesn’t capture or store any data on its system other than for the time needed to complete business processes and connect and route messages to their target systems. However, because you can process messages and/or communicate with systems that contain sensitive data (personal data), you must have some good practices in BizTalk Server Applications to comply with privacy standards.
Business Activity Monitoring (BAM) is a collection of tools that allow you to manage aggregations, alerts, and profiles to monitor relevant business metrics (called Key Performance Indicators, or KPIs). It gives you end-to-end visibility into your business processes, providing accurate information about the status and results of various operations, processes, and transactions so you can address problem areas and resolve issues within your business. But it is also a component that can capture data from the messages passing by the systems, and some of these data can be sensitive – that shouldn’t happen, but it can happen.
So, it is always good in terms of security, control, documentation, and in some cases, privacy to know which users can access BAM data.
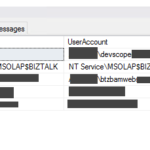
BizTalk Server: SQL Query to list all Users with access to BAMPrimaryImport database
This is a simple SQL Server Query that provides a list of all users that has access to the BAMPrimaryImport database.
THIS SQL SCRIPT IS PROVIDED “AS IS”, WITHOUT WARRANTY OF ANY KIND.
Monitoring a BizTalk Server environment can sometimes be a complex task due to the infrastructure and complexity layers behind the BizTalk Server. Apart from that, the administrator teams need to monitor all the applications deployed to the environment.
Ideally, the administration team should use all monitoring tools at their disposal, whether they are included with the product, such as BizTalk Server Administrative console, Event Viewer, HAT, or BAM. But the main problem with these tools is that:
They need manually intervention.
Almost all of them requires remote access to the environment.
When an administrator must manually check each server or application by events that may have occurred, that is not a very efficient and effective way to allocate the team’s time nor to monitor the environment.
Of course, they can also use other monitoring tools from Microsoft, such as Microsoft System Center Operation Manager (SCOM), or third-party monitoring solutions such as BizTalk360. These tools should be able to read events from all layers of the infrastructure and help the administration team to take preventive measures, notifying them when a particular incident is about to happen, for example, when the free space of a hard drive is below 10%. Furthermore, they should allow the automation of operations when a specific event occurs, for example, restart a service when the amount of memory used by it exceeds 200MB, thereby preventing incidents or failures, without requiring human intervention.
But the question is: and if you don’t have these tools?
You can archive these tasks in several ways. Many people create custom web portals to emulate some of the most basic tasks of the admin console. One of my favorite options is using a mix of PowerShell, schedule tasks, and/or Azure Services like Logic Apps and Functions. But today I will show you a different or alternative way:
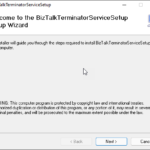
Create a Windows Service to monitor suspended Instances and automatically terminate them
Note: of course, this solution can be expanded to other kinds of stuff or add new funcionalities.
BizTalk Monitor Suspend Instance Terminator Service
This is a Windows Service that will be continually monitoring BizTalk Server for specific suspended messages (with an interval of x seconds/minutes/hours defined on code) and termites them automatically.
This tool allows you to configure:
The type of suspended messages you want to terminate
Terminate without saving the messages or saving them to a specific folder before terminating them.
These configurations are made on the app config of the service:
I recently brought some old BizTalk Server resources back to life, like the BizTalk Server WCF-Loopback Adapter or File-Z Adapter. And I have been working on several more resources. So today, it is a pleasure to bring back to life again an old tool created by my friend Thiago Almeida (LinkedIn, Twitter) back in the day he was a BizTalk Server developer:
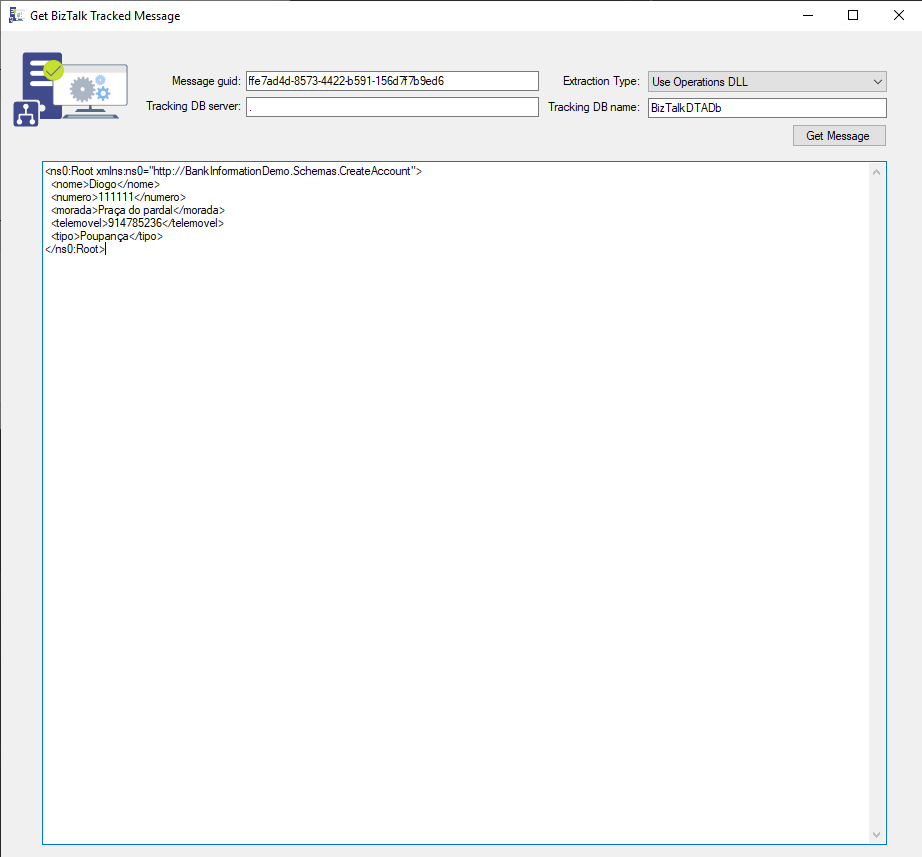
Get Tracked Message tool
This tool allows you to programmatically extract a message body from the BizTalk tracking database using 3 possible ways, as Thiago Almeida mentioned in his original blog post:
Operations DLL: this method uses the Microsoft.BizTalk.Operations assembly. This is pretty straightforward. You add a reference to Microsoft.BizTalk.Operations.dll and use the GetTrackedMessage of the BizTalkOperations class. You can also get to the message context using this method. This method is only available for BizTalk Server 2006 and late.
SQL: this method uses the bts_GetTrackedMessageParts stored procedure inside the tracking database expects the message GUID and will return the compressed message data. We can then use reflection to invoke the Decompress method of Microsoft.BizTalk.Message.Interop.CompressionStreams class inside Microsoft.BizTalk.Pipeline.dll to decompress the data returned from SQL.
And WMI: this method uses the WMI MSBTS_TrackedMessageInstance.SaveToFile method to save the instance to disk. This was the popular method in BizTalk Server 2004 since there were no operations DLL back then.
As some of you know, the body and context of messages in BizTalk are compressed, and rightfully so. However, the actual compression and decompression code are hidden inside an assembly called BTSDBAccessor.dll. This DLL, the BizTalk Database Accessor, is unmanaged and does a lot of work for BizTalk, including accessing the BizTalk databases to send and receive messages.
The application has only one form and expects the following parameters:
The message guid of the message you want to extract.
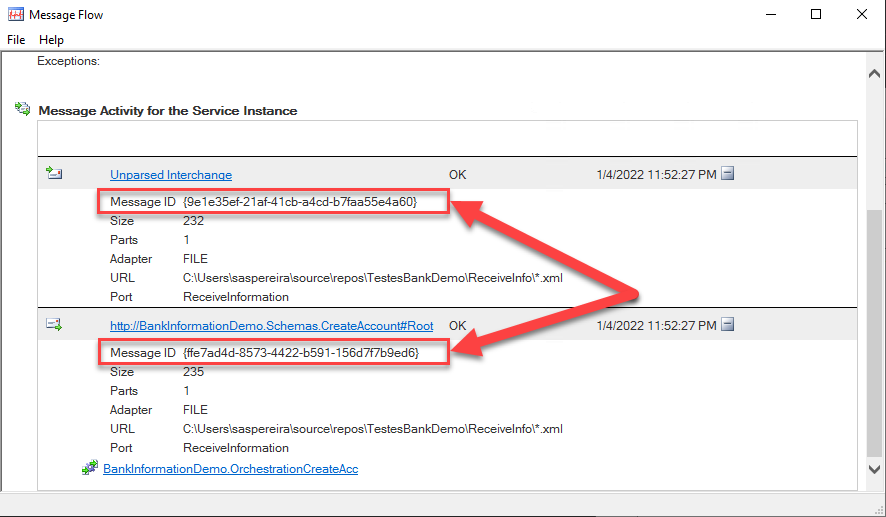
You can get this value for example, from the Message Flow
The extraction type (Use Operations DLL, Use SQL, Use WMI)
Tracking DB server (the BizTalk server name)
Tracking DB name (the BizTalk Tracking database name)
Credits
Thiago Almeida | Linkedin | The original craetor of this tool.
Diogo Formosinho | Linkedin | Member of my team and that help me migrate this tool and that add a more modern look to the tool.
Download
THIS TOOL IS PROVIDED “AS IS”, WITHOUT WARRANTY OF ANY KIND.
You can download the BizTalk Server GetTrackedMessage tool from GitHub here:
After I delivered 21 lectures last year, it is time to start the 2022 season in a “new place” (it is virtual): Chicago! The M365 Chicago Virtual Conference brought to you by VEEAM is a free online (in Microsoft Teams), one-day event on Friday, January 14, 2022. The event will run from 8:30 am ~ 4:30 pm Central Time. ?
Microsoft 365 specialists, Cloud IT administrators, Power Platform administrators, end-users, architects, developers, and other professionals that work with Microsoft Collaboration or Cloud Technologies will meet to share the latest information for working with anything and everything related to Microsoft 365 and Power Platform.
“M365 Below in Chicago!” is a community-led event dedicated to educating and engaging members of the technical community. The event draws upon the expertise of IT Professionals, Microsoft MVPs, Developers, Solution Architects, and other experts who come together to share their real-world experiences, lessons learned, best practices, and general knowledge with other like-minded individuals.
You will find sessions on different subjects like:
Teams
Power Platform
Employee Experience (Microsoft Viva)
SharePoint, OneDrive, Office, and Yammer
User Adoption & Productivity
M365 Security and Compliance
See the full event schedule here: Full schedule.
I choose to submit a session to this event, and I’m honored to be accepted as a guest speaker on a session about Power Automation: A new set of Best practices, tips and tricks. My session will take place at 03:00 pm according to UTC+0 on the Water Tower Power Platform room.
Power Automation: A new set of Best practices, tips and tricks
As I mentioned before, my session will be all about best practices and small tips and tricks that we can apply to our Power Automate flows. For those reasons, I would like to invite you to join me at the M365 Below in Chicago! virtual event on Friday, January 14, 2022.
Session name: Power Automation: A new set of Best practices, tips and tricks
Abstract: A brand new set of tips and tricks and best practices that you should know for being more productive and building more reliable and effective Power Automate flows. This is not an introduction session anymore. Instead, this session will go through a list of 10 new best practices, tips, and tricks addressing advanced topics like deployment, dynamic connectors configurations, etc.
Join us and reserve your presence at the M365 Below in Chicago! virtual event on Friday, January 14, 2022, it is free!