Today I’m going to go over how we solved a real scenario from one of our PowerBI Portal clients. For those who aren’t familiar with it, PowerBI Portal is a web tool that allows organizations to host an unlimited number of Power BI reports and dashboards on an online portal, and give access to it to any number of users, regardless of being in their organization or even having a Power BI account. PowerBI Portal is mainly used by organizations looking to share data with their clients, partners and suppliers, but there have been numerous entrepreneurial cases of people using it as a platform, selling their clients access to the portal or charging for the time they spent on PowerBI Portal.
Other interesting points about PowerBI Portal are the tool’s double layer of row-level security (user and role), which allows data managers to specify who has access to what, and the ability to only consume Power BI Embedded capacity when there’s activity on the platform, which can severely reduce an organization’s consumption bill.
Finally, it’s worth mentioning how flexible the PowerBI Portal API is, allowing for custom solutions such as the one we’ll cover in this blog post.
Challenge
Our PowerBI Portal client wanted a daily report of the top 10 vendors that accessed their organization’s portal along with the most viewed dashboards/reports to better understand how the tool was being used and by whom. The PowerBI Portal API is actually very powerful and straightforward to use, but it didn’t have this capability out-of-the-box so we proactively extend the product’s capabilities by using Azure Integration Services.
This proof-of-concept will explain how you can extend the product by using the existing APIs and creating a fancy Power BI access on the PowerBI Portal audit report.
Create Function App
If you don’t have yet a Function App with the .NET runtime stack created, the first step is to create one, and for that, you need to:
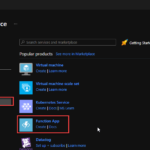
From the Azure portal menu or the Home page, select Create a resource.
In the Create a resource page, select Compute > Function App.
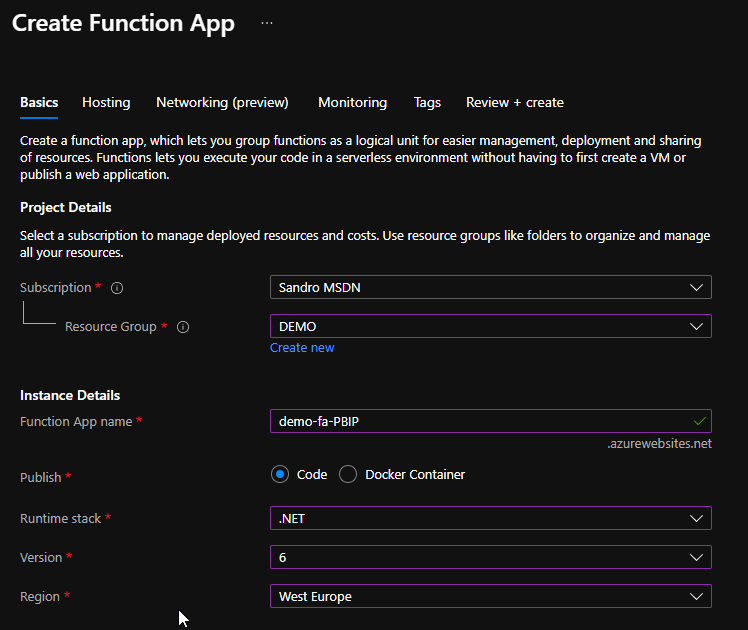
On the Create Function App Basics page, use the following function app settings:
Subscription: Select the subscription under which this new function app is created.
Resource Group: Select an existing Resource Group or create a new one in which your function app will be created.
Function App name: Name that identifies your new function app.
Publish: Select Code.
Runtime stack: Select the option .NET
Version: Choose the version of your installed runtime, in this case, 6
Region: Choose a region near you or near other services your functions access.
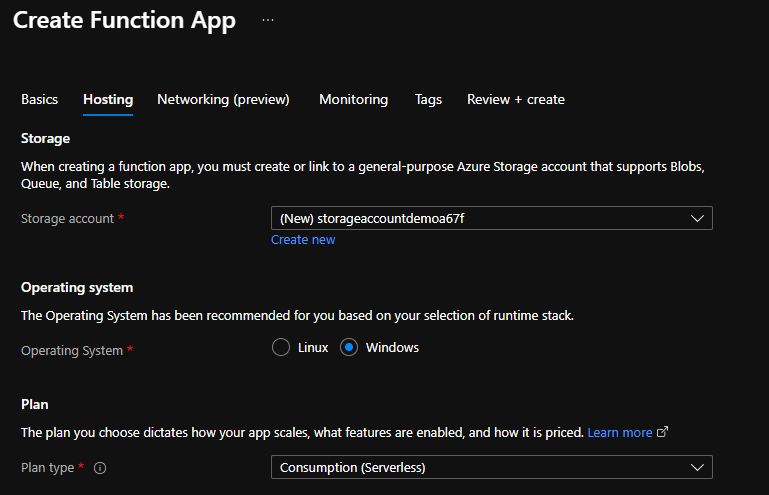
Select Next : Hosting. On the Hosting page, enter the following settings:
Storage Account: Create a storage account used by your function app or select an existing one
Operating system: I choose to use Windows since I’m feeling more comfortable with it.
Plan: Hosting plan that defines how resources are allocated to your function app. In this case, you need to select the Consumption plan.
You can customize the other option according to your intentions or leave the default values. For this demo, we will now select Review + create to review the app configuration selections.
On the Review + create page, review your settings, and then select Create to provision and deploy the function app.
Create HTTP trigger function
The next step is to create two HTTP trigger Function:
FA_Audit_Top10Reports
FA_Audit_Top10USers
For that we need to:
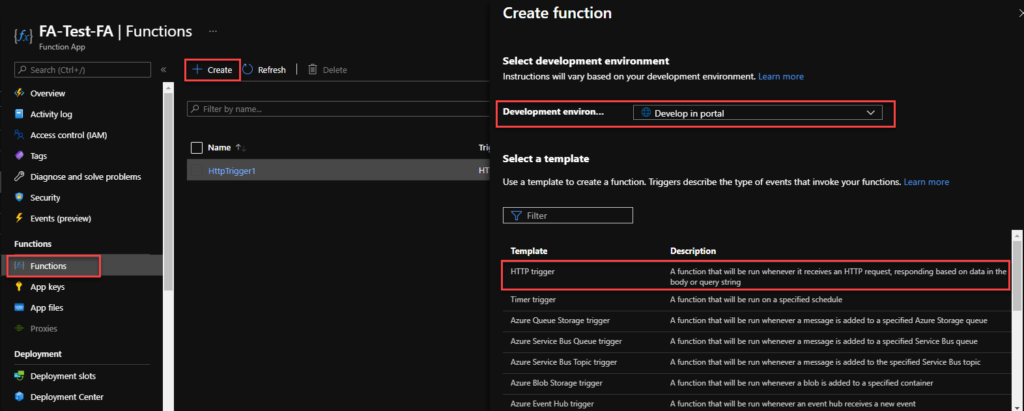
From the left menu of the Function App window, select Functions, then select Create from the top menu.
From the Create Function window, leave the Development environment property as Develop in portal and select the HTTP trigger template.
Under Template details give a proper name for New Function, and choose Function from the Authorization level drop-down list, and then select Create.
On the FA_Audit_Top10Reports window, select Code + Test, then on the run.ps1 file add the following code:
This function will return a list of top 10 reports in a HTML table format
...
string requestBody = new StreamReader(req.Body).ReadToEnd();
JArray data = (JArray)JsonConvert.DeserializeObject(requestBody);
var apiReport = new JArray();
var groups = data
.GroupBy(s => s["name"])
.Select(s => new
{
Dashboard = s.Key,
Count = s.Count()
})
.OrderByDescending(s=> s.Count).Take(10);
...
Note: this is a small part of the code. Click on the button below to download a simplified version of the source code from the overall solution.
On the FA_Audit_Top10USers window, select Code + Test, then on the run.ps1 file add the following code:
This function will return a list of top 10 users in a HTML table format
...
string requestBody = new StreamReader(req.Body).ReadToEnd();
JArray data = (JArray)JsonConvert.DeserializeObject(requestBody);
var apiReport = new JArray();
var groups = data
.GroupBy(s => s["userEmail"])
.Select(s => new
{
User = s.Key,
Count = s.Count()
})
.OrderByDescending(s=> s.Count).Take(10);
...
Note: this is a small part of the code. Click on the button below to download a simplified version of the source code from the overall solution.
Finally, we need to create a scheduling Logic App to trigger the monitoring Function and notify if any API Connection is broken. To simplify the solution, we will be using the Azure Portal to create also the Logic App.
From the Azure portal menu or the Home page, select Create a resource.
In the Create a resource page, select Integration > Logic App.
On the Create Logic App Basics page, use the following Logic app settings:
Subscription: Select the subscription under which this new Logic app is created.
Resource Group: Select an existing Resource Group or create a new one in which your Logic app will be created.
Type: The logic app resource type and billing model to use for your resource, in this case we will be using Consumption
Consumption: This logic app resource type runs in global, multi-tenant Azure Logic Apps and uses the Consumption billing model.
Standard: This logic app resource type runs in single-tenant Azure Logic Apps and uses the Standard billing model.
Logic App name: Your logic app resource name, which must be unique across regions.
Region: The Azure datacenter region where to store your app’s information. Choose a region near you or near other services your Logic app access.
Enable log analytics: Change this option only when you want to enable diagnostic logging. The default value in No.
When you’re ready, select Review + Create. On the validation page, confirm the details that you provided, and select Create.
After Azure successfully deploys your app, select Go to resource. Or, find and select your logic app resource by typing the name in the Azure search box.
Under Templates, select Blank Logic App. After you select the template, the designer now shows an empty workflow surface.
In the workflow designer, under the search box, select Built-In. From the Triggers list, select the Schedule trigger, Recurrence.
In the trigger details, provide the following information:
Interval: 1
Frequency: Day
Under the Recurrence trigger, select New step.
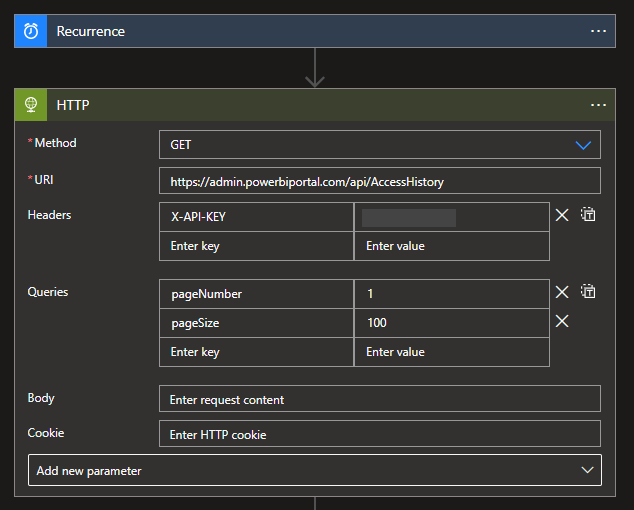
Select New step. In the search box, enter HTTP, and from the result panel select the HTTP, HTTP action and provide the following information:
Headers: you need to create the X-API-KEY with your access token
Queries: you need to specify two query parameters:
pageNumber: 1
pageSize: 100
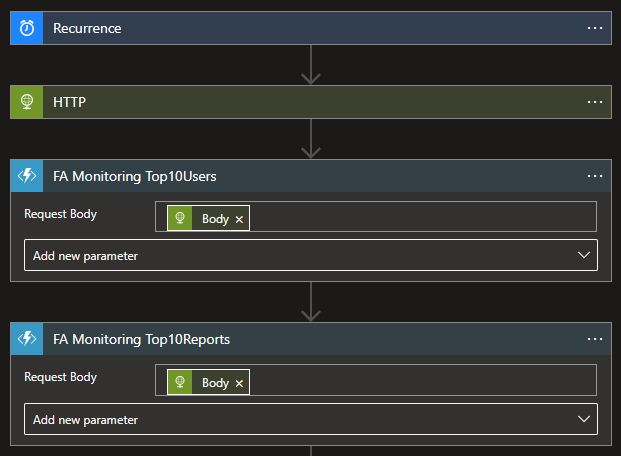
Select New step. In the search box, enter Azure Functions, and from the result panel select the Azure Functions, select the Function App that contains the Functions we create above and then select the FA_Audit_Top10Users function and provide the following information
Request Body: Result body of the HTTP action – @{body(‘HTTP’)}
Do the same steps, this time for the FA_Audit_Top10Reports function
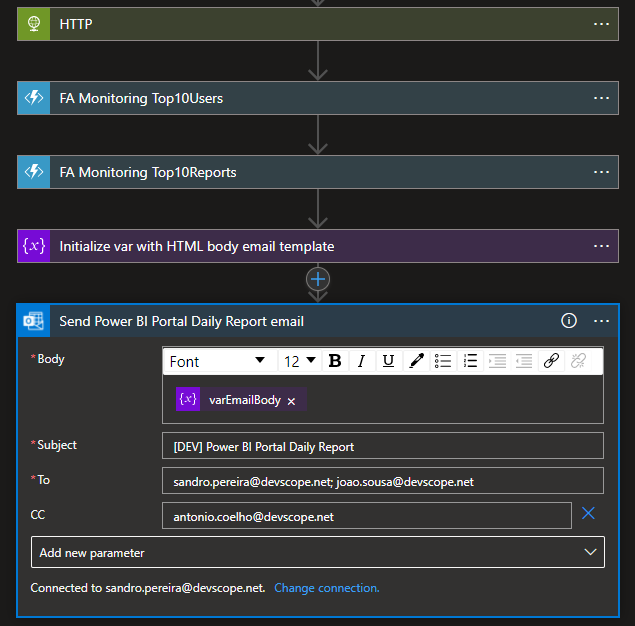
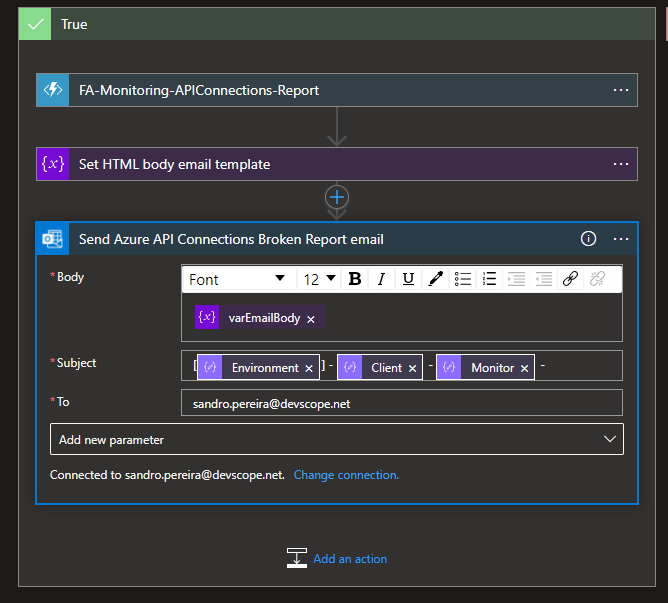
Select New step. In the search box, enter Variables, and from the result panel select the Variables, Initialize variable action and provide the following information:
Name: varEmailBody
Type: String
Value: provide the HTML email body template and add the result of the functions to that template
Note: this is a small part of the HTML body template code. You should customize it according to your needs.
And finally, select New step. In the search box, enter Office 365 Outlook, and from the result panel select the Office 365 Outlook, Send an email (v2)action and provide the following information:
Body: varEmailBody – @{variables(‘varEmailBody’)}
Subject: [DEV] Power BI Portal Daily Report
To: list of your email addresses.
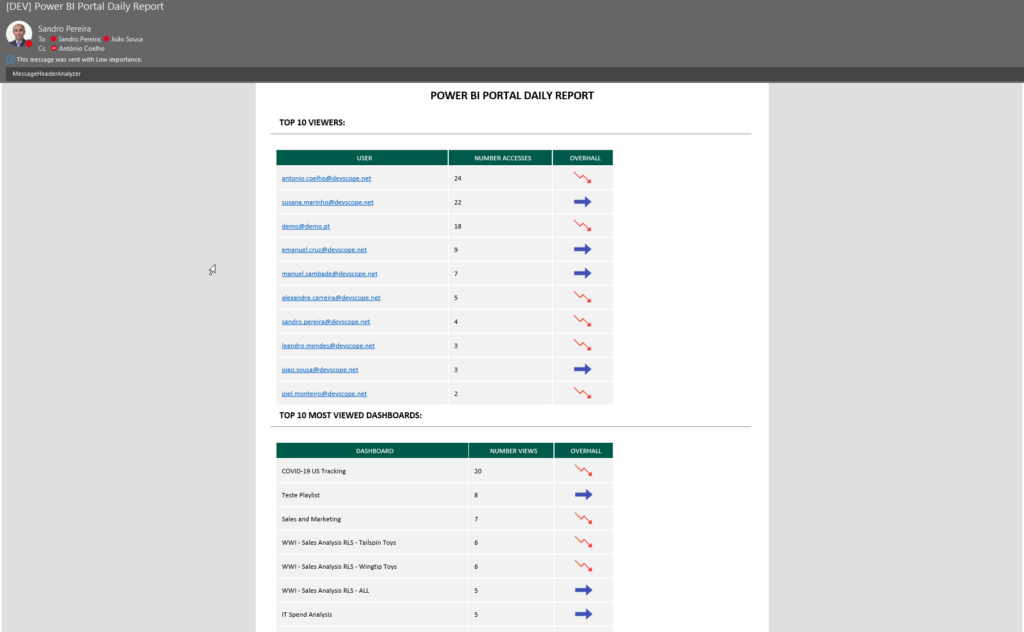
The result, once you try to execute the Logic App, will be a fancy HTML email:
More about Power BI Portal
PowerBI Portal is a web tool that allows users to embed any number of Power BI reports and dashboards on a portal with their organization’s layout, that can be shared with whoever they want, regardless of being in their organization or even having a Power BI account. Know more about it here.
We finally reach the last part of this small blog season on monitoring the status of your Azure API Connections. We start by using a simple PowerShell script locally on our machine to progress to an automated way using Azure Function Apps and Logic Apps. I mentioned in my last post that this previous option had a considerable handicap associated with costs since we couldn’t use the Consumption plan, and instead, we had to use an App Service plan.
Today we will go to address the best solution in my personal opinion:
Using a Schedule PowerShell Runbook on an Automation Account to check the Azure API Connection status
And once again, using a Logic App, this time with an HTTP- When a HTTP request is received trigger, to notify the internal support team if any findings (broken API Connections) were detected.
Note: the Logic App will only be triggered if the Runbook detects/find any non-coherent situations.
Solution 3: Using Automation Account and Logic App
Create Automation Account
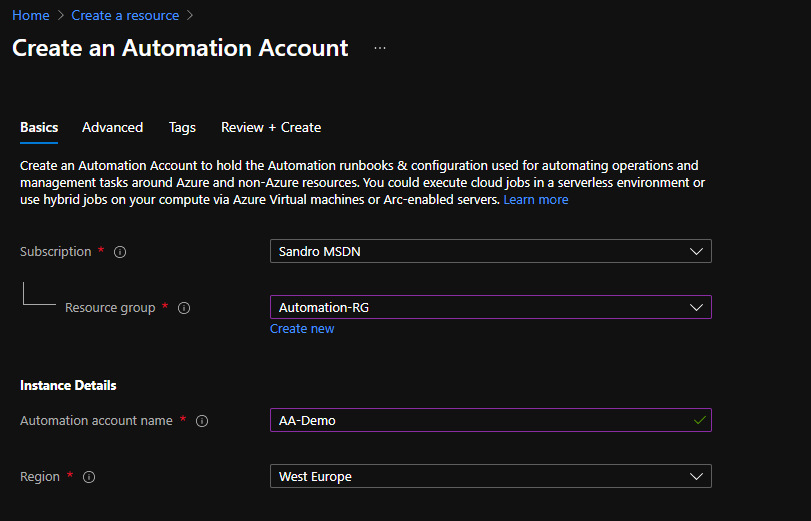
The first step, if you don’t have an Automation account yet, is to create one, and for that, you need:
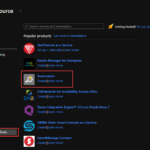
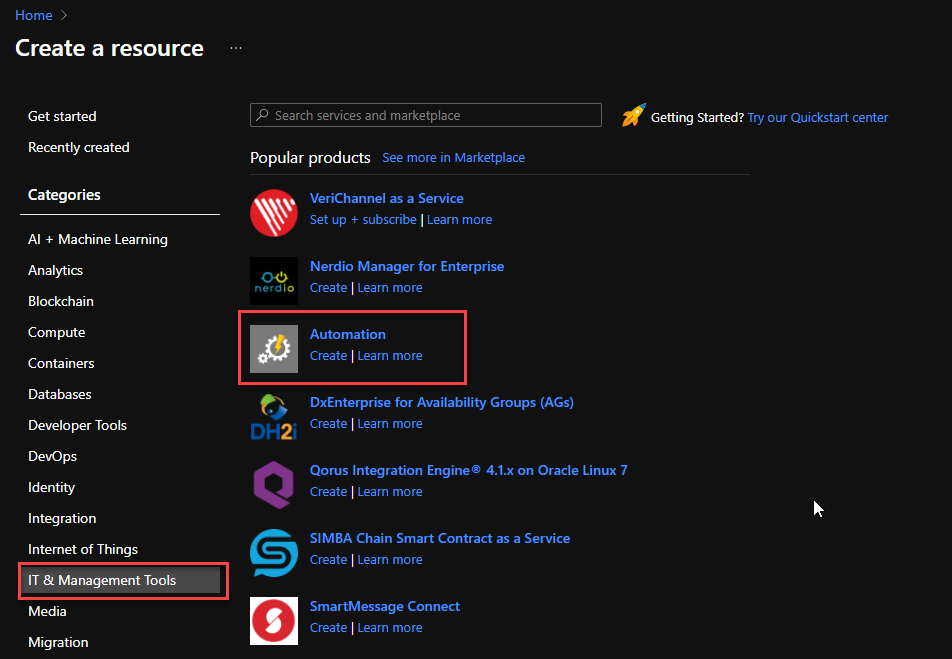
From the Azure portal menu or the Home page, select Create a resource.
In the Create a resource page, select IT & Management Tools > Automation.
On the Create an Automation Account Basics page, use the following settings:
Subscription: Select the subscription under which this new Automation Account will be created.
Resource Group: Select an existing Resource Group or create a new one in which your Automation Account will be created.
Automation account name: Name that identifies your new Automation Account.
Region: Choose a region near you or near other services your Automation Account access.
You can customize the other option according to your intentions or leave the default values. For this demo, we will now select Review + create to review the app configuration selections.
On the Review + create page, review your settings, and then select Create to provision and deploy the Automation Account.
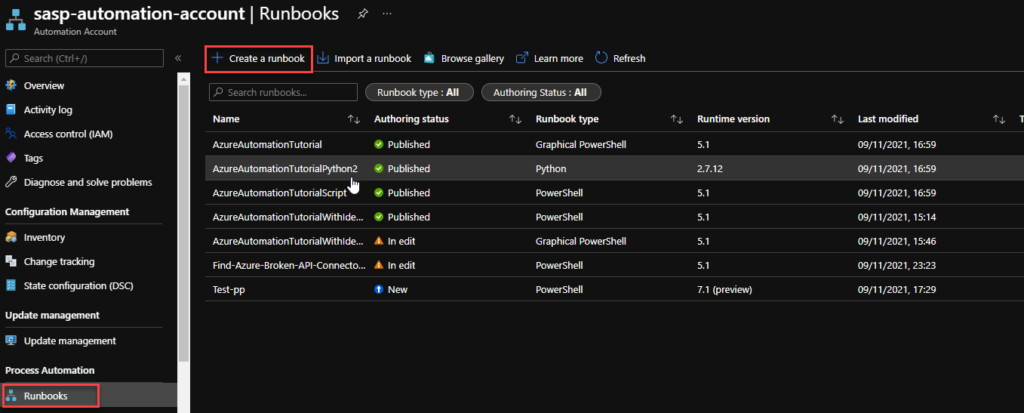
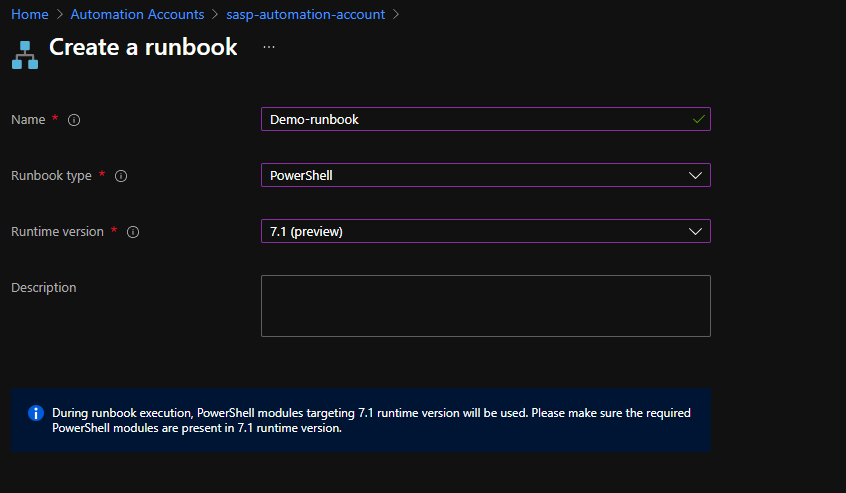
Create Automation PowerShell runbook
The next step is to create a PowerShell runbook. For that, you need to:
From the left menu of the Automation Account window, select Runbooks, then select Create a runbook from the top menu.
From the Create a runbook window, use the following settings:
Name: Name the runbook
Runbook type: From the Runbook type drop-down menu, select PowerShell.
Runtime version: From the Runtime time drop-down menu, select 7.1 (preview).
Description: Provide a description for this runbook (not mandatory filed)
Finally if everything works properly you can publish the runbook.
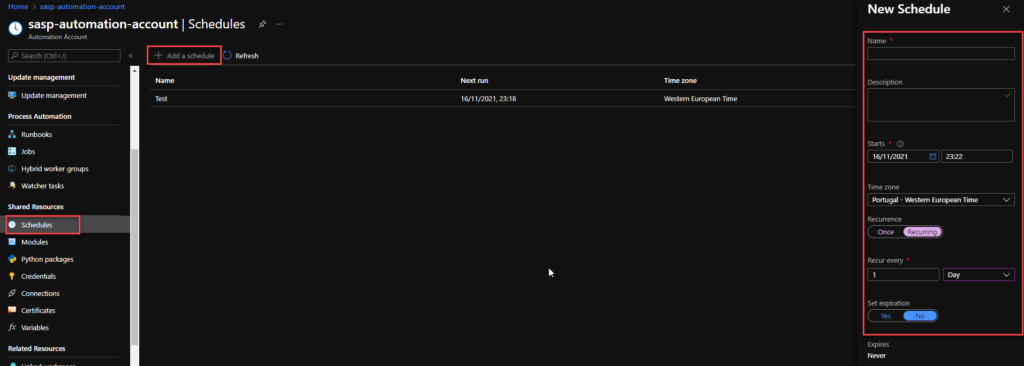
Now we need to schedule the runbook. For that, we need:
From the left menu of the Automation Account window, select Schedules, then select Add a schedule from the top menu.
From the New Schedule window, use the following settings:
Name: Name of the Schedule
Description: Provide a description for this schedule (not mandatory filed)
Starts: Datetime to start the schedule
Time zone: Time zone configured for this schedule, in my case Portugal – Western European Time
Recurrence: Select whether the schedule runs once or on a reoccurring schedule by selecting Once or Recurring. We are going to use Recurring
If you select Once, specify a start time and then select Create.
If you select Recurring, specify a start time.
Recur every: select how often you want the runbook to repeat. Select by hour, day, week, or month. In hour case, 1 per day
Set expiration: Leave the default property, No.
When you’re finished, select Create.
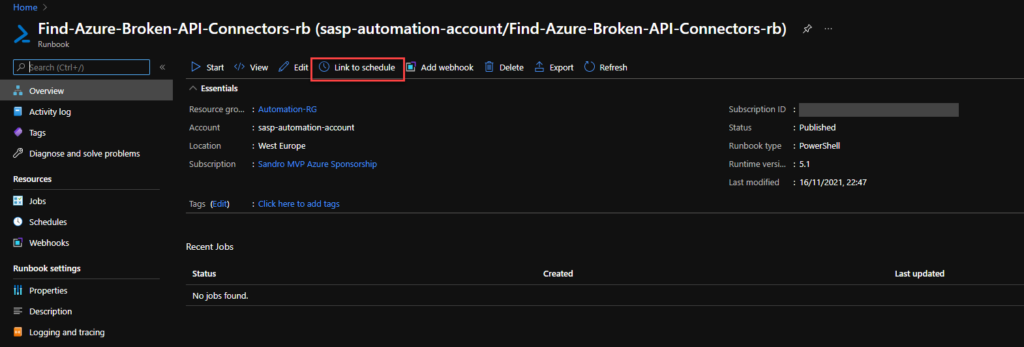
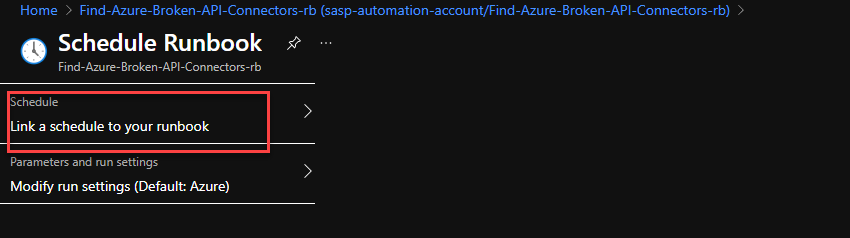
Now that we have our runbook and our schedule created, we need to bind these two, and for that, we need to:
Access to the previous runbook the we create above, and on the runbook page select Link to schedule
On the Schedule Runbook page, select Link a schedule to your runbook.
On the Schedule page, select the schedule we create above from the schedule list
And then select OK.
Create a Logic App
Finally, we need to create a Logic App with an HTTP- When a HTTP request is received trigger to notify if any API Connection is broken. To simplify the solution, we will be using the Azure Portal to create also the Logic App.
Note: once again, the Logic App will only be triggered if the Runbook detects/finds any non-coherent situations..
To accomplish that, we need to:
From the Azure portal menu or the Home page, select Create a resource.
In the Create a resource page, select Integration > Logic App.
On the Create Logic App Basics page, use the following Logic app settings:
Subscription: Select the subscription under which this new Logic app is created.
Resource Group: Select an existing Resource Group or create a new one in which your Logic app will be created.
Type: The logic app resource type and billing model to use for your resource, in this case we will be using Consumption
Consumption: This logic app resource type runs in global, multi-tenant Azure Logic Apps and uses the Consumption billing model.
Standard: This logic app resource type runs in single-tenant Azure Logic Apps and uses the Standard billing model.
Logic App name: Your logic app resource name, which must be unique across regions.
Region: The Azure datacenter region where to store your app’s information. Choose a region near you or near other services your Logic app access.
Enable log analytics: Change this option only when you want to enable diagnostic logging. The default value in No.
When you’re ready, select Review + Create. On the validation page, confirm the details that you provided, and select Create.
After Azure successfully deploys your app, select Go to resource. Or, find and select your logic app resource by typing the name in the Azure search box.
Under Templates, select Blank Logic App. After you select the template, the designer now shows an empty workflow surface.
In the workflow designer, under the search box, select Built-In. From the Triggers list, select the Request connector, and the When a HTTP request is received trigger.
Use the following sample payload to generate the schema
Then we be using the following actions to notify the support team:
Choose an Azure function: I’m calling and Azure Function to transform the list of broken API’s in a HTML table.
Set variable: I’m setting the varEmailBody with my default HTML email body Template and add the HTML table that the Azure Function returned
Send an email (v2) – Office 365 Outlook: To send the email to the support team
The result, once you try to execute the Logic App, will be a fancy HTML email:
Although this approach required quick learning about Azure Automation, that was quite simple, and for me, this is the best approach in terms of cost and architecture design.
Last week I wrote the first part of this small blog season on monitoring the status of your Azure API Connections. In the first part, I described how you could easily create a simple PowerShell script to have a simple report of the status of all your existing Azure API Connections. I knew since the beginning that that solution wasn’t the ideal one, it was good enough to run it from time to time manually on-demand, but that is not the situation you want to be in. So, today we will go to address the first solution that came into my mind and, in fact, was also suggested both by Mike and Nino:
Using an Azure Function App to check the Azure API Connections status
I endup also added a schedule Logic App to trigger that Function App because I want to notify the internal support team if any findings (broken API Connections) were detected.
Solution 2: Using Function App and Logic App
The first question that appeared in this solution was: what kind of runtime stack to use on your Function App: .NET or PowerShell Core?
I decided to use PowerShell Core because I already have all the PowerShell working from the previous solution, so for me made all sense to use this instead of having to recreate all this logic with .NET.
Create Function App
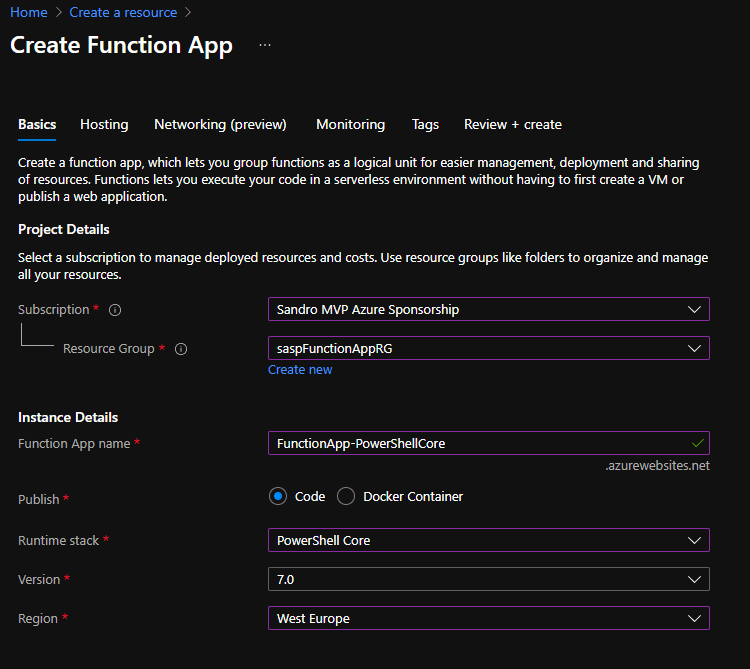
If you don’t have yet a Function App with the PowerShell Core runtime stack created, the first step is to create one, and for that, you need to:
From the Azure portal menu or the Home page, select Create a resource.
In the Create a resource page, select Compute > Function App.
On the Create Function App Basics page, use the following function app settings:
Subscription: Select the subscription under which this new function app is created.
Resource Group: Select an existing Resource Group or create a new one in which your function app will be created.
Function App name: Name that identifies your new function app.
Publish: Select Code.
Runtime stack: Select the option PowerShell Core
Version: Choose the version of your installed runtime, in this case, 7.0
Region: Choose a region near you or near other services your functions access.
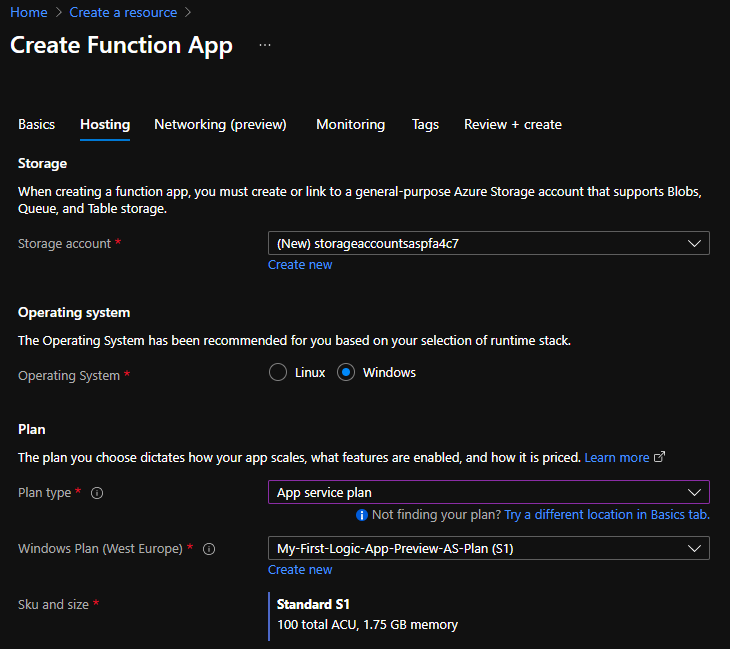
Select Next : Hosting. On the Hosting page, enter the following settings:
Storage Account: Create a storage account used by your function app or select an existing one
Operating system: I choose to use Windows since I’m feeling more comfortable with it.
Plan: Hosting plan that defines how resources are allocated to your function app. In this case, you need to select the App Service plan.
Note: I initially tried to use the Consumption plan, but I couldn’t import and use the Azure modules with the consumption plan. I think they are not supported in that type of plan.
Windows Plan: Select an existing plan or create a new one.
Sku and size: I use the Standard S1
YYou can customize the other option according to your intentions or leave the default values. For this demo, we will now select Review + create to review the app configuration selections.
On the Review + create page, review your settings, and then select Create to provision and deploy the function app.
Create HTTP trigger function
The next step is to create an HTTP trigger Function:
From the left menu of the Function App window, select Functions, then select Create from the top menu.
From the Create Function window, leave the Development environment property as Develop in portal and select the HTTP trigger template.
Under Template details use HttpTrigger1 (or provide a better name) for New Function, and choose Function from the Authorization level drop-down list, and then select Create.
On the HttpTrigger1 window, select Code + Test, then on the run.ps1 file add the following code:
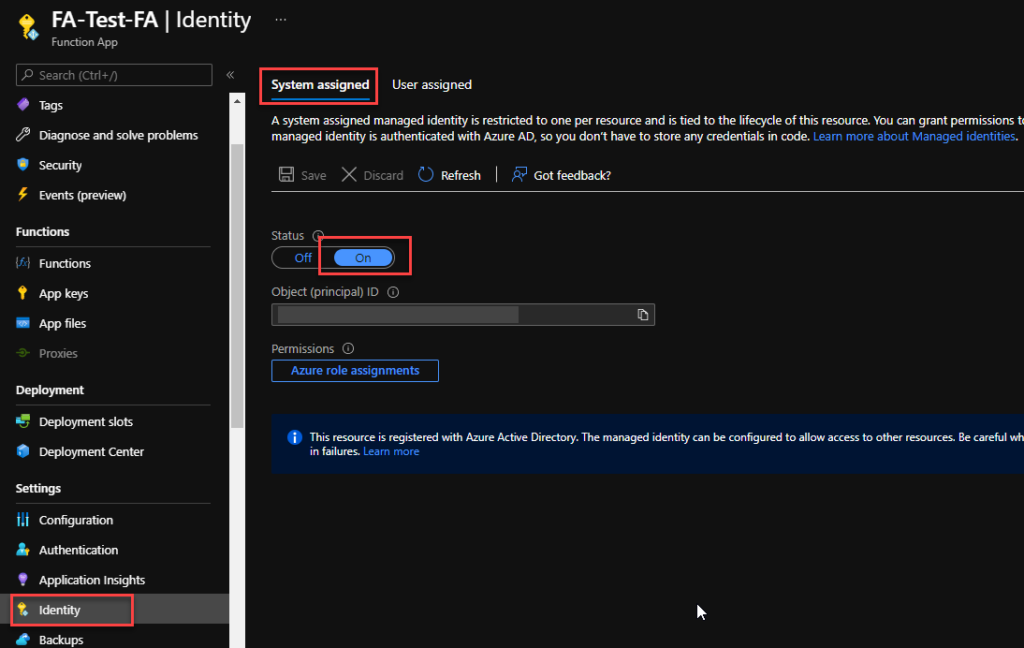
Now that we have created our function, we need to provide permission for this function to access and read from your subscription or different resource groups. I choose to provide permissions at the resource level. And for that, you need to:
From the left menu of the Function App window, select the Identity option, then select the System assigned tab from the top menu.
On the Status, select On and click Save. This will create an Object (principal) ID.
Click on the Azure role assignments button, and on the Azure role assignments window, click Add role assignment (Preview).
On the Add role assignment (Preview) page, set the following settings:
Scope: Select Resource Group from the combo box list.
Subscription: Select the subscription under the resource group you want to monitor is.
Resource group: Select the resource group you want to monitor.
Role: Select the Reader role.
Click Save.
Repeat the same steps for all the resource groups you want to monitor.
Create a Logic App
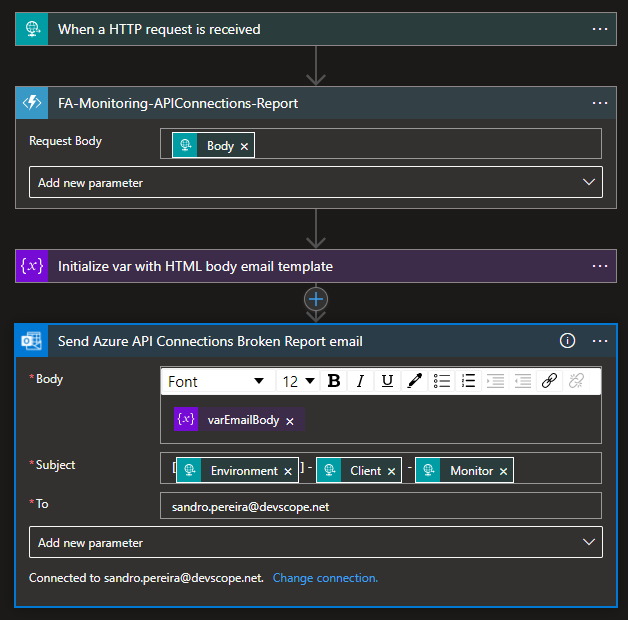
Finally, we need to create a scheduling Logic App to trigger the monitoring Function and notify if any API Connection is broken. To simplify the solution, we will be using the Azure Portal to create also the Logic App.
From the Azure portal menu or the Home page, select Create a resource.
In the Create a resource page, select Integration > Logic App.
On the Create Logic App Basics page, use the following Logic app settings:
Subscription: Select the subscription under which this new Logic app is created.
Resource Group: Select an existing Resource Group or create a new one in which your Logic app will be created.
Type: The logic app resource type and billing model to use for your resource, in this case we will be using Consumption
Consumption: This logic app resource type runs in global, multi-tenant Azure Logic Apps and uses the Consumption billing model.
Standard: This logic app resource type runs in single-tenant Azure Logic Apps and uses the Standard billing model.
Logic App name: Your logic app resource name, which must be unique across regions.
Region: The Azure datacenter region where to store your app’s information. Choose a region near you or near other services your Logic app access.
Enable log analytics: Change this option only when you want to enable diagnostic logging. The default value in No.
When you’re ready, select Review + Create. On the validation page, confirm the details that you provided, and select Create.
After Azure successfully deploys your app, select Go to resource. Or, find and select your logic app resource by typing the name in the Azure search box.
Under Templates, select Blank Logic App. After you select the template, the designer now shows an empty workflow surface.
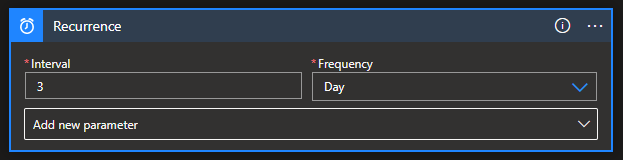
In the workflow designer, under the search box, select Built-In. From the Triggers list, select the Schedule trigger, Recurrence.
In the trigger details, provide the following information:
Interval: 1
Frequency: Day
Under the Recurrence trigger, select New step.
In the search box, enter Variables, and from the result panel select the Variables, Initialize variable action and provide the following information:
Name: varEmailBody
Type: String
Value: leave it empty
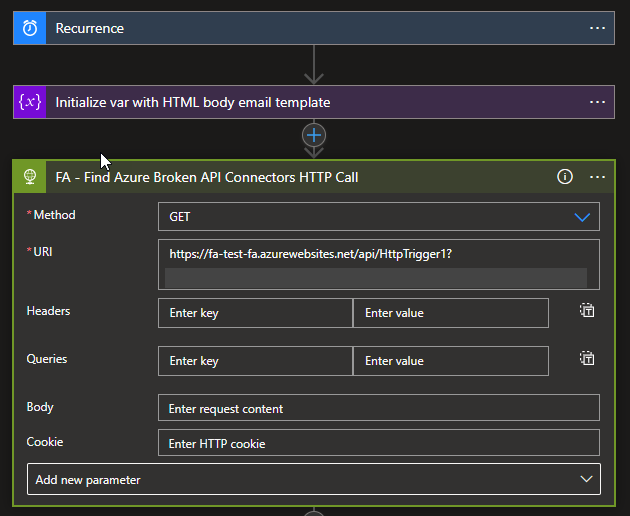
Select New step. In the search box, enter HTTP, and from the result panel select the HTTP, HTTP action and provide the following information:
Method: GET
URI: specify the endpoint of your Function that we created earlier on this blog post.
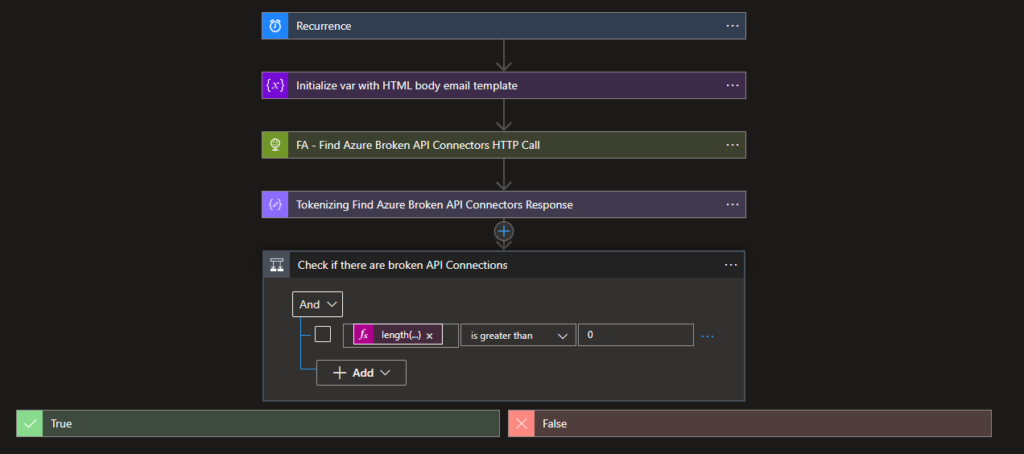
Select New step. In the search box, enter Data Operations, and from the result panel select the Data Operations, Parse Json action and provide the following information:
Method: body of the HTTP action
Use the following sample payload to generate the schema
Select New step. under the search box, select Built-In. From the Triggers list, select the Control, Condition action and provide the following condition:
length(body(‘Tokenizing_Find_Azure_Broken_API_Connectors_Response’)?[‘APIBroken’]) is greater than 0
Leave the False branch empty
On the True branch I end up adding the following action to notify the support team:
Choose an Azure function: I’m calling and Azure Function to transform the list of broken API’s in a HTML table.
Set variable: I’m setting the varEmailBody with my default HTML email body Template and add the HTML table that the Azure Function returned
Send an email (v2) – Office 365 Outlook: To send the email to the support team
The result, once you try to execute the Logic App, will be a fancy HTML email:
This approach is an elegant solution and relatively easier to build, nevertheless it has a significant disadvantage:
Az modules are not supported on a Consumption plan. At least I couldn’t make it work. So that means I need to use an App Service plan, which means I will have an additional cost or more costs associated with this solution, more or less 36.94€/month.
This could be almost if not free if we use a Consumption plan.
Do you feel difficult to keep up to date on all the frequent updates and announcements in the Microsoft Integration platform and Azure iPaaS?
Integration weekly updates can be your solution. It’s a weekly update on the topics related to Integration – enterprise integration, robust & scalable messaging capabilities and Citizen Integration capabilities empowered by Microsoft platform to deliver value to the business.
Sometimes I like to use my friends to have a different point of view of things, which is one of these cases. I have been discussing during this week with Mike Stephenson and Nino Crudele how we can easily manage and monitor our current Azure Logic App Connectors present on our Azure integration solutions.
One of the reasons why this is so important is because some of the connectors like for example, Office 365 connectors: Team Connector, Office 365 Outlook, and so on, can stop working for the simple reason that the access token has expired due to inactivity and without notice, your processes stop working also and it was precisely what happened in one of my clients. We noticed that the API Connections were expired because we were troubleshooting another issue.
Recently Mike wrote about his great solution here: Monitoring the status of API Connections for Logic Apps. But you can archive that goal using different approaches. Of course, you will find advantages and disadvantages in all of them.
I decided to create this series of 3 blog posts to present 3 different approaches by starting with the simplest one:
Solution 1: Using a simple PowerShell Script
The first thing I did while thinking about the problem was, yep, let’s create a PowerShell script to see what is possible or not. And so, my first approach was creating a simple PowerShell script that goes to all resources I have on my subscription and doing a simple report of the current status of the existing API connections.
It is for sure not the most elegant and best PowerShell script, but for a proof of concept works well, and it will provide a simple and color report of how your existing API Connections are:
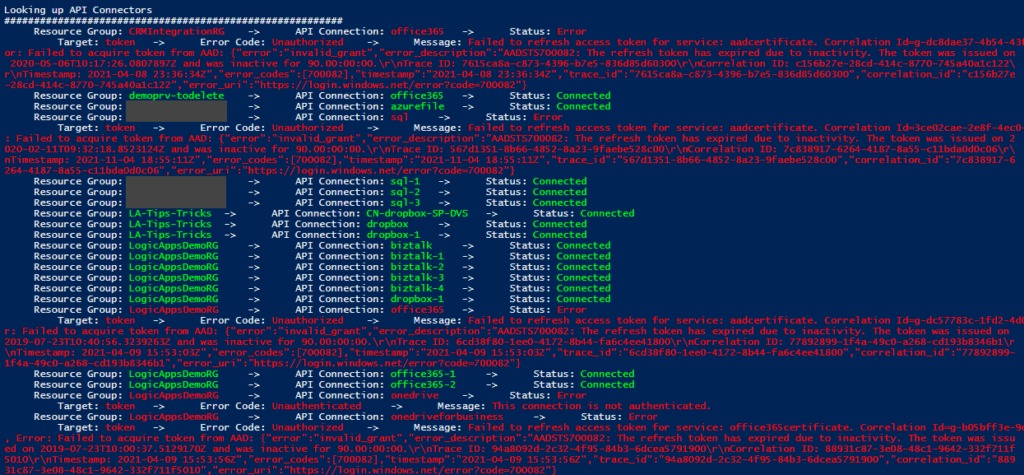
##############################################################
# Get list of API Connectors available on the Resource Group
##############################################################
Write-Host 'Looking up API Connectors'
Write-Host '#########################################################'
$resourceName = ''
$resources = Get-AzResource -ResourceType Microsoft.Web/connections
$resources | ForEach-Object {
$logicAppUrl = $_.ResourceId + '?api-version=2018-07-01-preview'
# Get Logic App Content
$resourceJsonResult = az rest --method get --uri $logicAppUrl
$resourceJson = $resourceJsonResult | ConvertFrom-Json
$resourceName = $_.Name
$resourceGroupName = $_.ResourceGroupName
# Check Logic App Connectors
$apiConnectionStatus = $resourceJson.properties.overallStatus
if($apiConnectionStatus -eq 'Error')
{
Write-Host "`t Resource Group: " -NoNewline; Write-Host $resourceGroupName -ForegroundColor Red -NoNewline; Write-Host "`t -> `t API Connection: " -NoNewline; Write-Host $resourceName -ForegroundColor Red -NoNewline; Write-Host "`t -> `t Status: " -NoNewline; Write-Host $apiConnectionStatus -ForegroundColor Red;
Write-Host "`t`t Target: " -NoNewline; Write-Host $resourceJson.properties.statuses.target -ForegroundColor Red -NoNewline;
Write-Host "`t -> `t Error Code: " -NoNewline; Write-Host $resourceJson.properties.statuses.error.code -ForegroundColor Red -NoNewline; Write-Host "`t -> `t Message: " -NoNewline; Write-Host $resourceJson.properties.statuses.error.message -ForegroundColor Red;
}
else
{
Write-Host "`t Resource Group: " -NoNewline; Write-Host $resourceGroupName -ForegroundColor Green -NoNewline; Write-Host "`t -> `t API Connection: " -NoNewline; Write-Host $resourceName -ForegroundColor Green -NoNewline; Write-Host "`t -> `t Status: " -NoNewline; Write-Host $apiConnectionStatus -ForegroundColor Green;
}
}
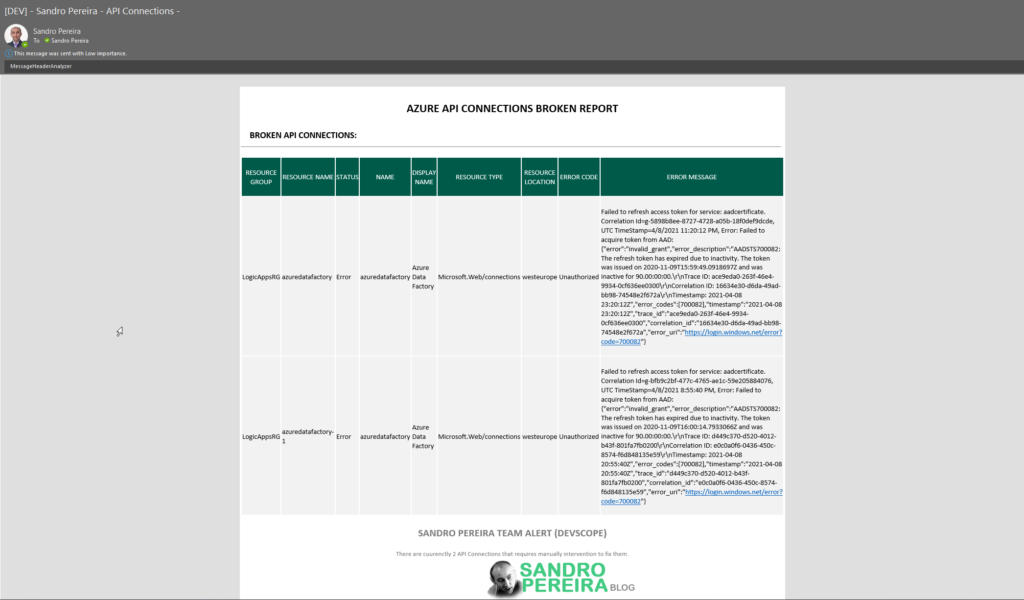
The result will be something like:
You will see on the picture above many samples that The refresh token has expired due to inactivity. Witch is normal because most processes I have under my subscription are samples or POC, and I only execute them from time to time, most of the time when I have speaking engagements or meetings with clients. However, there are real scenarios like my client case that we are using a Team Connector to notify us on the team channel when a significant issue appears. And this is something that should not happen often. Luckily it was our case, and due to inactivity, the API connection got broken. Still, unfortunately for us, we were not notified on the Teams channel when the issue appeared in production.
It was not a big issue because it was not a critical operation. The Logic App didn’t fail because it is configured not to fail on these notifications. Could we have a better logging system? Yes, we could, but we don’t have it at the moment. But with or without logging, you will only be aware of the issue when the error happens. And you don’t want to be in that position. So it is always better for you to be proactive and prevent these issues from occurring.
The main issue with this approach is that this script is good enough to run it from time to time manually on-demand, but this again is not the situation you want to be in. So, in the following parts, I will address 2 approaches where and how you can set up this to be a scheduled process using Azure features.
Download
THIS POWERSHELL SCRIPT IS PROVIDED “AS IS”, WITHOUT WARRANTY OF ANY KIND.
You can download API Connections Status Report from GitHub here:
In the previous posts of these series, we’ve talked about how to build and prepare your Logic App for CI/CD. In this last post, I’ll show you how to build your Azure Pipeline, making it prepared for any environment you need.
If you’ve missed the other posts, here are the links for them:
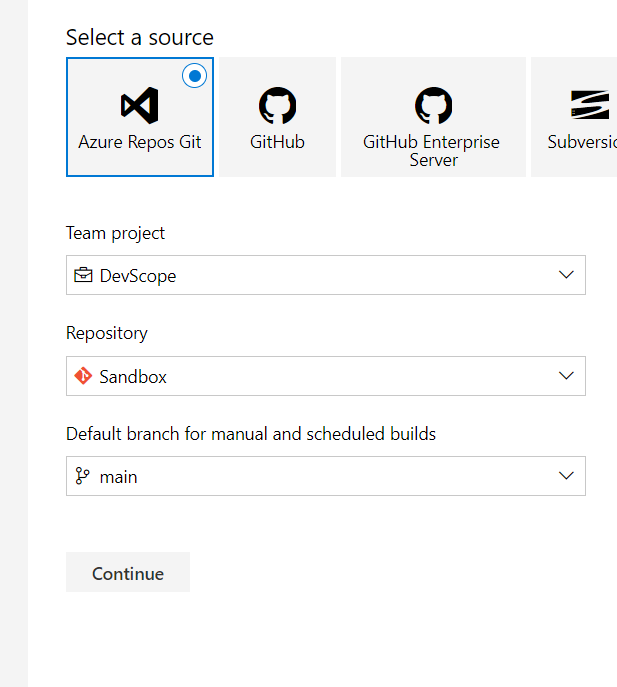
Assuming you already have your repo configured, building the pipeline is fairly simple and quick. I’m not a big fan of using YAML, I find it easier to use the classic editor, having the GUI seems more appealing to me.
Having your repo in place and all the code ready, you need create the Pipeline.
As such, you need to choose the classic editor (or venture yourself in YAML) and select your repo and branch.
The available templates are helpful but if you’re just trying to deploy logic apps, I’d suggest you start with an empty job, because you might have actions that are not necessary and you’ll have to delete them.
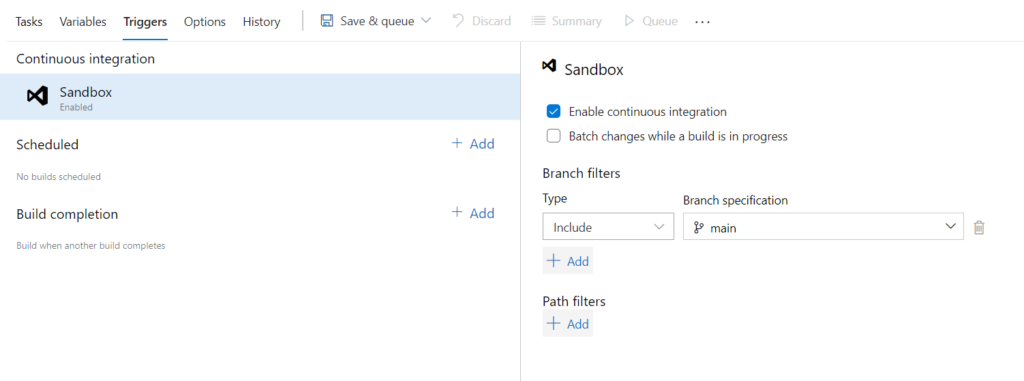
The first thing we’re going to do, is configure the pipeline for continuous integration. It doesn’t take much to achieve this, you just need to activate the needed triggers. By default, it will filter to your main branch, but you can change this and trigger for specific projects and branches. This comes in handy when you have multiple projects and you only want to include some in the build.
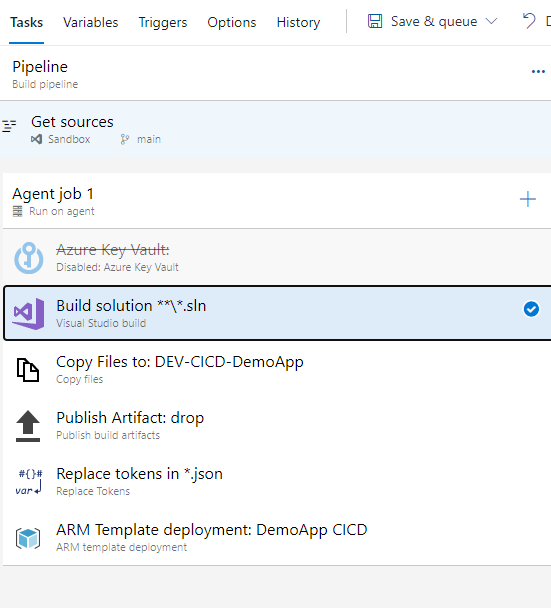
After enabling the triggers, you’ll need to add the required tasks to get your pipeline going. You might be getting a few secrets in Key vault, if that’s the case, do remember to add the Azure Key Vault task. This will pull either all the secrets or the filtered ones you’ve selected, keeping them in cache for the pipeline execution. This will be used in the Replace Tokens task, which I’ll discuss a bit down the road.
As you can see, it doesn’t take many tasks to have a functional pipeline, ready to deploy your Logic App to the CI environment.
The required tasks are:
Visual Studio build – to build your solution, obviously
Copy files – which will copy the desired files over to a folder in the Drop
Publish build artifacts – makes the drop available to use in the pipeline and the release
Replace Tokens – a very handy tool that allows you to replace your tokens with the variables or group variables values
ARM template deployment
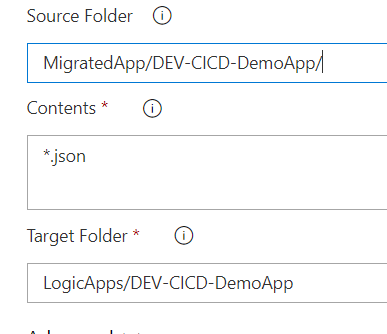
The Copy files task is very simple and easy to use. You take the input folder, copy the files you want/need to the target folder. Easy-peasy-lemon-squeezy.
I’d advise you to set the Target Folder as a named one, when you’re building the Release, it will be easier to find what you need if you divide your assets by name.
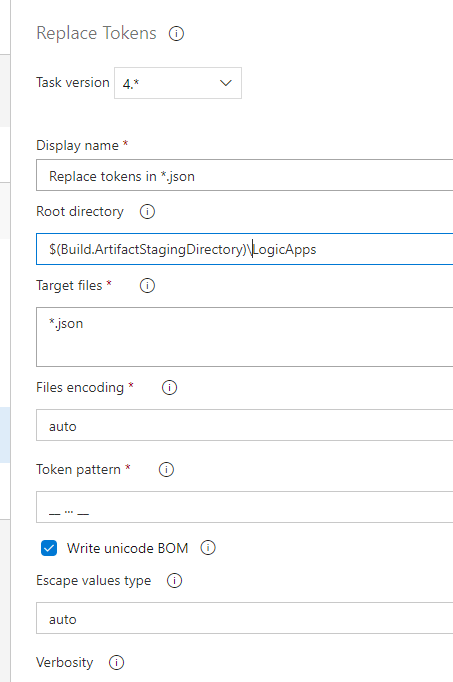
After copying the files, we will replace the tokens. How does this work?
Simply put, the task collects all the variables in memory and searches for the token pattern in all the target files. Given that we wrote our parameters with the __ … __ token, if we use other tokens in the files, it should not affect them. This is by far, in my opinion, the most helpful task in multi-environment deployment. It takes out the need to have multiple files by environment and having tons of variables.
Having the files copied, tokens replaced, our Logic App is ready for deployment in the CI environment. Now, this is not mandatory, you might not want to deploy your LA from the pipeline, you might want to use the Release instead. This is fine, you just need to move the ARM deployment tasks to the Release, it will not affect the outcome nor the pipeline.
As you can see, after selecting the Azure details (Subscription, RG, Location, etc) it becomes easy to select your LA to deploy. Since we used the LogicApps folder, we just need to reference the JSON files and the task will pick them up from the drop folder and deploy them.
Final notes
You’re now ready to go on your adventures and build your Logic Apps, get them ready for Continuous Integration and deploy them. I didn’t approached the Release Pipeline because it’s also very simple. You will only require to create your variables, replace your tokens and deploy the ARM templates.
You can fiddle around with gates, automated deployments, pre-deployment approvals and all, but that is a more advanced feature.
Having multiple releases that you want to joint deploy, you can even build Orchestrations (I can hear all the BizTalk bells ringing in our heads). This is not as simple as isolated deployments, because it does involve some orchestration of the parts (well, duhh).
I hope this small series of posts helped you to solve issues and to improve your deployments.
Completing the enormous saga, aka nightmare, to install BAM in one of my latest BizTalk Server installations and once I thought I solve all the issues… BAM strikes again! Now complaining about the following error:
Exception Message=”Microsoft (R) Business Activity Monitoring Utility Version 3.13.717.0 Copyright (C) Microsoft Corporation. All rights reserved.
ERROR: Failed to set up BAM database(s). Database ‘BAMAnalysis’ has compatibility level larger than 1103 with StorageEngineUsed set to InMemory. Tabular databases with compatibility level at 1200 or above must use StorageEngineUsed set to TabularMetadata.
My team didn’t follow the SQL Server installation, we just send to another team the requirements necessary for BizTalk Server and the installation guide, so we were a little surprised by this error.
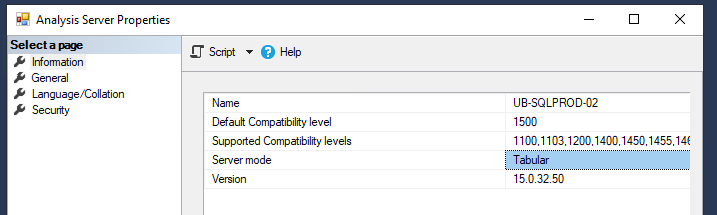
And despite I never had seen this error before, the reason was quite simple: This error is caused by the SQL Server Analysis Services (SSAS) instance being installed using the tabular mode, and BizTalk Server needs a multi-dimensional mode SSAS instance.
Solution
You have at least two solutions on the table to solve this issue.
Solution 1: Uninstall and re-install SQL Server Analysis Services (SSAS)
The trick here is to be able to know how to uninstall SSAS and to do that you need to:
Open Command Prompt as Administrator model on the SQL Server and execute the following command
Action performed. In here we are going to uninstall
Feature we are going to remove. AS indicates Analysis Services instance
The name of our AS instance
After that, you just need to add new features to the existing installation, in this case, a multi-dimensional mode SSAS instance.
Solution 2: Modify the msmdsrv.ini file
An alternative way is to modify the msmdsrv.ini file. Administrators can modify default server configuration properties of an SQL Server Analysis Services (SSAS) instance by using SQL Server Management Studio. However, properties pages in SQL Server Management Studio show a subset of the properties most likely to be modified. For SSAS, all properties are in the msmdsrv.ini file.
The default installation, msmdsrv.ini can be found in the C:Program FilesMicrosoft SQL ServerMSAS15.MSSQLSERVEROLAPConfig folder
Of course, this depend on the version you are using.
On the msmdsrv.ini file:
Configure the DeploymentMode property to be 0 (zero) and save the file
After that, restart the SSAS instance and these will change from a tabular instance to a multi-dimensional instance
Do you feel difficult to keep up to date on all the frequent updates and announcements in the Microsoft Integration platform and Azure iPaaS?
Integration weekly updates can be your solution. It’s a weekly update on the topics related to Integration – enterprise integration, robust & scalable messaging capabilities and Citizen Integration capabilities empowered by Microsoft platform to deliver value to the business.
Nevertheless, while trying to configure BAM features, I was getting the following error message:
Could not load file or assembly ‘Microsoft.SqlServer.SQLTask, Version=13.0.0.0?,Culture=neutral, PublicKeyToken=89845dcd8080cc91’ or one of its dependencies. The system cannot find the file specified.
Once I solve that one, I endup getting another one:
Could not load file or assembly ‘Microsoft.SqlServer.Management.IntegrationServices, Version=13.0.0.0?,Culture=neutral, PublicKeyToken=89845dcd8080cc91’ or one of its dependencies. The system cannot find the file specified.
And another one:
Could not load file or assembly ‘Microsoft.AnalysisServices, Version=13.0.0.0?,Culture=neutral, PublicKeyToken=89845dcd8080cc91’ or one of its dependencies. The system cannot find the file specified.
And another one:
Could not load file or assembly ‘Microsoft.AnalysisServices.Core, Version=13.0.0.0?,Culture=neutral, PublicKeyToken=89845dcd8080cc91’ or one of its dependencies. The system cannot find the file specified.
And another one:
Could not load file or assembly ‘Microsoft.AnalysisServices.AdomdClient, Version=13.0.0.0?,Culture=neutral, PublicKeyToken=89845dcd8080cc91’ or one of its dependencies. The system cannot find the file specified.
This was a kind of a nightmare of errors after errors!
Cause
This is something that always annoyed me since Microsoft decided to separate the SSMS from the default installation. So, on one hand, it is great that clients can update to a recent version of the tool. Still, on the other hand, it complicates specific previous simple tasks like performing the configuration of BizTalk Server features in special BAM features.
By design, the latest SSMS only includes the latest version of SSIS assemblies.
I have been using this SSMS 18.4 version in almost all my BizTalk Server installations. But also, in most of my recent installations, my clients didn’t want me to install BAM because they were not using this feature. The reason I use SSMS 18.4 version is because it was the latest version available before BizTalk Server 2020 was released.
I have tried to uninstall this SSMS version and install a previous one – 17.9.1 – to solve this issue, but by doing that, I got a ton of other problems with the based features of BizTalk Server like SSO and Runtime. So I decide to keep using SSMS 18.4.
Trying to find the correct version of the SSMS may be an inglorious Task.
I saw comments and suggestions to solve this issue that I would do in a BizTalk Server environment like:
Installing SSIS on the BizTalk Server machine and re-run BizTalk configuration
Installing SSDT (SQL Server Data Tools) full ISO on the BizTalk Server machine and re-run BizTalk configuration
or by installing the Client Tools SDK from SQL Server installation media on BizTalk machine and re-run BizTalk configuration – this was, in fact, a possible alternative
But again, this issue is related without a doubt with problems related to assemblies reference mismatch.
Solution
You have several solutions on the table to solve this issue. I endup deciding that the simple and fast way was to do Assembly redirect at the machine level.
To solve this problem by using Assembly Binding Redirection in the machine configuration file (Machine.config) you should change both:
I usually use a range of different usernames to define as the administrator of my Azure Virtual Machines, and I have others that clients shared with me. So, you may be thinking, why are you accessing the Azure VM’s using the administration account and not an AD account? Typically, these are standalone development environments where I need permissions as administrator, so sometimes, this is the quick and easy way. We may argue if this is the best practice or not, but it is without a dought the fastest and easy way.
And today, one of my team members called me asking what was the password of user ABC (not the real username name) to access one of our Azure BizTalk Server Development VM’s because he was trying all possible variants and it was not able to log in. Unfortunately, I don’t remember all the VM administrator usernames I use to create our internal VM, so the first question I asked was not about the password but if he was using the correct username to access the machine. He was not sure about it neither.
So, the main question is: How can you quickly find the Azure VM administrator username of a specific machine?
There maybe be many ways to find this information. I will highlight here two of them that I normally use.
Option 1: Using the Azure Portal
Go to Virtual Machines services on your Azure portal.
Select the Virtual Machine that you want to find the username.
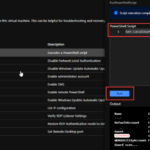
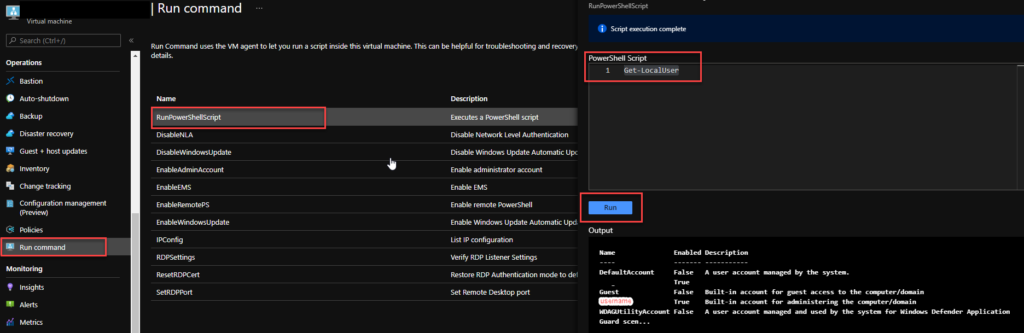
On the Virtual Machine property page, from the option tree, click on the Run command option from the Operations section.
On the Run command page, select RunPowerShellScript and them type Get-LocalUser on the PowerShell Script panel and click Run
The output will be a list of local user present on the machine mentioning what is the administrator.
Option 2: Using PowerShell
Another easy option is using a simple PowerShell script: