by Lex Hegt | May 29, 2019 | BizTalk Community Blogs via Syndication
From time to time, in conversations we have with our prospects and customers, the question pops up if additional licenses needed for BizTalk components on separate servers. You can install BizTalk360 on a BizTalk server, but also on a separate server on which no BizTalk processing takes place. Normally, we recommend to install BizTalk360 on a separate server. This has advantages like not using resources which BizTalk can use for processing and (equally important) to prevent not able to access BizTalk360 when the BizTalk server goes down.
For BizTalk360 to work, it needs the so-called BizTalk Server Administration Tools. You need to install these tools on the server which will run BizTalk360, as they contain the APIs which BizTalk360 uses to access BizTalk Server.
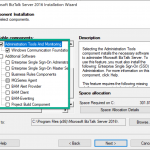
These APIs, being used by third party products like BizTalk360, is not the only reason why an organisation might want to install these components. These APIs are part of a set of components and tools, you might want to install on a separate server. In the BizTalk Server installer, this set can be found under the category Administration Tools and Monitoring and Additional software, as you can seen in below screenshot.
The set of Additional BizTalk Server software
The Administration Tools and Monitoring and Additional software contain the following components and tools:
- Administration and Monitoring Tools
- Development Tools
- Software Development Kit(s)
- HTTP Receive Adapter
- SOAP Receive Adapter
- Windows SharePoint Services Adapter Web Service
- Windows Communication Foundation Adapters
- Business Activity Monitoring (“BAM”) Event APIs and Interceptors & Administration Tools
- BAM Alert Provider for SQL Notification Services
- BAM Client
- BizTalk Server Related Schemas and Templates
- Business Activity Services
- Master Secret Server/Enterprise Single Sign-On
- MQHelper.dll
- ADOMD.NET
- MSXML
- SQLXML
- Business Rules Component
- MQSeries Agent
Why would you need these components/tools
So, given the list with available components/tools, an organisation could have several reasons to install them, depending on the purpose of the component. You could think of BizTalk users who might want to achieve, for example, the following:
- use the BizTalk APIs as this is a requirement for third party software
- use the BizTalk Server APIs for self-developed software or scripts
- provide the Business Rules Composer to the desktop computer of (functional) users
- make the Enterprise Single Sign-On (ESSO) tools highly available by installing them on separate servers
- use the Developer tools on a build server for BizTalk
- use the BAM tools on a separate server
Hence, it makes sense to be sure whether (or not) you require additional BizTalk Server licenses for the server(s) on which such components will be installed.
The hunt for information
We have been trying to find that information somewhere on the internet. However, as Microsoft is the supplier of the product, we searched for a formal statement from their side. Therefore, we checked web sites like
the BizTalk Server product web site and the
BizTalk Server Core Documentation. However, we were not able to find that information.
As we want to give our customers clarity about this matter, we decided to reach out to the Product Group directly. After a couple of emails, the Product Group informed us where to find the information we were looking for. See below, the email we received from the Product Group.
No additional licenses required for Administration Tools etc.
The email from the Product Group mentions that:
These two highlighted items, “Administration Tools” and “Business Rules Component” are the components to which you refer. The EULA indicates these can be installed on other physical or virtual systems without incurring an additional license cost.
For people who are working with BizTalk Server for some time, it is no surprise that no additional license costs are involved in installing these tools on separate machines. Main reason for this, is that by only installing these tools, the machines are not a part of the BizTalk Group and no additional BizTalk processing is taking place (like receiving/sending messages or processing orchestrations).
However, it has always been a bit frustrating that we could not back this by a statement from Microsoft. So, we are glad that we can now refer to an official resource which gives clarity about this matter.
How to find the End User License Agreement(EULA)
Now we know where to find that information, let’s have a look on how to find the EULA, including the section where the clarity is given.
1. Download and mount the en_host_integration_server_2016_enterprise_x64_cd_9503501.iso (ISO file name varies depending on where you obtain the software—e.g., Volume License site or Visual Studio or Evaluation Center)

2. Start a Windows Explorer and navigate to the BizTalk Server folder

3. Locate and load the EULA.RTF in Microsoft Word
 4. See section “2. Use Rights” titled “e. Running Instances of Additional Software”
There you have it, written in black on white! No license costs will be incurred for installing the Administration Tools etc. on a separate server!
Conclusion
We, as a company, are glad to be able to give clarity to our customers, prospects and partners about the matter that no additional license costs will be incurred in case of installing the Administration Tools etc. at separate servers. However, also organisations who are using BizTalk Server, resellers of Microsoft products and consultancy companies who advice their customers about BizTalk Server, are now able to safely say that no additional license costs are involved in case of installing these components and tools as they are backed by the EULA from Microsoft.
From this place, we also like to thank the BizTalk Server Product Group to help in giving the clarity.
The post Do you need additional BizTalk Server Licenses for installing BizTalk components on separate servers appeared first on BizTalk360.
by Sandro Pereira | May 27, 2019 | BizTalk Community Blogs via Syndication
Finally, the last blog post on this series about BizTalk Bindings Exportation with PowerShell:
- How can we easily export a binding file from a BizTalk Application?
- How can we easily export a binding file from a specify assembly?
- Using the fully qualified name (FQName) of the assembly.
- Using only the assembly name
- How can we easily export a binding file from a Receive Port?
- How can we easily export a binding file from a Send Port?
- How can we easily export a binding file from a list of assemblies?
- By fully qualified name (FQName);
- By assembly names;
Today’s blog post will be about: How to Export BizTalk Server Bindings by a List of Port Names with PowerShell.
In other words, instead of generating a specific binding file for each port: Receive Port and/or Send Port, we will include all of the receive ports and send ports bindings in a unique binding file, so it can easily be handled.
This functionality should be something that should exist in the BizTalk Server Administration Console, but it is impossible to be addressed using the out-of-the-box tool BizTalk Server Administration Console or even with the BTSTask command-line tool which is included with BizTalk Server.
As always, and like the previous samples, we could fully automate this Binding generation for each environment, but once again let’s keep it simple. With this PowerShell sample, we will be able to generate a unique binding file for a list of specific assemblies deployed in my BizTalk Server environment. The script will perform the following tasks:
- Generate a Binding file for 3 environments DEV, QA and PRD
- Generate a unique binding file, instead of having separated binding files for each Port name (receive port and/or send port)
function bts-list-ports-exportbindings([string]$bindingFilePath, [string]$bindingNamePrefix, [string]$appName, [string]$rcvPortNames, [string]$sndPortNames, [boolean]$generateDiffEnvBindings)
{
    $finalBinding = (Get-Content "C:TempBTSTemplateBindingInfo.xml")
    $moduleRefNode = $finalBinding.SelectSingleNode("BindingInfo/ModuleRefCollection")
    $sendPortNode = $finalBinding.SelectSingleNode("BindingInfo/SendPortCollection")
    $receivePortNode = $finalBinding.SelectSingleNode("BindingInfo/ReceivePortCollection")

    $listRcvPorts = $rcvPortNames.Split("|")
    $listSndPorts = $sndPortNames.Split("|")

    $taskParams = ” ExportBindings /Destination:$bindingfilePath$appName.BindingInfo.xml /ApplicationName:$appName ”
    Start-Process "BTSTask.exe" $taskParams -Wait

    $xml = (Get-Content "$bindingfilePath$appName.BindingInfo.xml")

    foreach($receivePortBinding in $xml.BindingInfo.ReceivePortCollection.ReceivePort)
    {
        if($listRcvPorts -Contains $receivePortBinding.Name)
        {
            $node = $finalBinding.ImportNode(($receivePortBinding), $true);
            $receivePortNode.AppendChild($node);
        }
    }

    foreach($sendPortBinding in $xml.BindingInfo.SendPortCollection.SendPort)
    {
        if($listSndPorts -Contains $sendPortBinding.Name)
        {
            $node = $finalBinding.ImportNode(($sendPortBinding), $true);
            $sendPortNode.AppendChild($node);
        }
    }

    $finalBinding.Save("$bindingfilePath$bindingNamePrefix.BindingInfo.xml")

    if($generateDiffEnvBindings)
    {
        $finalBinding.Save("$bindingfilePath$bindingNamePrefix.QA.BindingInfo.xml")
        $finalBinding.Save("$bindingfilePath$bindingNamePrefix.PRD.BindingInfo.xml")
    }
}

THIS POWERSHELL IS PROVIDED “AS IS”, WITHOUT WARRANTY OF ANY KIND.
We will not change the URI for each environment – it could be done, but is not the goal here, it is just a start.
You can download the full script from here: Export BizTalk Server Bindings from a List of Port Names with PowerShell
The post BizTalk Bindings Exportation: How to Export BizTalk Server Bindings by a List of Port Names with PowerShell appeared first on BizTalk360.

by Gautam | May 27, 2019 | BizTalk Community Blogs via Syndication
Do you feel difficult to keep up to date on all the frequent updates and announcements in the Microsoft Integration platform and Azure iPaaS?
Integration weekly update can be your solution. It’s a weekly update on the topics related to Integration – enterprise integration, robust & scalable messaging capabilities and Citizen Integration capabilities empowered by Microsoft platform to deliver value to the business.
If you want to receive these updates weekly, then don’t forget to Subscribe!
Microsoft Announcements and Updates
Community Blog Posts
Videos
Podcasts
How get started with iPaaS design & development in Azure?
- Robust Cloud Integration with Azure
- Microsoft Azure for Developers: What to Use When
- Serverless Computing: The Big Picture
- Azure Logic Apps: Getting Started
- Azure Logic Apps: Fundamentals
- Microsoft Azure Developer: Creating Enterprise Logic Apps
- Microsoft Azure API Management Essentials
- Azure Functions Fundamentals
- Cloud Design Patterns for Azure: Availability and Resilience
- Architecting for High Availability in Microsoft Azure
Feedback
Hope this would be helpful. Please feel free to reach out to me with your feedback and questions.
by Sandro Pereira | May 22, 2019 | BizTalk Community Blogs via Syndication
Let’s continue with some deep dive scripts about exporting BizTalk Server bindings, addressing some useful and unsupported scenarios that are impossible to be addressed using out-of-the-box with the standard tools BizTalk Server Administration Console or even with the BTSTask command-line tool included with BizTalk Server.
- How can we easily export a binding file from a list of assemblies?
- How can we easily export a binding file from a Receive Port?
- How can we easily export a binding file from a Send Port?
- And many more
Also recapitulating some of the default scenarios/functionalities already addressed previously done in a different way and with small improvements with PowerShell:
- How can we easily export a binding file from a BizTalk Application?
- How can we easily export a binding file from a specify assembly?
- Using the fully qualified name (FQName) of the assembly.
- Using only the assembly name
Today’s blog post will be about: How to Export BizTalk Server Send Port Binding with PowerShell.
Like Receive Ports, this functionality should be something that should exist in the BizTalk Server Administration Console, but it doesn’t. In some cases we can achieve this in the developing phase using the Visual Studio, while we generate the schemas for LOB systems, for example:
- In the Solution Explorer, right-click a BizTalk project, point to Add, and then click Add Generated Items
- In the Add Generated Items… – <BizTalk ProjectName> dialog box, in the Templates section, click Consume Adapter Service and then click Add
- You should then select the binding you want to use, configure the parameters and the operations you want to do
Along with the LOB Schemas, this will also generate the binding files for the receive port or send port.
So, again, the question that we may ask is: Is there any way that we can easily accomplish this? The response is yes, again, all of this can be fully automated using, for example, PowerShell scripts.
This script, combined with the Receive Ports, is extremely useful if:
- you use several cases of content-based routing (without orchestrations)
- you create new send ports, for example with filters
- new receive port in your environment
and if you don’t want to export/import the full application binding that may affect something that you already have in production.
Like the previous samples, we could fully automate this Binding generation for each environment, but once again, let’s keep it simple and address what is mandatory and easily forgotten. With this PowerShell sample we will be able to generate a binding file for a specific assembly name deployed in my BizTalk Server environment. The script will perform the following tasks:
- Generate a Binding file for 3 environments DEV, QA and PRD
- Changing the NT Group Name for each different environment
- Generate a specific Send Port deployed in your environment
function bts-send-port-exportbindings([string]$bindingFilePath, [string]$appName, [string]$portName, [boolean]$generateDiffEnvBindings)
{
    $portRen = $portName.Replace(" ", "")
    $taskParams = ” ExportBindings /Destination:$bindingfilePath$appName.$portRen.BindingInfo.xml /ApplicationName:$appName ”
    #First version: $p = [diagnostics.process]::start(“BTSTask.exe”, $taskParams)
    Start-Process "BTSTask.exe" $taskParams -Wait

    $xml = (Get-Content "$bindingfilePath$appName.$portRen.BindingInfo.xml")
    foreach($RemoveModuleRef in $xml.BindingInfo.ModuleRefCollection.ModuleRef)
    {
        $xml.BindingInfo.ModuleRefCollection.RemoveChild($RemoveModuleRef)
    }
    foreach($RemoveSendPort in $xml.BindingInfo.SendPortCollection.SendPort)
    {
        if($RemoveSendPort.Name -ne $portName)
        {
            $xml.BindingInfo.SendPortCollection.RemoveChild($RemoveSendPort)
        }
    }
    foreach($RemoveReceivePort in $xml.BindingInfo.ReceivePortCollection.ReceivePort)
    {
        $xml.BindingInfo.ReceivePortCollection.RemoveChild($RemoveReceivePort)
    }
    $xml.Save("$bindingfilePath$appName.$portRen.BindingInfo.xml")

    if($generateDiffEnvBindings)
    {
        # QA Binding Info Generation
        $xml.SelectNodes("//Host") | % {
            $_.NtGroupName = $global:qaNTGroupName
        }
        $xml.Save("$bindingfilePath$appName.$portRen.QA.BindingInfo.xml")

        # PRD Binding Info Generation
        $xml.SelectNodes("//Host") | % {
            $_.NtGroupName = $global:prdNTGroupName
        }
        $xml.Save("$bindingfilePath$appName.$portRen.PRD.BindingInfo.xml")
    }
}

THIS POWERSHELL IS PROVIDED “AS IS”, WITHOUT WARRANTY OF ANY KIND.
You can download the full script from here: Export BizTalk Server Send Port Binding with PowerShell
The post BizTalk Bindings Exportation: How to Export BizTalk Server Send Port Binding with PowerShell appeared first on BizTalk360.
by Sandro Pereira | May 20, 2019 | BizTalk Community Blogs via Syndication
Until now we have seen some default functionalities, except for the last sample, done in a different way and with small improvements with PowerShell:
- How can we easily export a binding file from a BizTalk Application?
- How can we easily export a binding file from a specify assembly?
- Using the fully qualified name (FQName) of the assembly.
- Using only the assembly name
From now on we will deep dive in this topic, addressing some useful unsupported scenarios, which are impossible to be addressed using the out-of-the-box tools BizTalk Server Administration Console or even with the BTSTask command-line tool included with BizTalk Server.
- How can we easily export a binding file from a list of assemblies?
- How can we easily export a binding file from a Receive Port?
- How can we easily export a binding file from a Send Port?
- And many more
Today’s blog post will be about: How to Export BizTalk Server Receive Port Binding with PowerShell.
This functionality should be something that should exist in the BizTalk Server Administration Console; in some cases, we can achieve this in the developing phase using the Visual Studio while we generate the schemas for LOB system, for example:
- In the Solution Explorer, right-click a BizTalk project, point to Add, and then click Add Generated Items.
- In the Add Generated Items… – <BizTalk ProjectName> dialog box, in the Templates section, click Consume Adapter Service and then click Add
- You should then select the binding you want to use, configure the parameters and the operations you want to do
Along with the LOB Schemas, this will also generate the binding files for the receive port or send port.
Why we don’t have this option in the BizTalk Server Administration Console for me is unclear, it should be there since day one in my opinion.
So, again, the question that we may ask is: Is there any way that we can easily accomplish this? The response is yes, again, all of this can be fully automated using, for example, PowerShell scripts.
Like the previous samples, we could fully automate this Binding generation for each environment, but once again let’s keep it simple and address what is mandatory and easily forgotten. With this PowerShell sample, we will be able to generate a binding file for a specific assembly name which is deployed in my BizTalk Server environment. The script will perform the following tasks:
- Generate a Binding file for 3 environments DEV, QA and PRD
- Changing the NT Group Name for each different environment
- Generate a specific Receive Port deployed in your environment
function bts-receive-port-exportbindings([string]$bindingFilePath, [string]$appName, [string]$portName, [boolean]$generateDiffEnvBindings)
{
    $portRen = $portName.Replace(" ", "")

    $taskParams = ” ExportBindings /Destination:$bindingfilePath$appName.$portRen.BindingInfo.xml /ApplicationName:$appName ”
    #First version: $p = [diagnostics.process]::start(“BTSTask.exe”, $taskParams)
    Start-Process "BTSTask.exe" $taskParams -Wait

    $xml = (Get-Content "$bindingfilePath$appName.$portRen.BindingInfo.xml")
    foreach($RemoveModuleRef in $xml.BindingInfo.ModuleRefCollection.ModuleRef)
    {
        $xml.BindingInfo.ModuleRefCollection.RemoveChild($RemoveModuleRef)
    }
    foreach($RemoveSendPort in $xml.BindingInfo.SendPortCollection.SendPort)
    {
        $xml.BindingInfo.SendPortCollection.RemoveChild($RemoveSendPort)
    }
    foreach($RemoveReceivePort in $xml.BindingInfo.ReceivePortCollection.ReceivePort)
    {
        if($RemoveReceivePort.Name -ne $portName)
        {
            $xml.BindingInfo.ReceivePortCollection.RemoveChild($RemoveReceivePort)
        }
    }
    $xml.Save("$bindingfilePath$appName.$portRen.BindingInfo.xml")

    if($generateDiffEnvBindings)
    {
        $xml.Save("$bindingfilePath$appName.$portRen.QA.BindingInfo.xml")
        $xml.Save("$bindingfilePath$appName.$portRen.PRD.BindingInfo.xml")
    }
}

THIS POWERSHELL IS PROVIDED “AS IS”, WITHOUT WARRANTY OF ANY KIND.
You can download the full script from here: Export BizTalk Server Receive Port Binding with PowerShell
The post BizTalk Bindings Exportation: How to Export BizTalk Server Receive Port Binding with PowerShell appeared first on BizTalk360.
by Sandro Pereira | May 20, 2019 | BizTalk Community Blogs via Syndication
Last blog post I wrote about an “Access is denied” error while trying to connect with SQL Server Integration Services (SSIS). Today’s post is about the same problem but in a different situation/context, of course with a different cause and solution, this time I got this error while trying to execute a SQL Server Job to run the BAM_AN_<name>View and BAM_DM_<name> to import BAM data to Analysis Server and maintaining the BAMPrimaryImport BAM tables:
Date 5/10/2019 12:41:03 PM
Log Job History (BAM <name> SQL Server Integration Services Packages)
Step ID 1
Server localhost
Job Name BAM <name> SQL Server Integration Services Packages
Step Name BAM <name> Cube Update Integration Services package
Duration 00:00:01
Sql Severity 0
Sql Message ID 0
Operator Emailed
Operator Net sent
Operator Paged
Retries Attempted 0
Message
Executed as user: NT ServiceSQLAgent$BIZTALK. Microsoft (R) SQL Server Execute Package Utility Version 13.0.5264.1 for 64-bit Copyright (C) 2016 Microsoft. All rights reserved. Started: 12:41:04 PM Could not load package “MSDBBAM_AN_<name>View” because of error 0xC00160AE. Description: Connecting to the Integration Services service on the computer “localhost” failed with the following error: “Access is denied.” By default, only administrators have access to the Integration Services service. On Windows Vista and later, the process must be running with administrative privileges in order to connect to the Integration Services service. See the help topic for information on how to configure access to the service. Source: Started: 12:41:04 PM Finished: 12:41:04 PM Elapsed: 0.016 seconds. The package could not be loaded. The step failed.

To better contextualize this issue, I got this error after:
- I give permissions to my user to connect to SSIS (see how in my previous blog post)
- I successfully created the SQL JOB to import and maintain BAM data, so I was able to navigate in SSIS to select the correct packages
Cause
Again, the description says that by default, only administrators have access to the Integration Services service. On Windows Vista and later, the process must be running with administrative privileges to connect to the Integration Services service. That, in other words, means:
- insufficient rights to connect to SSIS.
And the reason behind that is that the tasks are by default running under (Run as) SQL Server Agent Service Account that is typically a different user that the user that is configuring/creating the importation Jobs. Usually, it will run under a service account or NT Service like: “NT SERVICEMSSQLSERVER” or in my case “NT ServiceSQLAgent$BIZTALK” and this may not have access to SSIS.

Solution
The solution to this issue is:
- to give permission to the SQL Server Agent Service Account
- or for better control, you should set up a Proxy Account to run SSIS packages.
To set up a Proxy Account to run SSIS packages you should:
- Note: I will assume that there a Login for the user is already created/configured in SQL Server and that will also have access to BAMPrimaryImport database;
- The first step is to create the credentials which will be then used in the Proxy Account. To do this, we need to:
- In SQL Server Management Studio, click on Security and then right click on Credentials, click on New Credential…

-
- On the New Credential window
- Put a Credential name. You can put the same name as the domain name or a meaningful name. In my case, I add “BAM Import Account”
- Click on Identity, which will open the Select User or Group window to ensure you select the correct user or Group;
- And then you will need to put in the password for the Domain account you selected and confirm the password in another text box

-
-
- Then click Ok to create your new Credential
- The second step will be creating a proxy to be used within the SQL Server Agent. To do that you should:
- In SSMS, click on SQL Server Agent, then Proxies and then SSIS Package Execution.
- Right-click and select New Proxy…

-
- On the New Proxy account window
- Give your Proxy a meaningful name, in my case, “BAM Proxy”
- Under Credential Name select the credential you should use to execute the packages, in my case, “BAM Import Account”
- And activate the following subsystems from the list:
- “SQL Server Integration Services Package”

-
-
- Then click Ok to create your new Proxy.
- The third and final step is to associate this proxy on your job execution. To do that you should:
- In SSMS go to SQL Server Agent, right click on the BAM importation Jobs and select Properties
- Select the steps tab and for edit all the steps that are executing the SSIS packages
- On the “Run as” combo box, you will now be able to see the Proxy created earlier. Select that option. And click OK.

Now, and assuming that you configured adequately, if you manually run the job, or wait for the next scheduled execution, it will run successfully… we hope.
The post BizTalk Server 2016 and SQL Server Integration Services (SSIS) 2016: Connecting to the Integration Services service on the computer “localhost” failed with the following error: “Access is denied.” – PART II: Could not load package BAM_AN_<name> appeared first on SANDRO PEREIRA BIZTALK BLOG.
by Gautam | May 19, 2019 | BizTalk Community Blogs via Syndication
Do you feel difficult to keep up to date on all the frequent updates and announcements in the Microsoft Integration platform and Azure iPaaS?

Integration weekly update can be your solution. It’s a weekly update on the topics related to Integration – enterprise integration, robust & scalable messaging capabilities and Citizen Integration capabilities empowered by Microsoft platform to deliver value to the business.
If you want to receive these updates weekly, then don’t forget to Subscribe!
Microsoft Announcements and Updates
Community Blog Posts
Videos
Podcasts
How get started with iPaaS design & development in Azure?
- Robust Cloud Integration with Azure
- Microsoft Azure for Developers: What to Use When
- Serverless Computing: The Big Picture
- Azure Logic Apps: Getting Started
- Azure Logic Apps: Fundamentals
- Microsoft Azure Developer: Creating Enterprise Logic Apps
- Microsoft Azure API Management Essentials
- Azure Functions Fundamentals
- Cloud Design Patterns for Azure: Availability and Resilience
- Architecting for High Availability in Microsoft Azure
Feedback
Hope this would be helpful. Please feel free to reach out to me with your feedback and questions.
by Sandro Pereira | May 19, 2019 | BizTalk Community Blogs via Syndication
Let’s stay on the topic of my last blog post “BizTalk Server 2016 and SQL Server Integration Services (SSIS) 2016” and described another issue that I recently faced while trying to connect with SQL Server Integration Services (SSIS): “Access is denied“. The full error description was:
TITLE: Connect to Server
——————————
Cannot connect to localhost.
——————————
ADDITIONAL INFORMATION:
Failed to retrieve data for this request. (Microsoft.SqlServer.Management.Sdk.Sfc)
For help, click: http://go.microsoft.com/fwlink?ProdName=Microsoft%20SQL%20Server&LinkId=20476
——————————
Connecting to the Integration Services service on the computer “localhost” failed with the following error: “Access is denied.”
By default, only administrators have access to the Integration Services service. On Windows Vista and later, the process must be running with administrative privileges in order to connect to the Integration Services service. See the help topic for information on how to configure access to the service.
For help, click: http://go.microsoft.com/fwlink/?LinkId=506689
——————————
Connecting to the Integration Services service on the computer “localhost” failed with the following error: “Access is denied.”
By default, only administrators have access to the Integration Services service. On Windows Vista and later, the process must be running with administrative privileges in order to connect to the Integration Services service. See the help topic for information on how to configure access to the service.
——————————
BUTTONS:
OK
——————————
Cause
Well, the description says that by default, only administrators have access to the Integration Services service. On Windows Vista and later, the process must be running with administrative privileges in order to connect to the Integration Services service. However, I was a local administrator and a BizTalk Administrator
But still, the cause is clear: insufficient rights to connect to SSIS. When using SQL Server 2012 or later, when a user without enough rights attempts to connect to an instance of Integration Services on a remote server, the server responds with an “Access is denied” error message. You can avoid this error message by ensuring that users have the required DCOM permissions.
Solution
So, to solve this issue, you should:
- Open Component Services; from a Run dialog, you can enter “dcomcnfg“, with Administrator permissions.
- On the left-hand tree, navigate to Component Services | Computers | My Computer | DCOM Config.
- Find “Microsoft SQL Server Integration Services 13.0“, right-click and select “Properties“
- On the Properties windows, select the “Security” tab and for each type of permission click “Edit” and add an appropriate AD group or user.
- Select “Allow” to all options.

Once you have completed, you will be required to restart the SSIS service.
- From the start menu, navigate to the “SQL Servers Configuration Manager“, right-click on “SQL Server Integration Services“, and “Restart“.
The post BizTalk Server 2016 and SQL Server Integration Services (SSIS) 2016: Connecting to the Integration Services service on the computer “localhost” failed with the following error: “Access is denied.” appeared first on SANDRO PEREIRA BIZTALK BLOG.
by Sandro Pereira | May 15, 2019 | BizTalk Community Blogs via Syndication
On the last blog post and PowerShell sample we addressed, for the first time in the series of posts, a way to aggregate several binding exportations in a unique binding file based on a list of assemblies with fully qualified names (FQName):
- How can we easily export a binding file from a list of assemblies?
- By fully qualified name (FQName);
Today’s blog post will be similar, but instead of using the FQName, we will be using the assembly name only: How to Export BizTalk Server Resource Bindings from a List of Assembly Names with PowerShell
In other words, instead of generating a specific binding file for each resource: Receive Port, Send Port or Assembly, we will be generating a unique binding file that will include all of this information so it can easily be handled.
Recapping also the samples we have shared until now:
- How can we easily export a binding file from a BizTalk Application?
- How can we easily export a binding file from a specify assembly?
- Using the fully qualified name (FQName) of the assembly.
- Using only the assembly name
- How can we easily export a binding file from a Receive Port?
- How can we easily export a binding file from a Send Port?
- And many more
And to unveil the last chapter of this series that we will be publishing soon:
- How can we easily export a binding file from a list of Receive Ports and/or Send Ports?
Just like the previous samples, we could fully automate this Binding generation for each environment, but once again let’s keep it simple and address what is mandatory and easily forgotten. With this PowerShell sample, we will be able to generate a unique binding file for a list of specific assemblies deployed in my BizTalk Server environment. The script will perform the following tasks:
- Generate a Binding file for 3 environments DEV, QA and PRD
- Changing the NT Group Name for each different environment
- Generate a unique binding file, instead of having separated binding files for each assembly
function bts-list-resource-exportbindings-by-assembly-name([string]$bindingFilePath, [string]$appName, [string]$listAssemblyName, [boolean]$generateDiffEnvBindings)
{
    #splits all the assemblies by |
    $list = $listAssemblyName.Split("|")
    $finalBinding = (Get-Content "C:TempTemplateBindingInfo.xml")
    $moduleRefNode = $finalBinding.SelectSingleNode("BindingInfo/ModuleRefCollection")
    $sendPortNode = $finalBinding.SelectSingleNode("BindingInfo/SendPortCollection")
    $receivePortNode = $finalBinding.SelectSingleNode("BindingInfo/ReceivePortCollection")
    $displayName = 'assemblyName'
    $appsList=New-Object System.Collections.ArrayList
    $assemblyListFQN = New-Object System.Collections.ArrayList
    $appsList = BTSTask.exe ListApp /ApplicationName:$appName
    #region Add FQN to list
    foreach($string in $appsList)
    {
        #region Get Assembly Fully Qualified Name
        $list = $listAssemblyName.Split("|")

        foreach($element in $list)
        {
            if($string.Contains('-'))
            {
                if($string.Split('-')[1].Split('"')[1] -eq "System.BizTalk:BizTalkAssembly")
                {
                    foreach($element in $list){
                        if($string.Split('-')[2].Split('"')[1].StartsWith($element))
                        {
                            if(!$assemblyListFQN.Contains($string.Split('-')[2].Split('"')[1])){
                                $assemblyListFQN.Add($string.Split('-')[2].Split('"')[1]);
                                #display name Set
                            }
                        }
                    }
                }
            }
        }
        #endregion
    }
    #endregion

    #loop assemblies
    foreach($string in $assemblyListFQN)
    {
        $dllName = $string.Substring(0, $string.IndexOf(','))
        $taskParams = ” ExportBindings /Destination:$bindingfilePath$appName.$dllName.BindingInfo.xml /AssemblyName:""$string"" ”
        Start-Process "BTSTask.exe" $taskParams -Wait

        $xml = (Get-Content "$bindingfilePath$appName.$dllName.BindingInfo.xml")

        foreach($moduleRef in $xml.BindingInfo.ModuleRefCollection.ModuleRef)
        {
            $node = $finalBinding.ImportNode(($moduleRef), $true);
            $moduleRefNode.AppendChild($node);
        }
        foreach($sendPort in $xml.BindingInfo.SendPortCollection.SendPort)
        {
            $node = $finalBinding.ImportNode(($sendPort), $true);
            $sendPortNode.AppendChild($node);
        }
        foreach($receivePort in $xml.BindingInfo.ReceivePortCollection.ReceivePort)
        {
            $node = $finalBinding.ImportNode(($receivePort), $true);
            $receivePortNode.AppendChild($node);
        }
    }
    $finalBinding.Save("$bindingfilePath$appName.BindingInfo.xml")

    #generate different Environments Bindings
    if($generateDiffEnvBindings)
    {
        $xml = (Get-Content "$bindingfilePath$appName.BindingInfo.xml")

        # QA Binding Info Generation
        $xml.SelectNodes("//Host") | % {
            if(!$_.Attributes['xsi:nil'].Value)
            {
                $_.NtGroupName = $global:qaNTGroupName
            }
        }
        $xml.Save("$bindingfilePath$appName.QA.BindingInfo.xml")

        # PRD Binding Info Generation
        $xml.SelectNodes("//Host") | % {
            if(!$_.Attributes['xsi:nil'].Value)
            {
                $_.NtGroupName = $global:prdNTGroupName
            }
        }
        $xml.Save("$bindingfilePath$appName.PRD.BindingInfo.xml")
    }
}

THIS POWERSHELL IS PROVIDED “AS IS”, WITHOUT WARRANTY OF ANY KIND.
To be honest, I think this is the less useful script because it is not that much practical use, and also it will have several limitations when we have several and different versions of the same published DLL. But, it can be very useful and practical in situations where we can guarantee that we have only one DLL version published in our environment.
You can download the full script from here: Export BizTalk Resource Bindings from a List of Assembly Names with PowerShell
The post BizTalk Bindings Exportation: How to Export BizTalk Server Resource Bindings from a List of Assembly Names with PowerShell appeared first on BizTalk360.
by Saranya Ramakrishnan | May 13, 2019 | BizTalk Community Blogs via Syndication
It’s time to upgrade your BizTalk360 installation! We are here with our next release of BizTalk360, v9.0. We always aim to constantly improve our product based on customer’s feedback and their business needs. The features added in this release are typically chosen from our feedback portal and based on the impact and the number of requests.
Benefits out of this release
BizTalk360 Auditing – When you are a group of support people, diagnosing and solving problems in your production environment, it’s important to keep track of who is doing what in the environment. With BizTalk360 activities auditing, you can easily identify who did what.
SMTP Notification Channel – Managing the email recipients which are mapped to an alarm is very simple now. With the SMTP notification channel, you can configure email distribution lists which can be mapped to multiple alarms. In addition to this, you can also configure specific team member emails to receive Up and Auto Correct alerts.
Switch User Role – The User roles can be changed in a single step. You can easily convert a super user to a normal user and vice versa.
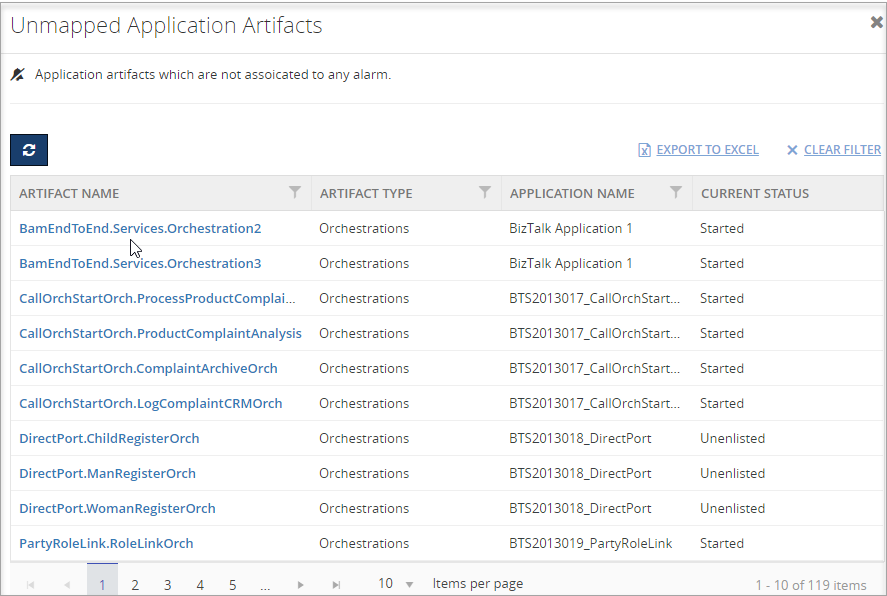
Unmapped Application Artifacts – We don’t want you to miss artifacts for monitoring. With this new Unmapped application artifacts feature, you can determine the artifacts which are not (yet) mapped for monitoring.
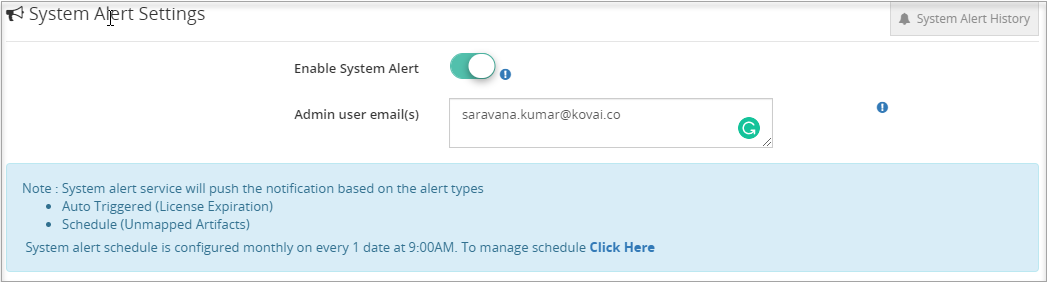
System Alerts – The BizTalk360 administrator can get to know about the health of BizTalk360 environment through System Alerts. The administrator can now get alerts about BizTalk360 License expiration, Unmapped application artifacts list and Monitor error details.
Copy to Clipboard – With this,user can copy the field values in a single click from the BizTalk360 UI.
Let’s jump into the features in detail
BizTalk360 Auditing
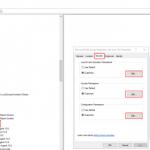
BizTalk360 has a powerful operational governance and auditing capability to maintain the logs of the user activities in the system. This feature helps the BizTalk administrators to find out “Who did what” in the environment over a period of time. BizTalk360 already has the capability to audit BizTalk level activities. You can think of actions on BizTalk Applications, Service Instances, Host Instances, BizTalk and SQL Servers, ESB Messages and Business Rules.
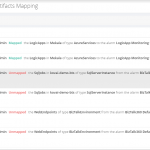
For this release we have implemented BizTalk360 activities auditing. This will give a clear insight about the various activities performed by the user in the Manage Alarm, Artifacts Mapping, and Secure SQL query sections.
Alarm operations such as new alarm creation, changing the alarm status (Enable/Disable), deleting an alarm, updating alarm details will be logged with the existing and new values, along with the user details. Administrator can also view the artefact mapping details. For instance, if any artifacts have been added or removed from an alarm mapping for monitoring, that will be logged.
Secure SQL query auditing includes Creating new query, Editing/Deleting the query and Query import.
SMTP Notification Channel
The SMTP Notification Channel provides an ability to create email distribution lists by grouping email ids based on the business needs.
Using the same email recipients for multiple alarms was not easy in earlier versions; the recipient’s details needed to be entered for each alarm. To overcome this, we have introduced the SMTP Notification channel, through which the user can configure email distribution lists under one channel and can be mapped to multiple alarms. In addition to this, we have added email grouping for Up Alert and Auto Correct Alert. With this, the user can configure different email ids to receive Up and Auto Correct alerts.
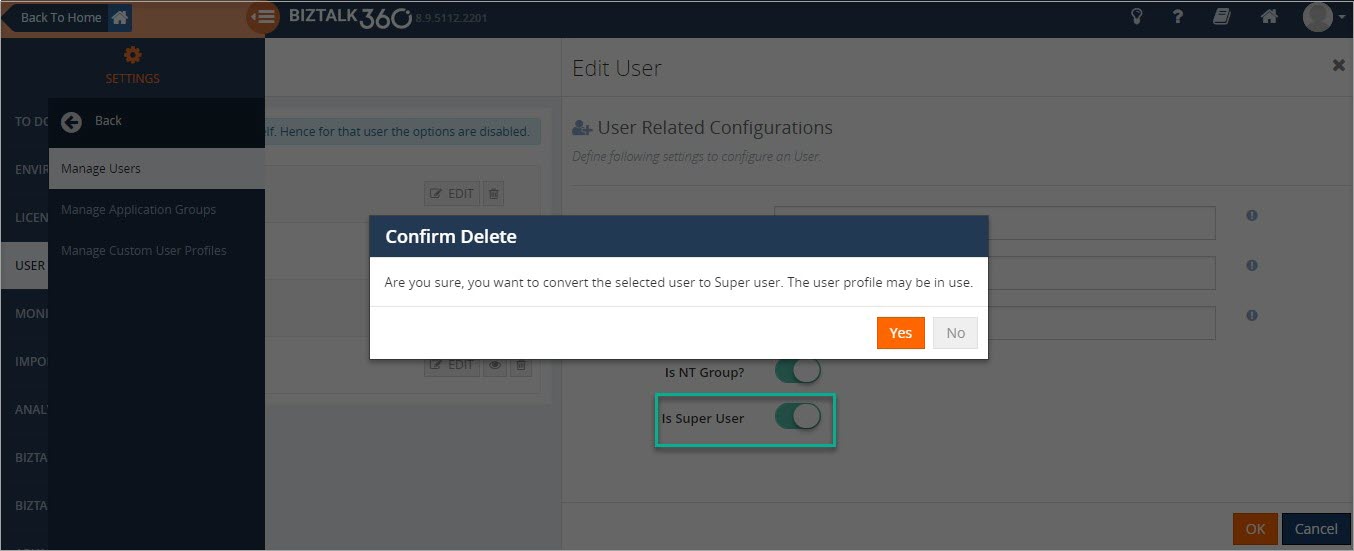
Switch User Roles
In earlier versions, there was no option to convert a Super user to a Normal user or vice versa. To change the user roles, the profile needed to be deleted and recreated again, which is a time-consuming process. This has been solved in this version; the user roles can quickly be converted in a single step, by editing the user and toggling the user roles.
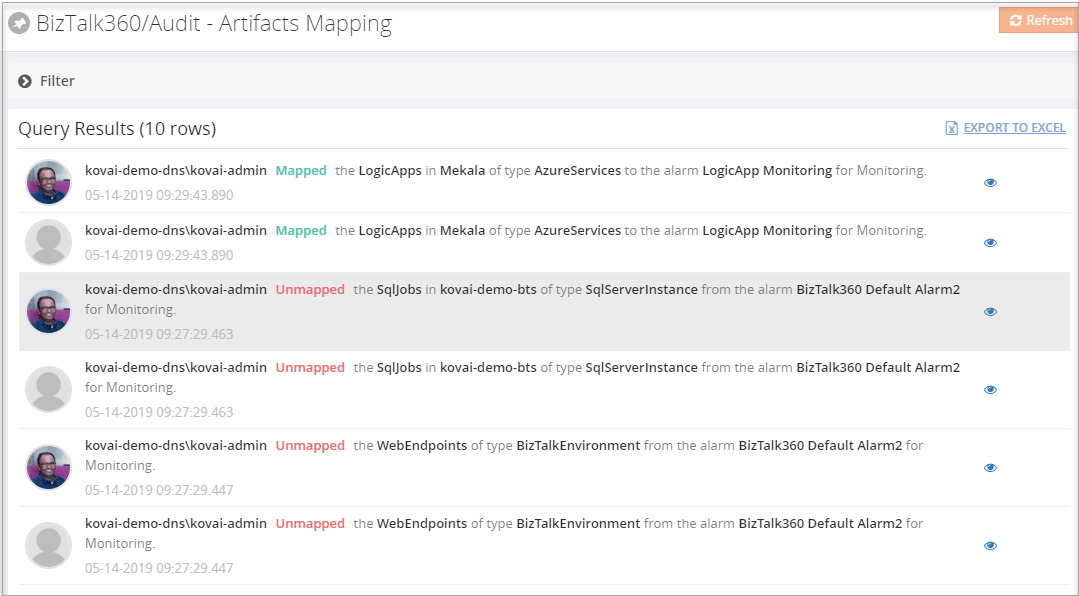
Unmapped Application Artifacts List
BizTalk360 can monitor amongst others BizTalk application artifacts. With this new Unmapped application artifacts feature, you are able to determine the artifacts which are not (yet) mapped for monitoring.
You will get a summarized list of unmapped application artifacts in the Monitoring Dashboard. This list contains the artifacts which are not mapped to any of the alarms for monitoring. For instance, if any new artifacts have been added in your BizTalk environment, we will bring that to your notice and you can easily map the artifacts for monitoring.
 System Alerts
BizTalk360 is the single tool to manage operational activities, monitoring and analytics of the mission-critical BizTalk environment. Systems Alerts are sent to the BizTalk360 administrator about the health of BizTalk360 environment. The administrator can now easily get the alerts about BizTalk360 License expiration and Unmapped application artifacts list in the BizTalk environment.
The list of Unmapped application artifacts can be notified based on the alert schedule in the system settings. License Expiration notification will be automatically be triggered on 30, 15, 7 and 2 days before the license expiry.
Copy To Clipboard
Our business data is highly valuable. The information uses contain decision-making and problem-solving. From v9.0 on, the Copy to Clipboard option is provided to copy information in a single click from the BizTalk360 UI to the Windows Clipboard.
Few Enhancements and Bug Fixes
Besides these new features, we have also brought several enhancements and bug fixes.
Default Auto Correct Reset Interval
Auto healing is an existing feature which tries to bring the artifacts back to the expected state after a violation has occurred. The system will retry the auto healing process for a configured number of times. Once the retry limit is reached, the auto healing process will be stopped. The user can set the number of retries and reset it when the maximum limit is reached. However, it can be time-consuming to set the reset interval time for every configured auto correct. To overcome this, an option to set the default auto-correct reset interval is introduced in the System settings section.
Monitoring Dashboard Improvements
The BizTalk360 ‘Monitoring Dashboard‘ becomes the one-stop point for support people to view the health status of the BizTalk environment. You can see the summarized dashboard can be seen in a much enriched view.
Now the monitoring graph can be resized based on the screen resolution.
Blade Improvements
When multiple blades are opened, there was a partial inconsistency with the blades. Already opened blades remained open until the user close it manually. Now, the blade will get closed when the user clicks on another blade and the user is able to view only the relevant blades.
Conclusion
Considering the feedback from our customers, BizTalk360 will continue to provide more useful features. Why not give BizTalk360 a try! It takes about 10 minutes to install on your BizTalk environments and you can witness and check the security and productivity of your own BizTalk Environments.
The post BizTalk360 v9.0 Released appeared first on BizTalk360.


