
by Gautam | Sep 30, 2018 | BizTalk Community Blogs via Syndication
Do you feel difficult to keep up to date on all the frequent updates and announcements in the Microsoft Integration platform?

Integration weekly update can be your solution. It’s a weekly update on the topics related to Integration – enterprise integration, robust & scalable messaging capabilities and Citizen Integration capabilities empowered by Microsoft platform to deliver value to the business.
If you want to receive these updates weekly, then don’t forget to Subscribe!
Feedback
Hope this would be helpful. Please feel free to reach out to me with your feedback and questions.
by Sivaramakrishnan Arumugam | Sep 27, 2018 | BizTalk Community Blogs via Syndication
In very few days, we will release BizTalk360 version 8.9. As everyone is excited, I’m excited too as, in every release of BizTalk360, we constantly improve and include features based on the customer’s feedback and business needs. In the upcoming version, we have implemented a few features purely based on the customer’s feedback.
Here is the list of features which I’m going to cover in this blog:
- PDF Download
- Restore System Email XSLT Template
- Monitoring IBMMQ and Azure Service Bus Queues using Message Age
- Performance improvements
PDF Download
Based on the existing implementation in the Analytics reporting module, many of our customers requested the PDF download feature. We have implemented the PDF Download capability for the following modules:
- Graphical Flow (Tracking)
- Messaging Patterns
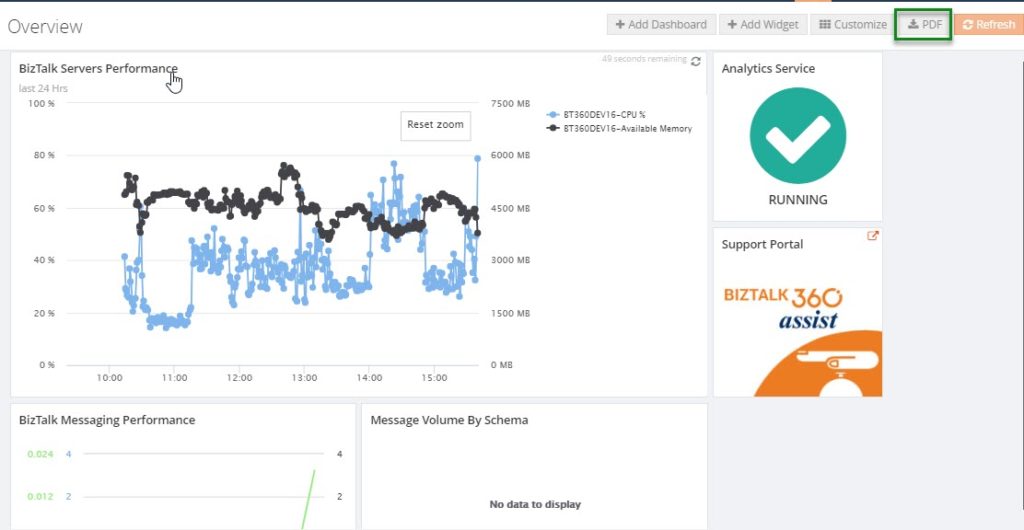
- Operations Dashboard
- Monitoring Dashboard
- Analytics Dashboard
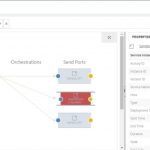
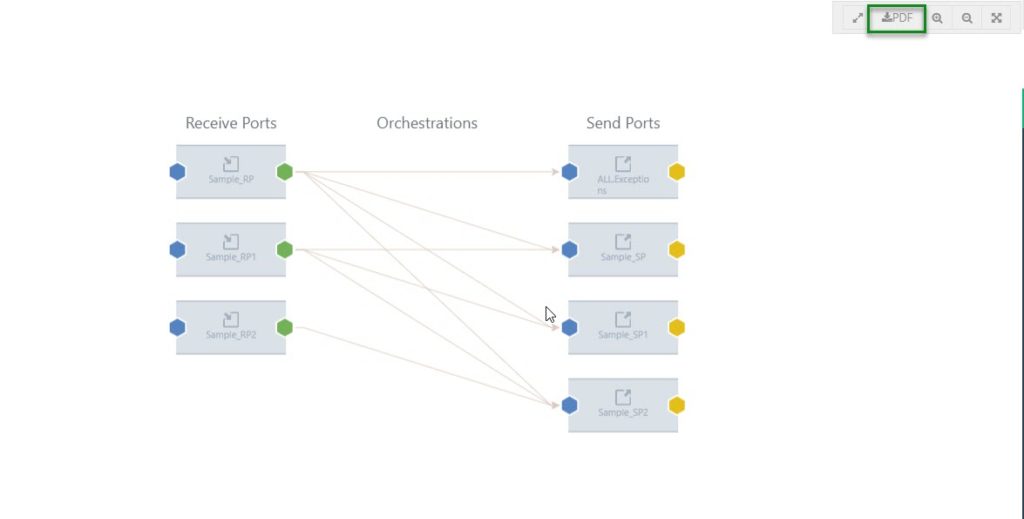
In Graphical Flow (Tracking)
The user views the entire flow of the message from where it entered the BizTalk server to the point where it left the BizTalk Server environment. All the message flows are indicated by arrow marks between the nodes, which will provide a clear indication of the message transactions.
Say, in a message flow a message is not sent to the expected node; this will become clear in the Graphical Flow (Tracking) feature.
Example: The Viewer shows you what messages a service instance (pipeline or orchestration) sent and received, and details such as the URL, port, and party used. You can also see which preceding service instances handled the messages coming into the service instance you are currently viewing.
You can link back to these instances and see the messages coming into and going out of these instances.You can also see the subsequent service instances that received messages from the service instance you are currently viewing, and link forward to these instances to see the messages coming into and going out of these instances.
In other words, you can walk through the entire path of an activation message through your business process.
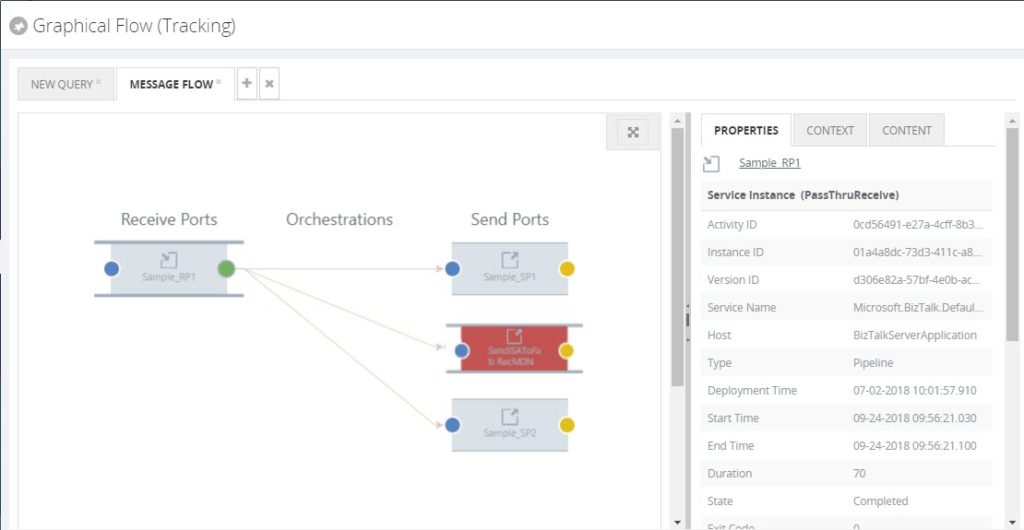
In such cases, the new PDF download implementation will be helpful to download the flow and escalate the problem to the required team.
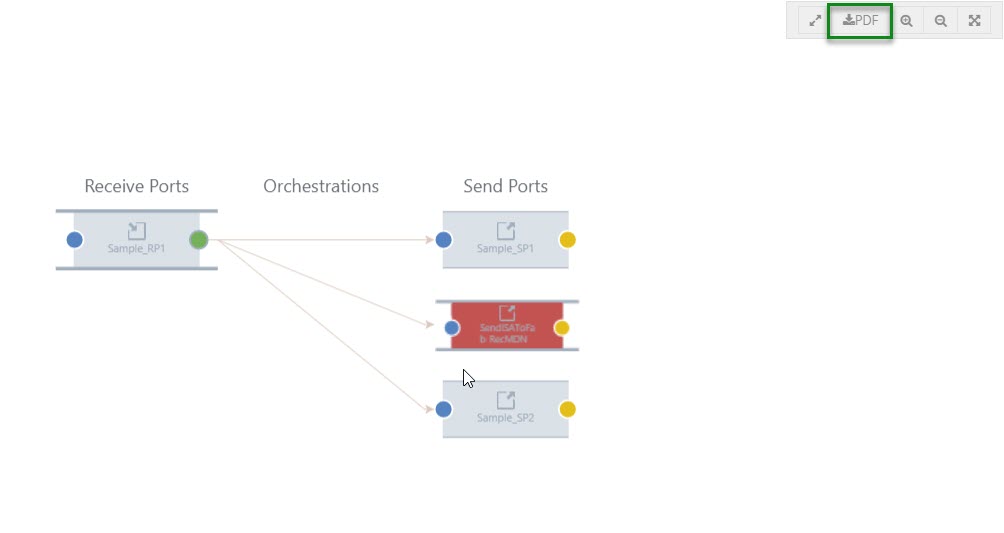
To capture the full message pattern, you can choose the full-screen view. Along with the zoom in and zoom out capability, we have introduced a new option PDF download feature.
The PDF will get downloaded and be given the name of a pipeline of the selected port. Say for example, in the graphical flow, if you choose a Receive Port and select the download option, the PDF will be downloaded and be given the name of the Receive Port pipeline.
Messaging Patterns
As you are aware, the message patterns are the unique flows that get recorded for the message transfers. To capture a message flow, choose the full-screen view option. Along with the zoom in and zoom out options, the PDF download button will now be visible
When the user wants to see a message flow, we display it as a graphical pattern with the artifacts involved.
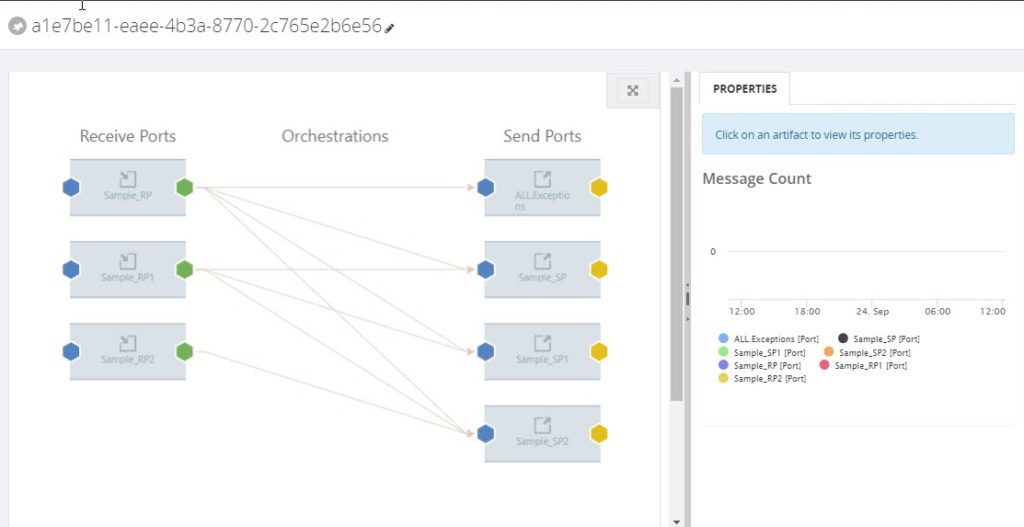
Example: A message can be received by a receive port, split up and processed in separate orchestrations, after which the processed messages are being sent to external processes/systems. To capture a unique message flow and use it for reference in the future, the PDF download will be helpful.
Messaging Patterns will be downloaded with the name of the message pattern.
Operations Dashboard
BizTalk360 has a capability to add default widgets and create your own custom widgets. In such cases, you have configured important widgets into the dashboard.
Even though you have an option to make the dashboard as global, when you want to share within the team you would have to make screenshots. To avoid creating screenshots again, we have implemented the PDF download option.
When you navigate to the Operations Dashboard, at the top right corner, next to the Refresh button, the PDF button will be available.
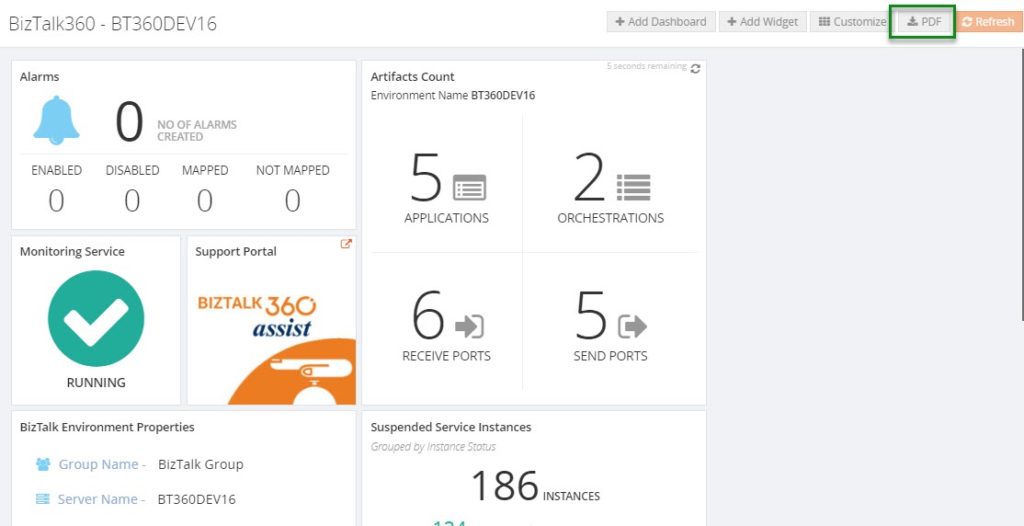
When you download the Operations Dashboard, the PDF will get downloaded with the name of the dashboard.
Monitoring Dashboard
You may get the status of an alarm via notifications from BizTalk360 whenever the port goes down. You can also receive the complete status of the monitored artifacts, with the help of a regular health check alarm for each hour. But, when you want to share the immediate status of the alarm the PDF download option will be helpful.
The download option will be enabled, similar to the Messaging Patterns for the Operations Dashboard. You can choose the full-screen view option. Along with the zoom in and zoom out buttons, the PDF download button will now be visible.
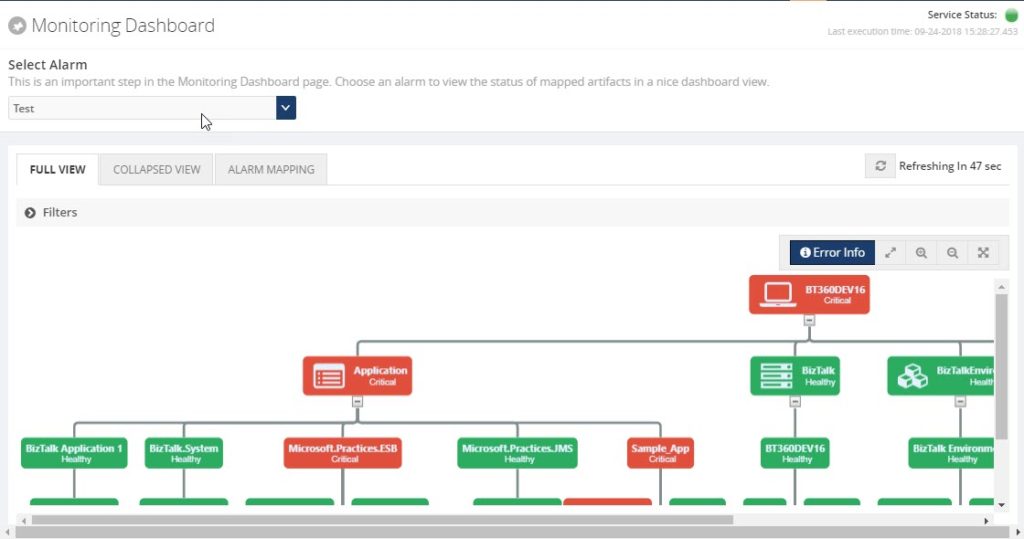
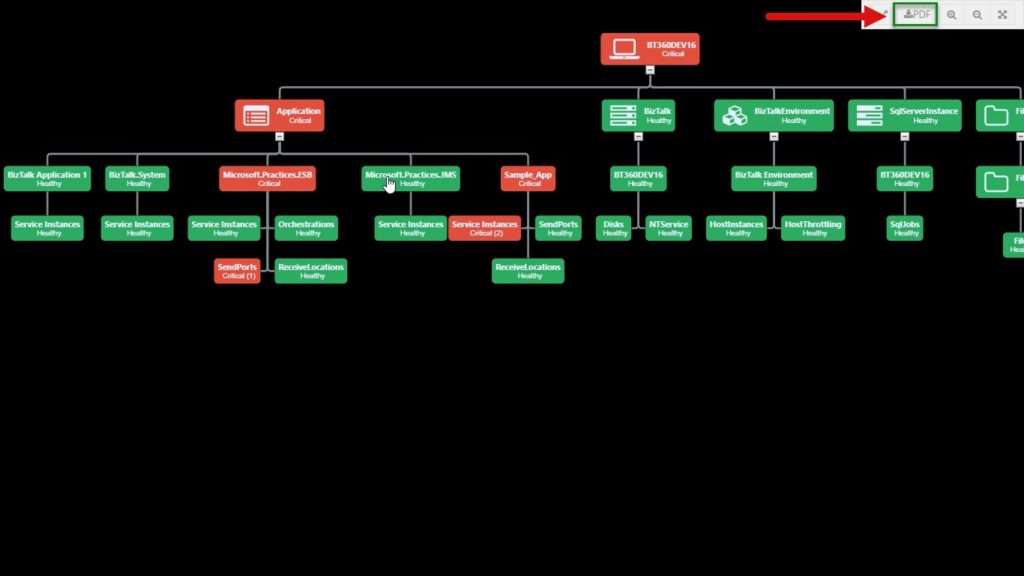
As seen in the messaging pattern, when you download the monitoring dashboard, the PDF will be saved with the alarm name which you were viewing.
Analytics Dashboard
Like the Operations Dashboard, in the Analytics Dashboard, at the top right corner, next to the Refresh button, the PDF download button will be available.
When you download the PDF, it will get downloaded with the name of the dashboard.
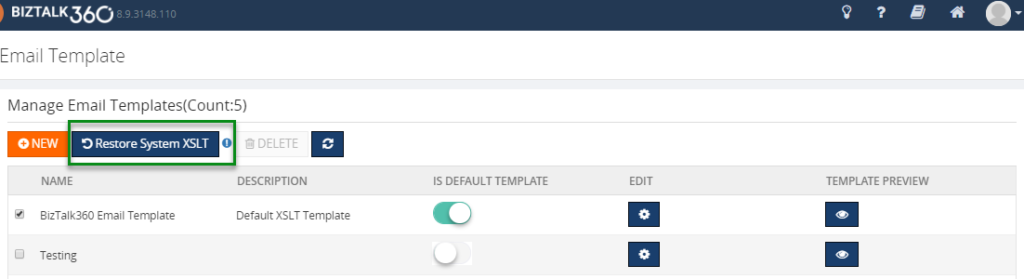
Restore System XSLT
We constantly improve the email templates based on the customer requests and we provide the templates directly to the customers. After that, we make the changes on the default email template in the very next release.
To make use of the newly improved email template in both default and custom email templates which are already created, until now people had to update their template(s) manually. While doing the manual changes, there may be a chance of misconfiguring the template. To avoid the manual changes, we brought this new capability “Restore System XSLT”, directly from the user interface.
Monitor with Message Age
Another most requested capability is monitoring IBMMQ and Azure Service bus queues with message age.
Message age is the time a message exists in a Queue. Using the message age parameter, you can monitor the queue messages along with the time messages exist in a queue.
In a real-time scenario, a message should be processed and send out, as the queues serve as first in first out. If it is not being processed and still pending in the queues over a particular period, you will get notified with the implementation of Message Age parameter.
We have implemented Message Age parameter as an additional monitoring filter option, in two places.
- Azure Service Bus queues
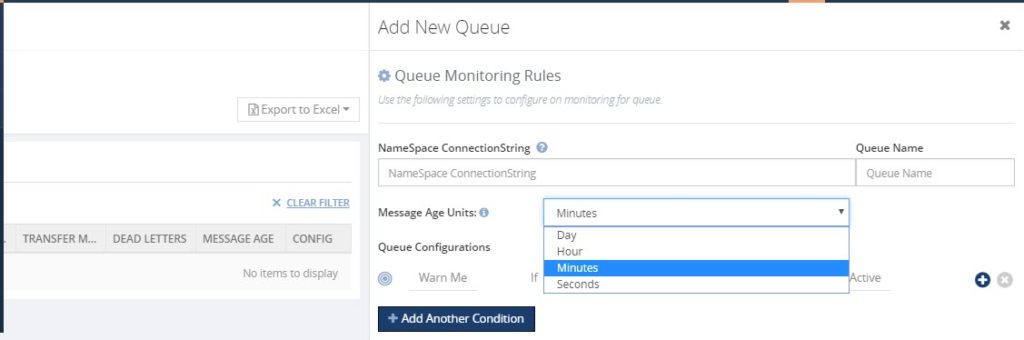
- IBM MQ
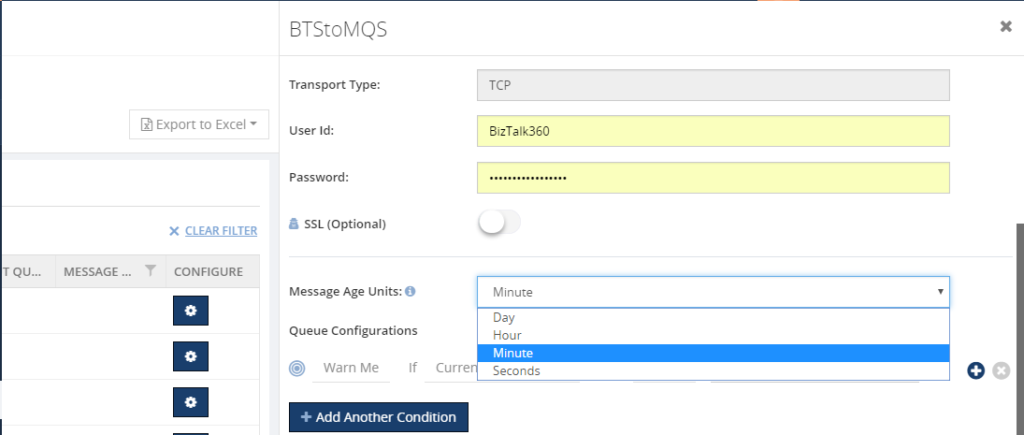
As of now, using the Message Age parameter, you can monitor the message age from few seconds to 24 hours Say, for example, if you want to monitor a queue using the message age parameter, you can monitor the queue messages along with the time of the message when it is created.
Performance Improvement
For the table “b360_BizTalkDB_Tbl_sizes”, every minute a stored procedure in BizTalk360 will clear a table of old records and insert new records.
One of our customers started facing problems, that due to high CPU usage because of that query is being executed every minute. Also, while deleting an entry, a full table scan is done, every time the query is executed. In an environment, this causes 2 seconds of CPU usage and half a million of I/O’s per query. Also, there were duplicate entries in the table for different regional settings.
The cleaning takes place on both the MessageBox and the Tracking database. It causes 4 statements per minute, like the one above, and it leads to high CPU usage.
We found that a table index is missing for the table b360_BizTalkDB_Tbl_sizes. So, we have created an index for the table and also tuned the query for making entries. This will help to reduce the CPU usage.
Conclusion
We always keep track of our Feedback Portal and take up the valid suggestions and feedback. Now, it is your turn to fill your business scenarios and features you are expecting to have in BizTalk360; please fill this questionnaire. Your valuable suggestions will help us to prioritize the next set of feature for upcoming releases.
Author: Sivaramakrishnan Arumugam
Sivaramakrishnan is our Support Engineer with quite a few certifications under his belt. He has been instrumental in handling the customer support area. He believes Travelling makes happy of anyone. View all posts by Sivaramakrishnan Arumugam

by Sandro Pereira | Sep 26, 2018 | BizTalk Community Blogs via Syndication
A few days ago, I publish the first version of the community project BizTalk Pipeline Components Extensions Utility Pack for BizTalk Server 2016. Today I please to announce that a new pipeline component was added to this project: Multi-Part Message Attachments Zipper Pipeline Component.
This was an old component that I had published in the past for BizTalk Server 2006/2006 R2/2009 and 2010 that I now updated and improved to BizTalk Server 2016 with the help with my internal team at DevScope, in special, Pedro Almeida.
What is BizTalk Pipeline Components Extensions Utility Pack?
BizTalk Pipeline Components Extensions Utility Pack is a set of custom pipeline components (libraries) with several custom pipeline components that can be used in received and sent pipelines, which will provide an extension of BizTalk out-of-the-box pipeline capabilities.

Multi-Part Message Attachments Zipper Pipeline Component
The BizTalk Multi-Part Message Attachments Zipper is a pipeline component for BizTalk Server which can be used in a send pipeline and is intended to replace all attachments of a multi-part message for its zipped equivalent.
The capabilities are similar to those available in compression software such as WinZip or 7-zip:
- Attachments Compression – Extracts, in a send pipeline, all message parts include in a multi-part message that is not included in the message body (Message Body Part = False), compresses it and attaches the compressed attachment back to the message.
- This component requires one configuration that is the FileExtension where you can specify if you want for example a .zip or .gz file.
No compression/decompression software needs to be installed in the BizTalk Server machines.
To use this pipeline component in your projects you just copy the “PipelineComponentMultipartMsgZipAttach.dll” file into “Pipeline Components“ folder that exists in BizTalk Server Installation directory: “..Program Files (x86)Microsoft BizTalk Server <version>Pipeline Components” on every server.
You do not need to add a custom pipeline component to be used by the BizTalk Runtime to the Global Assembly Cache (GAC).
The project is available on BizTalk Server Open Source Community repository on GitHub (https://github.com/BizTalkCommunity) and everyone can contribute with new pipeline components that can extend or improve the existing BizTalk Server capabilities.
At the moment it is only available for BizTalk Server 2016 but it will soon be compiled and available for previous versions of the product.
Where to download?
You can download BizTalk Pipeline Components Extensions Utility Pack from GitHub here:
 BizTalk Pipeline Components Extensions Utility Pack
GitHub
Author: Sandro Pereira
Sandro Pereira lives in Portugal and works as a consultant at DevScope. In the past years, he has been working on implementing Integration scenarios both on-premises and cloud for various clients, each with different scenarios from a technical point of view, size, and criticality, using Microsoft Azure, Microsoft BizTalk Server and different technologies like AS2, EDI, RosettaNet, SAP, TIBCO etc. He is a regular blogger, international speaker, and technical reviewer of several BizTalk books all focused on Integration. He is also the author of the book “BizTalk Mapping Patterns & Best Practices”. He has been awarded MVP since 2011 for his contributions to the integration community. View all posts by Sandro Pereira
by Sandro Pereira | Sep 25, 2018 | BizTalk Community Blogs via Syndication
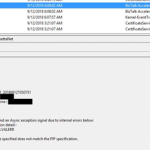
PIP name specified does not match the PIP specification, this is the last RosettaNet error that tries to make my life a little bit difficult.
Fortunately, to date, Microsoft documentation has significantly improved, moving to DOCS was a good approach and community members now have the availability to help to improve the product documentation. Nevertheless, there are still some topics that the existing the documentation is obsolete, scarce or simply non-existent. One of these topics is Microsoft BizTalk Accelerator for RosettaNet.
I was receiving this error on the PublicResponderProcess orchestration, for those who are not familiar with Microsoft BizTalk Accelerator for RosettaNet (BTARN), this is a default artifact developer by Microsoft that compose a BizTalk Solution that handles PIP messages:
- When a responder receives a request message, BTARN routes the request message from the public-process orchestration, to the private-process orchestration, to the line-of-business (LOB) program. The responder requires the response service content from the LOB program to generate a RosettaNet response message back to the initiator. Many of the elements in the response message are populated using the values from the request message. As a result, you can incorporate a map in the responder private-process orchestration to help the LOB program generate the response service-content message in the required format.
The difficult part is to “debug”/track these errors to understand what and why this is happening. The full error message in the event log was:
Source module:
PublicResponderProcess
Correlation information:
PIP Code : 3C4
PIP Version : V01.00
PIP InstanceID : 922731_20180912T050751
SourcePartnerName :
DestinationPartnerName:
Description:
Public Responder could not send an Async exception signal due to internal errors bellow:
RNIF Exception detail:-
Error code:UNP.SHDR.VALERR
Error Number:2005
Description: PIP name specified does not match the PIP specification.
: PIP name specified does not match the PIP specification")
Note: this same error can occur in previous or new versions of BizTalk Server.
Cause
Again, it was difficult to understand all the internal behaviors developed by Microsoft for BTARN but basically, when you receive a PIP message you will end up receiving 4 parts:
- The Preamble:
- All RosettaNet messages must have a Preamble. It is specified with a DTD that is common across all messages.
- The Preamble section of the MIME message contains elements that are global to the RosettaNet service and others that are common to the Service Header and Service Content; for example, the message standard and version used in the message.
<Preamble xmlns="http://schemas.microsoft.com/biztalk/btarn/2004/Preamble_MS_V02_00.dtd">
    <standardName>
        <GlobalAdministeringAuthorityCode>
            RosettaNet
        </GlobalAdministeringAuthorityCode>
    </standardName>
    <standardVersion>
        <VersionIdentifier>
            V02.00
        </VersionIdentifier>
    </standardVersion>
</Preamble>
- The Delivery Header
- The delivery header is new in RNIF 2.0 and facilitates the routing of messages through hubs. It contains the following attributes:
- Elements for the sending and receiving of trading partner identities
- Message date and time stamp
- Globally unique tracking ID
<DeliveryHeader xmlns="http://schemas.microsoft.com/biztalk/btarn/2004/DeliveryHeader_MS_V02_00.dtd">
    <isSecureTransportRequired>
        <AffirmationIndicator>
            Yes
        </AffirmationIndicator>
    </isSecureTransportRequired>
    <messageDateTime>
        <DateTimeStamp>
            20180912T050743.000Z
        </DateTimeStamp>
    </messageDateTime>
    <messageReceiverIdentification>
        <PartnerIdentification>
            <GlobalBusinessIdentifier>
                xxxx
            </GlobalBusinessIdentifier>
        </PartnerIdentification>
    </messageReceiverIdentification>
    <messageSenderIdentification>
        <PartnerIdentification>
            <GlobalBusinessIdentifier>
                yyyyy
            </GlobalBusinessIdentifier>
        </PartnerIdentification>
    </messageSenderIdentification>
    <messageTrackingID>
        <InstanceIdentifier>
            922730_20180912T050744**00**
        </InstanceIdentifier>
    </messageTrackingID>
</DeliveryHeader>
-
- The Service Header is specified with a DTD that is common across all messages. A separate DTD and/or XML schema for each message validates the body of the messages.
- The Service Header helps identify the following items:
- The PIP
- The activity and the action to which the message belongs
- The PIP instance
- Information about the sender of the message
- Information about the recipient of the message
- The date and time at which the message was sent
- Whether the message is a Test message or a Production message
- Whether the sender is to be treated as an “unknown partner”
- The Service Header format is fixed and independent of the specifics of the message contained in the payload. However, the Service Content could change based on the variance in the business content.
<ServiceHeader xmlns="http://schemas.microsoft.com/biztalk/btarn/2004/ServiceHeader_MS_V02_00.dtd">
    <ProcessControl>
        <ActivityControl>
            <BusinessActivityIdentifier>
                Notify Of Invoice Reject
            </BusinessActivityIdentifier>
            <MessageControl>
                <fromRole>
                    <GlobalPartnerRoleClassificationCode>
                        Invoice Reject Provider
                    </GlobalPartnerRoleClassificationCode>
                </fromRole>
                <fromService>
                    <GlobalBusinessServiceCode>
                        Invoice Reject Provider Service
                    </GlobalBusinessServiceCode>
                </fromService>
                <Manifest>
                    <numberOfAttachments>
                        <CountableAmount>
                            0
                        </CountableAmount>
                    </numberOfAttachments>
                    <ServiceContentControl>
                        <ActionIdentity>
                            <GlobalBusinessActionCode>
                                Invoice Reject Notification Action
                            </GlobalBusinessActionCode>
                        </ActionIdentity>
                    </ServiceContentControl>
                </Manifest>
                <toRole>
                    <GlobalPartnerRoleClassificationCode>
                        Invoice Reject Receiver
                    </GlobalPartnerRoleClassificationCode>
                </toRole>
                <toService>
                    <GlobalBusinessServiceCode>
                        Invoice Reject Receiver Service
                    </GlobalBusinessServiceCode>
                </toService>
            </MessageControl>
        </ActivityControl>
        <GlobalUsageCode>
            Test
        </GlobalUsageCode>
        <pipCode>
            <GlobalProcessIndicatorCode>
                3C4
            </GlobalProcessIndicatorCode>
        </pipCode>
        <pipInstanceId>
            <InstanceIdentifier>
                922730_20180912T050744
            </InstanceIdentifier>
        </pipInstanceId>
        <pipVersion>
            <VersionIdentifier>
                V01.00
            </VersionIdentifier>
        </pipVersion>
        <KnownInitiatingPartner>
            <PartnerIdentification>
                <GlobalBusinessIdentifier>
                    XXXXXX
                </GlobalBusinessIdentifier>
            </PartnerIdentification>
        </KnownInitiatingPartner>
    </ProcessControl>
</ServiceHeader>
- And the Service Content
- Service Content is specified in individual PIPs. Each PIP has one or more business actions that are described by means of individual DTDs or schema.
- The payload part of a RosettaNet Business Message—that is, the actual business content—is a message in XML format.
: PIP name specified does not match the PIP specification - Message Parts")
For this problem, the things you need to know about the PublicResponderProcess orchestration is that:
- It will call a method “GetRuntimeConfig” on the “GetRNConfig” shape that will get the process/agreement configuration;
rnConfig = Microsoft.Solutions.BTARN.ConfigurationManager.RuntimeConfigGenerator.GetRuntimeConfig
  (destinationPartyID, sourcePartyID, pipCode, pipVersion,
    false, true
 );
- And it will call a method “IsActionMessageValid” on the “ValidateMessage” shape that will validate if the message received a match to any process/agreement active in the system
rnConfig.IsActionMessageValid( inRNIFMessage, out exceptionInfo );
-
- This last method calls an additional method call “ValidateActionServiceHeader”, here a piece of the code:
...
if (propertyValue != base.GetPIPConfigValue("PIP_Name"))
{
   str = str + StringResources.GetString(StringResourceIDNames.rtcV11InvalidPipName);
}
...
-
-
- “GetPIPConfigValue(“PIP_Name”)” comes from the RosettaNet process

-
-
- The other comes from the Service Header message part in the BusinessActivityIdentifier element
- Both need to be equal – case sensitive!
My problem was that:
- the RosettaNet process name was: Notify of Invoice Reject
- and the Service Header was: Notify Of Invoice Reject
Solution
To solve this issue you must.
- Ensure that the process name is equal to the BusinessActivityIdentifier element in the Service Header message part
Author: Sandro Pereira
Sandro Pereira lives in Portugal and works as a consultant at DevScope. In the past years, he has been working on implementing Integration scenarios both on-premises and cloud for various clients, each with different scenarios from a technical point of view, size, and criticality, using Microsoft Azure, Microsoft BizTalk Server and different technologies like AS2, EDI, RosettaNet, SAP, TIBCO etc. He is a regular blogger, international speaker, and technical reviewer of several BizTalk books all focused on Integration. He is also the author of the book “BizTalk Mapping Patterns & Best Practices”. He has been awarded MVP since 2011 for his contributions to the integration community. View all posts by Sandro Pereira
by Mekala Ramesh | Sep 25, 2018 | BizTalk Community Blogs via Syndication
High availability, Multi server, Multi-environment Infrastructure Guide
This article will help you to understand the architecture of the infrastructure details for various scenarios of high availability, multi-server and multiple environments setup.
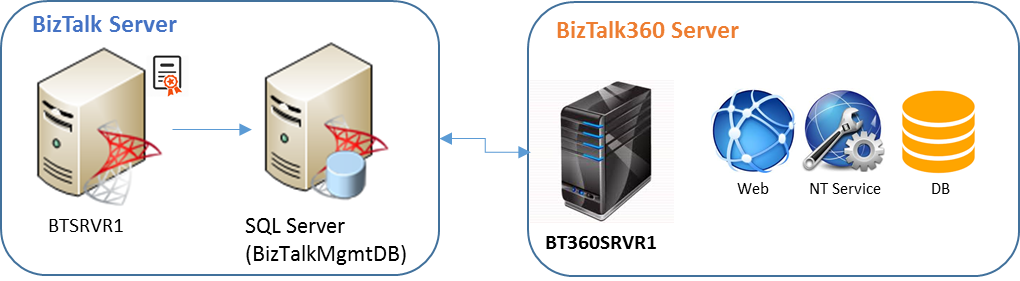
With regards to High Availability of BizTalk360, there are few parts which can be made Highly Available/Load Balanced:
- The User Interface
- The Windows NT services (Monitoring & Analytics)
- The BizTalk360 database
The User Interface (UI)
The UI, including the REST services, can be made Highly Available by installing BizTalk360 on multiple servers. By putting a software/hardware load balancer (NLB) in front of these BizTalk360 servers, the UI of BizTalk360 can be accessed via the virtual address which is provided by the NLB.
Independently whether one of the BizTalk360 servers is down, you will always be able to access BizTalk360 via the address of the NLB. This is in no way related to the high availability of the BizTalk360 NT services.
The BizTalk360 Windows NT services
Depending on the license tier a company goes for, BizTalk360 comes with the following Windows NT services:
- One for the Monitoring activities
- One for collecting Analytical data (only needed in case of Platinum license)
To split the responsibilities of the NT services, each of these services contains several sub-services. One of these sub-services is used for heartbeat and will be used in case BizTalk360 is installed on multiple servers.
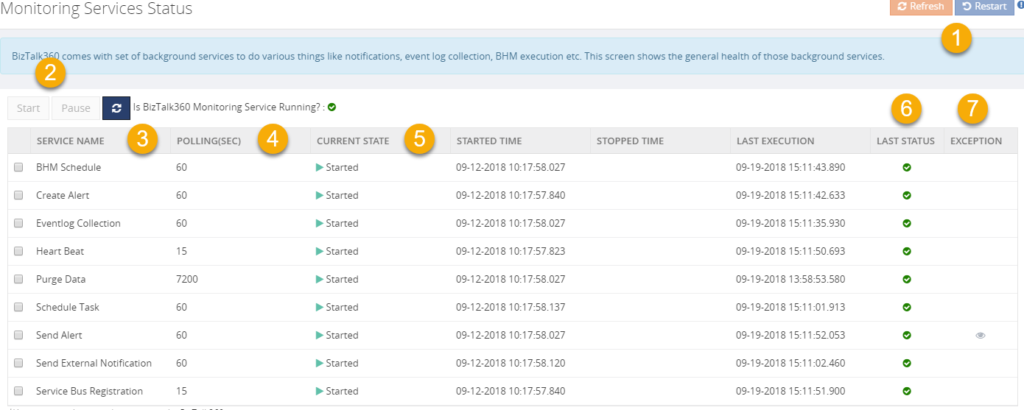
The picture shows the BizTalk360 Monitoring Service, including its sub-services. See below list, for some more explanation about the capabilities:
- Refresh and Restart buttons – With the Refresh button, the status of the Monitoring service and its sub-services are retrieved. The Restart option enables you to restart the Monitoring services. As a result, the sub-services will also be restarted
- Start and Pause buttons – Each sub-service can be Started/Paused individually. By selecting one or more sub-services with the check boxes, you can Start/Pause multiple sub-services at once
- Service Name column – This column shows the name of all sub-services. Based on that, you will understand the responsibilities of each sub-service. As mentioned earlier, the Heart Beat sub-service is one of them
- Polling (Sec) column – Each sub service has its own polling interval, after which the sub-service will do its job. It is not possible to change this interval. In the Last Execution column, the date and time of the last execution of each sub-service is shown
- Current State column – This column shows the actual state of each sub-service. By default, all these sub-services should be Started
- Last Status – This column shows whether the last execution of the sub-service was successful or not
- Exception – In case the last execution was not successful, the exception of the last execution is shown in this column
To make these NT services highly available, BizTalk360 needs to be installed in multiple servers. At these servers, the BizTalk360 NT services must be started. From that moment on, the heartbeat of the services will be monitored cross-wise between the services on the BizTalk360 servers. For each (Monitoring and Analytics) service only one on either BizTalk360 machine can be Active. In other words, this is an Active-Passive configuration. Active-Active is not supported!
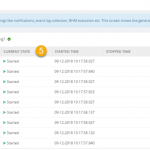
Below screenshot shows a configuration in which the BizTalk360 Monitoring service is installed in 2 servers. As you can see, the BTS2016LAB02 server is Active, which means that it is performing the monitoring tasks. The other server, the BTS2016LAB03, is not active. However, this server can be activated by clicking the Activate button.
Again, it is important to remember that although BizTalk360 can be installed on multiple servers, only one of these servers can be Active and performing the monitoring tasks.

In such multi-BizTalk360 server setups, in case the heartbeat sub-service on the Active BizTalk360 machine is not responding, there is automated fail-over of the BizTalk360 NT services taking place. So, the tasks of the BizTalk360 NT services will be performed by the server which was, until then, Passive. Thereby, High Availability is reached.
The BizTalk360 database
For making the BizTalk360 database highly available, you need to use a clustered SQL instance. That could be the same SQL instance as where the BizTalk databases reside, but could also be a separate (clustered) instance.
Different standalone and multi-server scenarios
As BizTalk Server can also be made High Available and Load Balanced, there are quite a lot of different scenarios possible, with respect to the server setup of both products. Let’s have a look at the most common scenarios and see how these scenarios affect the BizTalk360 licensing.
Scenario 1 – Standalone BizTalk server and standalone BizTalk360 server
First scenario, let us see how a simple solution, like having a standalone BizTalk Server and a standalone BizTalk360 environment setup will look like.
Following are the prerequisites:
- 1 x BizTalk Server
- 1 x MS SQL Server
- 1 x BizTalk360 server
- 1 x valid BizTalk360 server license (total BizTalk Server count will be 1 in this scenario)
Scenario 2 – Multiple BizTalk servers and a standalone BizTalk360 server
In our following scenario, we will see how to have multiple BizTalk Servers and a standalone BizTalk360.
Following are the prerequisites:
- 2 x BizTalk Server
- 1 x MS SQL Server
- 1 x BizTalk360 server
- 1 x valid BizTalk360 server license (total BizTalk Server count will be 2 for the BizTalk360 license)
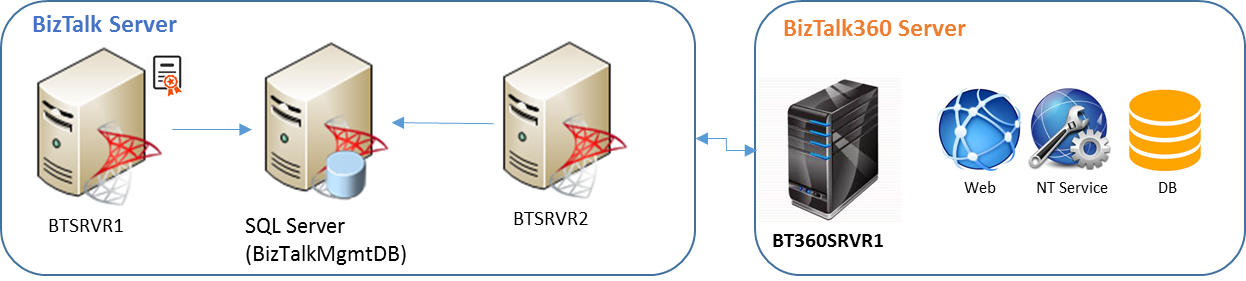
- Though we require one BizTalk360 license, the max server count for the license, should be = 2 as BizTalk360 is licensed per number of BizTalk servers in the BizTalk group
- If both BizTalk servers (BTSRVR1, BTSRVR2) are active, it means that this is a multi-server environment
- If BTSRVR1 is active and BTSRVR2 is passive (or vice versa), then it is High Availability
Scenario 3 – Multiple BizTalk servers and multiple BizTalk360 servers
Below is the diagram that explains how to have a multiple server setup for both BizTalk Server and BizTalk360 servers and its pre-requisites:
- 2 x BizTalk Server
- 1 x MS SQL Server
- 2 x BizTalk360 servers
- 1 x valid BizTalk360 server license (Total BizTalk Server count will be 2 for the BizTalk360 license)
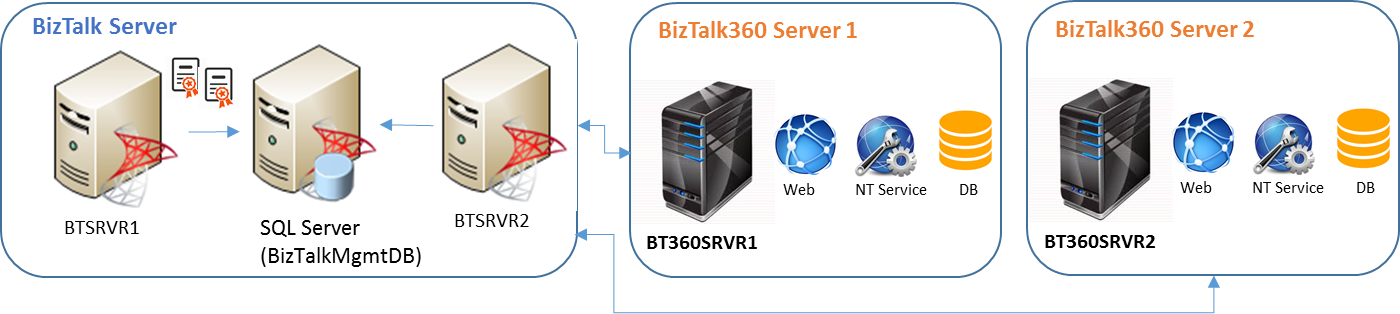
In this scenario, we have used two BizTalk360 servers, pointing to the same BizTalk group, which makes BizTalk360 highly available.
Scenario 4 – 2 multi-server BizTalk groups and multiple BizTalk360 servers
Now, we will see another scenario where we have multiple BizTalk Server environments; both BizTalk Server & BizTalk360 are highly available.
Following are the prerequisites:
- 2 x 2 BizTalk Server
- 2 x MS SQL Server
- 2 x BizTalk360 server
- 2 x valid BizTalk360 licenses (total BizTalk Server count will be 2 for each BizTalk360 license)

As we have seen, there can be several combinations of server setups, and it is purely based on the customer’s requirement and their infrastructural policies. What we explained are 4 various scenarios and their requirements. These are basic setups and the fundamentals will not change, even if you have other scenarios.
Author: Mekala Ramesh
Test Lead at BizTalk360 – Software Testing Engineer having diverse exposure in various features and application testing with a comprehensive understanding of all aspects of SDLC. Strong knowledge to establish the testing process from the scratch. Love to test the software product to deliver it with good quality. Strongly believes on “Testing goes beyond just executing the test protocol”. View all posts by Mekala Ramesh
by Gautam | Sep 24, 2018 | BizTalk Community Blogs via Syndication
Do you feel difficult to keep up to date on all the frequent updates and announcements in the Microsoft Integration platform?

Integration weekly update can be your solution. It’s a weekly update on the topics related to Integration – enterprise integration, robust & scalable messaging capabilities and Citizen Integration capabilities empowered by Microsoft platform to deliver value to the business.
If you want to receive these updates weekly, then don’t forget to Subscribe!
Feedback
Hope this would be helpful. Please feel free to reach out to me with your feedback and questions.
by Sandro Pereira | Sep 23, 2018 | BizTalk Community Blogs via Syndication
Last Friday while checking the Twitter I found a twitter from Jon Levesque asking if someone had a sample on how to took SQL data table results and passed a markdown-formatted table into an Approval Request. By coincidence, two week ago, I was helping a colleague of mine doing something similar, in that case, it was just adding a well formatted table with the results of an SQL expression to a notification email. Two different but similar scenarios.
To be able to create this simple proof-of-concept you should:
- Access the Flow portal: https://flow.microsoft.com/ and sign in with your account
- In flow.microsoft.com, select “My flows” in the top navigation bar, and then select “+ Create from blank” to create a Flow from scratch.
- On the “Create a flow from blank”, select “Create from blank” to start the process of creating an empty Flow
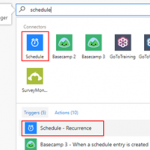
Because this is a simple POC and it supposed to be a notification email we will be using the Scheduler trigger to start the Flow from time to time. For that you need:
- On the Flow designer, on the Trigger event enter “Schedule” and select the option “Schedule – Recurrence”

- For this POC, we want to receive a notification on a daily, so on the Schedule Trigger configuration set the:
- “Interval” property as “1”
- And the “Frequency” property has “Day”

- Add the next step by clicking the “+New step” button and then choose the “Add an action” option

- On the “Choose an action” window, enter “SQL Server” and select the action “SQL Server – Execute a SQL query”

| Note: |
| This can be a different action like, get rows or execute a stored procedure. |
-
- After you connect to the proper SQL Server and database, on the Execute a SQL query action configuration:
- On the “query” property, type
SELECT [Id],
       [Name],
       [Age],
       [Nacionality]
FROM [dbo].[Persons]

- Add the next step by clicking the “+New step” button and then choose the “Add an action” option
- On the “Choose an action” window, enter “Variables” and select the action “Variables – Initialize variable”

-
- On the Variable action configuration:
- On the “Name” property, type “lines”
- On the “Type” property, specify the type as “String”
- On the “Value” property leave it blank

| Note: |
| Initialize variable needs to be performed on Top Level, in other words, outside any cycle operation (Do Until or For Each). Initialize variable inside cycles are not permitted. |
- Add the next step by clicking the “+New step” button and then choose the “Add an action” option
- On the “Choose an action” window, enter “Variables” and select the action “Variables – Append to string variable”

-
- On the Variable action configuration:
- On the “Name” property, select “lines” variable
- On the “Value” property type
<tr>
<td style="border:1px solid black; border-collapse: collapse;">@{items('Apply_to_each')?['Name']}</td>
<td style="border:1px solid black; border-collapse: collapse;">@{items('Apply_to_each')?['Nacionality']}</td>
</tr>

| Note: |
| @{items(‘Apply_to_each’)?[‘Name’]} and @{items(‘Apply_to_each’)?[‘Nacionality’]} are inserted and selected from the list of “Execute a SQL query” action tokens |
- Because we can have multiple rows retrieved from SQL Server, the Flow designer will automatically place this “Variable – Append to string variable” inside a Loop that will iterate thru each SQL row.

Now that we have our SQL rows partially well formatted in a markdown-formatted table, what we need to do is create our notification/Approval Request email. To do that we need:
- Add the next step by clicking the “+New step” button and then choose the “Add an action” option
- On the “Choose an action” window, enter “Office 365 Outlook” and select the action “Office 365 Outlook – Send an email”

- On the Office 365 Outlook action configuration:
- On the “To” property, type the email for which you want to send the email
- On the “Subject” property, type the subject of the email
- On the “Body” property, type:
<h1>Summary</h1>
<table style="border:1px solid black; border-collapse: collapse;">
@{variables('lines')}
</table>
by www.devscope.net

| Note: |
| @{variables(‘lines’)} is inserted and selected from the list of “Variables” tokens |
Now the final trick for you to receive this type of email:

instead of this:

On the Office 365 Outlook action configuration you need to:
- Click on “Show advanced options”.

- And on the “Show advanced options”:
- On the “Is HTML” property, select “Yes”

Author: Sandro Pereira
Sandro Pereira lives in Portugal and works as a consultant at DevScope. In the past years, he has been working on implementing Integration scenarios both on-premises and cloud for various clients, each with different scenarios from a technical point of view, size, and criticality, using Microsoft Azure, Microsoft BizTalk Server and different technologies like AS2, EDI, RosettaNet, SAP, TIBCO etc. He is a regular blogger, international speaker, and technical reviewer of several BizTalk books all focused on Integration. He is also the author of the book “BizTalk Mapping Patterns & Best Practices”. He has been awarded MVP since 2011 for his contributions to the integration community. View all posts by Sandro Pereira
by Sandro Pereira | Sep 21, 2018 | BizTalk Community Blogs via Syndication
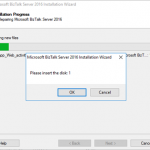
A funny error I found out on December 4, 2017, that I’m now recovering from my backlog to be published. While trying to repair a BizTalk Server 2016 installation on a virtual machine I got this annoying, funny and strange error: Please insert the disk: 1.
Microsoft BizTalk Server 2016 Installation Wizard
Please insert the disk: 1

and regardless of what I did back then, like running the execution file as an administrator, I was getting this error every time I was trying to repair the BizTalk Server installation.
And what I did back then was:
- Attach the BizTalk Server ISO file in the DVD drive of Virtual Machine that was running in the Hyper-V;
- And execute the installation file from the DVD drive of the VM;
Cause
Unfortunately, this message may appear if you are trying to repair the product from the CD/DVD drive and the reason is not clear for me.
I don’t know if this error occurred by the fact that in the original installation the ISO that was locally on the machine or it is just a coincidence.
Solution
The solution, however, is very simple:
- Copy content of the BizTalk Server 2016 ISO to the local hard drive of the Virtual Machine – but I believe that this can be the same to other BizTalk Server versions;
- And execute from the local Hard Drive the BizTalk Server setup file has an Administrator;
By doing that you will definitely solve the “Please insert the disk: 1” issue and you will be able to repair the existing installation.
Author: Sandro Pereira
Sandro Pereira lives in Portugal and works as a consultant at DevScope. In the past years, he has been working on implementing Integration scenarios both on-premises and cloud for various clients, each with different scenarios from a technical point of view, size, and criticality, using Microsoft Azure, Microsoft BizTalk Server and different technologies like AS2, EDI, RosettaNet, SAP, TIBCO etc. He is a regular blogger, international speaker, and technical reviewer of several BizTalk books all focused on Integration. He is also the author of the book “BizTalk Mapping Patterns & Best Practices”. He has been awarded MVP since 2011 for his contributions to the integration community. View all posts by Sandro Pereira

by Sandro Pereira | Sep 20, 2018 | BizTalk Community Blogs via Syndication
Finally, my latest whitepaper has been published: “BizTalk Server and GDPR“! After doing several GDPR assessments and talked a little about this topic on INTEGRATE 2018 London event I thought this should be the next logical step considering that this is a topic that has worried a lot of BizTalk Server customers, and still worries, and in a more general way all organizations regardless of whether they use or not BizTalk Server.

In a general way, BizTalk Server is GDPR compliant – in fact Microsoft Product group announced in INTEGRATE2018 London Event that one of the features of BizTalk Server 2016 Feature Pack 3 (FP3) was FIPS and GDPR privacy standards compliant, but that was just a marketing strategy since, in its most simplistic form, BizTalk Server is a messaging broker, which doesn’t capture or store any type of data on its system other than for the time needed to complete business processes and to connect and route messages to their target systems. However, because you can process messages and/or communicate with systems that contain sensitive data (personal data) you must have some good practices in BizTalk Server Applications to comply with GDPR. So, in other words, BizTalk Server is GDPR compliant but your BizTalk Applications may not be.
What to expect about BizTalk Server and GDPR whitepaper
BizTalk Server is part of complex enterprise IT environment, we also need to guarantee that these BizTalk Server environments are GDPR compliant. This white paper intends to provide key points on how you can archive and deploy secure integrations in BizTalk Server, and how you can ensure and/or help organizations for this complex middle piece, become GDPR compliant.
This whitepaper will cover the impact of the new regulations and what needs to be done with a focus exclusively on BizTalk Server environments.
Where I can download it
The whitepaper is completely free and you can download it here:
I would like to take this opportunity also to say thanks to Lex Hegt for helping me reviewing this whitepaper especially for the incredible work of him correcting my horrible English and in this way make the document and my thoughts being readable.
I hope you enjoy reading this paper and any comments or suggestions are welcome.
You can also find, download and enjoy several other free whitepapers of my own here:
Author: Sandro Pereira
Sandro Pereira lives in Portugal and works as a consultant at DevScope. In the past years, he has been working on implementing Integration scenarios both on-premises and cloud for various clients, each with different scenarios from a technical point of view, size, and criticality, using Microsoft Azure, Microsoft BizTalk Server and different technologies like AS2, EDI, RosettaNet, SAP, TIBCO etc. He is a regular blogger, international speaker, and technical reviewer of several BizTalk books all focused on Integration. He is also the author of the book “BizTalk Mapping Patterns & Best Practices”. He has been awarded MVP since 2011 for his contributions to the integration community. View all posts by Sandro Pereira
by Praveena Jayanarayanan | Sep 20, 2018 | BizTalk Community Blogs via Syndication
We are super excited to welcome our new release version of BizTalk360, v8.9. There has already been a series of blogs explaining the features coming up in the release. Here is another such blog which explains the enhancements done in the User Access Policy section in v8.9.
User Access Policy is one important feature in BizTalk360, where you can provide access to certain applications in your BizTalk environment to Normal Users and NT groups. This is not available at the BizTalk server level. The importance of this feature can be read here “Why did we build User Access Policy to Manage BizTalk Server Security?
Customer Feedback getting answered
In BizTalk360, we aim at improving the product and adding new features based on the customer feedback and business scenarios. The Feedback portal is one such platform for the customers to provide their suggestions on which can be voted by other customers, if they feel that these ideas fit in their business requirements as well. It’s based on the priority of voting the features and enhancements before getting picked up for development. One such feedback was the access to newly created BizTalk applications.

Hence, in the new release we thought of giving a fresh coat of paint to this feature, based on the feedback we received.
What’s New in User Access Policy
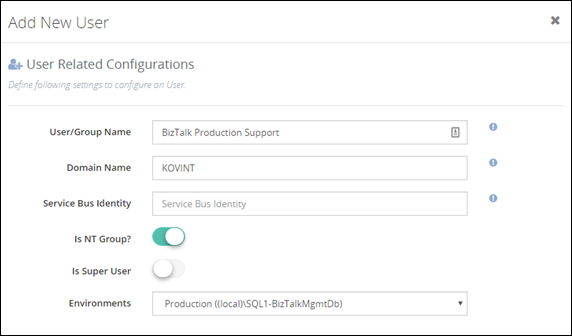
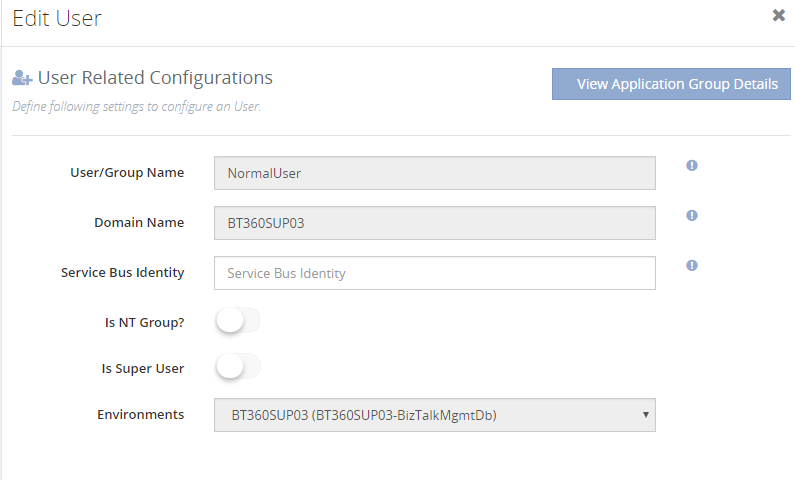
BizTalk360 supports management of multiple BizTalk Server environment from a single console. So, you can set up security and access rights from a single place. You can either configure security for individuals or as team (ex: Create an NT Group called “BizTalk Production Support”).
Now here comes the twist on the Application access. For your information, the rest all remains the same.
In earlier versions, it was a simple grid displaying all the available applications in a BizTalk environment and you can select the applications to provide access to Normal Users/Groups. But now we have slightly modified this, to provide multiple options for providing access to the applications. This would surely be more user friendly and of course meet the requirements. The different options include:
- Grant Access by Applications
- Grant Access to all Applications
- Wildcard Search
- Grant Access to Application Groups
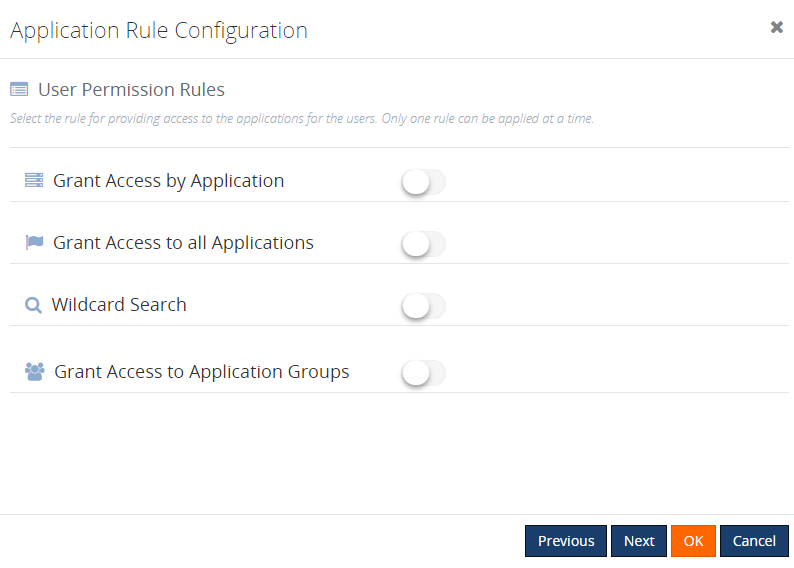
Only one rule can be applied at a time. This holds for both users and groups. We shall have a detailed look at each one of them.
Grant Access to All Applications
As the name denotes, enabling this rule will provide access to all the available applications for the Normal Users/Groups. This will be similar to the permissions of the Super User who will have access to all applications.
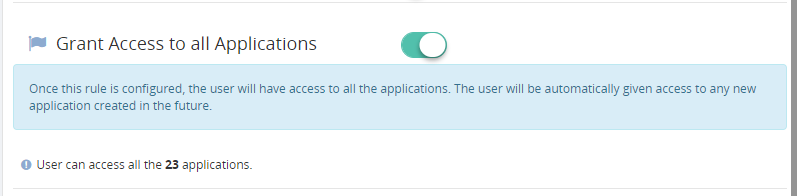
Note: The user will automatically be granted access to all the newly created applications. The user doesn’t need to scroll down the complete list, to select the newly created application and provide access. The extra burden to check for the new applications is now reduced.
Wildcard Search
This is the new capability introduced in this release. It enables users to select the options from the wildcard operator drop down.
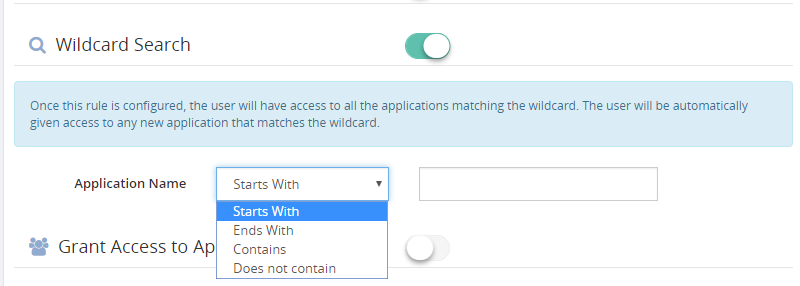
With the four options that are available in the Wildcard search, the user can select the required option and provide the search value. Once this rule is configured, the user will have access to all the applications matching this wildcard. The user will automatically be given access to the newly created applications that match the wildcard.
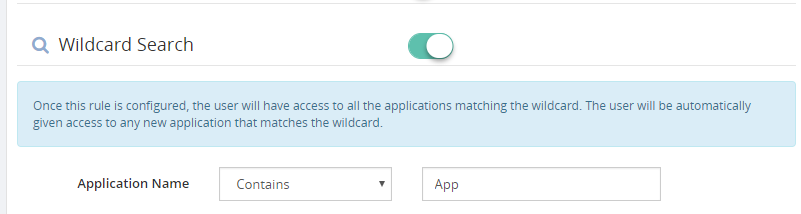

This will save a lot of time because in a business scenario, the applications will be named based on specific activity and it would be easy for the admins to select the appropriate wildcard option and provide access. This would be quite interesting and easy option for configuring access to these applications.
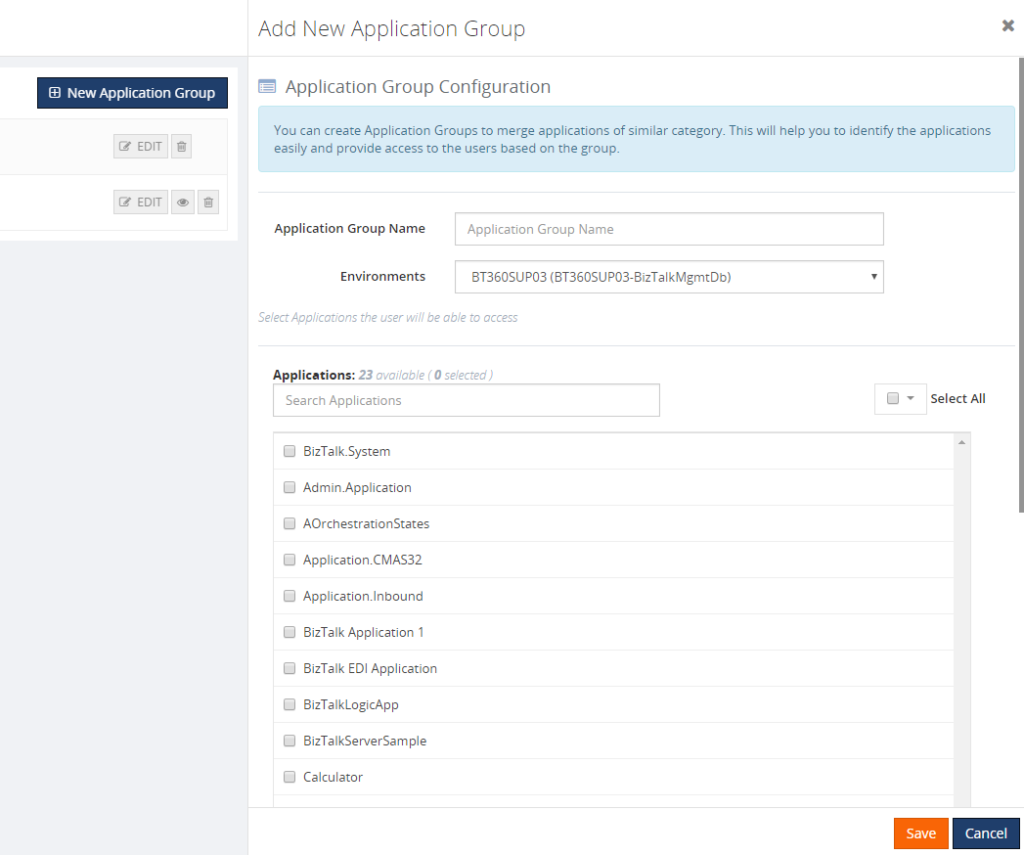
Grant Access to Application Groups
We know about the BizTalk Group. But what is this Application Group? Sounds new, isn’t it? Yes, it is new to BizTalk360. With this new capability, you can create Application Groups and map the applications to that group. Once the user is given access to the Application group, he can access all the applications mapped to that group.
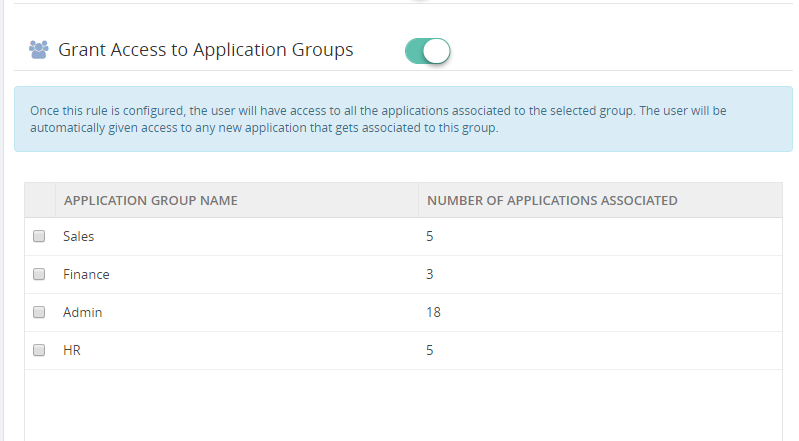
The Concept of Application Groups
The Application Group is something new to BizTalk360. We always aim at providing a user interface that must ease the work of the customer, with minimal configuration. You can create a group and map the related applications to that group.
Now, providing access to this application group will automatically enable the users to access the applications which are mapped to that Application Group. This Application Group is only related to BizTalk360 and not to BizTalk itself. When the corresponding Normal User logs in to BizTalk360, his access will be limited to these applications. Only Super Users can view and edit the Application Groups.
The Normal Users/Groups will have access to other modules in BizTalk360, based on the applications only. The concept of Application Groups was created to ease the work of the admins.
It is also possible to view the list of Application Groups created for an environment; editing or deletion them is done by the Super users.
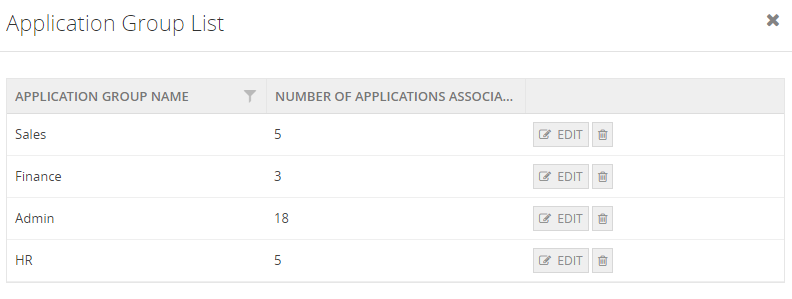
Scenario
Do you know what happens if you try to delete an Application Group that is already given access to a Normal user? It is not possible to delete that Application Group. The exception message would be captured and displayed in the UI.
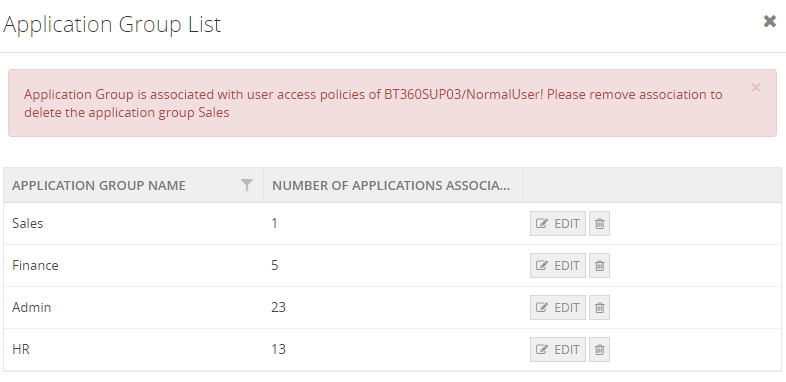
This way, it would be easy to identify the association between the user and the Application Group.
Would it not be interesting to try this out?
What would happen to existing user configuration?
Now that we know what the different available options are for associating the applications to new users/groups. At this point of time, there must be a question coming up on what would happen to the existing users created when we upgrade from an older version to the new version of BizTalk360.
- Will all that information be lost?
- Do I need to create all the users once again and configure the rules?
- Will the user data not get migrated during the upgrade?
Lot more questions would come up during the upgrade, as this is a critical area of security and there would be different users and groups which are already created and provided access to the applications.
Please don’t panic. As promised, we always take care of your data and configuration and migrate them successfully to the new version. There will not be any data loss.
Yes, your data and configuration are safe and will be migrated successfully during the upgrade. Now, said that the data will be safe, what will happen to the User configuration data after the upgrade? There was no concept of Wildcard or Application group in the previous versions. The only which was available, was to select the applications from the grid and save them.
For persisting the existing configuration data, we have another rule available: ‘Grant Access by Application’. You will probably be happy to hear that!
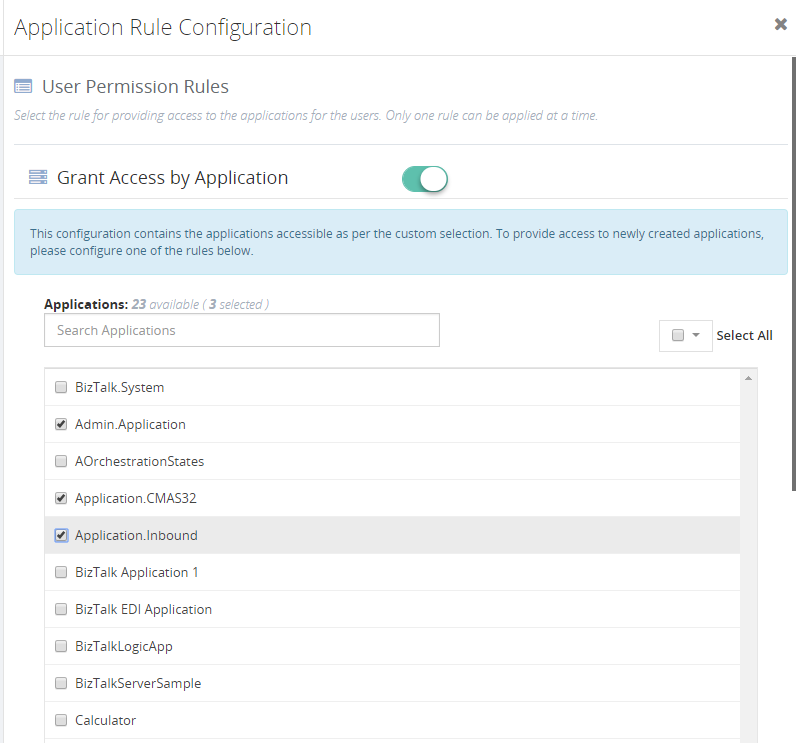
Once the upgrade is completed, this will be the default rule which is selected for existing users. Once the Super users edits the details for a Normal User, this rule is selected. They can now change the rule configuration as per the requirement.
The only difference between this configuration and the other new rules is that when Grant Access by Applications is configured, newly applications created will not automatically be given access as in the other rules.
Viewing the permitted applications
Once the rule is configured, there is a view option for the admin to verify who have been provided access to which applications. Here is the option that we have given:
A view option has been provided in the User settings screen, which will list all the permitted applications for the users.

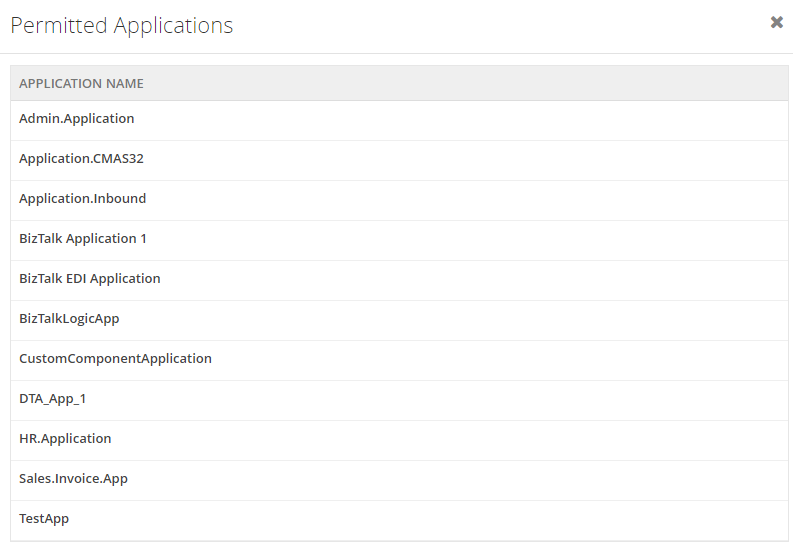
By viewing the permitted applications, the Super User can verify if the access to the applications have properly been provided to the Normal users/groups.
Conclusion
With the new look for application access, we are convinced that we brought a great new feature 😊. It will save time for the admins to provide access to users and groups. It will now be easy for users to take care of the newly created applications as well. Once the rule is configured, it is all set and no need to worry about new applications.
Happy monitoring with BizTalk360!
Author: Praveena Jayanarayanan
I am working as Senior Support Engineer at BizTalk360. I always believe in team work leading to success because “We all cannot do everything or solve every issue. ‘It’s impossible’. However, if we each simply do our part, make our own contribution, regardless of how small we may think it is…. together it adds up and great things get accomplished.” View all posts by Praveena Jayanarayanan


: PIP name specified does not match the PIP specification")
: PIP name specified does not match the PIP specification - Message Parts")


