Upsert into Azure Table Storage from BizTalk in 10 minutes
A quick you tube video to show how easy it is to send messages to to table storage from BizTalk
[embedded content]
A quick you tube video to show how easy it is to send messages to to table storage from BizTalk
[embedded content]

Microsoft has been providing support for a lot of external services such as BTTN, Flic etc., to trigger a Microsoft Flow by pressing a button. BTTN is a physical button made by The Button Corporation, while Flic is an offering from Shortcut Labs. In this blog, we will take a look at how we can trigger a Microsoft Flow by integrating with BTTN service. Credits to the Microsoft team for offering these hooks to connect to external services.
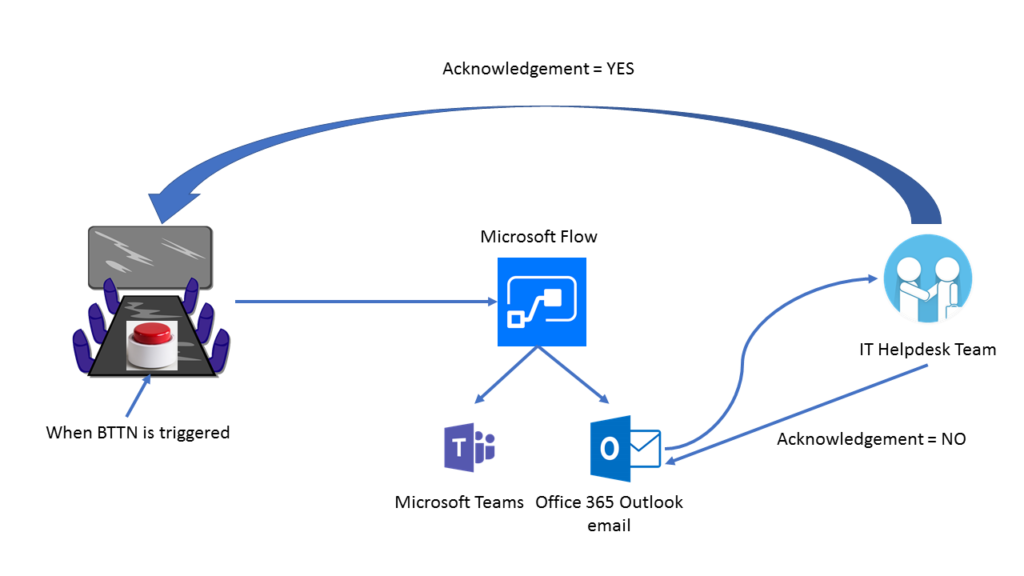
To explain the integration with Microsoft Flow buttons, let’s consider this scenario. We will have a virtual BTTN named Conference Room 1 Bttn which will be specific to a conference room at Contoso company. The purpose of this button is to seek immediate assistance from the IT Help desk team at Contoso for any issues in the conference room (such as WiFi not working, need extra VGA/HDMI cable connector, etc.,). When the virtual Bttn is pressed, a Microsoft Flow will run in the background that will automatically send an email to the IT Help desk team and notify them on their Microsoft Teams channel. When the agent picks up the case, the person who triggered the Bttn will be notified (via email) about the status of the ticket.
BTTN or BT.TN is a very simple internet user interface which when pressed can be used to trigger any specific action. You can imagine BTTN as a physical button (Ex., the emergency red button on train engines or big machinery) which can trigger an action when pressed.
BTTN is available as a physical button for different purposes such as simple laundry pickup in one click, call a taxi with the click of a button, assistance when something is not right in the conference room, and so on. You can purchase these physical buttons from here.
BTTN has the built-in capability to integrate with the following services – Facebook, Twitter, Email, SMS, Microsoft Flows, IFTTT, Zapier, and HTTP.
BTTN Corporation also has a virtual button (a smart cloud service) that has the capability to execute an action on one of the above-mentioned integrations in a couple of mouse clicks without having to write any code.
You can easily claim your virtual bttn from here. The virtual bttn is free of cost and you can use it for 30 days. Simply complete the cart payment step (of course without spending any money!) and you will see a confirmation message saying your virtual bttn will be delivered in 2 business days.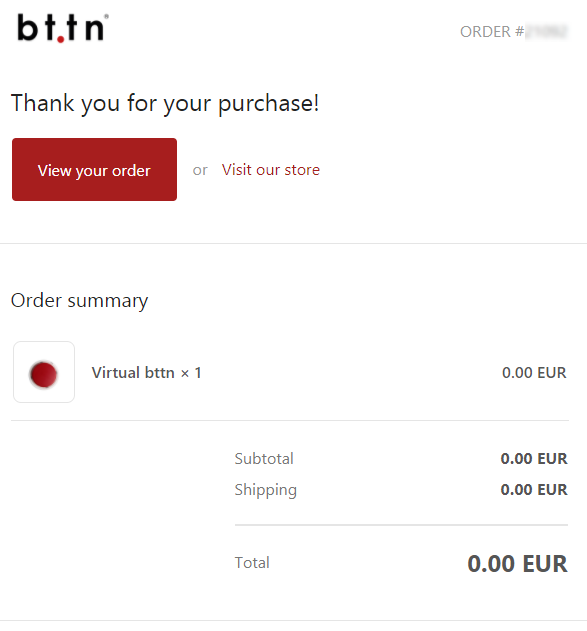
However, it usually just takes about 6-8 hours for your virtual bttn to be delivered on to your mailbox. In the email, you will be presented with a link to register your bttn. Enter the Bttn device ID and the authentication code which is available in the registration link. These fields will be automatically populated if you click the link from your email. Accept the terms & privacy policy and click Register.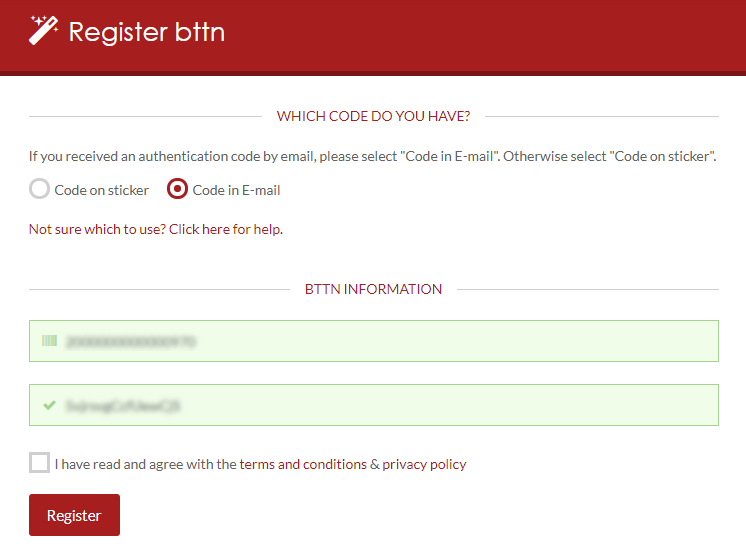
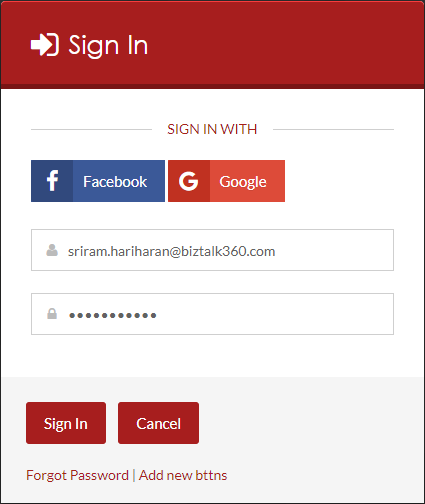
You will be prompted to create a password. Once done, log in with your email address and password. You will notice the screen that will display your virtual bttn.

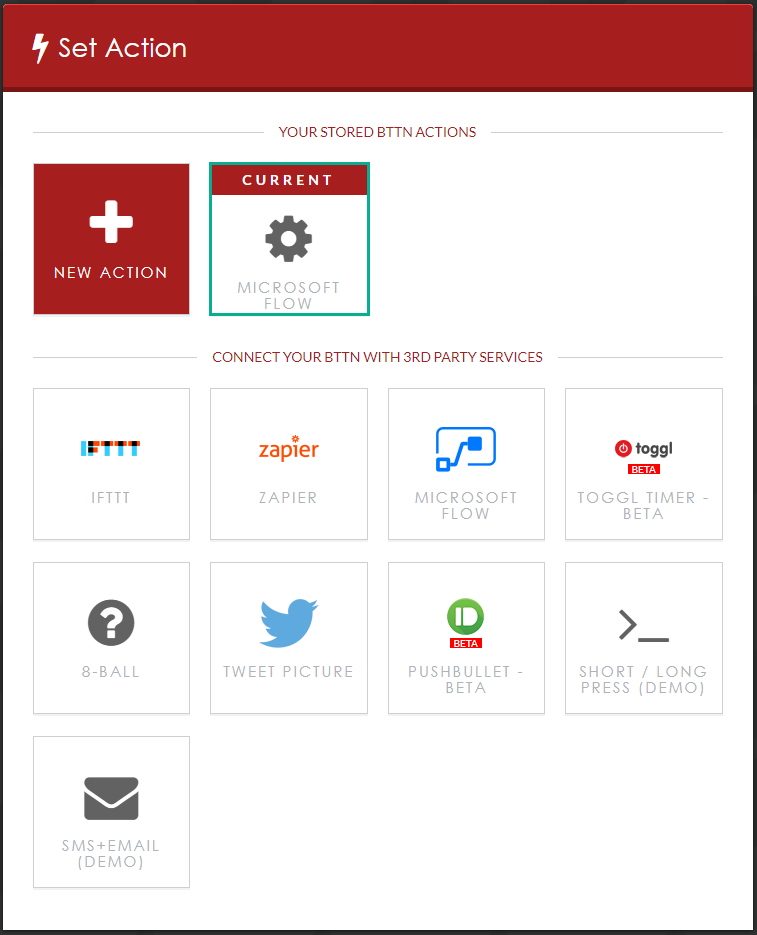
Now that we have created the virtual Bttn, let’s move to the next step of creating the Microsoft Flow. Microsoft Flow has pre-built Flow templates readily available for BTTN integration. In the search screen, enter “Bttn” to filter out the templates for Bttn.
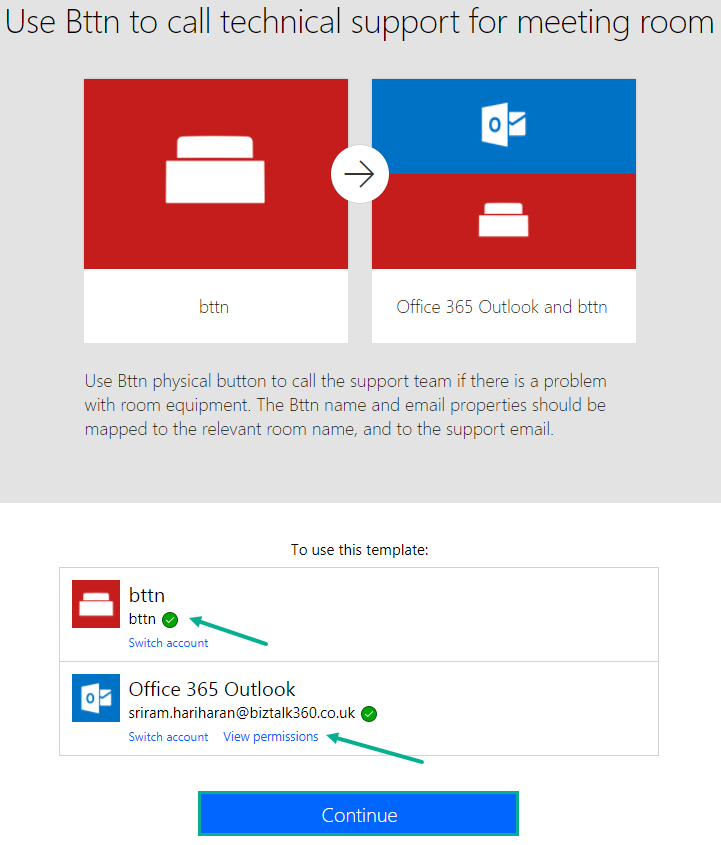
We will use the predefined “Use Bttn to call technical support for meeting room” Microsoft Flow template for our scenario. Click the template.
To start using the template, you need to define the BTTN and authorize Microsoft Flow to be able to access the Bttn. Similarly, you need to configure Office 365 Outlook to be able to trigger emails when the Bttn is pressed.

Next, we will define the Flow steps to match our scenario.
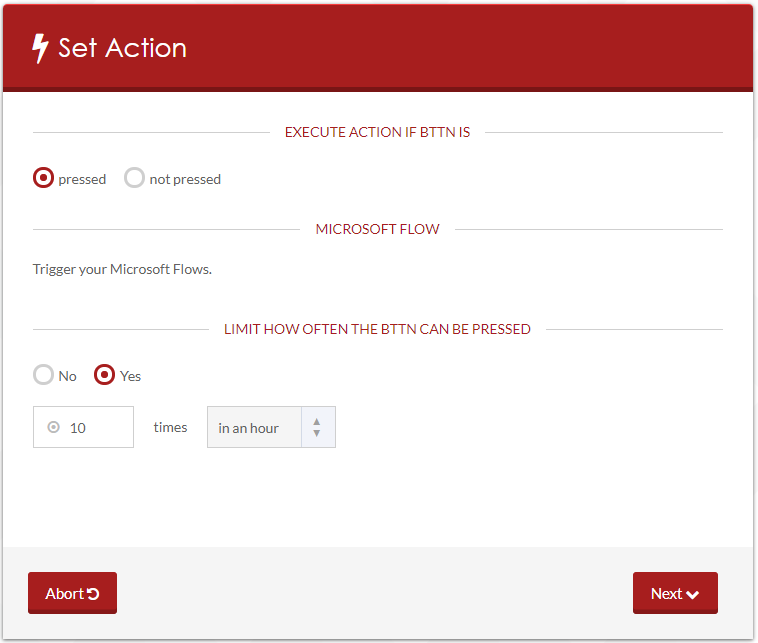
Step 1: Trigger to execute when the Bttn is pressed

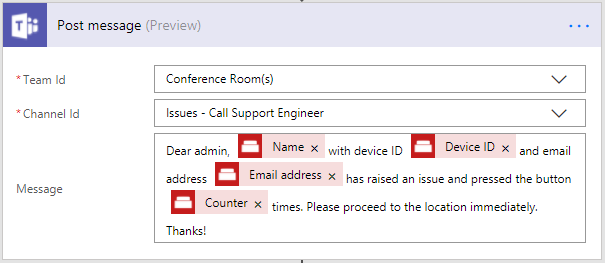
Step 2: Notification to Microsoft Teams Channel of IT Help desk team
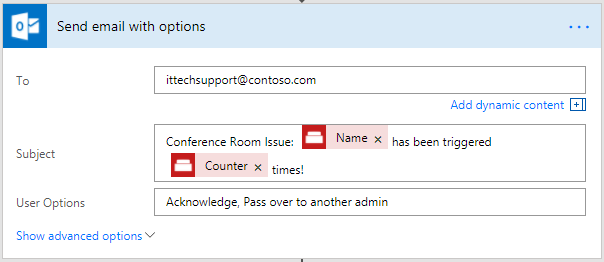
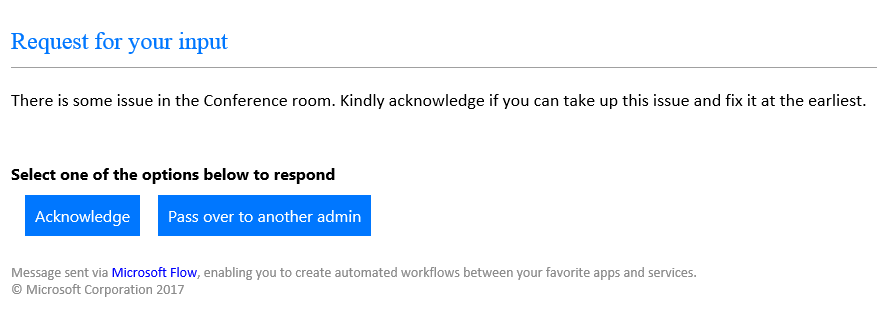
Step 3: Trigger email with options (Acknowledge/Reject) to the support engineer
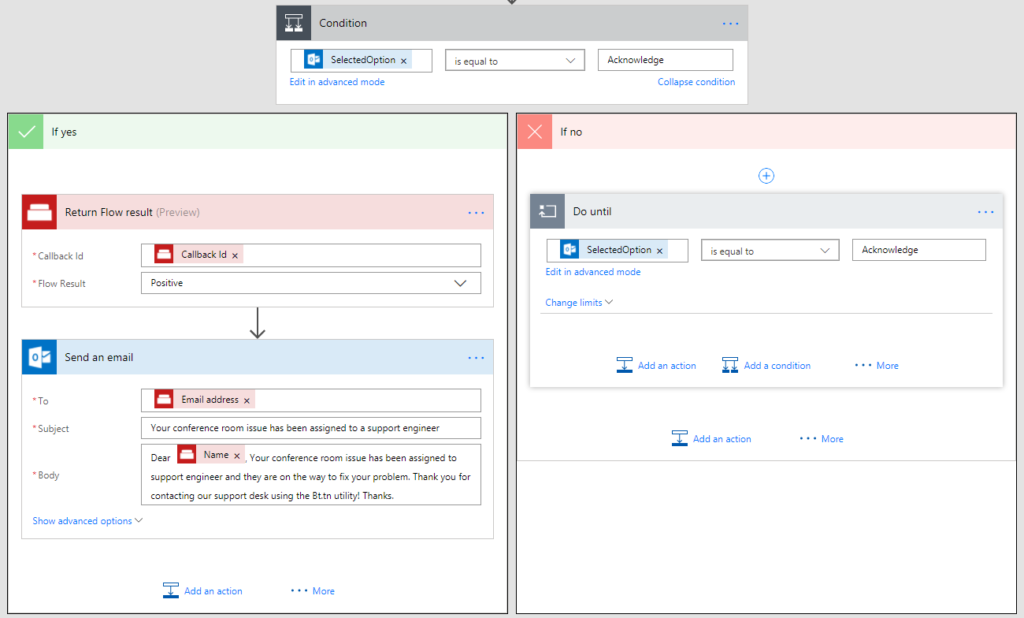
Step 4: Condition to execute depending on the option chosen by the support engineer. The ‘Yes’ block will execute if the support person acknowledges the request.
That’s it! You have now configured the Flow required for the scenario. Let’s see how the scenario will work in real time.
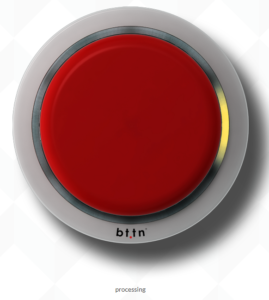
To get the scenario working, the first step is to trigger the virtual button. Navigate to your button home page and click the Rocket Launcher icon to launch your virtual bttn. You will see a new tab opening with a big red button (which is your virtual bttn that will trigger the Microsoft Flow that we created earlier). The status of the bttn will be in an Idle state.
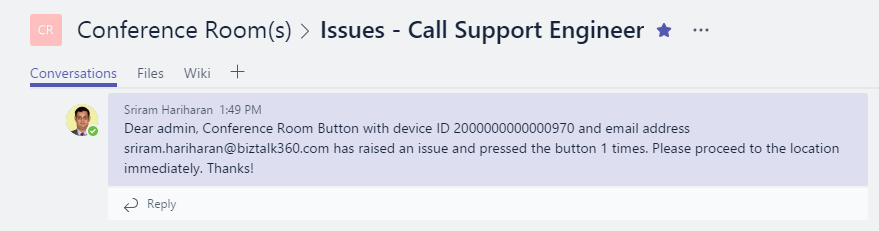
Press the virtual Bttn once to trigger the Microsoft Flow. You will notice a yellow color light glowing around the button that signifies the Flow is executing. The status of the bttn will now be in the “Processing” state. Within the next few seconds, the IT Help desk team will receive the notification first on the Microsoft Teams channel with information about the issue.
The IT help desk team will also receive an email with acknowledgment options to their email id.
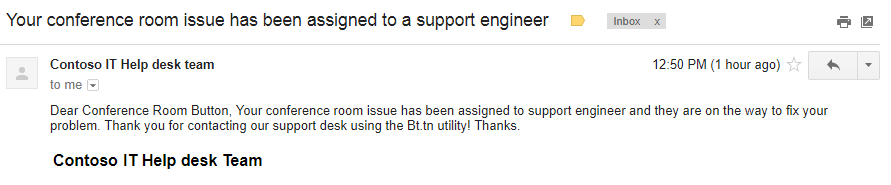
When the Acknowledge button is pressed, the flow will further execute to the condition part and execute the ‘Yes’ block that will trigger back a confirmation email to the registered bttn email id with the confirmation message.

Once the Flow is complete, you will notice that the status of the Flow button will be Green with the status as Positive Result.
You can take a look at the Run History to view the list of runs of the flow and time taken to execute the flow.
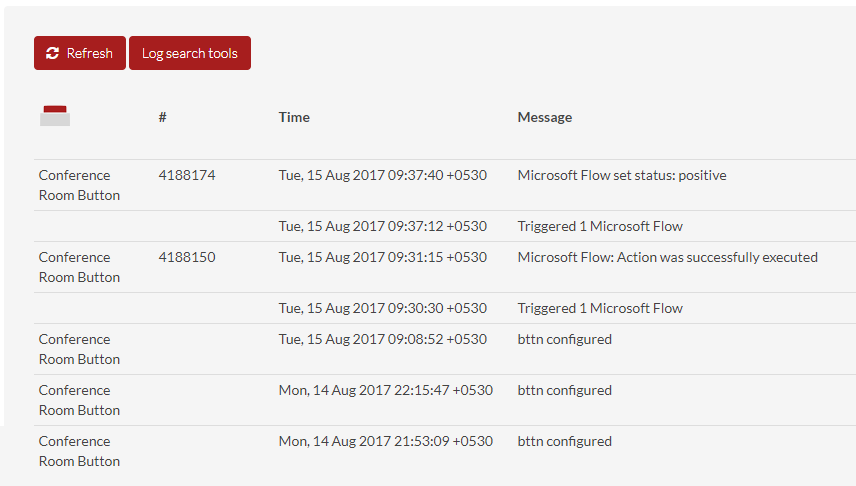
Alternatively, you can take a look at the diagnostics information from the Bttn perspective through the Log section on your bttn homepage.
I hope you got a fair idea of how you can take advantage of Microsoft’s investment into integrating different services that open up a plethora of opportunities to integrate different systems. One of the slightest modifications to this scenario could be to directly log the issues into ServiceNow portal (if your organization is using ServiceNow for keeping track of the issues). You can use HTTP + Swagger action and define APIs for ServiceNow so that you can directly log tickets into ServiceNow from Microsoft Flow. Kent Weare demonstrated this scenario on Episode 27 of Middleware Friday. You can watch the video recording of the session here –
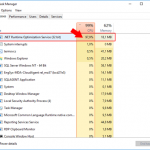
It is very important to optimize everything possible for BizTalk archive the best performance it can, especially if you are dealing with BizTalk Server DEV environments on Azure using Azure Virtual Machines. Again, as I explain in a previous post (here), we normally tend to be careful in choosing the VM Disk type and VM sizes mostly because of the price, so tuning the machine is very important, otherwise sometimes they tend to be a little slow and even the most insignificant things (that we think they are) can have a huge impact on BizTalk Server performance. One of the cases that I found these days was the .NET Runtime Optimization Service causing high CPU usage…

… Indeed, and we don’t need to give explanations to explain that everything that may affects the CPU to cause a High Load (or usage) inherently affects and cause huge impact on BizTalk Server performance.
The .NET framework is regularly optimized by Microsoft using the .NET Runtime Optimization Service to make sure you get the best out of the system libraries and this is also done for your installed managed application. It is also more or less responsible for precompiling .NET assemblies in the background. Once it’s done, it will go away. And while you may see CPU usage almost near the 100%, the compilation happens in a process with low priority, so it tries not to steal the CPU for other processes you are doing. Once everything is compiled, assemblies will now be able to share pages across different processes and warm startup will be typically much faster.
Again, once the .NET Runtime Optimization Service once the service finishes his process it will go away, but in my case this process was already running several hours, so instead of waiting until for the computer to idle, we can force it to compile everything now! Solving this “issue” in a fast way (couple of minutes). For that you should:
This will process all pending work. Once this is done, the service will shutdown, as it has nothing else to do and you will see that the CPU will be back to the normality.

This can be important to be aware for the Administration team (or DevOps team) while planning your .NET framework update to make sure that everything run smoothly especially in the production environment, otherwise this can be one of the reasons (at least for a few minutes or hours) for you notice that our production applications are running a little slowly.
There is also a PowerShell provide by the Microsoft .NET team to speed up the optimization service: DrainNGenQueue.ps (see more here)
I have been working with API Management (APIM) for a long time, not only playing around with POC and testing new features but actually working and implementing real solutions for clients. I also delivered several API Management talks here in Portugal but I realize that I never wrote a blog post about this topic. That will change today hehe.
OpenAPI Specification (formerly Swagger Specification) is an API description format for REST APIs. An OpenAPI file allows you to describe your entire API, including:
API specifications can be written in YAML or JSON. The format is easy to learn and is both human-readable and machine-readable.
This specification is widely used these days, especially in the Microsoft community, but unfortunately, not all of them use it and there are still quite a few APIs that do not expose any kind of specification/documentation like Swagger, WADL or even WSDL (this last for web services).
For REST APIs, I have seen several suppliers/partners use Postman Collections to easily test their APIs by emulating request but also to document the APIs by adding a name and descriptions to requests, sample requests, headers, and other metadata. Performing unit tests in all the operations and sharing them inside their teams.
Postman Collections are groups of requests that can be run together as a series of requests, against a corresponding environment. Using scripts, you can build integration test suites, pass data between API requests, and build workflows that mirror your actual use case of APIs.

See how to create a Postman Collection here: Creating collections
I have to say, I love Postman but I never used it for that propose, although it is an excellent tool, in my opinion, I believe that to document an API it has some limitations.
And in one of my recent projects the partner delivered me a Postman Collection as a way of documenting their REST API which led me to a “small” problem:
So, how can I import a Postman collection into my Azure API Management?
Fortunately for us, there are several free tools that allow you to convert (or transform) a postman collection (1.0 – 2.0) to formats of your choice that in our case Swagger. And one of these tools is APIMATIC.
For that you just need to:

The output file will be automatically downloaded into your machine.

Now that I have my swagger file, I can now access my API Management in the Azure Portal and then:


It probably doesn’t do everything for you, you may need to optimize the query parameters or the URL template parameters, but at least this approach will do 90% of the work for you:

This approach saved me several working hours on the task of exposing the Partner API in my API Management Portal.
Do you feel difficult to keep up to date on all the frequent updates and announcements in the Microsoft Integration platform?
Integration weekly update can be your solution. It’s a weekly update on the topics related to Integration – enterprise integration, robust & scalable messaging capabilities and Citizen Integration capabilities empowered by Microsoft platform to deliver value to the business.
If you want to receive these updates weekly, then don’t forget to Subscribe!
Hope this would be helpful. Please feel free to let me know your feedback on the Integration weekly series.
I been delivering a lot of BizTalk Server Training Courses for Developers and for Administrator in the past years that I normally like to call them “Developing BizTalk Server version Course” or “BizTalk Server Operations, Administration, and Maintenance (OAM) course” – yes I know, I am very creative in terms of names – and one of the good things about using Azure Virtual Machines for that is that we can easily create several developer machines in a short period of time and manage them for not consuming resources. And normally on of the task that is present in both courses is to configure BizTalk Server environment, because I believe that all BizTalk Developers should know the basics of BizTalk Server in terms of installation, configuration and optimizations – tasks that are normally done by BizTalk Administrations – I can go further and say that, in my personal opinion, if you don’t know these basic concepts you are not truly a BizTalk Developer because many things can be done by configurations and not code.
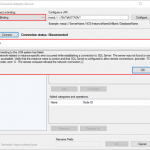
One of these tasks is to install and configure BizTalk Server LOB adapters, in especially SQL Server adapter, since in a Developer standalone machine we will need to have SQL Server, so it is easy to test this LOB Adapter. However, if we create the Azure BizTalk Server 2016 Developer machine, configure BizTalk Server and then install and configure LOB adapters without doing anything more and you try to create a BizTalk Server solution using Visual Studio and generate SQL Server schemas:
We will get the following error message:
Connecting to the LOB system has failed.
A network-related or instance-specific error occurred while establishing a connection to SQL Server. The server was not found or was not accessible. Verify that the instance name is correct and that SQL Server is configured to allow remote connections. (provider: TCP Provider, error: 0 – The remote computer refused the network connection.).

when we try to connect to the SQL Server configured.
This error may occur for several reasons like BizTalk Server cannot communicate with SQL Server machine because some firewall restrictions or SQL Server does not accept Remote Connections and so on.
However, in our case, we are talking about a standalone BizTalk machine that is trying to access a database in the local SQL Server.
Our problem was that by default what Microsoft could possibly configure wrong in terms of SQL Server protocols on the BizTalk Server developer image on Azure… is actually set up wrongly!

And as I described in my BizTalk Server Installation and configuration tutorial (see here), one of the important steps is to configure SQL Server Network Protocols, in special ensuring that TCP/IP is enabled and Shared Memory is disabled. You can see how to accomplish this using SQL Server Configuration Manager tool here.
The actual problem that was causing the connecting to fail while trying to connect to the LOB system, in this particular case the SQL Server is because the TCP/IP protocol is disabled.
To properly configure the protocols for SQL Server, especially the TCP/IP protocol, you should:

After correctly configure the SQL Server protocols, again, especially the TCP/IP, you will be able to successfully connect and generate the SQL Server Schemas that you need for your BizTalk Server Solution.
Summer holidays are over, it is back to work and a few weeks later back into the trenches I learned a lot more about Azure Cosmos DB, Azure Search and the latest addition to the Platform Event Grid.
Microsoft launched a new service, Event Grid to support serverless events with intelligent routing and providing an uniform event consumption using a pub-sub model (similar to pub-sub we know from BizTalk Server). Like some integration minded folks I written three blogs about the service on my own blog:
Besides EventGrid, the Microsoft Pro Integration PG announced a Logic Apps Management (Preview) solution in OMS. And I have tried out this service too a wrote a blog about it:
Based on the release of the OMS solution for Logic App, I delved into monitoring and operations a bit. And saw many monitoring solutions when it comes to a serverless integration solution in Azure. You can read about this topic on the BizTalk360 blog:
The last blog post was inspired by Saravana’s article on LinkedIn: Challenges Managing Distributed Cloud Applications
To conclude managing a distributed cloud native solution with several Azure services is a challenge!
On the 1st of October I will join Codit. Why you might ask? The year contract at Macaw ends at the 30th of September and I realized that my skills, speaking engagements, passion and focus lies more with Azure, Integration, IoT. And this fits with the Codit corporate strategy, plus I have more than 100 integration focussed sparring partners.
This month I haven’t read that much other than a book about rise of robots. The message in this book was rather grim and I felt that almost no one will have a job in 10 years or so. A scary, fascinating read.

My favorite albums in August were:

I deciced I wanted to run another marathon and enrolled into the Tokyo Marathon at the end of February 2018. Therefore, I started running 4 to 5 times a week this month and I am making good progress

Next month will be my last with my current employer Macaw, before I start at Codit. Moreover, I will be speaking at the end of the month in Oslo for the Norwegian BizTalk User Group together with Eldert and Tomasso.
Cheers,
Steef-Jan
This week I received a call of one of my customers reporting me a strange issue. Strange because everything was running fine and suddenly, for no apparent reason, each time someone tried to invoke or browse WCF Services exposed by BizTalk Server the IIS Application pool configured for that services automatically stopped.
If we tried to browse the services we got the following error message:
Login failed for user ‘Domain/user’
Exception Details: System.SqlClient.SqlException: Login failed for user ‘domain/user’

Of course, with that type of error description, the first step we did was to reenter the credentials for that user in the application pool but… the same problem persisted.
When we investigated the event viewer for additional error details we found in the Security log the following message:
Log Name: Security
Source: Microsoft-Windows-Security-Auditing
Date: {date}
Event ID: 4625
Task Category: Logon
Level: Information
Keywords: Audit Failure
User: N/A
Computer: {machine name}
Description:
An account failed to log on.
Subject:
Security ID: SYSTEM
Account Name: {account name}
Account Domain: {domain name}
Logon ID: 0x3E7
Logon Type: 4
Account For Which Logon Failed:
Security ID: NULL SID
Account Name: {account name}
Account Domain: {domain name}
Failure Information:
Failure Reason: The user has not been granted the requested logon type at this machine.
Status: 0xC000015B
Sub Status: 0x0
So, at this point, we knew that this was a security policies problem and we suspect that some automatic process created by sysadmins where changings something in the Local Security Settings on the BizTalk Server machine.
After some research, we found out that the user account that is running the Application Pool – in which the BizTalk WCF Services are exposed – requires having “Log on as batch job” rights
Note: By definition, this security setting (Log on as a batch job), allows a user to be logged on by means of a batch-queue facility and is provided only for compatibility with older versions of Windows. For example, when a user submits a job by means of the task scheduler, the task scheduler logs that user on as a batch user rather than as an interactive user.
To add user rights in the “Log on as batch job” policy, you need to:


Note: Of course, for you to do the above steps, you need to have administrator rights on the computer or be part of specific domain groups in case of Security Settings policies are governed by some AD domain groups.
Note: this problem can also occur and the same solution can be applied to SharePoint.
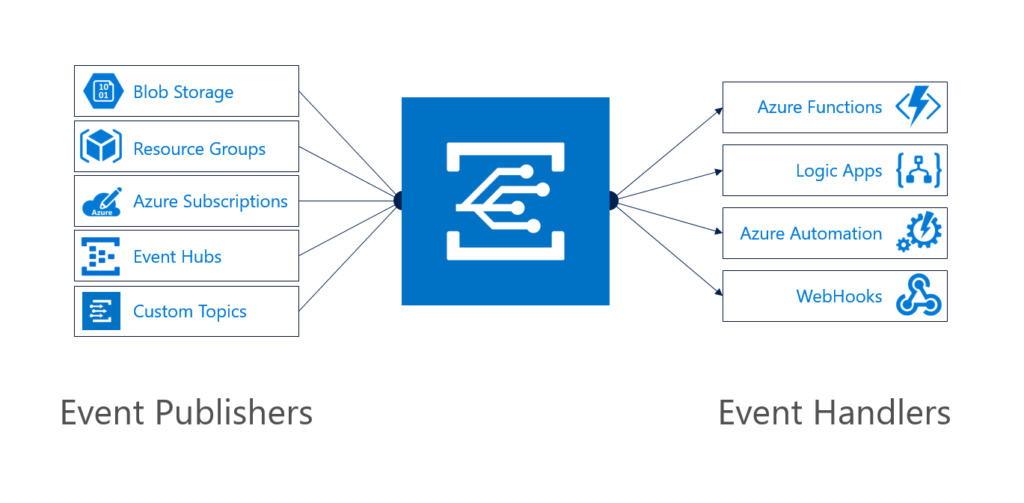
Event Grid Topic is a part of Event Grid, a new Platform Service, which provides intelligent event routing through filters and event types. Moreover, it offers a uniform publish-subscribe model similar to the model of the BizTalk runtime. However, we are talking events here and not messaging. Event Grid is a managed service in Azure with service fabric underneath. Some of the characteristics of Event Grid are discussed in one of Tom Kerhove’s latest’s posts : Exploring Azure Event Grid.
Event Grid offers custom event routing capabilities with an Event Grid Topic. Consequently, a Topic can be provisioned through the Azure Portal. And once the Topic becomes available you can hook it up with one of more subscribers.
Custom events can be pushed to an Event Grid Topic, which can have multiple subscribers. Subsequently, the subscription is set on either Event Type and/or filters (Prefix, Suffix). Hence, a broadcast of a single event to multiple handlers can be accomplished. Therefore, each handler can operate on the event.
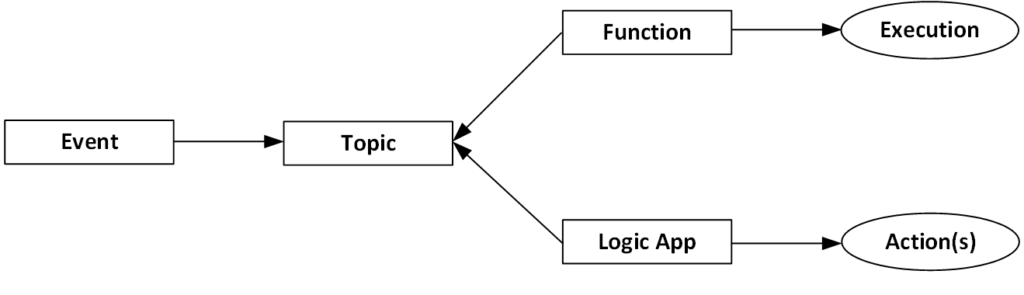
The consumption of the events will be through the custom Event Grid Topic as shown above. Futhermore, consumers can be a Function, Logic App, WebHook or Azure Automation currently. And the mechanism of subscriptions in Logic App and Functions is through WebHooks, which I will eloborate more about in event subscribers.
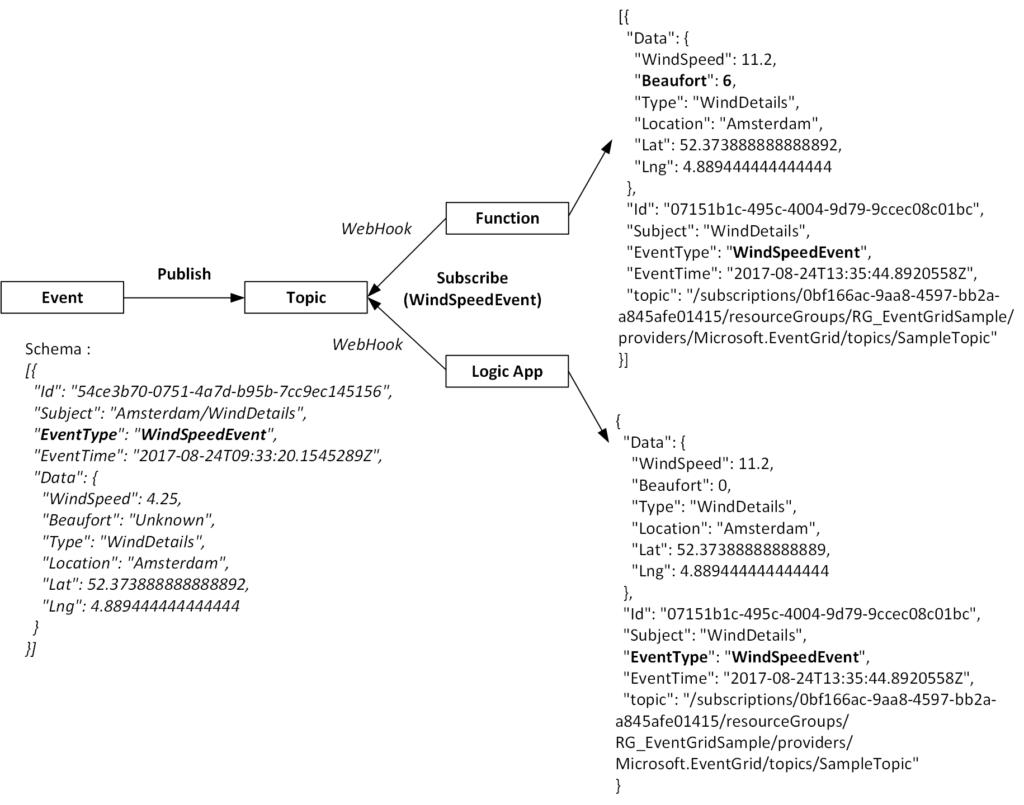
Custom events need to adhere to a schema, which includes five mandatory string properties and a required data object. Subsequently, a custom event needs these properties. Therefore, a .NET client for instance can leverage the System.Net.Http namespace using a HttpClient. Hence to be able to sent a custom event with a .NET client to the Event Grid Topic, you’ll need to know the endpoint (URL) and SAS-Key.
Let me explain here. First of all, a Event Grid Topic requires either a SAS-key or key authentication, however the last one is easier to implement in a .NET client. Hence, you add a default request header with the key “aeg-sas-key” with the value in key1 found in the Azure Event Grid Topic Overview.
To actually sent the event, you can use the PostAsync method. This method of the HttpClient requires the content (event data) and Endpoint URL, which also can be found in the Azure Event Grid Topic Overview.
The content has to event schema. Therefore, the payload could look like:
| [ {“Data”: {“WindSpeed”:6.2, “Beaufort”:0, “Type”:”WindDetails”, “Location”:”Amsterdam”, “Lat”:52.373888888888892, “Lng”:4.889444444444444 }, “Id”:”a72f1473-d763-43c0-ad49-13dacf9158d3″, “Subject”:”WindDetails”, “EventType”:”WindSpeedEvent”, “EventTime”:”2017-08-24T14:32:15.5814874Z” } ] |
In bold you can see the event details (data) and Id, Subject, EventType and EventTime, which are the mandatory string properties. You might ask yourself now, there are only four string properties and one data, where’s the topic property? Probably once the event above is published to the Event Grid Topic, the topic property is added to the event.
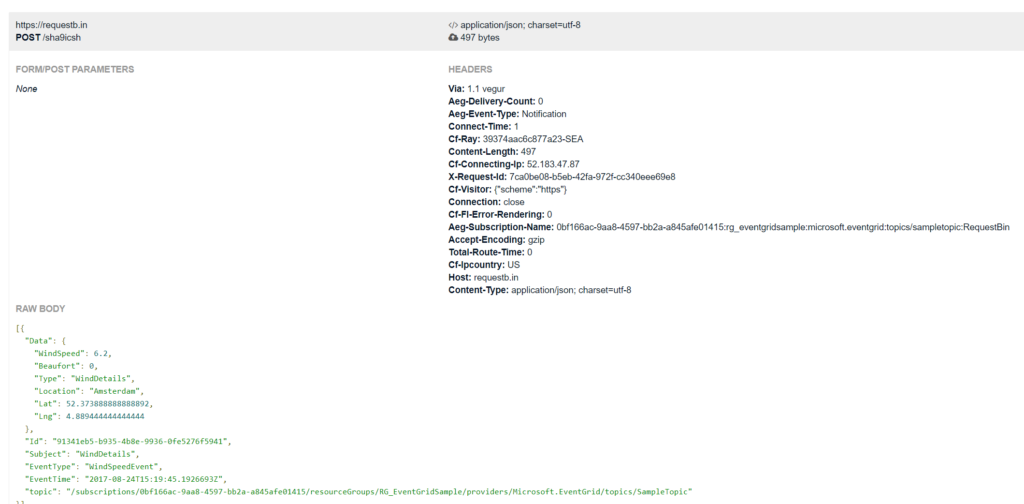
| [{ {“WindSpeed”:6.2, “Beaufort”:0, “Type”:”WindDetails”, “Location”:”Amsterdam”, “Lat”:52.373888888888892, “Lng”:4.889444444444444 }, “Id”: ” a72f1473-d763-43c0-ad49-13dacf9158d3″, “Subject”: “WindDetails”, “EventType”: “WindSpeedEvent”, “EventTime”: “2017-08-24T14:01:57.4354747Z”, “topic”: “/subscriptions/0bf166ac-9aa8-4597-bb2a-a845afe01415/resourceGroups/RG_EventGridSample/providers/Microsoft.EventGrid/topics/SampleTopic” }] |
The Event Grid uses HTTP response codes to acknowledge receipt of events. Hence the event above sent to a custom event topic will provide the following response :
| {StatusCode: 200, ReasonPhrase: ‘OK’, Version: 1.1, Content: System.Net.Http.StreamContent, Headers: { x-ms-request-id: e6c1fbf3-f295-49b3-ad13-b26c22b60313 Date: Thu, 24 Aug 2017 14:41:19 GMT Server: Microsoft-HTTPAPI/2.0 Content-Length: 0 }} |
The Http Status code is 200, which is OK (event delivered). In addition I suggest you read Event Grid message delivery and retry.
A custom Event Grid Topic can have one of more subscriptions (event handlers). A subscription is an instruction for the Topic to tell it “I want this event”. In addition, the instruction can contain filters (pre- post) and/or an EventType. The Event Grid itself supports multiple subscriber types like WebHooks. And depending on subscriber type, the Event Grid has a mechanism to guarantee delivering the event to the subscriber. Do for WebHooks it’s a 200-OK, similar to when a .NET client is delivering an event to the Event Grid Topic.
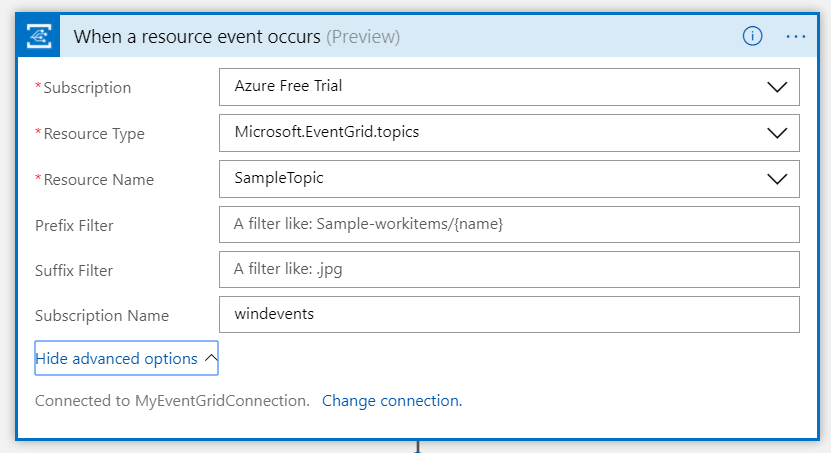
Azure Function or Logic App can use the WebHook mechanism to subscribe to events on a custom Event Grid Topic. As a result, the subscription is created in the Azure Event Grid Topic containing an URL for which the Event Grid Topic can deliver the events to (POST). In addition, the Event Type can be specified, i.e. by default this is all. And finally filters can be applied, which are optional. To conclude a custom event with a certain type can be published to an Event Grid Topic, which has one of more subscribers interested in the events of a certain type.
Note the subscription of a Logic to events in the Event Grid Topic is done through a Logic App Trigger. However, to subscriber to a specific Event Type you will need to edit the subscription in the Event Grid Topic to set it from all to the required one.
A function can subscribe to events using a WebHook trigger. You create a subscription in the Event Grid Topic by providing the URL of the WebHook trigger function and Event Type (and optional filters if necessary).
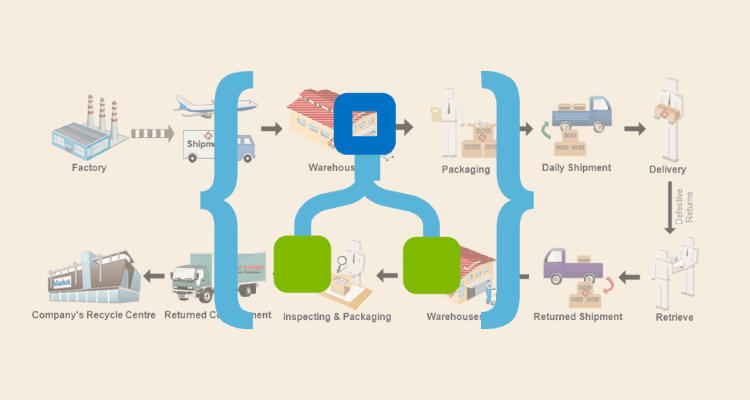
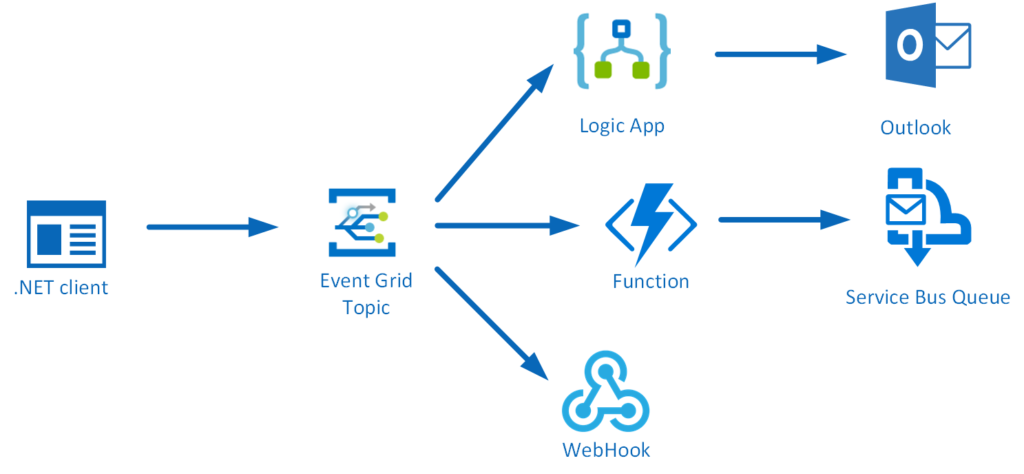
To have a better understanding of routing custom events with a Event Grid topic let us look how custom events are sent and how they are consumed by multiple subscribers. Therfore, I will discuss the following scenario with you using serveral Azure services like :
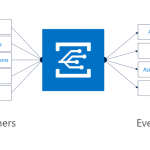
The .Net client sends a custom event to a custom Event Grid Topic provisioned in Azure. Subsequently, a Azure Function, Logic App and WebHook (RequestBin) will subscribe to an event of the Type WindSpeedEvent. First of all the Function will process the event by enriching it with a calculated value of Beaufort, and sent the enriched event to a Service Bus queue. Furthermore, the Logic App will evaluate the windspeed and send an email if windspeed is higher than a specified value. And finally RequestBin will just consume the event.
The following diagram shows the event flow of the scenario.
A custom event can be sent to a Event Grid Topic using a .NET client. In our scenario the custom event is of the type WindSpeedEvent, containing a few fields, including WindSpeed in meters per second and no known Beaufort (0) yet.
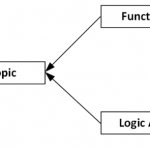
The Event Topic has three subscribers:
Each will receive the event, as each has subscribed to the Topic with events of Type WindSpeedEvent. Hence, in the Azure Function Monitor Pane I observed the consumption of the event.
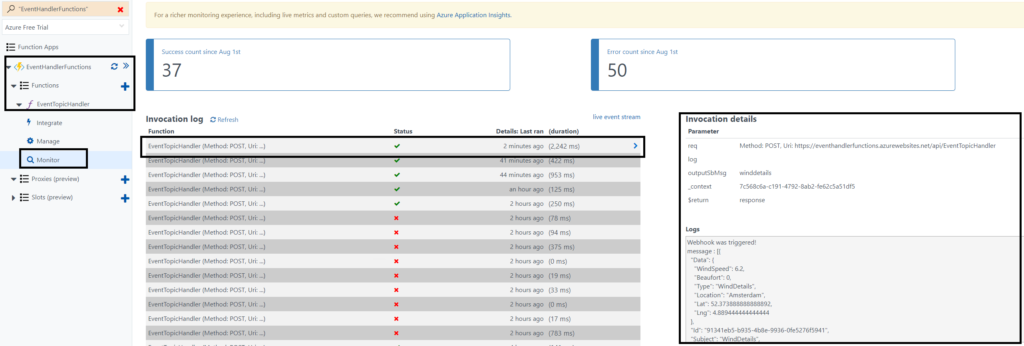
Subsequently, in the Logic Run History I observed the consumption of the event.

Finally, when refreshing the RequestBin page I see the event in its raw format. And this is smilar to the Event Grid Quickstart Create and route custom events with Azure Event Grid.
To conclude, each subscriber recieves the event of the Type WindSpeedEvent.
The Event Grid Topic in our scenario has three subscribers, see the screenshot of the Event Grid Topic Overview below.
Custom Event handling with an Event Grid Topic is easy to comprehend. Also it opens doors to many scenario’s ranging from IOT to Website Traffic monitoring. In this post I focused only on a custom event handled by several subscribers. However, Event Grid has more to offer in handling events from other sources like Azure Subscriptions, resource groups, and other. Finally, more publishers and handlers will be available in the future. To conclude Event Grid in my opinion is a great addition to other serverless capabilities in Azure. However I like to emphasise it is event capability in Azure compatible with other serverless components like Logic Apps and Functions.

After having shown how to send our custom events to Event Grid in my previous blog post, we will now see how we can create custom subscribers. Event Grid will be integrated with all Azure services, but by allowing us to create our own custom subscribers as well, we can truly route events to any service or application. And what’s more, we will also see how we can use the API to create a subscription from our subscriber, allowing us to quickly onboard new services, which can then start listening to the events which are of interest to them. In this sample, we will create an Azure API App, which will receive the events from our previous blog post, and store them in Azure Table Storage. On starting, the API App will check if the subscriptions it uses are created, and if not, it will create them and point them to the various endpoints the API App exposes.
Azure Event Grid
As we will be using Table Storage to store the data from the events, we will start by creating this in a storage account. I am using the storage account I created in this post, but of course you can also set up a new account for this.
Create Table Storage
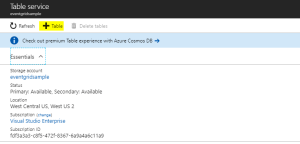
Add Table Storage
Now we will create the API App which will subscribe to our events. Start by creating a new ASP.NET Web Application project.
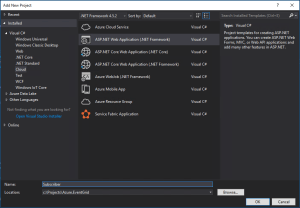
Create ASP.NET Web Application project
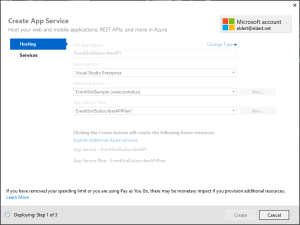
Now choose the Azure API App template.
Create Azure API App
As we will be connecting to Table Storage, we will add Azure Storage as a connected service on the overview pane.
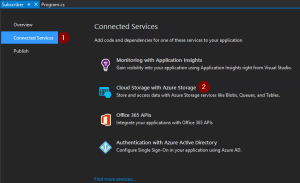
Add Azure Storage
Choose the storage account in which we created the Table Storage. Optionally you can also create a new Storage Account from here.
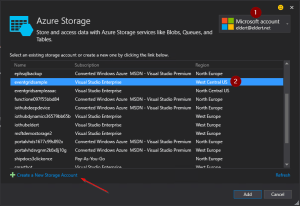
Choose Storage Account
We can now start implementing our API App. Let’s start by adding some application settings in the web.config file. These will be needed later on in our application. Once the API App has been deployed we will recreate these settings on the API App’s application settings as well. These are the settings which need to be created.
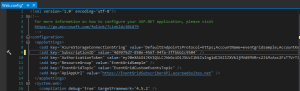
Add application settings
We now will create two new classes, which will be be used to receive the repair and order events we sent in in the previous blog post. The first class is the data we sent in our Data node in our custom event.
/// <summary> /// Data which can be sent with various ship events. /// </summary> public class ShipEventData { /// <summary> /// Name of the ship. /// </summary> public string Ship { get; set; } /// <summary> /// Type of event. /// </summary> public string Type { get; set; } /// <summary> /// Device received in the event. /// </summary> public string Device { get; set; } /// <summary> /// Description received in the event. /// </summary> public string Description { get; set; } /// <summary> /// Product received in the event. /// </summary> public string Product { get; set; } /// <summary> /// Amount received in the event. /// </summary> public int? Amount { get; set; } } |
And the second class is the event we will receive this from Event Grid.
/// <summary> /// Class used to receive ship event values. /// </summary> public class ShipEventValue { /// <summary> /// Time when event was created. /// </summary> public string EventTime; /// <summary> /// Data of the event. /// </summary> public ShipEventData Data; } |
Now let’s implement the Subscription class, which will be used to create the subscriptions we need for our sample when the API App starts.
/// <summary> /// Defines a subscription with its filters. /// </summary> public class Subscription { /// <summary> /// Name of the subscription. /// </summary> public string Name; /// <summary> /// Filter which will look at the start of the subscription's subject. /// </summary> public string PrefixFilter; /// <summary> /// Filter which will look at the end of the subscription's subject. /// </summary> public string SuffixFilter; } |
We will also need a class which will be used to insert our data into the Table Storage.
/// <summary> /// Used to insert ship events to Table Storage. /// </summary> public class ShipEventEntity : TableEntity { /// <summary> /// Constructor. /// </summary> public ShipEventEntity(string ship, string dateTime) { PartitionKey = ship; RowKey = dateTime; } /// <summary> /// Type of event. /// </summary> public string Type { get; set; } /// <summary> /// Device received in the event. /// </summary> public string Device { get; set; } /// <summary> /// Description received in the event. /// </summary> public string Description { get; set; } /// <summary> /// Product received in the event. /// </summary> public string Product { get; set; } /// <summary> /// Amount received in the event. /// </summary> public int? Amount { get; set; } } |
The controller is used to expose our methods to the outside world. In this case, we will provide four endpoints for different types of subscriptions. Each method will be called by the subscribtion on different events, and write the data it received to it’s own table in Table Storage. In a production implementation, this would probably be four different services, and for different parties who are interested in the events (for example, a specific ship might have to get it’s orders from supplier, while another ship gets it’s orders from supplier B).
We will change the name of the default ValuesController class to SubscriberController to better represent our scenario, and instantiate a CloudStorageAccount used to communicate with our Table Storage.
public class SubscribersController : ApiController { /// <summary> /// Storage account used to store to Table Storage. /// </summary> private readonly CloudStorageAccount _storageAccount = CloudStorageAccount.Parse(CloudConfigurationManager.GetSetting("AzureStorageConnectionString")); } |
Add the following method to the class, which will take the data we receive on our endpoints, and store it into Table Storage.
/// <summary> /// Insert Ship Event into table storage. /// </summary> private async Task InsertToTable(IReadOnlyList<ShipEventValue> value, string tableName) { // Check if any events were received if (value == null || value.Count == 0) { return; } // Create the table client var tableClient = _storageAccount.CreateCloudTableClient(); // Retrieve a reference to the table var table = tableClient.GetTableReference(tableName); // Create the table if it doesn't exist table.CreateIfNotExists(); // Create a new ship event entity var shipEventEntity = new ShipEventEntity(value[0].Data.Ship, value[0].EventTime) { Type = value[0].Data.Type, Product = value[0].Data.Product, Amount = value[0].Data.Amount, Device = value[0].Data.Device, Description = value[0].Data.Description }; // Create the TableOperation object that inserts the customer entity var insertOperation = TableOperation.Insert(shipEventEntity); // Execute the insert operation await table.ExecuteAsync(insertOperation); } |
And the final piece in this class are the methods for the endpoints. Notice the ActionName attributes, which we will use to have various endpoints in our API.
/// <summary> /// Receives all events. /// </summary> [ActionName("All")] public async Task<StatusCodeResult> PostAll([FromBody] List<ShipEventValue> value) { await InsertToTable(value, "All"); return new StatusCodeResult(HttpStatusCode.Created, this); } /// <summary> /// Receives all types of events for the ship Hydra. /// </summary> [ActionName("Hydra")] public async Task<StatusCodeResult> PostHydra([FromBody] List<ShipEventValue> value) { await InsertToTable(value, "Hydra"); return new StatusCodeResult(HttpStatusCode.Created, this); } /// <summary> /// Receives repairs for all ships. /// </summary> [ActionName("Repairs")] public async Task<StatusCodeResult> PostRepairs([FromBody] List<ShipEventValue> value) { await InsertToTable(value, "Repairs"); return new StatusCodeResult(HttpStatusCode.Created, this); } /// <summary> /// Receives orders for the ship Aeris. /// </summary> [ActionName("AerisOrders")] public async Task<StatusCodeResult> PostAerisOrders([FromBody] List<ShipEventValue> value) { await InsertToTable(value, "AerisOrders"); return new StatusCodeResult(HttpStatusCode.Created, this); } |
Now hop on over to the WebApiConfig class, and implement the following code. This will generate the different endpoints for our Controller actions.
public static class WebApiConfig { public static void Register(HttpConfiguration config) { // Web API routes config.MapHttpAttributeRoutes(); config.Routes.MapHttpRoute(name: "routes", routeTemplate: "api/{controller}/{action}"); } } |
Finally we need to implement the Global.asax class, in which we will create our Event Grid Subscriptions on start up of the API App. This is where we define the subscriptions to be created, including their filters. Event Grid allows us to filter on the subject’s prefix and suffix, as well as the event type.
public class WebApiApplication : HttpApplication { /// <summary> /// Subscriptions to be created. /// </summary> private readonly List<Subscription> _subscriptions = new List<Subscription> { new Subscription { Name = "All" }, new Subscription { Name = "Hydra", PrefixFilter = "Hydra" }, new Subscription { Name = "Repairs", SuffixFilter = "Repair" }, new Subscription { Name = "AerisOrders", PrefixFilter = "Aeris", SuffixFilter = "Order" } }; } |
Currently we don’t have a SDK available to work with Event Grid, so we will be using a HttpClient to work directly against its API.
/// <summary> /// Create HTTP client used to communicate with Azure. /// </summary> /// <returns></returns> private static HttpClient CreateHttpClient() { // Create a HTTP client var httpClient = new HttpClient(); // Add key in the request headers httpClient.DefaultRequestHeaders.Add("Authorization", $"Bearer {CloudConfigurationManager.GetSetting("AuthorizationToken")}"); // Return the HTTP client return httpClient; } |
For each subsription, we will need to check if it does not already exist. This allows us to add new subscriptions whenever we want.
/// <summary> /// Check if subscription exists. /// </summary> private static async Task<bool> SubscriptionExists(string subscription) { // Check if subscription exists var result = await CreateHttpClient() .GetAsync( $"https://management.azure.com/subscriptions/{CloudConfigurationManager.GetSetting("SubscriptionID")}/resourceGroups/{CloudConfigurationManager.GetSetting("ResourceGroup")}/providers/Microsoft.EventGrid/topics/{CloudConfigurationManager.GetSetting("EventGridTopic")}/providers/Microsoft.EventGrid/eventSubscriptions/{subscription}?api-version=2017-06-15-preview"); return result.IsSuccessStatusCode; } |
If the specific subscription does not yet exist, we will create it using the following code.
/// <summary> /// Create subscription with filters. /// </summary> private static async Task CreateSubscription(string subscription, string prefixFilter, string suffixFilter) { // Set up create subscription message var createSubscription = new { properties = new { destination = new { endpointType = "webhook", properties = new { endpointUrl = $"{CloudConfigurationManager.GetSetting("ApiAppUrl")}/api/Subscribers/{subscription}" } }, filter = new { includedEventTypes = new[] { "shipevent" }, subjectBeginsWith = prefixFilter, subjectEndsWith = suffixFilter, subjectIsCaseSensitive = "false" } } }; // Create content to be sent var json = JsonConvert.SerializeObject(createSubscription); var content = new StringContent(json, Encoding.UTF8, "application/json"); // Create subscription await CreateHttpClient() .PutAsync( $"https://management.azure.com/subscriptions/{CloudConfigurationManager.GetSetting("SubscriptionID")}/resourceGroups/{CloudConfigurationManager.GetSetting("ResourceGroup")}/providers/Microsoft.EventGrid/topics/{CloudConfigurationManager.GetSetting("EventGridTopic")}/providers/Microsoft.EventGrid/eventSubscriptions/{subscription}?api-version=2017-06-15-preview", content); } |
And finally implement the method which will loop over our subscriptions, creating the ones we need. Call this method whenever the application is started.
/// <summary> /// Entry point of application. /// </summary> protected async void Application_Start() { GlobalConfiguration.Configure(WebApiConfig.Register); await CreateSubscriptions(); } /// <summary> /// Create subscriptions that don't exist. /// </summary> private async Task CreateSubscriptions() { // Check if subscriptions can be created, this will only be done if the endpoint of this API App has been updated in the settings if (CloudConfigurationManager.GetSetting("ApiAppUrl").ToLowerInvariant().Contains("tobereplaced")) { return; } // Loop through subsriptions foreach (var subscription in _subscriptions) { // Check if subscription already exists if (await SubscriptionExists(subscription.Name)) { continue; } // Create subscription await CreateSubscription(subscription.Name, subscription.PrefixFilter, subscription.SuffixFilter); // Wait for a while, to prevent throttling Thread.Sleep(5000); } } |
Now that our API App has been completed, we can deploy it to Azure. Rightclick on the project, and select Publish. This will create the publishing wizard. Create a new API App, and set the properties where you want it to be deployed.
Publish API App
Once it has been deployed, we need to add the application settings for the API App in the portal.
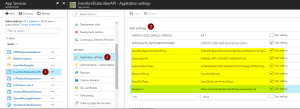
Add application settings
After the settings have been added, restart the API App. This will now start the creation of the subscriptions, which you should be able to see in the Event Grid blade after a minute or so.

Event Grid Subscriptons have been created by the API App
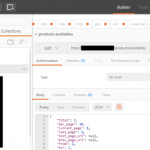
Now that we have our events set up end to end, we can use the application from this blog post to start generating events. These will then be routed by Event Grid to the endpoints of our subscriptions, which trigger the API App’s different methods. And finally, they will be stored into the various tables in our table storage. The complete code with this blog post can be found here.
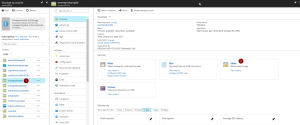
Events stored in Table Storage
