by stephen-w-thomas | Dec 30, 2016 | BizTalk Community Blogs via Syndication
It is that time of year where I like to reflect back on what the previous year has brought and also set my bearings for the road ahead. If you are interested in reading my 2015 recap, you can find it here.
Personal
2016 was a milestone birthdate for myself and my twin brother. In order to celebrate, and try to deny getting old for another year, we decided to run a marathon in New York City. The NYC Marathon is one of the 6 major marathons in the world so it acted as a fantastic backdrop for our celebration. Never one to turn down an adventure, my good friend Steef-Jan Wiggers joined us for this event. As you may recall, Steef-Jan and I ran the Berlin Marathon (another major) back in 2013.
The course was pretty tough. The long arching bridges created some challenges for me, but I fought through it and completed the race. We all finished within about 10 minutes of each and had a great experience touring the city.
Kurt, Kent and Steef-Jan in the TCS tent before the race
At the finish line with the hardware.
Celebrating our victory at Tavern on the Green in Central Park.
Speaking
Traveling and speaking is something I really like to do and the MVP program has given me many opportunities to scratch this itch. I also need to thank my previous boss and mentor Nipa Chakravarti for all of the support that she has provided which made all of this possible.
In Q2, I once again had a chance to head to Europe to speak at BizTalk360’s Integrate Event with the Microsoft Product Group. My topic was on Industrial IoT and some of the project work that we had been working on. You can find a recording of this talk here.
On stage….
I really like this photo as it reminds me of the conversation I was having with Sandro. He was trying to sell me a copy of his book, and I was trying to convince him that if he gave me a free copy, that I could help him sell more. Sandro has to be one of the hardest working MVPs I know who is recognized as one of the top Microsoft Integration Gurus. If you have ever having a problem in BizTalk, there is a good chance he has already solved it. You can find his book here in both digital and physical versions.
BizTalk360 continues to be an integral part of the Microsoft Integration community. Their 2016 event had record attendance from more than 20 countries. Thank-you BizTalk360 for another great event and for building a great product. We use BizTalk360 everyday to monitor our BizTalk and Azure services.
On a bit of a different note, this past year we had a new set of auditors come in for SOX compliance. For the first time, that I have experienced, the auditors were really interested in how we were monitoring our interfaces and what our governance model was. We passed the audit with flying colours, but that was really related to having BizTalk360. Without it, our results would not have been what they were.
Q3
Things really started to heat up in Q3. My first, of many trips, was out to Toronto to speak at Microsoft Canada’s Annual General meeting. I shared the stage with Microsoft Canada VP Chris Barry as we chatted about Digital Transformation and discuss our experiences with moving workloads to the cloud.
Next up was heading to the south east United States to participate in the BizTalk Bootcamp. This is my third time presenting at the event. I really enjoy speaking at this event as it is very well run and is in a very intimate setting. I have had the chance to meet some really passionate integration folks at this meetup so it was great to catch up once again. Thank-you Mandi Ohlinger and the Microsoft Pro Integration team for having me out in Charlotte once again.
At the Bootcamp talking about Azure Stream Analytics Windowing.
The following week, I was off to Atlanta to speak at Microsoft Ignite. Speaking at a Microsoft premier conference like Ignite (formerly TechEd) has been a bucket list item so this was a really great opportunity for me. At Ignite, I was lucky enough to participate in two sessions. The first session that I was involved in was a customer segment as part of the PowerApps session with Frank Weigel and Kees Hertogh. During this session I had the opportunity to show off one of the apps my team has built using PowerApps. This app was also featured as part of a case study here.
On stage with PowerApps team.
Next up, was a presentation with John Taubensee of the Azure Messaging team. Once again my presentation focused on some Cloud Messaging work that we had completed earlier in the year. Working with the Service Bus team has been fantastic this year. The team has been very open to our feedback and has helped validate different use cases that we have. In addition to this presentation, I also had the opportunity to work on a customer case study with them. You can find that document here. Thanks Dan Rosanova, John Taubensee, Clemens Vasters and Joe Sherman for all the support over the past year.
Lastly, at the MVP Summit in November, I had the opportunity to record a segment in the Channel 9 studio. Having watched countless videos on Channel 9, this is always a neat experience. The segment is not public yet, but I will be sure to post when it is. Once again, I had the opportunity to hang out with Sandro Pereira before our recordings.
In the booth, recording.
Prepping in the Channel 9 studio
Writing
I continue to write for InfoQ on Richard Seroter’s Cloud Editorial team. It has been a great experience writing as part of this team. Not only do I get exposed to some really smart people, I get exposed to a lot of interesting topics that only fuels my career growth. In total, I wrote 46 articles but here are my top 5 that I either really enjoyed writing or learned a tremendous amount about.
- Integration Platform as a Service (iPaaS) Virtual Panel In this article, I had the opportunity to interview some thought leaders in the iPaaS space from some industry leading organizations. Thank-you Jim Harrer (Microsoft), Dan Diephouse (MuleSoft) and Darren Cunningham (SnapLogic) for taking the time to contribute to this feature. I hope to run another panel in 2017 to gauge how far iPaaS has come.
- Building Conversational and Text Interfaces Using Amazon Lex – After researching this topic, I immediately became interested in Bots and Deep Learning. It was really this article that acted as a catalyst for spending more time in this space and writing about Google and Microsoft’s offerings.
- Azure Functions Reach General Availability – Something that I like to do, when possible, is to get a few sound bytes from people involved in the piece of news that I am covering. I met Chris Anderson at the Integrate event earlier in the year, so it was great to get more of his perspective when writing this article.
- Microsoft PowerApps Reaches General Availability – Another opportunity to interview someone directly involved in the news itself. This time it was Kees Hertogh, a Senior Director of Product Marketing at Microsoft.
- Netflix Cloud Migration Complete – Everyone in the industry knows that Netflix is a very innovative company and has disrupted and captured markets from large incumbents. I found it interesting to get more insight into how they have accomplished this. Many people probably thought the journey was very short, but what I found was that it wasn’t the case. It was a very methodical approach that actually took around 8 years to complete.
Another article that I enjoyed writing was for the Microsoft MVP blog called Technical Tuesday. My topic focused on Extending Azure Logic Apps using Azure Functions. The article was well received and I will have another Technical Tuesday article published early in the new year.
Back to School
Blockchain
I left this topic off of the top 5 deliberately as I will talk about it here, but it absolutely belongs up there. Back in June, I covered a topic for InfoQ called Microsoft Introduces Project Bletchley: A Modular Blockchain Fabric. I really picked up this topic out of our Cloud queue as my boss at the time had asked me about Blockchain and I didn’t really have a good answer. After researching and writing about the topic, I had the opportunity to attend a Microsoft presentation in Toronto for Financial organizations looking to understand Blockchain. At the Microsoft event (you can find similar talk here), Alex Tapscott gave a presentation about Blockchain and where he saw it heading. ConsenSys, a Microsoft partner and Blockchain thought leader was also there talking about the Brooklyn Microgrid. I remember walking out the venue that day thinking everything was about to change. And it did. I needed to better understand blockchain.
For those that are not familiar with blockchain, simply put, it is a paradigm that focuses on using a distributed ledger for recording transactions and providing the ability to execute smart contracts against these transactions. An underlying principle of blockchain is to address the transfer of trust amongst different parties. Historically, this has been achieved through intermediaries that act as a “middleman” between trading partners. In return, the intermediary takes a cut on the transaction, but doesn’t really add a lot of value beyond collecting and dispersing funds. Trading parties are then left to deal with the terms that the intermediary sets. Using this model typically does not provide incentives for innovation, in fact it typically does the opposite and stifles it due to complacency and entitlement by large incumbent organizations.
What you will quickly discover with blockchain is that it is more about business than technology. While technology plays a very significant role in blockchain, if your conversation starts off with technology, you are headed in the wrong direction. With this in mind, I read Blockchain Revolution by Alex and Don Tapscott which really focuses on the art of the possible and identifying some modern-day scenarios that can benefit from blockchain. While some of the content is very aspirational, it does set the tone for what blockchain could become.
Having completed the book, I decided to continue down the learning path. I wanted to now focus on the technical path. I am a firm believer that in order for me to truly understand something, I need to touch it. By taking the Blockchain Developer course from B9Lab I was able to get some hands on experience with the technology. As a person that spends a lot of time in the Microsoft ecosystem, this was a good learning opportunity to get back into Linux and more of the open source community as blockchain tools and platforms are pretty much all open source. Another technical course that I took was the following course on Udemy. The price point for this course is much lower, so it may be a good place to start without making a more significant financial investment in a longer course.
Next, I wanted to be able to apply some of my learnings. I found the Future Commerce certificate course from MIT. It was a three month course, all delivered online. There were about 1000 students, worldwide, in the course and it was very structured and based upon a lot of group work. I had a great group that I worked with on an Energy-based blockchain startup. We had to come up with a business plan, pitch deck, solution architecture and go to market strategy, Having never been involved in a start-up at this level (I did work for MuleSoft, but they were at more than 300 people at the time), it was a great experience to work through this under the tutelage of MIT instructors.
If you are interested in the future of finance, aka FinTech, I highly recommend this course. There is a great mix of Finance, Technology, Entrepreneurs, Risk and Legal folks in this class you will learn a lot.
Gary Vaynerchuk
While some people feel that Twitter is losing its relevancy, I still get tremendous value out of the platform. The following is just an example. Someone I follow on Twitter is Dona Sarkar, from Microsoft, I had the opportunity to see her speak at the Microsoft World Partner Conference and quickly became a fan. Back in October, she put out the following tweet, which required further investigation on my part.
Dona’s talks, from the ones that I have seen, are very engaging and also entertaining at the same time. If she is talking about “Gary Vee” in this manner, I am thinking there is something here. So I start to digest some of his content. I was very quickly impressed. What I like about Gary is he has a bias for action. Unfortunately, I don’t see this too often in Enterprise IT shops; we try to boil the ocean and watch initiatives fail because people have added so much baggage that the solution is unachievable or people have become disenfranchised. I have also seen people being rewarded for building “strategies” without a clue how to actual implement them. I find this really prevalent in Enterprise Architecture where some take pride in not getting into the details. While you may not need to stay in the details for long, without understanding the mechanics, a strategy is just a document. And a strategy that has not/cannot be executed is useless.
If you have not spent time listening to Gary, here are some of his quotes that really resonated with me.
- Bet on your strengths and don’t give a f&%# about what you are not good at.
- Educate…then Execute
- You didn’t grow up driving, but somehow you figured it out.
- Results are results are results
- I am just not built, to have it dictate my one at-bat at life.
- Document, Don’t Create.
- We will have people who are romantic and hold onto the old world who die and we will have people that execute and story tell on the new platform who emerge as leaders in the new world.
- I am built to get punched in the mouth, I am going spit my front tooth out and look right back at you and be like now what bitch.
If this sounds interesting to you, check out a few of his content clips that I have really enjoyed:
Looking Forward
I find it is harder and harder to do this. The world is changing so fast, why would anyone want to tie themselves down to an arbitrary list? Looking back on my recap from last year, you won’t find blockchain or bots anywhere in that post, yet those are two of the transformative topics that really interested me in 2016. But, there are some constants that I don’t see changing. I will continue to be involved in the Microsoft Integration community, developing content, really focused on iPaaS and API Management. IoT continues to be really important for us at work so I am sure I will continue to watch that space closely. In fact, I will be speaking about IoT at the next Azure Meetup in Calgary on January 10th. More details here.
I will also be focusing on blockchain and bots/artificial intelligence as I see a lot of potential in these spaces. One thing you can bet on is that I will be watching the markets closely and looking for opportunities where I see a technology disrupting or transforming incumbent business models.
Also, it looks like I will be running a marathon again in 2017. My training has begun and am just awaiting confirmation into the race.
by Rene Brauwers | Dec 20, 2016 | BizTalk Community Blogs via Syndication
In our previous post, I guided you through setting up a WCF service and protecting it using URL Authentication. Although a lengthy post you would have noticed that setting up url-authentication is actually quite simple and only involving a few steps.
Anyways, in this post we will be focusing on adding the integration magic, without adding a single line of custom code, using Azure Logic Apps.
The integration magic which we will be adding will take care of the following functionality within our end-to-end scenario.
A request will come in which will start our process which is to retrieve a list of customers.
The customer information to be retrieved combines the result from two sources; the first source being the WCF service we build in our previous post and the second source a public rest api. The data which is to be returned to the caller as such will consist of the base data originating from the wcf services enriched with data obtained from the public rest api.
Visualizing the flow
Before we start implementing the solution using Logic Apps it is always a good practice to work-out the actual process flow using a tool such as Microsoft Visio.
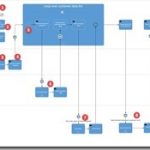
Having said that, let’s eat my own dogfood. Low and behold, see below the diagram depicting the process and an explanation of the process.
The process kicks off whenever a http post requesting a list of customer data is being made to Logic Apps (1). Once received within logic apps a new message (soap request) has to be created (2). Once created this message is being offloaded to the custom WCF service (3), we created in the previous post. If the call is successful the webservice will return a list of customers (4). The information contained within the response contains the following data: customerId, FirstName, SurName and postcode.
The postcode value(s) contained within this response is subsequently used to retrieve detailed location information.
In order to retrieve this location information, logic apps will perform a loop over the response message (5), extract the postal code and invoke a custom rest API to do the location lookup (6). The response received contains the following data: Suburb name, postcode, state-name, state abbreviation, locality and the latitude and longitude of the locality.
This data and the basic customer data is then combined and temporarily persisted in DocumentDB (7).
//Reason, for leveraging this external persistence store is to make life easier for us, as we want //enrich all the customer data with additional information retrieved from the second api call and //return it in one go to the caller. Currently there is no easy way of doing this directly from within //logic-apps as, however, have no fear; in one of the next releases a feature to store session state //within a logic app will be implemented and thus we would no longer need to result to an //intermediate ‘session state’ store.
This process is then repeated for all customers and once we have iterated over all customer records we exit the loop and retrieve all ‘enriched’ documents stored in DocumentDB (8) which we then will return to the caller. The information returned to the caller will then contain the following data; FirstName, LastName and Location information consisting of Locality, State Name, SubUrb, Postcode and longitude and latitude (9).
Provision the logic App
At this point we have worked out the high-level flow and logic and as such we can now go-ahead and create the logic app, so let’s go ahead and do so
1. Login to the Azure Portal
2. Select the resource-group which you created in part-1, in which you deployed your custom wcf service. In my case this resource-group is called Demos
3. Once the resource-group blade is visible, click on the Add button
4. A new blade will popup, within this blade search for Logic App and click on the Logic App artefact published by Microsoft and of the Category Web + Mobile
5. Click on create
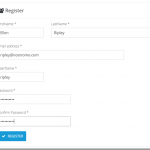
6. Now fill out the details and once done click Create, after which your logic app will be created
7. Once the logic app has been created, open it and you should be presented with a screen which allows you to create a new logic app using one of the pre-build templates. In our case we will choose the “Blank LogicApp”
Implement the ‘Blank LogicApp’
Once you’ve clicked on the blank logic app template, the designer will pop up. We will be using this designer to develop the below depicted flow which will be explained in the following sections. Well let’s get started.
Step 1: Request Trigger
Within this designer, you will be presented with a ‘card selector’. This card selector, being the first of many, contains so-called triggers. These triggers can best be explained as ‘event listeners’ which indicate when a logic app is to be instantiated.
In our scenario, we want to trigger our logic app by means of sending a request. So, in our case we would select the Request trigger. Now select this Request Trigger.
To dig up more information regarding the different triggers and actions you can click on the Help button, which will open up a Quick Start Guide blade containing links too more information.
Configure
Once you’ve selected the trigger, the Request Trigger ‘Card’ will be expanded and will allow you to configure this trigger.
1. This section is not customizable, but once the logic app is saved will contain the generated endpoint. This endpoint is to be used by clients who which to invoke the logic app.
2. The request body JSON schema section, is an optional section, which allows us to add a schema describing what the inbound request message should look like.
You might be wondering why bother? Well if we bother by adding a schema we get the benefit of an ‘intellisense like’ experience from within the designer, which can help us down the road in case we want to easily access one of the properties of the request message in a follow up action.
So let’s go ahead and add a schema. In our case, we will only require one property to be send to our logic-app and this property is RequestId. We will be using the property further down the stream to uniquely identify the request and use it to store our ‘session state’.
As such our Json request can be represented as follows:
{
“RequestId”:”2245775543466″
}
Now that we know what the payload message looks like, we need to derive the Json schema. Well luckily for us, we can go to JSONSchema.net and generate a schema. J The generated schema, subsequently would be represented as
{
“type”: “object”,
“properties”: {
“RequestIds”: {
“type”: “string”
}
},
“required”: [
“RequestIds”
]
}
At this point we have all the information required to fill out the ‘Request Body JSON Schema’ section, so all we have to do is copy and paste it into that section.
3. At this point we are ready to proceed with our next step. Which according to our high-level design consists of an activity which composes a new message, which represents the request message (soap) which is to be send to the customer WCF service.
So, let’s proceed and click on the + New Step button
4. Now several options appear, but we are currently only interested in the option ‘Add an action’, so select this.
Step 2: Compose SOAP request message
As part of our last step we clicked on the “new step” button and selected “Add an action”. Which subsequently would display the ‘card selector’ again, only this time displaying available actions to choose from.
Please note: typical actions to choose from would include
· connectors to SaaS services such as Dynamics CRM Online, on premise hosted Line of business applications such as SAP and connectors to existing logic-apps, azure functions and API’s hosted in API Management
· typical workflow actions which allow us to delay processing or even allow us to terminate further processing.
Looking back at our overall scenario which we are about to implement one of the initial actions would be retrieving a list of customers.
In order to retrieve this list of customers we would need to invoke our Customer WCF service, we build earlier. As our WCF service is SOAP based, it requires us to implement one additional step before we can actually invoke the service from within Logic Apps and this steps involves creating the SOAP request message, using a Compose Action.
So from within the ‘Card Selector’ select the compose Action.
Please note: In the near future this additional step will no longer be required as API Management will be able to RESTify your soap endpoints which than can easily consumed from within logicapps (see roadmap). Besides having functionality in API Management, the chances are pretty good as well that a first-class SOAP connector will be added to logic apps in the future as it is ranked high on the logic apps functionality wishlist.
Configure
Once you’ve selected the compose action the following ‘Card’ will show up on in the designer which allows you to compose a Message, which in our case will be the SOAP Request message.
1. The input section allows us to construct the soap (xml) message, which will act as the request which we will be sending to our customer WCF service.
So how would you determine what this message would look like. Well the easiest way would be by using a tool such as SOAPUI which can generate a sample request message. In the previous post, I’ve added a section which explains how to do this and in our scenario the soap request message looks as follow:
<?xml version=”1.0″ encoding=”UTF-8″?>
<Envelope xmlns=”http://schemas.xmlsoap.org/soap/envelope/”>
<Body>
<GetCustomers xmlns=”http://tempuri.org/” xmlns:xsi=”http://www.w3.org/2001/XMLSchema-instance” />
</Body>
</Envelope>
2. Once we have our sample SOAP request message, we simply copy and paste it into the input field.
Please note; once you click on the Inputs section a windows will appear which will allow you to select ‘dynamic content, used within this flow’. This is the ‘intellisense like’ experience I referred to earlier in this post. Anyways we will be ignoring this for now, but in future steps we will be using this.
3. At this point we are ready to proceed with our next step. Which will actually call our customer WCF service.
So, let’s proceed and click on the + New Step button
4. Once again several options appear and once again select the option ‘Add an action’.
Step 3: Invoke our Customer WCF Service
After completing step 2 we are now able to actually implement calling our customer WCF service. In order to do so all, we need to do is select the ‘HTTP’ Action from within the ‘Card Selector’
Configure
Once you’ve selected the HTTP action the following ‘Card’ will show up on in the designer which allows you to configure the HTTP request in order to receive the customer information.
As you might remember the custom WCF Service which we are about to invoke uses URL Authorization using Azure Active Directory (see previous post) and as such requires any (POST) request to be authenticated. Long story short; One of the nice things of the HTTP action is that it makes it a breeze invoking web-services even if they require authentication, all we need to do is configure the action correctly and this is done by expanding the advanced options of the HTTP Card, which will allow us to do so.
1. The Method which we need to select is ‘POST’ as we will be posting the soap request to the customer WCF service.
2. The Uri sections allows us to enter the Request URL of the web-service. In our case that would be https://demo-apis.azurewebsites.net/Customers.svc
3. The Headers sections will be used to add both the SOAP Action which needs to be invoked as well as the Content-Type of the actual request message.
The easiest way to retrieve the SOAP Action would be by means of SOAPUI as well. So from within SOAPUI open the request and then select WS-A (bottom menu-bar), and then copy and paste the Action
The header information needs to be passed in as a Json string, and looks as follows
{
“Content-Type”:”text/xml”,
“SOAPAction”:”http://tempuri.org/ICustomers/GetCustomers”
}
4. The body section will contain the message which we composed in the previous step. As such once you click in this section, additional information will displayed on the desiger which allows you to select ‘dynamic content’. (this is the ‘intellisense like’ experience I referred to earlier). From this menu, select the variable ‘’ This variable contains the message which we composed earlier.
5. Now click on the Show Advanced Options, which will allow us to fill out the required authentication information.
6. From the dropdown select Active Directory OAuth
7. For Active Directory OAuth we will require to fill out the Tenant, Audience, Client ID and Secret. This information is to be retrieved as follows
a. In the Azure Portal, go to Azure Active Directory Blade and click on APP Registrations
b. Select the application in question (see previous blog-post) which you registered for the WCF Customer service. In my case demo-apis
c. Now on the settings blade click on Properties and make a note of the following:
Application ID – This is the equivalent of the Client ID
App ID Uri – This is the equivalent of the Audience
d. GO back to the settings blade, click on Keys
e. Now it is time to generate the secret. In order to do this, add a description and select how long the secret should be valid. Once done save the entry and make a note of the value (this is the secret)
f. Now on the portal page, click on the Help Icon and select ‘Show diagnostics’
g. In the window, which pops up, search for tenants. Find your tenant (most likely the one which states ‘isSignedInTenant = true’ and note down the Tenant ID
h. At this point we have all the information in order to fill out the required information
Test
Now that we’ve implemented the call, it would be a good time to go ahead and test the logic app. Luckily for us, this is quite simple.
1. Click on the Save button to save your logic app
2. Now Click on the run button.
3. Wait a few seconds and you should see a debug output. If everything went Ok, it should look similar to the image below.
4. Now click on the HTTP – GetCustomers shape. Which allows you to look at the debug / tracking information. It will show you the input as well as the output information.
5. Now go to the OUTPUTS section and copy and paste the Body section. We will be needing this in Step 4 J
Step 4: Loop over the customer result
Our last step resulted in the fact that we configured our HTTP Action which was responsible for invoking our customer wcf service and returning us a list of customers.
Now in this step we will need to loop over the returned customer list, such that we can enrich each individual record with localization information obtained from a different API.
In order to do so we will have to select a for-each action. This action can be selected by clicking on the “+ New Step button”. Several options will appear of which we need to select the ‘more’ followed with the ‘add a for each’ action.
Configure
1. Once the for-each step has been selected it is being dropped on the designer. The designer than offers us a section in which we can add in input over which we want to loop.
2. If our WCF service would have returned an Json Array object, we would have been able to simply select this output using the ‘Dynamic Content’ selection process (aka intellisense). However in our case the output over which we want to loop is a customer resultset formatted in XML. So, in our case we will need to help the the logic-apps engine a bit, and they way to do this, is by adding a custom expression. Which in our case is a Xpath expression, pointing to the node over which we want to loop.
The xpath expression in our case would be:
/*[local-name()=”Envelope”]/*[local-name()=”Body”]/*[local-name()=”GetCustomersResponse”]/*[local-name()=”GetCustomersResult”]/*
Easiest way to test this xpath expression, would be by using the response message we extracted when we tested our logic app earlier and subsequently use an online tool to test the xpath expression.
Now that we have our xpath expression, we can use it in the following Logic App Expression
@xpath(xml(body(‘Replace with the name of action of which we want to use the response’,’Xpath Expression’)
In my scenario the expression would be as follows
@xpath(xml(body(‘HTTP_-_GetCustomers’)), ‘/*[local-name()=”Envelope”]/*[local-name()=”Body”]/*[local-name()=”GetCustomersResponse”]/*[local-name()=”GetCustomersResult”]/*’)
Step 5: Extract individual customer info
In our previous step we instantiated our for-each loop which will loop over our xml result set. Now our next step is to extract the individual customer info and store it in a intermediate json format which we will be using in subsequent actions.
So from within our for-each action, select the Add an action.
From within the ‘Card Selector’ select the compose Action.
Configure
Once you’ve selected the compose action the following ‘Card’ will show up on in the designer which allows you to compose a Message, which in our case will be a custom Json message which holds the individual customer information consisting of CustomerId, FirstName, LastName and PostCode
Note: As in Step 4 when configuring the for-each iteration path. We will be leveraging xpath expressions in order to extract the individual customer data. Alternatively, I could have leveraged an Azure Function to convert the received XML Customer response into JSON or I could have leveraged API Management which by means of policies can perform conversion from xml to json out of the box. In my next post (part 3 of this series) I will be using this.
.
1. The input section allows us to construct our custom Json message which holds the individual customer information consisting of CustomerId, FirstName, LastName and PostCode
2. In order to extract the required fields from the xml will be leveraging the following xpath queries
a. customerId extraction:
string(/*[local-name()=”CustomerData”]/*[local-name()=”CustomerId”])’)
b. FirstName extraction:
string(/*[local-name()=”CustomerData”]/*[local-name()=”FirstName ”])’)
c. SurName extraction:
string(/*[local-name()=”CustomerData”]/*[local-name()=”SurName”])’)
d. PostCode extraction:
string(/*[local-name()=”CustomerData”]/*[local-name()=”PostCode”])’)
the logic app expression which we will be leveraging to extract a value using xpath will be
@{xpath(xml(decodeBase64(item().$content)), ‘Xpath Expression‘) where item() refers to the current item (customer record) in the loop and $content represents the content (customer record xml part)
Combined in a Json construct the complete message construction would look like (note that we escape using )
{
“CustomerId”: “@{xpath(xml(decodeBase64(item().$content)), ‘string(/*[local-name()=”CustomerData”]/*[local-name()=”CustomerId”])’)}”,
“FirstName”: “@{xpath(xml(decodeBase64(item().$content)), ‘string(/*[local-name()=”CustomerData”]/*[local-name()=”FirstName”])’)}”,
“LastName”: “@{xpath(xml(decodeBase64(item().$content)), ‘string(/*[local-name()=”CustomerData”]/*[local-name()=”SurName”])’)}”,
“PostCode”: “@{xpath(xml(decodeBase64(item().$content)), ‘string(/*[local-name()=”CustomerData”]/*[local-name()=”PostCode”])’)}”
}
Test
Now that we’ve implemented the xml extraction within the for-each, it would be a good time to go ahead and test the logic app, and see if everything works accordingly.
1. Click on the Save button to save your logic app
2. Now Click on the run button.
3. Wait a few seconds and you should see a debug output. If everything went Ok, it should look similar to the image below.
4. As you can see the last item in the flow, contains a Json output depicting the customer values extracted.
Step 6: Invoke the postcodeapi
Now that we have extracted our customer data and stored it in a json format. We can proceed with the next step, which invokes invoking a public postcode api. In order to do so we will once again select the HTTP Action within the ‘Card Selector’
Configure
Once you’ve selected the HTTP action the following ‘Card’ will show up on in the designer which allows you to configure the HTTP request in order to receive localization information based on a postal code.
1. The Method which we need to select is ‘GET as we will be retrieving data from a rest endpoint.
2. The Uri sections allows us to enter the Request URL of the web-service. In our case that would be http://v0.postcodeapi.com.au/suburbs.json?postcode=XXXXX where XXXX is a dynamic parameter, to be more specific; we will be using the PostCode field which we extracted in step 5. In order to use this PostCode value we will
a. Enter the value http://v0.postcodeapi.com.au/suburbs.json?postcode= in the Uri field.
b. Select the dynamic content ‘Outputs’ from the Extracted xml
We are currently not able to directly access the PostCode field from within the designer as the designer currently is not aware of this property. It is only aware of the fact that the ‘compose step – Extracted xml’ has a output which is a ‘message’ and as such we can only select the complete message.
Note: In a future release of logic-apps this experience will be improved and additional magic will be added such that the designer can ‘auto-discover’ these message properties. How this will be implemented is not 100% clear, but one of the possibilities would be; that we would manually add a ‘description’ of the output (Json schema, for example) to the compose action or any other action which returns / creates an object.
3. In order to select the PostCode field from the Outputs, we will be needing to switch to Code View.
4. Once in code view, find the code block which contains the http://v0.postcodeapi.com.au/suburbs.json?postcode= url. Once found we simple modify the code from
http://v0.postcodeapi.com.au/suburbs.json?postcode=@{outputs(‘Extracted_xml’)}
to
http://v0.postcodeapi.com.au/suburbs.json?postcode=@{outputs(‘Extracted_xml’).PostCode}
5. Now go back to the designer
6. And behold the designer now states “http://v0.postcodeapi.com.au/suburbs.json?postcode={} PostCode”
Test
Now that we’ve implemented the postcode api call, it would be a good time to go ahead and test the logic app.
1. Click on the Save button to save your logic app
2. Now Click on the run button.
3. Wait a few seconds and you should see a debug output. If everything went Ok, it should look similar to the image below. If you expand the HTTP action, you wull notice that the URI now is composed using the extracted PostCode value
Step 7: Compose an enriched customer message
Now that we have invoked the postcode API it is time to combine both the original customer data and the postcode data. In order to do this, we will be composing a new Json message using the Compose Action.
From within the ‘Card Selector’ select the compose Action.
Configure
Once you’ve selected the compose action the following ‘Card’ will show up on in the designer which allows you to compose a Message, which in our case will be a new Json message which holds both the customer data as well as the location data retrieved from the PostCode lookup.
1. The input section allows us to construct our custom Json message which will hold all the combined data
2. Now copy and paste the below ‘sample’ json message into the input section
This message will be of the following structure:
{
“FirstName”: “## FirstName from the WCF Customer web service##”,
“LastName”: “## LastName from the WCF Customer web service##”,
“Location”: {
“Latitude”: “## Latitude obtained from the postal api##”,
“Locality”: “## Locality obtained from the postal api##”,
“Longitude”: “## Longitude obtained from the postal api##”,
“PostCode”: “# PostCode from the ‘extract_xml’ message##”,
“State”: “## State obtained from the postal api##”,
“Suburb”: “## Suburb obtained from the postal api##”
},
“RequestId”: “## Obtained from the request trigger##”,
“id”: “# CustomerId from the ‘extract_xml’ message##”
}
3. Now go to code view
4. Once in code view, find the code block which represents the Json message which we just copied and pasted in the input section.
Note: In a future release of logic-apps this experience will be improved and additional magic will be added such that the designer can ‘auto-discover’ these message properties, which we will now add manually. How this will be implemented is not 100% clear, but one of the possibilities would be; that we would manually add a ‘description’ of the output (Json schema, for example) to the compose action or any other action which returns / creates an object.
5. Now replace the json such that it looks like depicted below
“Enrich_with_postal_code”: {
“inputs”: {
“FirstName”: “@{outputs(‘Extracted_xml’).FirstName}”,
“LastName”: “@{outputs(‘Extracted_xml’).LastName}”,
“Location”: {
“Latitude”: “@{body(‘HTTP’)[0].latitude}”,
“Locality”: “@{body(‘HTTP’)[0].locality}”,
“Longitude”: “@{body(‘HTTP’)[0].longitude}”,
“PostCode”: “@{outputs(‘Extracted_xml’).PostCode}”,
“State”: “@{body(‘HTTP’)[0].state.name}”,
“Suburb”: “@{body(‘HTTP’)[0].name}”
},
“RequestId”: “@{triggerBody()[‘RequestId’]}”,
“id”: “@{outputs(‘Extracted_xml’).CustomerId}”
},
“runAfter”: {
“HTTP”: [
“Succeeded”
]
},
“type”: “Compose”
},
Test
Now that we’ve composed a message containing both the WCF and PostCode API data, it would be another good time to go ahead and test if everything works and this time we will be testing our logic app using Fiddler
1. Download Fiddler, if you already have.
2. Go to you logic app and expand the Request Trigger and press on the “Copy Icon”, this will copy the logic app endpoint to your clipboard.
3. Open fiddler, and select the composer tab
4. In the composer
a. Set the HTTP Action to POST
b. Copy and Paste the uri in the Uri field
c. In the header section add
i. Content-Type:application/json
d. In the body section add the following json
{
“RequestId”:”20161220″
}
e. Click on the Execute button
5. Now go back to your Logic App
6. In the run history, select the last entry
7. If everything went Ok, it should look similar to the image below.
Step 8: Store Session State in DocumentDB
At this point we have implemented functionality which
· allows us to iterate over all the customer records
· retrieve localization data from the postal code api using the postal code extracted from the customer record.
· Compose a new message which contains all the data.
The functionality which is left to implement at this point in time consists of; combining all the composed new messages, containing the customer and localization data, in one document and returning it to the caller.
Note: Currently there is no easy way of doing this directly from within logic-apps as logic apps currently does not contain the functionality which would allow us to ‘combine the data’ in memory. But have no fear; in one of the next releases of Logic Apps will have support for storing session state and once this is available we will no longer require this additional step, which is explained below.
Configure
As Logic Apps currently has no means of storing session state, we will be resorting to an external session state store. In our case, the most obvious choice would be DocumentDB.
So before we proceed, let’s go and create a DocumentDB service.
1. Go to the Azure Portal and click on the New Icon
2. Search for DocumentDB
3. Select DocumentDB from Publisher Microsoft
4. Fill out the required information and once done create the DocumentDB instance
5. After creation has completed, open the DocumentDB Instance.
6. Now Add a Collection
7. Fill out the required information for the Collection Creation, and press OK once done
8. Go back to the main DocumentDB Blade, and click on Keys
9. From within the Keys, Copy and Paste the Primary or Secondary Key
10. Now go back to our logic app, and open it in the designer
11. In the Logic App, Click on the Add New Item
12. Now search for DocumentDB Actions and select “Azure DocumentDB – Create or update document”
13. The connector will now be displayed and will require some configuration
14. Fill out the required information. For which it has to be noted that for Database Account Nam is the actual name of the documentDB. In my case docdb-playground.
15. Once filled out the information should look similar to the one depicted below in the image
16. At this point the connection has been created, and we can now proceed with the actual configuration in which we will
a. select the correct Database ID from the dropdown
b. select the collection to use
c. add the dynamic content (message) which we want to store
d. we set the value to True for IsUpsert
Step 9: Exit Loop, Retrieve and return Stored Data
Our last step resulted in the fact that we persisted all documents into DocumentDB. Now before we proceed, let’s have a look at Step 7 in which we composed the following message, which eventually was stored in DocumentDB.
Have a good look at the field: RequestId. This field is actually passed in whenever we invoke our LogicApp. (see step 7, the test section).
There was a reason why we added this field and have it stored in DocumentDB. The reason? Well this way we are able to select all documents stored in DocumentDB belonging to the specific ID of the current Request and return them to the caller.
Configure
1. Select the Add an action button located just below the for-each scope.
2. Now search for DocumentDB Actions and select “Azure DocumentDB – Query documents”
3. The Document DB Query Documents connector, can now be configured as follows
a. Select the correct database ID from the dropdown in our case ProcessingState
b. Select the applicable collection from the dropdown in our case LogicApp
c. Now add a query, which will return all documents stored in the collection which have the same request id.
SELECT c.Id as CustomerId, c.FirstName,c.LastName,c.Location FROM c where c.RequestId = …..
d. Where c.RequestId = “ SELECT REQUEST ID from the Dynamic Content window”
4. At this point we have completed the action which will retrieve all the applicable stored documents. So the only thing which is left to do is, returning this list of document back to the caller. In order to do this, we add one more action. This action is called Response
5. The Response action, can can now be configured as follows
a. Enter 200 for the return status code, this indicates the HTTP Status code ‘OK’
b. In the response header we will need to set the content-type. We will do this by adding the following piece of json
{ “Content-Type”:”application/json” }
c. In the body we will add the dynamic content which relates to documents which were returned from document DB
Test
Well now that we have implemented the complete flow, it is time to do our final test and once again we will be using Fiddler to perform this test.
1. Open fiddler, and select the composer tab
2. In the composer
a. Set the HTTP Action to POST
b. Copy and Paste the uri in the Uri field
c. In the header section add
i. Content-Type:application/json
d. In the body section add the following json
{
“RequestId”:”20161221″
}
e. Click on the Execute button
3. Now open the result and you should see a response similar to the one below
4. No go back to your logic app and in the run history, select the last entry
5. If everything went Ok, it should look similar to the image below.
Conclusion
This post has guided you through setting up a logic app which calls two api’s a, combines the data and returns the aggregated result back to the caller.
In my next post I will introduce API Management into the mix which will be using to expose the two api mentioned and apply some api management magic which further simplify our logic app implementation.
So until next time, stay tuned.
Cheers
René