
by community-syndication | Apr 30, 2016 | BizTalk Community Blogs via Syndication
I was pleased to find that you no longer get an error like “Cannot alter the role ’NSSubscriberAdmin’, because it does not exist or you do not have permission.” when you try to configure BAM Alerts when you configure BizTalk 2016. This error first appeared in BizTalk 2013 and was not fixed in BizTalk 2013R2. […]
Blog Post by: mbrimble

by Abhishek kumar Pathak | Apr 29, 2016 | BizTalk Community Blogs via Syndication
Recently there was a chance to implement the Power Shell script which will monitor the BizTalk application . It is very simple script which get executed by windows task scheduler at predefined time period. It will start all artifacts of BizTalk which will in stop/disable/unlisted state. If the artifacts are up and running, it will not do anything.
#BizTalk Application Monitoring
$Date = Get-Date
$Logfile = "C:ScriptLogs$(gc env:computername)_$(get-date -f yyyy-MM-dd).log"
Function LogWrite
{
   Param ([string]$logstring)
   Add-content $Logfile -value $logstring
}
$test = '----------------------------------------------------------'
LogWrite  $test
$test = 'Script Started-BizTalk Monitor at '+$Date.DateTime
LogWrite  $test

 # Get local BizTalk DBName and DB Server from WMI

 $btsSettings = get-wmiobject MSBTS_GroupSetting -namespace 'rootMicrosoftBizTalkServer'

 $dbInstance = $btsSettings.MgmtDbServerName

 $dbName = $btsSettings.MgmtDbName

 # Load BizTalk ExplorerOM

 [void] [System.reflection.Assembly]::LoadWithPartialName("Microsoft.BizTalk.ExplorerOM")

 $BizTalkOM = New-Object Microsoft.BizTalk.ExplorerOM.BtsCatalogExplorer

 $BizTalkOM.ConnectionString = "SERVER=$dbInstance;DATABASE=$dbName;Integrated Security=SSPI"

 [ARRAY]$apps=$BizTalkOM.Applications
  Foreach ($app in $apps)
    {
       if ($app.Name -like 'BizTalkAppName*')
        {
         $app.Start(63)
         $BizTalkOM.SaveChanges()

         $test = $app.Name+ " Started"
         LogWrite  $test
       }

    }
 $test = 'Script executed sucessfully at '+$Date.DateTime
 LogWrite  $test

 $test = '----------------------------------------------------------'
 LogWrite  $test
by community-syndication | Apr 28, 2016 | BizTalk Community Blogs via Syndication
The preparation for INTEGRATE 2016 is in full swing, the event is turning out into a global one. The event has received a lot of attention recently, being highlighted on the home page of Microsoft Integration and various high profile people like Scott Gu mentioning about the event. Integrate 2016 conference being held in London […]
The post INTEGRATE 2016 will be Live Streamed appeared first on BizTalk360 Blog.
Blog Post by: Saravana Kumar
by community-syndication | Apr 27, 2016 | BizTalk Community Blogs via Syndication
We launched BizTalk360 Version 8.0 few months ago, and the release has received tremendous response from the customers. This was not a normal release as it involved a complete refresh of the user interface, and the inclusion of 7 – 8 new features that are considered to be game changers for the product. One such […]
The post BizTalk360 Business Rules Composer appeared first on BizTalk360 Blog.
Blog Post by: Sriram Hariharan
by community-syndication | Apr 27, 2016 | BizTalk Community Blogs via Syndication
We are always looking for ways to improve the productivity of our end customers when it comes to BizTalk Support & Operations, in that aspect we are happy to introduce BizTalk360 Google Chrome extension. With the BizTalk360 Google Chrome Extension, users will be able to do the following tasks seamlessly: Search documentation and blog articles […]
The post Introducing BizTalk360 Google Chrome Extension appeared first on BizTalk360 Blog.
Blog Post by: Saravana Kumar

by stephen-w-thomas | Apr 25, 2016 | Stephen's BizTalk and Integration Blog
I am excited to be presenting at the 2016 INTEGRATE conference in London. Not only will I be able to get great pizza at Pizza Express, I will hopefully get to fill in everyone on the latest offerings in Azure IaaS.
Registration is still open for the conference. Rates are $450 pounds per person for the 3 day event. It is a super deal compared to other conferences. You can get more details on registration here.
My session title is “Azure IaaS Essentials for the BizTalk Developer”.
The abstract is below:
Azure Infrastructure as a Service consists of Virtual Networking and Virtual Machines. In this session Stephen will cover the essentials every developer should know about IaaS including on premise connectivity options, how to use virtual network with virtual machines, sizing options of virtual machines, and management options. Stephen will show you how to use PowerShell to take full control of Azure Virtual Machines and make Infrastructure almost as fun as Development! In addition, see how simple it is to build a full isolated BizTalk domain in Azure with just a few clicks.
If you are new to Azure or been out of the loop for even a few months, Michael Stephenson is putting on four “Zero-to-Cloud” sessions. Two are before the conference and 2 after. Each session is limited to 10 people and they are held at the BizTalk 360 office just outside of London (an easy 30 mina train ride from central London). While I have not attended one of his classed myself, I am sure it will not disappoint! Get more details on this even here.
Hope to see you in London in just a few week!!!
by community-syndication | Apr 25, 2016 | BizTalk Community Blogs via Syndication
Axon Olympus is er trots op te worden toegelaten tot Microsofts nieuwe Azure IoT Red Carpet programma. De partners hiervoor worden per stuk door Microsoft geselecteerd op basis van hun deskundigheid bij de uitvoering van IoT oplossingen. Internet of Things (internet der dingen of liever integratie van dingen) verbindt apparaten en sensoren met Cloud gebaseerde analysemogelijkheden.
Blog Post by: AxonOlympus

by Eldert Grootenboer | Apr 23, 2016 | BizTalk Community Blogs via Syndication
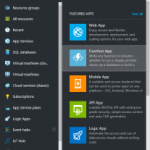
In my my previous post, I showed how we can use a WebJob to process a Service Bus queue and store the data in an Azure SQL database. This was pretty simple to set up, but it did require a good understanding of how to connect with these and process the data. Sometimes however we just want to do a quick integration without needing to set up all this plumbing. Recently Microsoft announced a new feature called Azure Functions, with now makes this possible. Azure functions can be used to create a small function which can run stand-alone, or be called from other applications, for example from a logic app, as has been described here by Sandro Pereira. Azure Functions provide out of the box connections for triggers, input and output to a lot of other Azure features, including Event Hubs, Service Bus, Azure Storage and DocumentDB. In this post I will show how we can process our message from the queue we created in this blogpost, and store it in an Azure Storage table. We will start by creating a new Function App in the portal.
Fill out the fields as specified. In case we allready have other App Services, we can run the Function in the same App Service Plan we are using for these by choosing Classic App Service Plan. However if we want the true cloud experience, it can also be run in a Dynamic App Service Plan, in which case Azure will provide all of the necessary resources when needed, and it will only cost us when our code is actually running.
Once the Function has been deployed, we can find it under App Services. Let’s create a new function in our Function App we just created. There’s either the possibility to start from scratch, or to use one of the premade templates.
We will create a function from scratch for this demo. Click on New Function, and select the ServiceBusQueueTrigger – C# template.
Now we can set up our function. We can either choose to use an existing queue, or if we specify a name for a queue which is not in the selected namespace yet, it will be created for us. We will select the queue we created earlier. When creating the connection to our Service Bus namespace, we have to use credentials with Manage permissions.
Once this simple setup has been done, click Create and we will see a Code editor in our browser with the outline for our function. As you will see, by default this function expects a string from our queue, however we are sending in a BrokeredMessage. Luckily, we can reference any namespace from our function as well. There are a couple of options to import namespaces. In our function, we will want to import the Microsoft.ServiceBus.Messaging namespace, which is part of the WindowsAzure.ServiceBus package. As this package is available from NuGet, we will use this to add the reference. Start by creating a project.json file, and add the following code, which will add a reference to version 2.7.6 of the package.
{
    "frameworks": {
        "net46":{
            "dependencies": {
                "WindowsAzure.ServiceBus": "2.7.6"
            }
        }
    }
}
|
Now we will use Kudu to upload the project.json file. The Kudu for our Function App can be reached on https://YOURAPP.scm.azurewebsites.net/. Go to the CMD Debug Console, and navigate to D:homesitewwwroot. Now we can drag and drop our project.json file here to upload it.
Going back to our Function App’s console, we will now see that the NuGet package we just added is being restored.
Now that we have added this NuGet package, we can reference the Microsoft.ServiceBus.Messaging from our code, and use the BrokeredMessage class in our incoming parameters.
Now that we have our input set up, we will add our output. Open the Integrate tab, and click New Output. Select Azure Storage Table as output, and set up the properties. We will let the function create a table for us, and we will use the shipname as a partition key.
To save our object to the Azure Storage Table, we have to create a class which will be used to map the data. Add the following class after the function. Be sure to include the PartitionKey and RowKey fields, as these are required when writing to Azure Table Storage. The other fields will hold the data we receive from our queue.
public class ErrorWarning
{
    public string PartitionKey { get; set; } // Required for writing to table storage
    public string RowKey { get; set; } // Required for writing to table storage
    public string CreatedDateTime { get; set; }
    public string ShipName { get; set; }
    public string Message { get; set; }
}
|
We also have to add a parameter to the function’s input parameters. When working with Azure Table Storage, this has to be an ICollector holding instances of the class we just created. Make sure to use the Table parameter name we just specified as name of the parameter. Once this is done, we can start implementing our function’s body. We will start by writing the data to the log, followed by creating an instance of our ErrorWarning class with the data we just received from the queue. We will then add this data to the Azure Table Storage.
public static void Run(BrokeredMessage myQueueItem, ICollector<ErrorWarning> queuesAndWarningsStorageTable, TraceWriter log)
{
    log.Verbose($"C# ServiceBus queue trigger function processed message: {myQueueItem.Properties["time"]}, {myQueueItem.Properties["ship"]}, {myQueueItem.Properties["exceptionMessage"]}");

    var item = new ErrorWarning {
        PartitionKey = myQueueItem.Properties["ship"].ToString(),
        RowKey = Guid.NewGuid().ToString(),
        CreatedDateTime = myQueueItem.Properties["time"].ToString(),
        ShipName = myQueueItem.Properties["ship"].ToString(),
        Message = myQueueItem.Properties["exceptionMessage"].ToString()
    };

    queuesAndWarningsStorageTable.Add(item);

    log.Verbose($"Added item {item.PartitionKey} to the table");
}
|
Now click Save and we will see our function is being compiled.
Now whenever a message is being placed on the queue, our Azure Function will pick it up, process the data, and place it into our Table Storage.
by Eldert Grootenboer | Apr 23, 2016 | BizTalk Community Blogs via Syndication
In my my previous post, I showed how we can use a WebJob to process a Service Bus queue and store the data in an Azure SQL database. This was pretty simple to set up, but it did require a good understanding of how to connect with these and process the data. Sometimes however we just want to do a quick integration without needing to set up all this plumbing. Recently Microsoft announced a new feature called Azure Functions, with now makes this possible. Azure functions can be used to create a small function which can run stand-alone, or be called from other applications, for example from a logic app, as has been described here by Sandro Pereira. Azure Functions provide out of the box connections for triggers, input and output to a lot of other Azure features, including Event Hubs, Service Bus, Azure Storage and DocumentDB. In this post I will show how we can process our message from the queue we created in this blogpost, and store it in an Azure Storage table. We will start by creating a new Function App in the portal.
Fill out the fields as specified. In case we allready have other App Services, we can run the Function in the same App Service Plan we are using for these by choosing Classic App Service Plan. However if we want the true cloud experience, it can also be run in a Dynamic App Service Plan, in which case Azure will provide all of the necessary resources when needed, and it will only cost us when our code is actually running.
Once the Function has been deployed, we can find it under App Services. Let’s create a new function in our Function App we just created. There’s either the possibility to start from scratch, or to use one of the premade templates.
We will create a function from scratch for this demo. Click on New Function, and select the ServiceBusQueueTrigger – C# template.
Now we can set up our function. We can either choose to use an existing queue, or if we specify a name for a queue which is not in the selected namespace yet, it will be created for us. We will select the queue we created earlier. When creating the connection to our Service Bus namespace, we have to use credentials with Manage permissions.
Once this simple setup has been done, click Create and we will see a Code editor in our browser with the outline for our function. As you will see, by default this function expects a string from our queue, however we are sending in a BrokeredMessage. Luckily, we can reference any namespace from our function as well. There are a couple of options to import namespaces. In our function, we will want to import the Microsoft.ServiceBus.Messaging namespace, which is part of the WindowsAzure.ServiceBus package. As this package is available from NuGet, we will use this to add the reference. Start by creating a project.json file, and add the following code, which will add a reference to version 2.7.6 of the package.
{
    "frameworks": {
        "net46":{
            "dependencies": {
                "WindowsAzure.ServiceBus": "2.7.6"
            }
        }
    }
}
|
Now we will use Kudu to upload the project.json file. The Kudu for our Function App can be reached on https://YOURAPP.scm.azurewebsites.net/. Go to the CMD Debug Console, and navigate to D:homesitewwwroot. Now we can drag and drop our project.json file here to upload it.
Going back to our Function App’s console, we will now see that the NuGet package we just added is being restored.
Now that we have added this NuGet package, we can reference the Microsoft.ServiceBus.Messaging from our code, and use the BrokeredMessage class in our incoming parameters.
Now that we have our input set up, we will add our output. Open the Integrate tab, and click New Output. Select Azure Storage Table as output, and set up the properties. We will let the function create a table for us, and we will use the shipname as a partition key.
To save our object to the Azure Storage Table, we have to create a class which will be used to map the data. Add the following class after the function. Be sure to include the PartitionKey and RowKey fields, as these are required when writing to Azure Table Storage. The other fields will hold the data we receive from our queue.
public class ErrorWarning
{
    public string PartitionKey { get; set; } // Required for writing to table storage
    public string RowKey { get; set; } // Required for writing to table storage
    public string CreatedDateTime { get; set; }
    public string ShipName { get; set; }
    public string Message { get; set; }
}
|
We also have to add a parameter to the function’s input parameters. When working with Azure Table Storage, this has to be an ICollector holding instances of the class we just created. Make sure to use the Table parameter name we just specified as name of the parameter. Once this is done, we can start implementing our function’s body. We will start by writing the data to the log, followed by creating an instance of our ErrorWarning class with the data we just received from the queue. We will then add this data to the Azure Table Storage.
public static void Run(BrokeredMessage myQueueItem, ICollector<ErrorWarning> queuesAndWarningsStorageTable, TraceWriter log)
{
    log.Verbose($"C# ServiceBus queue trigger function processed message: {myQueueItem.Properties["time"]}, {myQueueItem.Properties["ship"]}, {myQueueItem.Properties["exceptionMessage"]}");

    var item = new ErrorWarning {
        PartitionKey = myQueueItem.Properties["ship"].ToString(),
        RowKey = Guid.NewGuid().ToString(),
        CreatedDateTime = myQueueItem.Properties["time"].ToString(),
        ShipName = myQueueItem.Properties["ship"].ToString(),
        Message = myQueueItem.Properties["exceptionMessage"].ToString()
    };

    queuesAndWarningsStorageTable.Add(item);

    log.Verbose($"Added item {item.PartitionKey} to the table");
}
|
Now click Save and we will see our function is being compiled.
Now whenever a message is being placed on the queue, our Azure Function will pick it up, process the data, and place it into our Table Storage.