by Daniel probert | Feb 25, 2016 | BizTalk Community Blogs via Syndication
In the latest installment of the logicappsio webcast, Jeff Hollan and Kevin Lam covered off new features released this month, and also talked about what is coming up – you can watch it here: https://www.youtube.com/watch?v=7iZc1i9d7y0.
Of note in this webcast:
Released features this month:
- Updated Designer now released – now the cards are smaller, it’s a nicer mechanism for adding triggers/actions, and the cards run vertically instead of horizontally.
- We now have support for manual triggers e.g. a manual HTTP trigger which replaces the v1 HTTP Listener
- There’s a new Response action which can be used to send a response back to a waiting party (i.e. solicit-response)
- There’s a new action called “HTTP + Swagger” which allows you to supply a Swagger endpoint, and the designer will read the Swagger and give you a first-class experience in using your API App i.e. will show trigger actions, documentation etc.
- If/Else conditions are now supported in the designer.
- The “connectors” we used in the old designer have been replaced by Managed API Apps – these are also known as Connections. These are v2 API Apps, and no longer use the gateway service or Zumo tokens, and Microsoft host these connections for us. You can also use any custom API app as well, as long as it has a Swagger/Swashbuckle API.
- The trigger blade will now show you the Shared Access Signature URL needed to post to the trigger directly. Additionally logic apps will support multiple triggers (the designer doesn’t yet support this).
Features coming up soon:
- Adding support so that recurrence trigger can be run-now i.e. run immediately – today this is only supported for the manual triggers.
- Support for parallel actions in the new designer (this should be very cool – convoys anyone?!)
- Auto discovery of custom APIs – they talked about how any API Apps you have in your Resource Group will appear in a separate list, which is awesome. The idea that you can call any API you like is very powerful. Link this isn with Azure API Management Services and you get a very powerful set of tools.
- Auto discovery of workflows – you’ll be able to call another Logic App, and you’ll see a list of those logic apps inside your logic app.
- Flow monitoring – you get a view of your logic app history, but from inside the designer so you can see which paths were taken, which were skipped (a bit like the old Orchestration Debugger I imagine in BizTalk).
- Support for the Salesforce sandbox endpoint.
- The trigger experience in the new designer will get better – there will be more information on the trigger card.
Jeff then took us through a demo of how to use a v1 API App in the new designer (using the JSON Encoder BizTalk Connector as an example).
Jeff has also expanded on my blog post about using BizTalk/v1 connectors in the new designer, and has included details on how to add the Swagger/Swashbuckle details to your API App so that the new designer will be able to list any BizTalk/v1 API Apps you have defined in your Resource Group – you can read Jeff’s post here: http://blogs.msdn.com/b/logicapps/archive/2016/02/25/accessing-v1-apis-and-biztalk-apis-from-logic-apps.aspx.
by community-syndication | Feb 25, 2016 | BizTalk Community Blogs via Syndication
Switching to the old Logic Apps designer from a new Logic App is relatively easy… if you don’t have anything in your logic app! You just need to change the $schema value at the top of your logic app definition.
Blog Post by: Daniel Probert
by Daniel probert | Feb 25, 2016 | BizTalk Community Blogs via Syndication
Switching to the old Logic Apps designer from a new Logic App is relatively easy… if you don’t have anything in your logic app! You just need to change the $schema value at the top of your logic app definition.
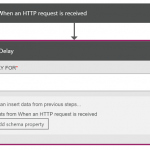
Here’s an example of how to do it:
- Create a new Logic App (will open in new designer)
- Add a manual HTTP Trigger, and a delay action (you need at least one trigger and one action in order to save your Logic App):
- Save your Logic App
- Open your logic app in code view
- Change the $schema value at the top from:
“$schema”: “https://schema.management.azure.com/providers/Microsoft.Logic/schemas/2015-08-01-preview/workflowdefinition.json#”,
to
“$schema”: “http://schema.management.azure.com/providers/Microsoft.Logic/schemas/2014-12-01-preview/workflowdefinition.json#“, (I’ve highlighted the bits that change)
- Close your logic app
- Reopen it – it will open in the old designer (although it will appear to have nothing in it, as the new manual HTTP trigger is not supported) – just add a new trigger and off you go.
Note: you may need to manually edit the code behind to remove the delay shape – your mileage may vary.
I suspect the product group will release a tool to make this easier.
You can also use this mechanism to go from the old designer to the new one.
by Dan Toomey | Feb 25, 2016 | BizTalk Community Blogs via Syndication
When it comes to processing zero-byte messages, the built-in receive adapters in BizTalk Server are somewhat inconsistent (see this recent post by Mark Brimble for more information). However, it seems that most receive adapters do not successfully process messages without body content. For example, the File adapter will delete an empty file and kindly put a notification to that effect in the event log. The HTTP adapter will reject a POST request with no content and return a 500 “Internal Server” error. So it probably isn’t any real surprise that the Azure Service Bus Messaging adapter introduced in BizTalk Server 2013 also obstructs bodiless messages. The difference here though is that the message will be successfully received from the queue or topic (and therefore removed from Service Bus), but will immediately be suspended with an error like the following:
A message received by adapter “SB-Messaging” on receive location “SB-ReceivePort_Queue_SB” with URI “sb://<namespace>.servicebus.windows.net/TestQueue” is suspended.
Error details: There was a failure executing the receive pipeline: “Microsoft.BizTalk.DefaultPipelines.PassThruReceive, Microsoft.BizTalk.DefaultPipelines, Version=3.0.1.0, Culture=neutral, PublicKeyToken=31bf3856ad364e35” Source: “Pipeline ” Receive Port: “SB-ReceivePort” URI: “sb://<namespace>.servicebus.windows.net/TestQueue” Reason: The Messaging Engine encountered an error while reading the message stream.
You will also see another error message recorded in the event log:
The Messaging Engine received an error from transport adapter “SB-Messaging” when notifying the adapter with the BatchComplete event. Reason “Object reference not set to an instance of an object.”.
And if you have message body tracking enabled on the receive port, you will also see this error message in the event log:
There was a failure executing the receive pipeline: “Microsoft.BizTalk.DefaultPipelines.PassThruReceive, Microsoft.BizTalk.DefaultPipelines, Version=3.0.1.0, Culture=neutral, PublicKeyToken=31bf3856ad364e35” Source: “Pipeline ” Receive Port: “SB-ReceivePort” URI: “sb://<namespace>.servicebus.windows.net/TestQueue” Reason: Cannot access a disposed object.
Object name: ‘CEventingReadStream’.
In the case of file based adapters, it seems pointless enough to process a message with no content, which is possibly why BizTalk rejects these. However, unlike empty files which are unlikely to have any meaningful dynamic context information besides the file name, a Service Bus message comes with a number of Brokered Message properties which are automatically added to the BizTalk message context by the SB-Messaging receive adapter. Aside from several standard properties, Brokered Message publishers can introduce any number of custom properties (up to a limit of 64KB). The BizTalk SB-Messaging receive adapter even allows you to promote these properties to a custom namespace when it is published to the MessageBox. Sometimes, these properties are all that is required for the transaction, particularly if it is used as a notification. Remember that not all BizTalk messages have to be XML; they can contain any content, including binary – as long as BizTalk is not expected to process the content. The MSDN documentation for XLANG message also says that it can have “zero or more message parts”.
So what exactly happens when BizTalk pops a message with no body off of a Service Bus queue? To test this out, I did the following:
- Created a Service Bus namespace and test queue in Azure and noted the ACS credentials. (Note: BizTalk Server 2013 R2 now also supports Shared Access Signatures for authorisation)
- Created a Receive Port and an SB-Messaging receive location in BizTalk and configured it to receive messages off of the queue
- Created a FILE send port that subscribes to messages from the Receive Port created in the previous step (to prevent persistence exceptions due to no subscription)
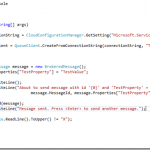
- Created a small console app to send a blank message to the queue; note that this only takes a couple of lines of code when using the Microsoft Azure Service Bus package available via Nuget:
- Ran the console application and observed the resulting suspended message and event log entry. Note that the custom BrokeredMessage property was automatically placed in the message context:
Remember also that once a message makes it through a receive adapter, it travels through a pipeline. A custom pipeline might contain components that process the context data in a message. In a recent case, we wanted to receive a message off a Service Bus queue that contained a timestamp and a BAM Activity ID within the Brokered Message properties and use it to finalise the BAM record. Our custom pipeline would read the properties from the message, close the BAM record, and then dispose of the message (as there was no need to persist it from this point on). Curiously enough, the pipeline processing succeeded. However, we still saw the 2nd error mentioned above appearing in the event log. So this proves that the error occurs after the pipeline handles the empty message without issue (provided your pipeline doesn’t contain a disassembler or other component that relies on the presence of a message body).
We could have chosen to ignore the errors, since we know our mission was still being accomplished (BAM record closed, and message was popped off of the queue). However this would introduce noise within a monitoring solution like BizTalk360 and potentially cause confusion for the support team. In the end, since the integration platform was the publisher of the Brokered Message anyway, we chose to introduce some content in the message body which alleviated the issue. However, this isn’t a great story because:
- Message sizes in Service Bus are limited to 256KB, so you need to take precautions that messages don’t exceed this length, and
- Sometimes you are not the publisher of the message and won’t have the option to control the body content.
I suppose another solution would be to write a custom adapter based on the existing SB-Messaging adapter that would gracefully handle an empty message, perhaps something along the lines of Nino Crudele’s proposed changes to the custom file adapter included in the SDK. But that’s a task for another day when there’s time to spare.

by Dan Toomey | Feb 25, 2016 | BizTalk Community Blogs via Syndication
When it comes to processing zero-byte messages, the built-in receive adapters in BizTalk Server are somewhat inconsistent (see this recent post by Mark Brimble for more information). However, it seems that most receive adapters do not successfully process messages without body content. For example, the File adapter will delete an empty file and kindly put a notification to that effect in the event log. The HTTP adapter will reject a POST request with no content and return a 500 “Internal Server” error. So it probably isn’t any real surprise that the Azure Service Bus Messaging adapter introduced in BizTalk Server 2013 also obstructs bodiless messages. The difference here though is that the message will be successfully received from the queue or topic (and therefore removed from Service Bus), but will immediately be suspended with an error like the following:
A message received by adapter “SB-Messaging” on receive location “SB-ReceivePort_Queue_SB” with URI “sb://<namespace>.servicebus.windows.net/TestQueue” is suspended.
Error details: There was a failure executing the receive pipeline: “Microsoft.BizTalk.DefaultPipelines.PassThruReceive, Microsoft.BizTalk.DefaultPipelines, Version=3.0.1.0, Culture=neutral, PublicKeyToken=31bf3856ad364e35” Source: “Pipeline ” Receive Port: “SB-ReceivePort” URI: “sb://<namespace>.servicebus.windows.net/TestQueue” Reason: The Messaging Engine encountered an error while reading the message stream.
You will also see another error message recorded in the event log:
The Messaging Engine received an error from transport adapter “SB-Messaging” when notifying the adapter with the BatchComplete event. Reason “Object reference not set to an instance of an object.”.
And if you have message body tracking enabled on the receive port, you will also see this error message in the event log:
There was a failure executing the receive pipeline: “Microsoft.BizTalk.DefaultPipelines.PassThruReceive, Microsoft.BizTalk.DefaultPipelines, Version=3.0.1.0, Culture=neutral, PublicKeyToken=31bf3856ad364e35” Source: “Pipeline ” Receive Port: “SB-ReceivePort” URI: “sb://<namespace>.servicebus.windows.net/TestQueue” Reason: Cannot access a disposed object.
Object name: ‘CEventingReadStream’.
In the case of file based adapters, it seems pointless enough to process a message with no content, which is possibly why BizTalk rejects these. However, unlike empty files which are unlikely to have any meaningful dynamic context information besides the file name, a Service Bus message comes with a number of Brokered Message properties which are automatically added to the BizTalk message context by the SB-Messaging receive adapter. Aside from several standard properties, Brokered Message publishers can introduce any number of custom properties (up to a limit of 64KB). The BizTalk SB-Messaging receive adapter even allows you to promote these properties to a custom namespace when it is published to the MessageBox. Sometimes, these properties are all that is required for the transaction, particularly if it is used as a notification. Remember that not all BizTalk messages have to be XML; they can contain any content, including binary – as long as BizTalk is not expected to process the content. The MSDN documentation for XLANG message also says that it can have “zero or more message parts”.
So what exactly happens when BizTalk pops a message with no body off of a Service Bus queue? To test this out, I did the following:
- Created a Service Bus namespace and test queue in Azure and noted the ACS credentials. (Note: BizTalk Server 2013 R2 now also supports Shared Access Signatures for authorisation)
- Created a Receive Port and an SB-Messaging receive location in BizTalk and configured it to receive messages off of the queue
- Created a FILE send port that subscribes to messages from the Receive Port created in the previous step (to prevent persistence exceptions due to no subscription)
- Created a small console app to send a blank message to the queue; note that this only takes a couple of lines of code when using the Microsoft Azure Service Bus package available via Nuget:
- Ran the console application and observed the resulting suspended message and event log entry. Note that the custom BrokeredMessage property was automatically placed in the message context:
Remember also that once a message makes it through a receive adapter, it travels through a pipeline. A custom pipeline might contain components that process the context data in a message. In a recent case, we wanted to receive a message off a Service Bus queue that contained a timestamp and a BAM Activity ID within the Brokered Message properties and use it to finalise the BAM record. Our custom pipeline would read the properties from the message, close the BAM record, and then dispose of the message (as there was no need to persist it from this point on). Curiously enough, the pipeline processing succeeded. However, we still saw the 2nd error mentioned above appearing in the event log. So this proves that the error occurs after the pipeline handles the empty message without issue (provided your pipeline doesn’t contain a disassembler or other component that relies on the presence of a message body).
We could have chosen to ignore the errors, since we know our mission was still being accomplished (BAM record closed, and message was popped off of the queue). However this would introduce noise within a monitoring solution like BizTalk360 and potentially cause confusion for the support team. In the end, since the integration platform was the publisher of the Brokered Message anyway, we chose to introduce some content in the message body which alleviated the issue. However, this isn’t a great story because:
- Message sizes in Service Bus are limited to 256KB, so you need to take precautions that messages don’t exceed this length, and
- Sometimes you are not the publisher of the message and won’t have the option to control the body content.
I suppose another solution would be to write a custom adapter based on the existing SB-Messaging adapter that would gracefully handle an empty message, perhaps something along the lines of Nino Crudele’s proposed changes to the custom file adapter included in the SDK. But that’s a task for another day when there’s time to spare.

by Eldert Grootenboer | Feb 24, 2016 | BizTalk Community Blogs via Syndication
This is the third post in my series on Integration of Things. In my previous post I explained how you could send and receive data on a Raspberry Pi 2 to Azure. Today I will explain how you can use an Azure cloud service as a worker role for retrieving the data from Event Hubs using the Event Processor Host library. We will save the retrieved data in an Azure Table Storage, which is a great service for working with large amounts of structured, non-relational data. Azure Table Storage is very fast, and cost efficient especially when working with lots of data, which makes it ideal for our scenario. The code for this blogpost can be found here.
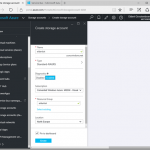
The Event Processor Host library will be used to retrieve the data from our event hub, and load it into Azure Table Storage. This library will distribute Event Hubs partitions accross our instances of the worker role, keeping track of leases and snapshots. This library really makes working with Event Hubs from .NET code a breeze to go through. We will need a blob storage for for the table and for the library to store its data, so let’s start by setting one up via the Azure Portal.
Our application will read from the event hub we created in the previous blogpost. To be able to access it, we need create a Shared Access Policy for this application with Listen permissions.
When working with Azure Table Storage, we need a class which represents the object which will be saved to the table. This class should derive from the TableEntity class, so it can be mapped into Table Storage. As we will be using this object in multiple project, we will create a new Class Library project for it.
We will need to add a reference to the WindowsAzure.Storage NuGet package in order to work with Azure Storage.
Add the class to the project which holds our object to be inserted into the table. We’ll use a method to set the partition and row key, which are used to shard the data and query the data. We use the same fields as we defined in the EngineInformation class used in the fieldhub project, so we can deserialize the objects we receive in the event hub directly into an object for the database. Unfortunatly it’s not possible to create a shared class library which can be used both by our worker role and the fieldhub UWP application, due to the incompatibility between Win32 and WinRT class libraries.
using System;

using Microsoft.WindowsAzure.Storage.Table;

namespace Eldert.IoT.Data.DataTypes
{
    /// <summary>
    /// Represents an engine information object for Azure Table Storage.
    /// </summary>
    public class EngineInformation : TableEntity
    {
        public Guid Identifier { get; set; }

        public string ShipName { get; set; }

        public string EngineName { get; set; }

        public double Temperature { get; set; }

        public double RPM { get; set; }

        public bool Warning { get; set; }

        public int EngineWarning { get; set; }

        public DateTime CreatedDateTime { get; set; }

        public void SetKeys()
        {
            PartitionKey = ShipName;
            RowKey = Identifier.ToString();
        }
    }
}
|
Next we are going to create a Cloud Service project containing a worker role, which we’re going to publish to Azure later on.
When the project is created, we will have two projects, one for the worker role, the other for the cloud service itself. Let’s start by setting up our worker role. As mentioned, we will implement the event processor library, for which we need to add the EventProcessorHost NuGet package to our project, as well as the WindowsAzure.Storage NuGet package for working with the table.
For this we will create a new class, which implements the IEventProcessor interface.
using System;
using System.Collections.Generic;
using System.Diagnostics;
using System.Text;
using System.Threading.Tasks;

using Eldert.IoT.Data.DataTypes;

using Microsoft.Azure;
using Microsoft.ServiceBus.Messaging;
using Microsoft.WindowsAzure.Storage;
using Microsoft.WindowsAzure.Storage.Table;

internal class ShipEventProcessor : IEventProcessor
{


}
|
This interface implements three methods. The first is OpenAsync, which gets called when the event processors are started for the partitions in our event hub. In this call we will also create the table to which we want to save our data in case it does not yet exist.
public Task OpenAsync(PartitionContext context)
{
        // Create the table if it doesn't exist yet
        if (_table.CreateIfNotExists())
        {
                Trace.TraceInformation("Table for EngineInformation has been created.");
        }

        Trace.TraceInformation($"EventProcessor started.  Partition: {context.Lease.PartitionId}, Current offset: {context.Lease.Offset}");

        return Task.FromResult<object>(null);
}
|
The second one is CloseAsync, which is called when the event processor is being shutdown. We will set a checkpoint here in case we are shutting down, so next time the event processor is started up for this partition, processing will resume from the last processed message.
public async Task CloseAsync(PartitionContext context, CloseReason reason)
{
    Trace.WriteLine($"EventProcessor is shutting down: Partition: {context.Lease.PartitionId} Reason: {reason}");

    // Place a checkpoint in case the event processor is shutting down
    if (reason == CloseReason.Shutdown)
    {
        await context.CheckpointAsync();
    }
}
|
The last method is ProcessEventsAsync, which is where the processing of the messages that are being received is done. As the messages were UTF8 serialized JSON strings, we will use the JSON library from Newtonsoft to deserialize the messages. To do so, we first need to install its NuGet package.
Now we will loop through the messages we received from our event hub, get the message string, and deserialize it to an EngineInformation object. Because event hubs works in a streaming manner, where we set checkpoints every x messages, we could receive messages more then once. To handle this, we will have to have some idempotency in place. I choose to just replace the existing object in the database, but for different scenarios this is something to think about. The reason we don’t place a checkpoint every message is due to performance reasons. Event Hubs are meant for large loads of messages, so it would be unwise to checkpoint every message. The storage account used for checkpointing probably wouldn’t handle this load, but more importantly checkpointing every single event indicates of a queued messaging pattern for which a Queue may be a better option than an Event Hub. The idea behind Event Hubs is that you will get at least once delivery at great scale. We therefor make our application idempotent so we can easily recover from failures or restarts that result in the same events being received multiple times.
/// <summary>
/// Processing of the messages received on the event hub.
/// </summary>
public async Task ProcessEventsAsync(PartitionContext context, IEnumerable<EventData> messages)
{
        try
        {
                // Gather the table operations to be performed
                var tableOperations = new TableBatchOperation();

                // Loop through received messages
                foreach (var eventData in messages)
                {
                        // Get the message received as a JSON string
                        var message = Encoding.UTF8.GetString(eventData.GetBytes());
                        Trace.TraceInformation($"Message received - Partition: {context.Lease.PartitionId} - Machine: {Environment.MachineName} Message: {message}");

                        try
                        {
                                // Deserialize the JSON message to an engine information object
                                var engineInformation = JsonConvert.DeserializeObject<EngineInformation>(message);
                                engineInformation.SetKeys();

                                // We have to take care of idempotency ourself, as we might get the same message multiple times
                                // To do so, we will insert new items, and replace existing items (which will replace the item with the same item)
                                // For extra performance we gather the table operations here, and will apply them later on in a batch
                                Trace.TraceInformation($"Adding {engineInformation.Identifier} to table");
                                tableOperations.Add(TableOperation.InsertOrReplace(engineInformation));
                        }
                        catch (Exception)
                        {
                                Trace.TraceWarning("Could not deserialize as EngineInformation object");
                        }
                }

                // Apply table operations if needed
                if (tableOperations.Count > 0)
                {
                        await _table.ExecuteBatchAsync(tableOperations);
                        Trace.TraceInformation("Saved data to database");
                }

                // Keep track of number of received messages, place a checkpoint after having processed 50 messages.
                // Make sure the messages are persisted in the table before placing the checkpoint
                if (++_messageCounter > 50)
                {
                        Trace.TraceInformation("Checkpoint placed");
                        await context.CheckpointAsync();
                        _messageCounter = 0;
                }
        }
        catch (Exception exception)
        {
                Trace.TraceError(exception.ToString());
                throw;
        }
}
|
We are now done with implementing the interface, the next step is to hook it into our WorkerRole class. Start by adding a reference to the ServiceBus Messaging namespace, which is used to work with the Event Processor Host, and adding a field for its instance. We will also need a reference to the Azure library, which will be used to retrieve our settings from the configuration we specify on our cloud service.
using System;
using System.Diagnostics;
using System.Net;
using System.Threading;
using System.Threading.Tasks;

using Microsoft.Azure;
using Microsoft.WindowsAzure.ServiceRuntime;

using Microsoft.ServiceBus.Messaging;

namespace Eldert.IoT.Azure.EventHubsProcessor.WorkerRole
{
    public class WorkerRole : RoleEntryPoint
    {
        private EventProcessorHost _eventProcessorHost;
        .
        .
        .
    }
}
|
Now we are going to add the settings we need to connect to our event hub and storage. We will store these in the settings of our cloud service, so that once it’s deployed, we can change these settings from the Azure Portal. Open the Cloud Service project, expand the Roles and double-click on the WorkerRole. Go to the settings tab, and add settings for the consumer group name, event hub name, storage connection string and event hubs connection string. Note that the settings only allow you to specify storage connection string as a connection string type, so for the event hubs connection string just use type string.
Back to our worker role project, when the worker role starts, we want the Event Processor Host to be initialized, so we will add this to the OnStart method. We need to set an identifier for the host, which will be used by the library to keep track which host is handling each partition. This will be used in loadbalancing the processing of the partitions, as each partition can be handled by a different host. We also need to specify the connection settings, which we just stored in the settings of the cloud service. Using CloudConfigurationManager.GetSetting() we can retrieve the settings to create an instance of the event processor host.
public override bool OnStart()
{
        // Create the event processor host
        // Create a unique identifier, which will be used to determine which partitions this processor is handling
        _eventProcessorHost = new EventProcessorHost(Guid.NewGuid().ToString(), CloudConfigurationManager.GetSetting("EventHub"), CloudConfigurationManager.GetSetting("ConsumerGroup"),
                CloudConfigurationManager.GetSetting("EventHubsConnectionString"), CloudConfigurationManager.GetSetting("IoTStorageConnectionString"));

        // Set the maximum number of concurrent connections
        ServicePointManager.DefaultConnectionLimit = 12;
        var result = base.OnStart();
        Trace.TraceInformation("Eldert.IoT.Azure.EventHubsProcessor.WorkerRole has been started");
        return result;
}
|
When the application starts running, we have to register the ShipEventProcessor we created earlier with the Event Processor Host, so it knows what actions to take on the messages. We’ll add this to the Run method.
public override void Run()
{
    Trace.TraceInformation("Eldert.IoT.Azure.EventHubsProcessor.WorkerRole is running");

    try
    {
        // Register the processor, at this point one or more partitions will be registered with the client, and it will start processing
        _eventProcessorHost.RegisterEventProcessorAsync<shipeventprocessor>().Wait();

        RunAsync(_cancellationTokenSource.Token).Wait();
    }
    finally
    {
        _runCompleteEvent.Set();
    }
}
|
And finally, when the application is being stopped, we have to unregister the event processor, to let it clean up and make the necesarry checkpoints. This should be added in the OnStop method.
public override void OnStop()
{
    Trace.TraceInformation("Eldert.IoT.Azure.EventHubsProcessor.WorkerRole is stopping");
    _cancellationTokenSource.Cancel();
    _runCompleteEvent.WaitOne();

    // Unregister the processor
    _eventProcessorHost.UnregisterEventProcessorAsync().Wait();

    base.OnStop();
    Trace.TraceInformation("Eldert.IoT.Azure.EventHubsProcessor.WorkerRole has stopped");
}
|
Now that all is in place, we can setup the application for publishing. As you have noticed, we use Trace to log information about our progress. As this application will be running in Azure, we will want to make this information accessible. Luckily this can be done easily by opening the worker role in our cloud service project, opening Configure for the diagnostics and setting the Log level to All in the Application logs tab, or a different setting if we would like less information to be logged, f.e. just errors.
We will also need to set a storage account where we want to log to. The logging will be stored in an Azure Table called in this WADLogsTable under this storage account. Currently this just the classic storage accounts, so create a new storage account for this.
Finally make sure to set the number of instances and VM size you will want to use.
Now we can go and publish our cloud service with the worker role to Azure. Right click on your cloud service project, and select Publish. Select the subscription to which you want to deploy.
Set the name of your service, along with the properties for it’s region and replication.
Next choose the storage account you just created for your logging.
And finally review your settings, and if all is ok, publish your service.
The Azure activity log will now open, where you can check on the progress of your deployment, and also will see if anything is not going right.
Once the deployment is done, you can use the Cloud Explorer from Visual Studio to check the logging in the WADLogsTable.
And the same can be used to check our data in the Azure Storage Table, remember to switch to the correct storage account. As you will see, the table was automatically created, and data is filled according to the format we set in our EngineInformation object.
We have now finished our worker role which retrieves the data from the event hub, and stores it in the database. In my next blogpost I will show how you can use Entity Framework to setup a Azure SQL database.
Code
by Eldert Grootenboer | Feb 24, 2016 | BizTalk Community Blogs via Syndication
This is the third post in my series on Integration of Things. In my previous post I explained how you could send and receive data on a Raspberry Pi 2 to Azure. Today I will explain how you can use an Azure cloud service as a worker role for retrieving the data from Event Hubs using the Event Processor Host library. We will save the retrieved data in an Azure Table Storage, which is a great service for working with large amounts of structured, non-relational data. Azure Table Storage is very fast, and cost efficient especially when working with lots of data, which makes it ideal for our scenario. The code for this blogpost can be found here.
The Event Processor Host library will be used to retrieve the data from our event hub, and load it into Azure Table Storage. This library will distribute Event Hubs partitions accross our instances of the worker role, keeping track of leases and snapshots. This library really makes working with Event Hubs from .NET code a breeze to go through. We will need a blob storage for for the table and for the library to store its data, so let’s start by setting one up via the Azure Portal.
Our application will read from the event hub we created in the previous blogpost. To be able to access it, we need create a Shared Access Policy for this application with Listen permissions.
When working with Azure Table Storage, we need a class which represents the object which will be saved to the table. This class should derive from the TableEntity class, so it can be mapped into Table Storage. As we will be using this object in multiple project, we will create a new Class Library project for it.
We will need to add a reference to the WindowsAzure.Storage NuGet package in order to work with Azure Storage.
Add the class to the project which holds our object to be inserted into the table. We’ll use a method to set the partition and row key, which are used to shard the data and query the data. We use the same fields as we defined in the EngineInformation class used in the fieldhub project, so we can deserialize the objects we receive in the event hub directly into an object for the database. Unfortunatly it’s not possible to create a shared class library which can be used both by our worker role and the fieldhub UWP application, due to the incompatibility between Win32 and WinRT class libraries.
using System;

using Microsoft.WindowsAzure.Storage.Table;

namespace Eldert.IoT.Data.DataTypes
{
    /// <summary>
    /// Represents an engine information object for Azure Table Storage.
    /// </summary>
    public class EngineInformation : TableEntity
    {
        public Guid Identifier { get; set; }

        public string ShipName { get; set; }

        public string EngineName { get; set; }

        public double Temperature { get; set; }

        public double RPM { get; set; }

        public bool Warning { get; set; }

        public int EngineWarning { get; set; }

        public DateTime CreatedDateTime { get; set; }

        public void SetKeys()
        {
            PartitionKey = ShipName;
            RowKey = Identifier.ToString();
        }
    }
}
|
Next we are going to create a Cloud Service project containing a worker role, which we’re going to publish to Azure later on.
When the project is created, we will have two projects, one for the worker role, the other for the cloud service itself. Let’s start by setting up our worker role. As mentioned, we will implement the event processor library, for which we need to add the EventProcessorHost NuGet package to our project, as well as the WindowsAzure.Storage NuGet package for working with the table.
For this we will create a new class, which implements the IEventProcessor interface.
using System;
using System.Collections.Generic;
using System.Diagnostics;
using System.Text;
using System.Threading.Tasks;

using Eldert.IoT.Data.DataTypes;

using Microsoft.Azure;
using Microsoft.ServiceBus.Messaging;
using Microsoft.WindowsAzure.Storage;
using Microsoft.WindowsAzure.Storage.Table;

internal class ShipEventProcessor : IEventProcessor
{


}
|
This interface implements three methods. The first is OpenAsync, which gets called when the event processors are started for the partitions in our event hub. In this call we will also create the table to which we want to save our data in case it does not yet exist.
public Task OpenAsync(PartitionContext context)
{
        // Create the table if it doesn't exist yet
        if (_table.CreateIfNotExists())
        {
                Trace.TraceInformation("Table for EngineInformation has been created.");
        }

        Trace.TraceInformation($"EventProcessor started.  Partition: {context.Lease.PartitionId}, Current offset: {context.Lease.Offset}");

        return Task.FromResult<object>(null);
}
|
The second one is CloseAsync, which is called when the event processor is being shutdown. We will set a checkpoint here in case we are shutting down, so next time the event processor is started up for this partition, processing will resume from the last processed message.
public async Task CloseAsync(PartitionContext context, CloseReason reason)
{
    Trace.WriteLine($"EventProcessor is shutting down: Partition: {context.Lease.PartitionId} Reason: {reason}");

    // Place a checkpoint in case the event processor is shutting down
    if (reason == CloseReason.Shutdown)
    {
        await context.CheckpointAsync();
    }
}
|
The last method is ProcessEventsAsync, which is where the processing of the messages that are being received is done. As the messages were UTF8 serialized JSON strings, we will use the JSON library from Newtonsoft to deserialize the messages. To do so, we first need to install its NuGet package.
Now we will loop through the messages we received from our event hub, get the message string, and deserialize it to an EngineInformation object. Because event hubs works in a streaming manner, where we set checkpoints every x messages, we could receive messages more then once. To handle this, we will have to have some idempotency in place. I choose to just replace the existing object in the database, but for different scenarios this is something to think about. The reason we don’t place a checkpoint every message is due to performance reasons. Event Hubs are meant for large loads of messages, so it would be unwise to checkpoint every message. The storage account used for checkpointing probably wouldn’t handle this load, but more importantly checkpointing every single event indicates of a queued messaging pattern for which a Queue may be a better option than an Event Hub. The idea behind Event Hubs is that you will get at least once delivery at great scale. We therefor make our application idempotent so we can easily recover from failures or restarts that result in the same events being received multiple times.
/// <summary>
/// Processing of the messages received on the event hub.
/// </summary>
public async Task ProcessEventsAsync(PartitionContext context, IEnumerable<EventData> messages)
{
        try
        {
                // Gather the table operations to be performed
                var tableOperations = new TableBatchOperation();

                // Loop through received messages
                foreach (var eventData in messages)
                {
                        // Get the message received as a JSON string
                        var message = Encoding.UTF8.GetString(eventData.GetBytes());
                        Trace.TraceInformation($"Message received - Partition: {context.Lease.PartitionId} - Machine: {Environment.MachineName} Message: {message}");

                        try
                        {
                                // Deserialize the JSON message to an engine information object
                                var engineInformation = JsonConvert.DeserializeObject<EngineInformation>(message);
                                engineInformation.SetKeys();

                                // We have to take care of idempotency ourself, as we might get the same message multiple times
                                // To do so, we will insert new items, and replace existing items (which will replace the item with the same item)
                                // For extra performance we gather the table operations here, and will apply them later on in a batch
                                Trace.TraceInformation($"Adding {engineInformation.Identifier} to table");
                                tableOperations.Add(TableOperation.InsertOrReplace(engineInformation));
                        }
                        catch (Exception)
                        {
                                Trace.TraceWarning("Could not deserialize as EngineInformation object");
                        }
                }

                // Apply table operations if needed
                if (tableOperations.Count > 0)
                {
                        await _table.ExecuteBatchAsync(tableOperations);
                        Trace.TraceInformation("Saved data to database");
                }

                // Keep track of number of received messages, place a checkpoint after having processed 50 messages.
                // Make sure the messages are persisted in the table before placing the checkpoint
                if (++_messageCounter > 50)
                {
                        Trace.TraceInformation("Checkpoint placed");
                        await context.CheckpointAsync();
                        _messageCounter = 0;
                }
        }
        catch (Exception exception)
        {
                Trace.TraceError(exception.ToString());
                throw;
        }
}
|
We are now done with implementing the interface, the next step is to hook it into our WorkerRole class. Start by adding a reference to the ServiceBus Messaging namespace, which is used to work with the Event Processor Host, and adding a field for its instance. We will also need a reference to the Azure library, which will be used to retrieve our settings from the configuration we specify on our cloud service.
using System;
using System.Diagnostics;
using System.Net;
using System.Threading;
using System.Threading.Tasks;

using Microsoft.Azure;
using Microsoft.WindowsAzure.ServiceRuntime;

using Microsoft.ServiceBus.Messaging;

namespace Eldert.IoT.Azure.EventHubsProcessor.WorkerRole
{
    public class WorkerRole : RoleEntryPoint
    {
        private EventProcessorHost _eventProcessorHost;
        .
        .
        .
    }
}
|
Now we are going to add the settings we need to connect to our event hub and storage. We will store these in the settings of our cloud service, so that once it’s deployed, we can change these settings from the Azure Portal. Open the Cloud Service project, expand the Roles and double-click on the WorkerRole. Go to the settings tab, and add settings for the consumer group name, event hub name, storage connection string and event hubs connection string. Note that the settings only allow you to specify storage connection string as a connection string type, so for the event hubs connection string just use type string.
Back to our worker role project, when the worker role starts, we want the Event Processor Host to be initialized, so we will add this to the OnStart method. We need to set an identifier for the host, which will be used by the library to keep track which host is handling each partition. This will be used in loadbalancing the processing of the partitions, as each partition can be handled by a different host. We also need to specify the connection settings, which we just stored in the settings of the cloud service. Using CloudConfigurationManager.GetSetting() we can retrieve the settings to create an instance of the event processor host.
public override bool OnStart()
{
        // Create the event processor host
        // Create a unique identifier, which will be used to determine which partitions this processor is handling
        _eventProcessorHost = new EventProcessorHost(Guid.NewGuid().ToString(), CloudConfigurationManager.GetSetting("EventHub"), CloudConfigurationManager.GetSetting("ConsumerGroup"),
                CloudConfigurationManager.GetSetting("EventHubsConnectionString"), CloudConfigurationManager.GetSetting("IoTStorageConnectionString"));

        // Set the maximum number of concurrent connections
        ServicePointManager.DefaultConnectionLimit = 12;
        var result = base.OnStart();
        Trace.TraceInformation("Eldert.IoT.Azure.EventHubsProcessor.WorkerRole has been started");
        return result;
}
|
When the application starts running, we have to register the ShipEventProcessor we created earlier with the Event Processor Host, so it knows what actions to take on the messages. We’ll add this to the Run method.
public override void Run()
{
    Trace.TraceInformation("Eldert.IoT.Azure.EventHubsProcessor.WorkerRole is running");

    try
    {
        // Register the processor, at this point one or more partitions will be registered with the client, and it will start processing
        _eventProcessorHost.RegisterEventProcessorAsync<shipeventprocessor>().Wait();

        RunAsync(_cancellationTokenSource.Token).Wait();
    }
    finally
    {
        _runCompleteEvent.Set();
    }
}
|
And finally, when the application is being stopped, we have to unregister the event processor, to let it clean up and make the necesarry checkpoints. This should be added in the OnStop method.
public override void OnStop()
{
    Trace.TraceInformation("Eldert.IoT.Azure.EventHubsProcessor.WorkerRole is stopping");
    _cancellationTokenSource.Cancel();
    _runCompleteEvent.WaitOne();

    // Unregister the processor
    _eventProcessorHost.UnregisterEventProcessorAsync().Wait();

    base.OnStop();
    Trace.TraceInformation("Eldert.IoT.Azure.EventHubsProcessor.WorkerRole has stopped");
}
|
Now that all is in place, we can setup the application for publishing. As you have noticed, we use Trace to log information about our progress. As this application will be running in Azure, we will want to make this information accessible. Luckily this can be done easily by opening the worker role in our cloud service project, opening Configure for the diagnostics and setting the Log level to All in the Application logs tab, or a different setting if we would like less information to be logged, f.e. just errors.
We will also need to set a storage account where we want to log to. The logging will be stored in an Azure Table called in this WADLogsTable under this storage account. Currently this just the classic storage accounts, so create a new storage account for this.
Finally make sure to set the number of instances and VM size you will want to use.
Now we can go and publish our cloud service with the worker role to Azure. Right click on your cloud service project, and select Publish. Select the subscription to which you want to deploy.
Set the name of your service, along with the properties for it’s region and replication.
Next choose the storage account you just created for your logging.
And finally review your settings, and if all is ok, publish your service.
The Azure activity log will now open, where you can check on the progress of your deployment, and also will see if anything is not going right.
Once the deployment is done, you can use the Cloud Explorer from Visual Studio to check the logging in the WADLogsTable.
And the same can be used to check our data in the Azure Storage Table, remember to switch to the correct storage account. As you will see, the table was automatically created, and data is filled according to the format we set in our EngineInformation object.
We have now finished our worker role which retrieves the data from the event hub, and stores it in the database. In my next blogpost I will show how you can use Entity Framework to setup a Azure SQL database.
Code
by Daniel probert | Feb 23, 2016 | BizTalk Community Blogs via Syndication
Updated 2016-02-25: I’ve clarified the section on setting access to your API App to Public Anonymous – you can still use Zumo tokens, but it’s better to use AD Auth to restrict access to your v1 API Apps – see this link for more info: http://aka.ms/logicapps-customapi.
Jeff Hollan (Microsoft) has also expanded on my blog post about using BizTalk/v1 connectors in the new designer, and has included details on how to add the Swagger/Swashbuckle details to your API App so that the new designer will be able to list any BizTalk/v1 API Apps you have defined in your Resource Group – you can read Jeff’s post here: http://blogs.msdn.com/b/logicapps/archive/2016/02/25/accessing-v1-apis-and-biztalk-apis-from-logic-apps.aspx.
Microsoft today released the Logic Apps preview refresh – which means a new designer and new connectors.
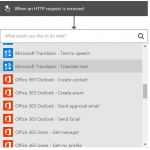
However, those BizTalky people amongst you might notice that there’s no mention of the BizTalk connectors in the list of actions you see in the new designer:
There’s an apparent reason for that: with the new refresh, Microsoft have migrated to managed connectors – and so the only connectors you see in the list are the new v2 managed connectors. And none of the BizTalk connectors have (yet) been migrated – they’re still v1 connectors.
However, fear not – you can still use them – you just have to manually add them (this applies to all v1 connectors and API apps).
This is a 3 step process:
1) Create the BizTalk Connector/v1 API App
This is really easy – just find the API App in the marketplace (you have to select the See All option), create an instance of it, and upload any resources it requires e.g. transforms for the Transform Service.
2) Enable CORS policies, get Swagger URL, and set authentication
a) Once the API app is created, open it, and click on the Host option:
This opens the API Host blade (which is the web site that hosts your API App).
b) Take a copy of the URL to your API App Host:
We’ll need that URL in a moment.
c) Now click on the All Settings option, and in the settings blade, scroll down till you come to the API section – click on the CORS link.
d) In the CORS blade, under Allowed Origins, type “*” (without the quotes!) press Save.
The blade should look like this:
e) Now we create the Swagger URL – the correct way to do this is to add /swagger/ui to the end of the Host URL you copied in step b) above and navigating to the Swagger UI page, but you can also do it by taking that URL, changing it to https, and adding :443/swagger/docs/1.0 to the end.
So for example, this URL:
http://flatfileencoderaab3a9a1a4d94e3d9b7d0b398a3e2744.azurewebsites.net
becomes
https://flatfileencoderaab3a9a1a4d94e3d9b7d0b398a3e2744.azurewebsites.net:443/swagger/docs/1.0
That’s the Swagger URL that you need.
f) One last step needed : we need to change the Access Level to be Public Anonymous, and setup authentication via Active Directory – see here for more details: http://aka.ms/logicapps-customapi. Previously we would get the logic app to use Zumo tokens to access the API app – you can still do this, but it means you’d be going through the old, deprecated Gateway server technology. For the purposes of this post, we’ll use Public Anonymous with no AD authentication, as it’s the easiest way to get this working. In your main API App blade, click All Settings then Application settings, and choose Public (Anonymous) and click save:
3) Create a new Logic App and reference your API App
In your new Logic App (using the new designer), whenever you add an action you can choose “HTTP + Swagger” and provide a URL to the Swagger that describes the API.
So that’s all we do – in our case, as we’re using a connector that is not a trigger (i.e. the Flat File Encoder) then we need to add a trigger (HTTP in our case) and then we can add an HTTP + Swagger action and specify the URL from step 2):
Once we click Next, then we get a list of the operations available on this API App:
And when we select one, we see the usual parameters for the API App, which we can populate from previous steps/actions/variables in our Logic App:
I’ll do a full demo video showing how you could use this method to use a number of BizTalk connectors in your Logic App in a later post.
by Tomasso Groenendijk | Feb 22, 2016 | BizTalk Community Blogs via Syndication
I’d like to build tools for other developers and in the past I created some small tools for BizTalk 2010 and BizTalk 2013 to test your maps. This time I wanted to create something else because nowadays I’m focusing more and more on functionality in Azure. Therefore I created an XSLT API that you can use to transform XML messages with XSLT. The API can also be used to execute BizTalk maps as long you don’t have Custom Functoids.
Prerequisites
The only thing what you have to do is to create account on Apigize.com. Then you get secure and optimized cloud storage for free that is only accessible by yourself. You can upload up to 10 XSLT files without any costs!
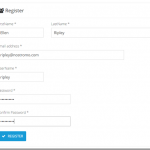
| On the Register page enter your details and then click on the Register button. |
|
| |
| Copy the Primary key value from Your subscription details. |
|
Note:
Every API request you make to the Web API must be authenticated by including an Authorization Header with your API Key. |
| |
| Click on Files API in the Documentation menu to see the operations of the Files API. |
|
| |
How to upload a XSLT map?
You can create a XSLT map by using the Visual Studio Enterprise Integration SDK or for example another XSLT tool like MapForce and XMLSpy from Altova. When you are finished creating the XSLT transformation, you upload the XSLT file into your integration account.
Use a tool like Postman to call the Files API.
Select POST and enter: https://free.apigize.io/v1/files in the Request URL.
In the Header enter “Ocp-Apim-Subscription-Key” as the key name and your Primary key as the value. |
|
| |
In the Body select the form-data radio button and then select the file that you want to upload.
Click on the Send button to upload the file. |
|
| |
How to create a XSLT transform?
With the XSLT API you can transform an .XML message.
Select POST and enter: https://free.apigize.io/v1/xslt/{XSLT filename} in the Request URL.
In the Header enter “Ocp-Apim-Subscription-Key” as the key name and your Primary key as the value. Also specify the Content-Type and what you want to Accept. |
|
| |
In the Body select the raw radio button and then enter the XML message that you want to transform.
Click on the Send button to transform the message. |
|
| |
Conclusion
In this blog post I only showed how to upload a file with the Files API and how to use the XSLT API. Of course there are more operations available on the API’s but these work similar. I want to add even more functionality to the API’s so stay tuned!

by community-syndication | Feb 20, 2016 | BizTalk Community Blogs via Syndication
This post attempts to summarise what happens when some BizTalk Adapters picks up a zero byte file. I am using BizTalk Server 2013 R2 with CU2 for these tests First let’s make it clear what zero byte file I used for my testing. I created my test file by opening notepad and saving as an […]
Blog Post by: mbrimble