by community-syndication | Dec 30, 2010 | BizTalk Community Blogs via Syndication
I have been configuring servers lately and have come across an issue that wasn’t clear.
I needed to enable network discovery, so I simply went to the advanced sharing center
I was unable to keep the sharing active.
I realized that I needed to ensure that the following services were running:
- Function Discovery Resource Publication
SSDP Discovery
UPnP Device Host
Also, I wanted to see ping requests, so I enabled the following in the Advanced Firewall settings:
by stephen-w-thomas | Dec 30, 2010 | Stephen's BizTalk and Integration Blog
I just wanted to thank all the entries into the “What is missing in BizTalk 2010 Contest”. It was a hard decision for the other judges and I.
Finally, the decision was made. The winner was Siffnn from the UK. He received a free hard copy of my book “Applied Architecture Patterns on the Microsoft Platform”.
His entry was the following:
“I Would like to See following features :
1- GUI in admin console to tune BizTalk Message Box Parameters
2- GUI similar to SQL Management studio to gather performance stats report for BizTalk Hosts/SQL Databases.
3-Web Based Fast Admin Console,tool.
4- Debugging Options should be easy
5- Standard Application Logging/Caching framework
6-Messaging Patterns should be available in Visual Studio while creating a BizTalk Project
7-There should be standard templates available to add performance counters in PUB/SUB projects.
8-There should be GUI tools available on BAM Infrastructure.
9-BAM Portal should be modified to display larger volume of data using custom data grids. Currently available reports are not very fast.”
Again, thanks to everyone who entered!
Have a Happy New Year!

by community-syndication | Dec 30, 2010 | BizTalk Community Blogs via Syndication
I learned a lot this year and I thought I’d take a moment to share some of my favorite blog posts, books and newly discovered blogs. Besides continuing to play with BizTalk Server, I also dug deep into Windows Server AppFabric, Microsoft StreamInsight, Windows Azure, Salesforce.com, Amazon AWS, Microsoft Dynamics CRM and enterprise architecture. I […]
by community-syndication | Dec 30, 2010 | BizTalk Community Blogs via Syndication
This is another in a series of posts I’m doing that cover some of the new ASP.NET MVC 3 features:
In today’s post I’m going to go into more details about how Layout pages work with Razor. In particular, I’m going to cover how you can have multiple, non-contiguous, replaceable “sections” within a layout file – and enable views based on layouts to optionally “fill in” these different sections at runtime. The Razor syntax for doing this is clean and concise.
I’ll also show how you can dynamically check at runtime whether a particular layout section has been defined, and how you can provide alternate content (or even an alternate layout) in the event that a section isn’t specified within a view template. This provides a powerful and easy way to customize the UI of your site and make it clean and DRY from an implementation perspective.
What are Layouts?
You typically want to maintain a consistent look and feel across all of the pages within your web-site/application. ASP.NET 2.0 introduced the concept of “master pages” which helps enable this when using .aspx based pages or templates. Razor also supports this concept with a feature called “layouts” – which allow you to define a common site template, and then inherit its look and feel across all the views/pages on your site.
I previously discussed the basics of how layout files work with Razor in my ASP.NET MVC 3: Layouts with Razor blog post. Today’s post will go deeper and discuss how you can define multiple, non-contiguous, replaceable regions within a layout file that you can then optionally “fill in” at runtime.
Site Layout Scenario
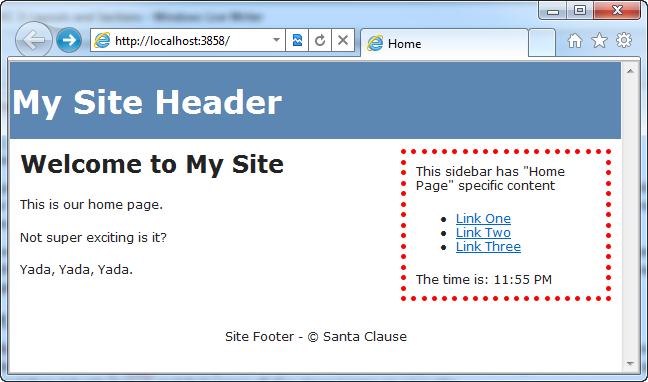
Let’s look at how we can implement a common site layout scenario with ASP.NET MVC 3 and Razor. Specifically, we’ll implement some site UI where we have a common header and footer on all of our pages. We’ll also add a “sidebar” section to the right of our common site layout.
On some pages we’ll customize the SideBar to contain content specific to the page it is included on:
And on other pages (that do not have custom sidebar content) we will fall back and provide some “default content” to the sidebar:

We’ll use ASP.NET MVC 3 and Razor to enable this customization in a nice, clean way.
Below are some step-by-step tutorial instructions on how to build the above site with ASP.NET MVC 3 and Razor.
Part 1: Create a New Project with a Layout for the “Body” section
We’ll begin by using the “File->New Project” menu command within Visual Studio to create a new ASP.NET MVC 3 Project. We’ll create the new project using the “Empty” template option:

This will create a new project that has no default controllers in it:

Creating a HomeController
We will then right-click on the “Controllers” folder of our newly created project and choose the “Add->Controller” context menu command. This will bring up the “Add Controller” dialog:

We’ll name the new controller we create “HomeController”. When we click the “Add” button Visual Studio will add a HomeController class to our project with a default “Index” action method that returns a view:

We won’t need to write any Controller logic to implement this sample – so we’ll leave the default code as-is.
Creating a View Template
Our next step will be to implement the view template associated with the HomeController’s Index action method. To implement the view template, we will right-click within the “HomeController.Index()” method and select the “Add View” command to create a view template for our home page:

This will bring up the “Add View” dialog within Visual Studio.

We do not need to change any of the default settings within the above dialog (the name of the template was auto-populated to Index because we invoked the “Add View” context menu command within the Index method).
When we click the “Add” Button within the dialog, a Razor-based “Index.cshtml” view template will be added to the \Views\Home\ folder within our project. Let’s add some simple default static content to it:

Notice above how we don’t have an <html> or <body> section defined within our view template. This is because we are going to rely on a layout template to supply these elements and use it to define the common site layout and structure for our site (ensuring that it is consistent across all pages and URLs within the site).
Customizing our Layout File
Let’s open and customize the default “_Layout.cshtml” file that was automatically added to the \Views\Shared folder when we created our new project:

The default layout file (shown above) is pretty basic and simply outputs a title (if specified in either the Controller or the View template) and adds links to a stylesheet and jQuery. The call to “RenderBody()” indicates where the main body content of our Index.cshtml file will merged into the output sent back to the browser.
Let’s modify the Layout template to add a common header, footer and sidebar to the site:

We’ll then edit the “Site.css” file within the \Content folder of our project and add 4 CSS rules to it:

And now when we run the project and browse to the home “/” URL of our project we’ll see a page like below:

Notice how the content of the HomeController’s Index view template and the site’s Shared Layout template have been merged together into a single HTML response.
Below is what the HTML sent back from the server looks like:

Part 2: Adding a “SideBar” Section
Our site so far has a layout template that has only one “section” in it – what we call the main “body” section of the response.
Razor also supports the ability to add additional "named sections” to layout templates as well. These sections can be defined anywhere in the layout file (including within the <head> section of the HTML), and allow you to output dynamic content to multiple, non-contiguous, regions of the final response.
Defining the “SideBar” section in our Layout
Let’s update our Layout template to define an additional “SideBar” section of content that will be rendered within the <div id=”sidebar”> region of our HTML. We can do this by calling the RenderSection(string sectionName, bool required) helper method within our Layout.cshtml file like below:

The first parameter to the “RenderSection()” helper method specifies the name of the section we want to render at that location in the layout template. The second parameter is optional, and allows us to define whether the section we are rendering is required or not. If a section is “required”, then Razor will throw an error at runtime if that section is not implemented within a view template that is based on the layout file (which can make it easier to track down content errors). If a section is not required, then its presence within a view template is optional, and the above RenderSection() code will render nothing at runtime if it isn’t defined.
Now that we’ve made the above change to our layout file, let’s hit refresh in our browser and see what our Home page now looks like:

Notice how we currently have no content within our SideBar <div> – that is because the Index.cshtml view template doesn’t implement our new “SideBar” section yet.
Implementing the “SideBar” Section in our View Template
Let’s change our home-page so that it has a SideBar section that outputs some custom content. We can do that by opening up the Index.cshtml view template, and by adding a new “SiderBar” section to it. We’ll do this using Razor’s @section SectionName { } syntax:

We could have put our SideBar @section declaration anywhere within the view template. I think it looks cleaner when defined at the top or bottom of the file – but that is simply personal preference.
You can include any content or code you want within @section declarations. Notice above how I have a C# code nugget that outputs the current time at the bottom of the SideBar section. I could have also written code that used ASP.NET MVC’s HTML/AJAX helper methods and/or accessed any strongly-typed model objects passed to the Index.cshtml view template.
Now that we’ve made the above template changes, when we hit refresh in our browser again we’ll see that our SideBar content – that is specific to the Home Page of our site – is now included in the page response sent back from the server:

The SideBar section content has been merged into the proper location of the HTML response :

Part 3: Conditionally Detecting if a Layout Section Has Been Implemented
Razor provides the ability for you to conditionally check (from within a layout file) whether a section has been defined within a view template, and enables you to output an alternative response in the event that the section has not been defined. This provides a convenient way to specify default UI for optional layout sections.
Let’s modify our Layout file to take advantage of this capability. Below we are conditionally checking whether the “SideBar” section has been defined without the view template being rendered (using the IsSectionDefined() method), and if so we render the section. If the section has not been defined, then we now instead render some default content for the SideBar:

Note: You want to make sure you prefix calls to the RenderSection() helper method with a @ character – which will tell Razor to execute the HelperResult it returns and merge in the section content in the appropriate place of the output. Notice how we wrote @RenderSection(“SideBar”) above instead of just RenderSection(“SideBar”). Otherwise you’ll get an error.
Above we are simply rendering an inline static string (<p>Default SideBar Content</p>) if the section is not defined. A real-world site would more likely refactor this default content to be stored within a separate partial template (which we’d render using the Html.RenderPartial() helper method within the else block) or alternatively use the Html.Action() helper method within the else block to encapsulate both the logic and rendering of the default sidebar.
When we hit refresh on our home-page, we will still see the same custom SideBar content we had before. This is because we implemented the SideBar section within our Index.cshtml view template (and so our Layout rendered it):
Let’s now implement a “/Home/About” URL for our site by adding a new “About” action method to our HomeController:

The About() action method above simply renders a view back to the client when invoked. We can implement the corresponding view template for this action by right-clicking within the “About()” method and using the “Add View” menu command (like before) to create a new About.cshtml view template.
We’ll implement the About.cshtml view template like below. Notice that we are not defining a “SideBar” section within it:

When we browse the /Home/About URL we’ll see the content we supplied above in the main body section of our response, and the default SideBar content will rendered:
The layout file determined at runtime that a custom SideBar section wasn’t present in the About.cshtml view template, and instead rendered the default sidebar content.
One Last Tweak
Let’s suppose that at a later point we decide that instead of rendering default side-bar content, we just want to hide the side-bar entirely from pages that don’t have any custom sidebar content defined. We could implement this change simply by making a small modification to our layout so that the sidebar content (and its surrounding HTML chrome) is only rendered if the SideBar section is defined. The code to do this is below:

Razor is flexible enough so that we can make changes like this and not have to modify any of our view templates (nor make change any Controller logic changes) to accommodate this. We can instead make just this one modification to our Layout file and the rest happens cleanly. This type of flexibility makes Razor incredibly powerful and productive.
Summary
Razor’s layout capability enables you to define a common site template, and then inherit its look and feel across all the views/pages on your site.
Razor enables you to define multiple, non-contiguous, “sections” within layout templates that can be “filled-in” by view templates. The @section {} syntax for doing this is clean and concise. Razor also supports the ability to dynamically check at runtime whether a particular section has been defined, and to provide alternate content (or even an alternate layout) in the event that it isn’t specified. This provides a powerful and easy way to customize the UI of your site – and make it clean and DRY from an implementation perspective.
Hope this helps,
Scott
P.S. In addition to blogging, I am also now using Twitter for quick updates and to share links. Follow me at: twitter.com/scottgu
by community-syndication | Dec 28, 2010 | BizTalk Community Blogs via Syndication
One of the sites I run for the Dutch .NET community is .NET Events in the Netherlands which lists all sorts of community events for, as the name suggests, Dutch .NET developers. The site has been around for a while but always forced people to either go to the site or use in iCalendar feed so see what is happening. Some time ago I decided that these should also be tweeted so people using Twitter would be notified of upcoming events.
There are several ways to automatically send tweets to Twitter and I choose to use TweetSharp as that seemed to be one of the more popular libraries around.
The first step is registering an application with Twitter. This is done using this page, make sure the access type is set to Read & Write so you can sent updates. This will give us the first two bits of information we need to send Twitter massages, the Consumer key and the Consumer secret.
Because I only needed to use a single client there is no need to implement the complete OAuth workflow to determine the authenticated access token. Instead I can just copy them from the Twitter site by clicking the My Access Token link to get to the following page where the Access Token (oauth_token) and the Access Token Secret (oauth_token_secret) are the last to pieces of information we need. These tokens don’t expire until we explicitly do so ourselves so we can keep on using these in our program
With these pieces in place sending a Twitter update is a breeze
private static void PostTweet(string twitterStatus)
{
var clientInfo = GetClientInfo();
var twitterStatuses = FluentTwitter.CreateRequest(clientInfo)
.AuthenticateWith(_oauthToken, _oauthTokenSecret)
.Statuses();
var tw = twitterStatuses.Update(twitterStatus);
var rsp = tw.Request();
if (rsp.IsTwitterError == false)
{
var status = rsp.AsStatus();
Console.WriteLine("Tweeting: {0}", status.Text);
}
else
{
var error = rsp.AsError();
Console.ForegroundColor = ConsoleColor.Red;
Console.WriteLine(error.ErrorMessage);
Console.ResetColor();
}
}
private static TwitterClientInfo GetClientInfo()
{
var clientInfo = new TwitterClientInfo()
{
ConsumerKey = _consumerKey,
ConsumerSecret = _consumerSecret
};
return clientInfo;
}
Don’t forget all required using statements as some of the methods like AuthenticateWith() and Update() called are extensions methods.
using TweetSharp;
using TweetSharp.Twitter.Extensions;
using TweetSharp.Twitter.Fluent;
Using the twitterStatuses you can also loop over the existing tweets, delete or retweet the just like you can in the user interface or Twitter.
Enjoy!
www.TheProblemSolver.nl
Wiki.WindowsWorkflowFoundation.eu
by community-syndication | Dec 28, 2010 | BizTalk Community Blogs via Syndication
With 2011 around the corner we, at Tellago and Tellago Studios , we have been spending a lot of times evaluating our successes and failures (yes those too ;)) of 2010 and delineating some of our goals and strategies for 2011. When I look at 2010 here…(read more)
by community-syndication | Dec 27, 2010 | BizTalk Community Blogs via Syndication
While working on one of my WP7 applications I noticed a weirs problem. The app is pretty simple with just two pages. I added the same page load animation, see below, to both pages and all seemed to work just fine.
<phone:PhoneApplicationPage.Projection>
<PlaneProjection
x:Name="plane"
CenterOfRotationX="0"/>
</phone:PhoneApplicationPage.Projection>
<phone:PhoneApplicationPage.Triggers>
<EventTrigger>
<BeginStoryboard>
<Storyboard>
<DoubleAnimation
Storyboard.TargetName="plane"
Storyboard.TargetProperty="RotationY"
From="-90"
To="0"
Duration="0:0:0.5"/>
</Storyboard>
</BeginStoryboard>
</EventTrigger>
</phone:PhoneApplicationPage.Triggers>
The animation cause the page to rotate in and is something I copied from Charles Petzold eBook Programming Windows Phone 7 although I shortened the time to just half a second. While developing everything worked just fine when I ran mu application in the emulator. However when I deployed my application to a real phone I noticed that the first page ran the animation just fine but the second page didn’t show the animation at all.
The hunt for the missing animation
After some trial and error I noticed that the animation started showing up if I increased the time to around 1.5 seconds. And it wasn’t the complete animation, only the last part would show up. The first second or so would just not show up at all. Of course I could have changed the animation to do nothing for a second and then sweep in but that felt like a wrong hack so I decided to find out what was really going on and why the two pages where behaving differently.
The guilty party is data binding
It turned out the main difference between the two pages was the fact that the second used data binding while the first didn’t. And when I removed the DataContext from the second page the animation would show up just as it was supposed to. Of course the data binding was there for a good reason and removing it wasn’t an option so I had to change the way the data binding was initialized.
I was using the excellent MVVM Light Toolkit written by Laurent Bugnion and it uses the ViewModelLocator pattern to hook up the View and the ViewModel. This works really well as Blend understand the paradigm and makes it very easy to do the UI work in Blend. However it also means that the DataContext is set when the page is first created. Normally not a bad thing nu in this case it meant that all data bindings where being evaluated right when the page was created, at the same time as the animation was running. So the solution was to move the runtime data binding to the page Loaded event using the following code:
void SecondPage_Loaded(object sender, RoutedEventArgs e)
{
DataContext = ViewModelLocator.SecondStatic;
}
Of course I also needed to prevent the page from setting the DataContext when first created while still maintaining the blendability of the page. This is achieved by making a small change to the ViewModelLocator class in the property that returns the ViewModel when the page is loaded%u00b1
public SecondViewModel Second
{
get
{
if (SecondStatic.IsInDesignMode)
return SecondStatic;
else
return null;
}
}
With these small changes in place the animation ran just fine and the data binding worked just fine as well.
Conclusion
The two tings I learned from this is not to trust the emulator as it runs a lot faster that the actual Windows Phone 7 and will hide these kind of problems and to set the page DataContext in the loaded events instead of during the page construction.
Enjoy!
www.TheProblemSolver.nl
Wiki.WindowsWorkflowFoundation.eu
by community-syndication | Dec 24, 2010 | BizTalk Community Blogs via Syndication
“In the beginning God made heaven and earth. Then he started to integrate.” At the very start was the requirement: integrate two working systems.
Small digging up: It was one system. It was good but IT guys want to change it to the new one, much better, chipper, more flexible, and more progressive in technologies, more suitable for the future, for the faster world and hungry competitors.
One thing. One small, little thing. We cannot turn off the old system (call it A, because it was the first), turn on the new one (call it B, because it is second but not the last one). The A has a hundreds users all across a country, they must study B. A still has a lot of nice custom features, home-made features that cannot disappear. These features have to be moved to the B and it is a long process, months and months of redevelopment.
So, the decision was simple. Let’s move slowlynot jump, let’s both systems working side-by-side several months. In this time we could teach the users and move all custom A’s special functionality to B.
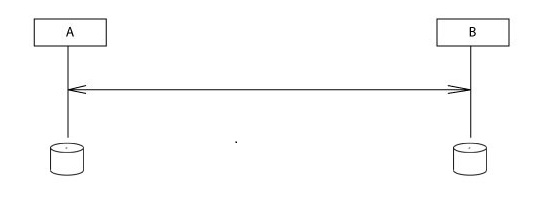
That automatically means both systems should work side-by-side all these months and use the same data. Data in A and B must be in sync. That’s how the integration projects get birth.
Moreover, the specific of the user tasks requires the both systems must be in sync in real-time. Nightly synchronization is not working, absolutely.
First draft
The first draft seems absolutely cool. Both systems keep data in SQL databases. When data changes, the Create, Update, Delete operations performed on the data, and the sync process could be started. The obvious decision is to use triggers on tables. When we are talking about data, we are talking about several entities. For example, Orders and Items [in Orders].
The decision was to use the BizTalk Server to synchronize systems. Why it was chosen is another story.
Second draft
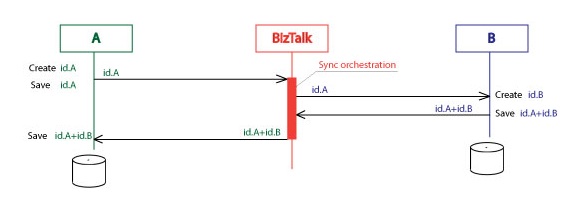
Let’s take an example how it works in more details.
1. User creates a new entity in the A system. This fires an insert trigger on the entity table. Trigger has to pass the message “Entity created”. This message includes all attributes of the new entity, but I focused on the Id of this entity in the A system. Notation for this message is id.A. System A sends id.A to the BizTalk Server.
2. BizTalk transforms id.A to the format of the system B. This is easiest part and I will not focus on this kind of transformations in the following text. The message on the picture is still id.A but it is in slightly different format, that’s why it is changing color. BizTalk sends id.A to the system B.
3. The system B creates the entity on its side. But it uses different id-s for entities, these id-s are id.B. System B saves id.A+id.B. System B sends the message id.A+id.B back to the BizTalk.
4. BizTalk sends the message id.A+id.B to the system A.
5. System A saves id.A+id.B.
Why both id-s should be saved on both systems? It was one of the next requirements. Users of both systems have to know the systems are in sync or not in sync. Users working with the entity on the system A can see the id.B and use it to switch to the system B and work there with the copy of the same entity.The decision was to store the pairs of entity id-s on both sides. If there is only one id, the entities are not in sync yet (for the Create operation).
Third draft
Next problem was the reliability of the synchronization. The synchronizing process can be interrupted on each step, when message goes through the wires. It can be communication problem, timeout, temporary shutdown one of the systems, the second system cannot be synchronized by some internal reason. There were several potential problems that prevented from enclosing the whole synchronization process in one transaction.
Decision was to restart the whole sync process if it was not finished (in case of the error). For this purpose was created an additional service. Let’s call it the Resync service.
We still keep the id pairs in both systems, but only for the fast access not for the synchronization process. For the synchronizing these id-s now are kept in one main place, in the Resync service database.
The Resync service keeps record as:
%u00b7 Id.A
%u00b7 Id.B
%u00b7 Entity.Type
%u00b7 Operation (Create, Update, Delete)
%u00b7 IsSyncStarted (true/false)
%u00b7 IsSyncFinished (true/false0
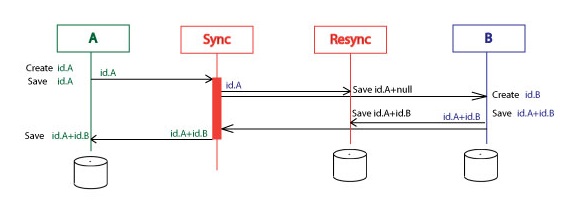
The example now looks like:
1. System A creates id.A. id.A is saved on the A. Id.A is sent to the BizTalk.
2. BizTalk sends id.A to the Resync and to the B. id.A is saved on the Resync.
3. System B creates id.B. id.A+id.B are saved on the B. id.A+id.B are sent to the BizTalk.
4. BizTalk sends id.A+id.B to the Resync and to the A. id.A+id.B are saved on the Resync.
5. id.A+id.B are saved on the B.
Resync changes the IsSyncStarted and IsSyncFinished flags accordingly.
The Resync service implements three main methods:
%u00b7 Save (id.A, Entity.Type, Operation)
%u00b7 Save (id.A, id.B, Entity.Type, Operation)
%u00b7 Resync ()
Two Save() are used to save id-s to the service storage. See in the above example, in 2 and 4 steps.
What about the Resync()? It is the method that finishes the interrupted synchronization processes. If Save() is started by the trigger event, the Resync() is working as an independent process. It periodically scans the Resync storage to find out “unfinished” records. Then it restarts the synchronization processes. It tries to synchronize them several times then gives up.
One more thing, both systems A and B must tolerate duplicates of one synchronizing process. Say on the step 3 the system B was not able to send id.A+id.B back. The Resync service must restart the synchronization process that will send the id.A to B second time. In this case system B must just send back again also created id.A+id.B pair without errors. That means “tolerate duplicates”.
Fourth draft
Next draft was created only because of the aesthetics. As it always happens, aesthetics gave significant performance gain to the whole system.
First was the stupid question. Why do we need this additional service with special database? Can we just master the BizTalk to do something like this Resync() does?
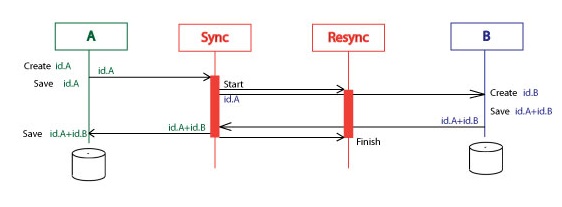
So the Resync orchestration is doing the same thing as the Resync service.
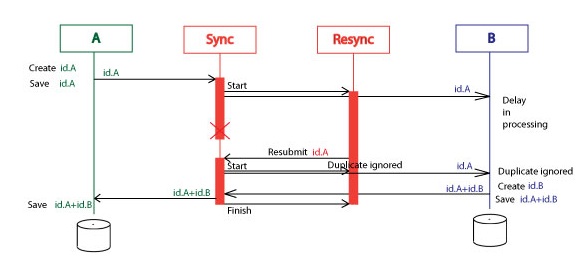
It is started by the Id.A and finished by the id.A+id.B message. The first works as a Start message, the second works as a Finish message.
Here is a diagram the whole process without errors. It is pretty straightforward.
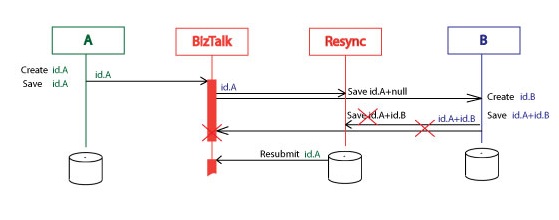
The Resync orchestration is waiting for the Finish message specific period of time then resubmits the Id.A message. It resubmits the Id.A message specific number of times then gives up and gets suspended. It can be resubmitted then it starts the whole process again:
waiting [, resubmitting [, get suspended]], finishing.
Tuning up
The Resync orchestration resubmits the id.A message with special “Resubmitted” flag. The subscription filter on the Resync orchestration includes predicate as (Resubmit_Flag != “Resubmitted”). That means only the first Sync orchestration starts the Resync orchestration. Other Sync orchestrations instantiated by the resubmitting can finish this Resync orchestration but cannot start another instance of the Resync.
Here is a diagram where system B was inaccessible for some period of time. The Resync orchestration resubmitted the id.A two times. Then system B got the response the id.A+id.B and this finished the Resync service execution.
What is interesting about this, there were submitted several identical id.A messages and only one id.A+id.B message. Because of this, the system B and the Resync must tolerate the duplicate messages. We also told about this requirement for the system B. Now the same requirement is for the Resunc.
Let’s assume the system B was very slow in the first response and the Resync service had time to resubmit two id.A messages. System B responded not, as it was in previous case, with one id.A+id.B but with two id.A+id.B messages.
First of them finished the Resync execution for the id.A. What about the second id.A+id.B? Where it goes? So, we have to add one more internal requirement. The whole solution must tolerate many identical id.A+id.B messages. It is easy task with the BizTalk. I added the “SinkExtraMessages” subscriber (orchestration with one receive shape), that just get these messages and do nothing.
Real design
Real architecture is much more complex and interesting.
In reality each system can submit several id.A almost simultaneously and completely unordered.
There are not only the “Create entity” operation but the Update and Delete operations. And these operations relate each other. Say the Update operation after Delete means not the same as Update after Create.
In reality there are entities related each other. Say the Order and Order Items. Change on one of it could start the series of the operations on another. Moreover, the system internals are the “black boxes” and we cannot predict the exact content and order of the operation series.
It worth to say, I had to spend a time to manage the zombie message problems. The zombies are still here, but this is not a problem now. And this is another story.
What is interesting in the last design? One orchestration works to help another to be more reliable. Why two orchestration design is more reliable, isn’t it something strange? The Synch orchestration takes all the message exchange between systems, here is the area where most of the errors could happen. The Resync orchestration sends and receives messages only within the BizTalk server.
Is there another design? Sure. All Resync functionality could be implemented inside the Sync orchestration. Hey guys, some other ideas?
by community-syndication | Dec 24, 2010 | BizTalk Community Blogs via Syndication
Just posted a new release of Microsoft.Activities.UnitTesting
This release incorporates the Task Parallel Library to greatly simplify test code.
Episodes
You can now create a task that will run an episode of work in the workflow. An episode is simply a pulse of work that the workflow runs.
For example an episode might look like the following
|
Thread
|
Action
|
|
host
|
Run the workflow
|
|
host
|
Wait for idle
|
|
Workflow
|
Activity 1
|
|
Workflow
|
Activity 2 (creates a bookmark)
|
|
Workflow
|
Invoke Idle delegate – host sets event
|
|
host
|
episode complete
|
Episodes can end in the following ways as defined by the new EpisodeEndedWith enum
|
Enum
|
Description
|
|
Timeout
|
The episode did not end within the timeout
|
|
Aborted
|
The episode aborted due to an unhandled exception
|
|
Completed
|
The episode ended when the workflow completed
|
|
Idle
|
The episode ended when the workflow became idle
|
Should Idle end an episode?
Ending an episode on idle is tricky because there are some idle events that you might not want to end a workflow. For example async activities such as the Delay activity will cause the workflow to idle. If you are testing a workflow and you want test what happens after the delay you don’t want the idle to end the episode. In other cases you might want to wait the second or third idle or for an idle where there is at least one bookmark.
The Async Episode methods offer overloads that allow you to control how an episode ends.
|
Option
|
Description
|
|
Default
|
An episode ends when completed or aborted
|
|
Idle Count
|
An episode ends when the specified idle count occurs
|
|
Func<WorkflowApplicationTest, bool>
|
You provide a function that will be invoked when idle is detected allowing you to determine if the episode should end. The function receives the active WorkflowApplicationTest object which has captured all the event arguments and tracking data as well as the last known bookmark count to help you make your decision
|
Async Methods
|
Method
|
Description
|
|
WorkflowApplicationTest.ResumeBookmarkAsync
|
returns a Task that will resume a bookmark to run an episode of work.
|
|
WorkflowApplicationTest.RunAsync
|
returns a Task that will run an episode of work.
|
|
WorkflowApplicationTest.TestActivityAsync
|
returns a Task that will run an episode of work.
|
Examples
Use the default to run until complete or abort
/// <summary>

/// Verifies that an episode ended with abort

/// </summary>

[TestMethod]

public void EpisodeShouldEndInAbort()

{

    // Arrange

    var host = WorkflowApplicationTest.Create(GetSequenceThatAbortsAfterAsync());


    // Act

    try

    {

        // Run the activity until it aborts, the activity will go idle once

        // because of the TestAsync activity.

        Assert.AreEqual(EpisodeEndedWith.Aborted, host.TestActivityAsync().Result.EpisodeResult);

    }

    finally

    {

        // Track the tracking records to the test results

        host.Tracking.Trace();

    }

}
Use the idleCount to run until n number of idle events
/// <summary>

/// Verifies that an episode of work ended with an idle event

/// </summary>

[TestMethod]

public void EpisodeShouldRunToIdleAndThenToCompletedAfterResumeBookmark()

{

    // Arrange

    var host =

        WorkflowApplicationTest.Create(

            new Sequence

                {

                    Activities =

                    {

                        new WriteLine(), new TestBookmark<int> { BookmarkName = "Bookmark1" }

                    }

                });


    try

    {

        // Act

        // Run the activity to the first idle

        Assert.AreEqual(EpisodeEndedWith.Idle, host.TestActivityAsync(1).Result.EpisodeResult);


        // Resume the bookmark and run the activity to completion

        Assert.AreEqual(EpisodeEndedWith.Completed, host.ResumeBookmarkAsync("Bookmark1").Result.EpisodeResult);

    }

    finally

    {

        host.Tracking.Trace();

    }

}
Use the Func<WorkflowApplicationTes, bool> method to run a workflow until an idle with at least 1 bookmark
/// <summary>

/// Verifies that an episode of work idles, then resumes to completion

/// </summary>

[TestMethod]

public void EpisodeShouldRunToIdleAndThenToCompletedAfterResumeBookmark()

{

    // Arrange

    var host =

        WorkflowApplicationTest.Create(

            new Sequence

                {

                    Activities =

                    {

                        new WriteLine(), new TestBookmark<int> { BookmarkName = "Bookmark1" }

                    }

                });


    try

    {

        // Act

        // Run the activity to the first idle

        Assert.AreEqual(EpisodeEndedWith.Idle, host.TestActivityAsync(1).Result.EpisodeResult);


        // Resume the bookmark and run the activity to completion

        Assert.AreEqual(EpisodeEndedWith.Completed, host.ResumeBookmarkAsync("Bookmark1").Result.EpisodeResult);

    }

    finally

    {

        host.Tracking.Trace();

    }

}

by community-syndication | Dec 24, 2010 | BizTalk Community Blogs via Syndication
To all my friends, “Bizketeers” and to all my readers, that all forms have encouraged me to continue my project, my sincere wishes for a Merry Christmas and a Happy New Year. And for the first time in my native language (Portuguese): Para todos os meus amigos, “BizTalkqueanos” e para todos os meus leitores, que […]