by community-syndication | May 29, 2009 | BizTalk Community Blogs via Syndication
Since the WCF Publishing Wizard in BizTalk does not support adding custom headers defined at the server, we need to programmatically modify what gets created by the wizard to add custom headers. However, from the client you have the option to pass in header values at will. If you are passing in headers generated at the client BizTalk will take them and map them to the context. However, they show up as an XML fragment and not as individual data items. It becomes annoying to constantly parse the fragment each and every time you want to get to the data.
What we are really interested in is the ability to expose the end point with the header values already defined, accept the header values from the client and either promote or write the values to the context and lastly, be able to create a behavior that you can attach to your WCF endpoint that exposes the properties through configuration to let you dynamically, per end point, set the header items and what you want to do with them as they are submitted. This will be a three part posting with a post covering each of these features.
For this first post, we will focus on the ability to expose the end point with the header values already defined. What makes this even more interesting is that there is no WSDL file as this gets generated dynamically when you access the SVC file. If you wish you can create a static WSDL file and then use the externalMetadataLocation attribute of the element in the Web.config file that the wizard generates to specify the location of the WSDL file. Then the static WSDL file will be sent to the user in response to WSDL and metadata exchange (MEX) requests instead of the auto-generated WSDL.
In our solution, we did not want to have to create WSDL files for each of our endpoints, nor did we want to maintain them. We needed a way to hook in to the dynamic WSDL creation process.
There are a number of posts out there that talk about this but after reviewing them I found that none of them gave the whole picture. They were all very good and they provided enough information to fill in many missing pieces but there was enough missing that I though it warranted looking at the whole picture.
We are going to start by creating our own EndPointBehavior. The EndPointBehavior allows us to inject custom functionality in the WCF execution pipeline.
To create the EndPointBehavior we need to create a solution that references System.ServiceModel.dll and includes a class that derives from BehaviorExtensionElement, IWsdlExportExtension and IEndpointBehavior. We need the functionality of the BehaviorExtensionElement to implement the configuration of the behavior, the functionality of the IWsdlExportExtension to change the generated WSDL and the functionality of the IEndPointBehavior to define the endpoint and its behavior.
Lets add a class file to our solution called SoapHeaderEndpointBehavior. After we create the class and inherit from our objects we need to add the following line of code to the ExportEndPoint method
SoapHeaderWsdlExport.ExportEndpoint(exporter,context);
and we need to add the following two lines of code to the ApplyDispatchBehavior method.
SoapHeaderMessageInspector headerInspector = new SoapHeaderMessageInspector();
endpointDispatcher.DispatchRuntime.MessageInspectors.Add(headerInspector);
Our code should look like this:
using System;
using System.Collections.Generic;
using System.Collections;
using System.Configuration;
using System.Runtime.Serialization;
using System.ServiceModel;
using System.ServiceModel.Channels;
using System.ServiceModel.Configuration;
using System.ServiceModel.Description;
using System.ServiceModel.Dispatcher;
using System.Text;
using System.Xml;
using System.Xml.Schema;
using System.Web.Services;
using System.Web.Services.Description;
using WsdlDescription = System.Web.Services.Description.ServiceDescription;
namespace Services.WCF.ServiceBehavior
{
public class SoapHeaderEndpointBehavior : BehaviorExtensionElement, IWsdlExportExtension, IEndpointBehavior
{
#region BehaviorExtensionElement Members
public override Type BehaviorType
{
get
{
return typeof(SoapHeaderEndpointBehavior);
}
}
protected override object CreateBehavior()
{
return new SoapHeaderEndpointBehavior();
}
#endregion
#region IWsdlExportExtension Members
public void ExportContract(WsdlExporter exporter, WsdlContractConversionContext context)
{
//throw new NotImplementedException();
}
public void ExportEndpoint(WsdlExporter exporter, WsdlEndpointConversionContext context)
{
SoapHeaderWsdlExport.ExportEndpoint(exporter,context);
}
#endregion
#region IEndpointBehavior Members
public void AddBindingParameters(ServiceEndpoint endpoint, BindingParameterCollection bindingParameters)
{
//throw new NotImplementedException();
}
public void ApplyClientBehavior(ServiceEndpoint endpoint, ClientRuntime clientRuntime)
{
//throw new NotImplementedException();
}
public void ApplyDispatchBehavior(ServiceEndpoint endpoint, EndpointDispatcher endpointDispatcher)
{
SoapHeaderMessageInspector headerInspector = new SoapHeaderMessageInspector();
endpointDispatcher.DispatchRuntime.MessageInspectors.Add(headerInspector);
}
public void Validate(ServiceEndpoint endpoint)
{
//throw new NotImplementedException();
}
#endregion
}
}
When we added code to the ExportEndpoint method, we utilized a custom object. Let’s add another class to our solution to implement the SoapHeaderWsdlExport. This class will add a header schema and its namespace, create and add a header message description and finally add the header to the operation.
using System;
using System.Collections.Generic;
using System.Linq;
using System.Text;
using System.Xml.Schema;
using System.Reflection;
using System.Web.Services.Description;
using System.Xml;
using System.ServiceModel.Description;
using WsdlDescription = System.Web.Services.Description.ServiceDescription;
namespace Services.WCF.ServiceBehavior
{
class SoapHeaderWsdlExport
{
public static void ExportEndpoint(WsdlExporter exporter, WsdlEndpointConversionContext context)
{
// Read the schema of the custom header message
XmlSchema customSoapHeaderSchema = XmlSchema.Read(Assembly.GetExecutingAssembly().GetManifestResourceStream(“Services.WCF.ServiceBehavior.SoapHeader.xsd”),
new ValidationEventHandler (SoapHeaderWsdlExport.ValidationCallBack));
// Create the HeaderMessage to add to wsdl:message AND to refer to from wsdl:operation
System.Web.Services.Description.Message headerMessage = CreateHeaderMessage();
foreach (WsdlDescription wsdl in exporter.GeneratedWsdlDocuments)
{
// Add the schema of the CustomSoapHeader to the types AND add the namespace to the list of namespaces
wsdl.Types.Schemas.Add(customSoapHeaderSchema);
wsdl.Namespaces.Add(“sh”, SoapHeaderNames.SoapHeaderNamespace);
// The actual adding of the message to the list of messages
wsdl.Messages.Add(headerMessage);
}
addHeaderToOperations(headerMessage, context);
}
private static System.Web.Services.Description.Message CreateHeaderMessage()
{
// Create Message
System.Web.Services.Description.Message headerMessage = new System.Web.Services.Description.Message();
// Set the name of the header message
headerMessage.Name = SoapHeaderNames.SoapHeaderName;
// Create the messagepart and add to the header message
MessagePart part = new MessagePart();
part.Name = “Header”;
part.Element = new XmlQualifiedName(SoapHeaderNames.SoapHeaderName, SoapHeaderNames.SoapHeaderNamespace);
headerMessage.Parts.Add(part);
return headerMessage;
}
private static void addHeaderToOperations(System.Web.Services.Description.Message headerMessage, WsdlEndpointConversionContext context)
{
// Create a XmlQualifiedName based on the header message, this will be used for binding the header message and the SoapHeaderBinding
XmlQualifiedName header = new XmlQualifiedName(headerMessage.Name, headerMessage.ServiceDescription.TargetNamespace);
foreach (OperationBinding operation in context.WsdlBinding.Operations)
{
// Add the SoapHeaderBinding to the MessageBinding
ExportMessageHeaderBinding(operation.Input, context, header, false);
ExportMessageHeaderBinding(operation.Output, context, header, false);
}
}
private static void ExportMessageHeaderBinding(MessageBinding messageBinding, WsdlEndpointConversionContext context, XmlQualifiedName header, bool isEncoded)
{
// For brevity, assume Soap12HeaderBinding for Soap 1.2
SoapHeaderBinding binding = new Soap12HeaderBinding();
binding.Part = “Header”;
binding.Message = header;
binding.Use = isEncoded ? SoapBindingUse.Encoded : SoapBindingUse.Literal;
messageBinding.Extensions.Add(binding);
}
private static void ValidationCallBack(object sender, ValidationEventArgs args)
{
if (args.Severity == XmlSeverityType.Warning)
Console.WriteLine(“\tWarning: Matching schema not found. No validation occurred.” + args.Message);
else
Console.WriteLine(“\tValidation error: ” + args.Message);
}
}
}
In the addHeaderToOperations method there are two calls to the ExportMessageHeaderBinding method. The second call passes the operation.Output parameter which will pass the header back to the calling application with the response message. This also also means that the method signature at the client will be to pass in the header object by Ref. Since we needed the client to pass the header data into BizTalk we didn’t need to echo the header back to the client so we deleted this line. If you want to echo it back then keep this line (as shown in the code above).
Also, in the code above, in the ExportEndpoint and CreateHeaderMessage methods there was another custom class called SoapHeaderNames. This class contained the values that we wanted to place in the custom header. By creating a class for this data we could limit the location of this information to one location. The code for the SoapHeaderNames class looks like this:
using System;
using System.Collections.Generic;
using System.Linq;
using System.Text;
namespace Services.WCF.ServiceBehavior
{
public static class SoapHeaderNames
{
public const String SoapHeaderName = “SoapHeader”;
public const String AppName = “App”;
public const String UserName = “User”;
public const String SoapHeaderNamespace = http://servicebehavior.mycompany.com;
}
}
Way back at the top, in the ApplyDispatchBehavior method of the SoapHeaderEndpointBehavior class we have a custom object called SoapHeaderMessageInspector. Therefore, let’s add another class for the SoapHeaderMessageInspector. There are two methods that we must implement on the IDispatchMessageInspector and they are the AfterReceiveRequest and the BeforeReceiveRequest. Since we are interested in applying the headers in the dynamic WSDL we will only need code in the BeforeReceiveRequest. The code will look like this:
using System;
using System.Collections.Generic;
using System.Linq;
using System.Text;
using System.ServiceModel.Dispatcher;
using System.ServiceModel;
using System.Xml;
namespace Services.WCF.ServiceBehavior
{
class SoapHeaderMessageInspector: IDispatchMessageInspector
{
#region IDispatchMessageInspector Members
public object AfterReceiveRequest(ref System.ServiceModel.Channels.Message request, System.ServiceModel.IClientChannel channel, System.ServiceModel.InstanceContext instanceContext)
{
return null;
}
public void BeforeSendReply(ref System.ServiceModel.Channels.Message reply, object correlationState)
{
// Look for my custom header in the request
Int32 headerPosition = OperationContext.Current.IncomingMessageHeaders.FindHeader(SoapHeaderNames.SoapHeaderName, SoapHeaderNames.SoapHeaderNamespace);
// Get an XmlDictionaryReader to read the header content
XmlDictionaryReader reader = OperationContext.Current.IncomingMessageHeaders.GetReaderAtHeader(headerPosition);
// Read through its static method ReadHeader
SoapHeader header = SoapHeader.ReadHeader(reader);
if (header != null)
{
// Add the header from the request
reply.Headers.Add(header);
}
}
#endregion
}
}
This code grabs the header section and will inject the header elements. In the BeforeSendReply method you will see we are using a SoapHeader object. This object contains the properties and methods to deal with the elements that we will be reading and writing to the header.
using System;
using System.Collections.Generic;
using System.Linq;
using System.Text;
using System.Xml;
using System.ServiceModel.Channels;
namespace Services.WCF.ServiceBehavior
{
[Serializable]
public class SoapHeader: MessageHeader
{
private string _app;
private string _user;
public string App
{
get
{
return (this._app);
}
set
{
this._app = value;
}
}
public string User
{
get
{
return (this._user);
}
set
{
this._user = value;
}
}
public SoapHeader()
{
}
public SoapHeader(string app, string user)
{
this._app = app;
this._user = user;
}
public override string Name
{
get { return (SoapHeaderNames.SoapHeaderName); }
}
public override string Namespace
{
get { return (SoapHeaderNames.SoapHeaderNamespace); }
}
protected override void OnWriteHeaderContents(System.Xml.XmlDictionaryWriter writer, MessageVersion messageVersion)
{
// Write the content of the header directly using the XmlDictionaryWriter
writer.WriteElementString(SoapHeaderNames.AppName, this.App);
writer.WriteElementString(SoapHeaderNames.UserName, this.User);
}
public static SoapHeader ReadHeader(XmlDictionaryReader reader)
{
String app = null;
String user = null;
// Read the header content (key) using the XmlDictionaryReader
if (reader.ReadToDescendant(SoapHeaderNames.AppName, SoapHeaderNames.SoapHeaderNamespace))
{
app = reader.ReadElementString();
}
if (reader.ReadToDescendant(SoapHeaderNames.UserName, SoapHeaderNames.SoapHeaderNamespace))
{
user = reader.ReadElementString();
}
if (!String.IsNullOrEmpty(app) && !String.IsNullOrEmpty(user))
{
return new SoapHeader(app, user);
}
else
{
return null;
}
}
}
}
There is also a schema, called SoapHeader.xsd, that needs to be added to the project as well. This schema defines the message contract for the header and is referenced and used in the ExportEndpoint method of the SoapHeaderWsdlExport class and looks like this:
<?xml version=”1.0″ encoding=”utf-16″?>
<xs:schema xmlns:xsi=”http://www.w3.org/2001/XMLSchema-instance” xmlns:b=”http://schemas.microsoft.com/BizTalk/2003″ xmlns=”http://servicebehavior.mycompany.com” attributeFormDefault=”unqualified” elementFormDefault=”qualified” targetNamespace=”http://servicebehavior.mycompany.com” xmlns:xs=”http://www.w3.org/2001/XMLSchema”>
<xs:element name=”SoapHeader”>
<xs:complexType>
<xs:sequence>
<xs:element name=”App” type=”xs:string” />
<xs:element name=”User” type=”xs:string” />
</xs:sequence>
</xs:complexType>
</xs:element>
</xs:schema>
At this point we have all the code that is part of our project. Once this is compiled, we need to add the assembly to the machine config.
There is an easy way to add entries by using the SvcConfigEditor.exe tool. This tool is part of the Windows SDK and, if installed, can be found in the \Program Files\Microsoft SDKs\Windows\v6.0A\Bin directory.
Once this utility is open you can click on the File ->Open->Config File menu item. Open the machine.config file. At the bottom of the tree view on the left side you will see an Advanced folder. Expand that node and expand the the Extensions folder. Click on the the ‘behavior element extensions’ node. At the bottom right, click on the new button. This will bring up the Extension Configuration Element Editor dialog box. Enter the name you wish to give to your extension and then click on the ellipses next to type. This will bring up the Type Browser dialog box. Browse to your component (also note that you can select assemblies already placed in the GAC). Once selected, your fully qualified assembly name will be entered. Select Save under the File menu. You are now ready to start using the new behavior.
Up to this point everything we have done has been specifically WCF functionality. The next paragraph will outline how we can utilized this behavior in a BizTalk WCF endpoint.
Create a WCF endpoint in BizTalk (if you need more information on creating a WCF endpoint check out the docs on MSDN (Insert Link)). One thing to keep in mind is that when you create a WCF end point in BizTalk using one of the standard bindings you will not have the option to specify a behavior. In order to specify a behavior you need to specify either the WCF-Custom or WCF-CustomIsolated binding. Once you select the binding type, click on the Configure button and the Transport Properties dialog will appear. Select the Behavior tab and then right click on the the Endpoint Behavior node. Once the popup menu appears, select Add extension. Select your behavior from the Select Behavior Extensions dialog box and click OK. Enter the rest of the specific information you need for the end point and click OK to save your endpoint.
We have now done everything that is needed to create a custom behavior including the ability to link into the dynamic WSDL creation process at run time, register the behavior and finally to use the behavior.
Now, when you create a client against the end point you will see that there will be two parameters for the web method call. The first will be the custom header and the second will be the message body. When we look in the object browser for the header object we will see that the two items appear that we defined in our behavior.
As I said at the beginning of this post, this will be a three part series. What we have not covered is the ability to accept these header values from the client and promote or write the values to the context (part 2) and we have not covered the ability to create a behavior that exposes the properties through configuration to let you dynamically, per end point, set the header items (part 3).
by community-syndication | May 28, 2009 | BizTalk Community Blogs via Syndication
WF4 beta 1 ships with a comprehensive set of activities (more than 35) that you can use to author your workflows or to create your own custom activities. This post will give you a quick tour through the activity palette and introduce you to the key characteristics of the out of the box activities.
Activities are the unit of work in a workflow program. Activities in WF4 have a signature and body. The signature of an activity is defined in terms of its public arguments. These public arguments define the data flow into and out of an activity. The body of an activity is a chunk of execution logic that may execute over multiple pulses of work. This logic can be expressed declaratively in terms of other activities or with imperative code.
Quick note: As you may have noticed, the activities in the toolbox are not sorted alphabetically. This is something that we are aware of and that will be fixed in the next Beta. For Beta1, if this bothers you, you can simply right-click in the toolbox and choose "Sort Items Alphabetically" and it will sort the items for you for easy discoverability.
Procedural
Procedural activities provide a mechanism to model sequential control flow using concepts you know from standard procedural languages like C# or VB like if, assign, while, etc. Procedural activities include the basic building blocks to represent sequential behavior, including control of flow, method invocation on CLR objects, collection manipulation, and error handling. It also covers advanced scenarios like parallel activities, transaction management, compensation, cancellation, and persistence. The table below contains all the activities in the procedural category. The words in bold in the description of each activity represent its most important arguments.
|
Activity
|
Description
|
Designer
|
|
Collection Management
|
|
AddToCollection<T>
|
Adds an Item to a Collection.
|
|
|
RemoveFromCollection<T>
|
Removes an Item from a Collection.
|
|
|
ClearCollection<T>
|
Clears a Collection, removing all items stored in it.
|
|
|
ExistsInCollection
|
Verifies if an Item exists in a Collection. If the item exists, its Result argument will yield True.
|
|
|
Control of Flow
|
|
If
|
The If activity selects a child activity for execution based on the value of a Boolean expression.
If the Boolean expression Condition yields True (and “Then” activity is configured), the “Then” activity is scheduled. If the expressions yields False (and “Else” activity is set), the “Else” expression is scheduled.
|
|
|
DoWhile
|
Executes its Body until the Condition evaluates to True. The Body will be executed at least once.
|
|
|
ForEach / ForEach<T>
|
ForEach activity contains a list of Values and a Body. At runtime, the list is iterated and the body is executed for each value in the list.
|
|
|
Pick
|
The Pick Activity provides event-based control flow modeling in WF. The only valid children for a Pick activity are PickBranches.
At the beginning of a Pick execution, all the Trigger activities from all its Branches are scheduled. When the first Trigger completes its corresponding Action activity is scheduled, and all other Trigger activities are canceled.
|
|
|
PickBranch
|
PickBranch represents a branch in a Pick. It consists of a Trigger and Action. PickBranch can only be added to a Pick activity.
|
|
|
Sequence
|
The Sequence activity allows for the execution of one or more Activities in order.
|
|
|
Switch<T>
|
Switch activity is similar to switch statement in C#. It contains an Expression and a set of Cases (each case has a key and an activity). After the expression is evaluated, the Switch activity looks for a Case with a key that matches the result of the expression and if found, it schedules the activity associated with that Case.
|
|
|
While
|
The While activity executes it’s Body while a Boolean Condition is True.
|
|
|
Parallel Execution
|
|
Parallel
|
Parallel activity allows parallel execution of its children. It operates by scheduling each WorkflowElement in its Branches collection at the beginning of its execution. It completes when all of its Branches complete or when its CompletionCondition property evaluates to true.
|
|
|
ParallelForEach / ParallelForEach<T>
|
The ParallelForEach activity enumerates the elements of a collection(Values) and executes an Activity for each element of the collection, in a similar way than the ForEach activity does. The main difference is that the embedded statement is executed in a parallel fashion.
Just like the Parallel Activity, ParallelForEach has a CompletionCondition, so that the ParallelForEach activity could complete early if the evaluation of the CompletionCondition returns true. The CompletionCondition is evaluated after each iteration is completed.
|
|
|
Error Handling
|
|
TryCatch
|
TryCatch activity is similar to the try..catch construct in C#: all activities in the Try block are executed and if an exception occurs, it will schedule the Catch block that best matches that exception (if no matching catch is found, the workflow is aborted). All Catch blocks are contained in a collection called Catches.
TryCatch activity also has a Finally block that is executed after the Try (and any eventual Catch).
A note on unhandled exceptions:
TryCatch provides exception handling at the workflow level. When an unhandled exception is thrown, the workflow is aborted and therefore the Finally block won’t be executed. This behavior is consistent with C#.
|
|
|
Catch<T>
|
Represents one catch block to be used in a TryCatch activity. If an exception is thrown within a Try Element, the TryCatch will attempt to find a matching Catch element based on the type of the thrown exception.
Catch<T> can only be used inside a TryCatch activity
|
|
|
Throw
|
Throw activity throws an exception within a workflow. Throw activity has an Exception property that contains the exception that will be thrown at execution time.
|
|
|
Utilities
|
|
Assign
|
The Assign activity assigns the value of its Value argument to its To argument.
The types of both arguments must be compatible. This compatibility is verified at runtime.
|
|
|
Delay
|
Delay Activity, as its name suggests, will block the current workflow execution path for a Duration specified by user. After the duration expires, the workflow continues execution as expected. The duration of the delay is set using a TimeSpan.
|
|
|
InvokeMethod / InvokeMethod<T>
|
InvokeMethod is the activity that allows you to call an existing CLR instance or static method. To invoke a method all you need to do is provide the owner of the method (TargetType for static methods, TargetObject for instance methods), the MethodName, and its Parameters.
InvokeMethod supports the following method invocation scenarios:
%u00b7 Public instance and static methods
%u00b7 Parameter passing by value and by reference
%u00b7 Support for parameter arrays
%u00b7 Support for generic parameters
%u00b7 Asynchronous method invocation
|
|
|
WriteLine
|
Writes text to the configured output console.
Writing beyond the System.Console
WriteLine has a TextWriter argument can be configured to write to different outputs. For example, we can configure the TextWriter property to send the text to an ASP.NET page. If the TextWriter is not set, it will be set by default to the System Console.
|
|
|
Advanced (Cancellation, Compensation, Transactions, and Persistence)
|
|
CancellationScope
|
The CancellationScope activity consists of two main parts, the Body and the CancelHandler. The body is the code path that normally executes. If the activity gets canceled, then the cancel handler is called.
|
|
|
CompensatableActivity
|
CompensableActivity is used to define a potentially long running activity with accompanying Compensation and Confirmation logic.
Compensation allows the user to specify corrective action to be taken on an activity based upon activity which occurs after the successful completion of the Body of the activity.
|
|
|
Compensate
|
Compensate is used to explicitly invoke the compensation handler of a CompensableActivity.
|
|
|
Confirm
|
Confirm is used to explicitly invoke the confirmation handler of a CompensableActivity.
|
|
|
Persist
|
Persists the workflow instance. Persistence will be done using the configuration of the WorkflowInstance that is being executed (this activity doesn’t have any arguments).
|
|
|
TransactionScopeActivity
|
The TransactionScopeActivity provides the mechanism for initializing a new transaction, making the transaction handle ambient (a workflow execution property) and calling complete on the transaction once the Body of the TransactionScope activity has completed.
TransactionScopeActivity supports “Requires” semantics. If there is already an ambient transaction it is used, else a new one is created.
Nested transaction scopes:
TransactionScopeActivity can be nested in another TransactionScopeActivity. A TransactionScopeActivity nested in another TransactionScopeActivity will use the existing transaction.
|
|
Flowchart
Flowchart is a new modeling style that we have introduced in WF4. Flowchart is a well known and intuitive paradigm to visually represent business processes. Business Analysts, Architects and Developers use often flowcharts as common language to express processes.
Flowchart is a very powerful construct since it provides the simplicity of sequence plus the ability of looping back to a previous point of execution. All this is conveyed using a very well known conceptual paradigm that is common across several disciplines beyond computer science!
|
Activity
|
Description
|
Designer
|
|
Flowchart
|
This is the root for a Flowchart. Since Flowchart is an activity like any other, it can be composed inside any container activity.
For example, we can add a Flowchart inside of a Sequence or a Flowchart inside another Flowchart.
The green ball in the image at the right represents the start node of the Flowchart.
|
|
|
FlowDecision
|
FlowDecision models conditional forks within a Flowchart. It can be seen as the equivalent of the procedural If activity in the Flowchart world.
This activity contains a Boolean expression Condition. If the expression evaluates to “True”, the true path is executed (otherwise, the false path is scheduled).
|
|
|
FlowSwitch
|
FlowSwitch activity selects a next node depending on the value of an expression. FlowSwitch can be seen as the equivalent of the procedural Switch activity in the Flowchart world.
|
|
Messaging
The WF4 Messaging Activities are designed to support message-oriented workflows and provide better integration of messaging into workflows. They enable workflows to send data out to other systems and receive data from other systems. These activities can be composed together and along with correlation can model many complex Message Exchange Patterns.
|
Activity
|
Description
|
Designer
|
|
Receive
|
Models one way receive of a message. It can receive data of the following types: Message, DataContract types, XmlSerializable types, and MessageContracts.
|
|
|
ReceiveAndSendReply
|
This activity template represents a correlated Receive activity and SendReply activity.
By using this template you can wait for an incoming message and then send a reply to the sender.
Since the Receive and the SendReply are inside a sequence, you can add any activity between them.
|
|
|
Send
|
Models one way send of a message. It can receive data of the following types: Message, DataContract types, XmlSerializable types, and MessageContracts.
This activity can be used in two ways:
1. Client: this activity can be used to send a request to a service. This is equivalent to a WCF client calling a service operation. No contract inference is performed on the client side.
2. On the server side the Send activity can be used to send a reply to a previous Receive. In this case the Send and Receive activities must have the same OperationName, Action and CorrelationHandle.
|
|
|
SendAndReceiveReply
|
This activity template represents a correlated Send activity and ReceiveReply activity.
By using this template you can send a message and then wait for a reply from the destination.
Since the Send and the ReceiveReply activities are inside a sequence, you can add any activity between them.
|
|
PowerShell
PowerShell activities, as their name imply, allow invoking PowerShell cmdlets (commandlets) and scripts from WF programs.
Please note that while these activities are included by default in the Beta1 toolbox, they will not be available in the final RTM bits when we release. This is because .NET Framework does not allow taking a dependency on a technology that does not ship in the framework. We’re working on a longer term strategy here since many customers have requested PowerShell activities. For RTM, you will find these activities in the SDK samples instead.
|
Activity
|
Description
|
Designer
|
|
InvokePowerShell
|
Invokes a PowerShell cmdlet that does not have a return value. InvokePowerShell can be used to invoke simple cmdlets and scripts. We can also pass parameters and input objects to the cmdlet. After execution, the activity provides a set of errors (if any occurred).
|
|
|
InvokePowerShell<T>
|
An activity that invokes and retrieves the resultant output from a PowerShell cmdlet. This flavor of the activity has all the same arguments than the non-generic version plus an InitializationAction.
The InitializationAction is used to map the results of the execution of the cmdlet to variables in our workflows.
|
|
Migration
WF 3.x and 4.0 can exist side by side, but you can also use WF 3.x activities in WF4 workflows using the Interop activity.
|
Activity
|
Description
|
Designer
|
|
Interop
|
The Interop activity is a WF4 activity that wraps a WF3 activity (a non-abstract CLR type that derives from System.Workflow.ComponentModel.Activity) thus allowing the WF3 activity to be used in WF4 workflows. Note that the WF3 activity can be a single leaf activity, or an entire compiled workflow (tree of activities).
The Interop activity bridges the WF4 and WF3 activity execution models, facilitates data flow across the interop boundary, and enables persistence and tracking of WF3 activity instances within WF4 workflow instances.
The Interop activity allows WF developers to move to the WF4 model in an incremental fashion:
%u00b7 Quickly experiment with WF4 using existing WF3 activity artifacts
%u00b7 Wrap WF3 activities the developer isn’t ready to redesign on the WF4 model
%u00b7 Wrap WF3 activities for which the developer doesn’t own or possess the source code (e.g. they purchased the activity from a third party)
|
|
Wrapping up
It’s been a long tour, hasn’t it? And this is just the beginning! There are a lot of new exciting features in WF4 and we are eager to share them with you in future posts.
This post is an introduction to the activities that we are shipping in the activities toolbox. If you want to see these activities in action, please check our WF samples. A good starting point are the samples under the folder %SamplesRoot%\WF\Built-InActivities.
We are keenly interested in understanding your scenarios and ideas, and helping you accomplish your goals on WF4. We’d appreciate your feedback (both positive and critical), and we look forward to continued dialogue about the activities that you would like to see in WF toolbox. We look forward to hearing from you!
by Richard | May 28, 2009 | BizTalk Community Blogs via Syndication
There are integrations which only purpose is to move a file just as it is. No advanced routing. No orchestration processing. No transformation. Just a simple port-to-port messaging scenario.
It is however still a good idea to monitor these just as one would monitor a more complicated integration. We use BAM to monitor all our integrations and to measure how many messages that has been processed in a integration. Using BAM monitoring in a simple solution as the above however has its issues …
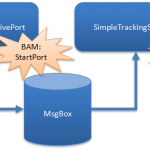
Setting up a simple test solution
-
The solution will move a XML file between two port called “SimpleTrackingReceivePort” and “SimpleTrackingSendPort”.
-
Both port have PassThru pipelines configured.
-
The XML file does not have a installed schema. Remember we are just moving the file not actually doing anything with it.
-
A BAM tracking definition with one milestone called “StartPort” will be used. This will be mapped to the “PortStartTime” property on both the receiving and sending port .
Our tracking profile configuration will like below. Dead simple.
So – what’s the problem?
Let us drop a XML message looking some like this.
<?xml version="1.0" encoding="UTF-16"?>
<SimpleTest>
    <SimpleContent Text="This is a test" />
</SimpleTest>
Remember that there is not a schema installed so we do not really have to worry about the structure of the file. It should just be “a file” to BizTalk and everything should be transferred between the ports. Even if we drop a executable or whatever – it should just be transferred. Nothing should read or examine the file as it’s just a pass thru!
As soon as BAM tracking is configured on a port that is however not the case. Lets take a look at the file we receive on the other end of our integration.
<SimpleTest>
    <SimpleContent Text="This is a test" />
</SimpleTest>
BizTalk now removed our XML declaration! Basically it treated the message as a XML message and parsed the message as such while tracking it. It’ will also add the dreaded Byte-Order-Mark and fail any non-valid XML messages. The problem is that this is not the behavior what one expects and causes receiving systems that rely on the XML declaration to fail!
As we also don’t have a installed schema it is not possible to use a XMLTransmit pipeline to add the XML declaration and remove the BOM.
What to do?
If you’d like to track a XML based message using BAM make sure you have the schema installed … Even if you are just using PassThru.
Is it a bug or just something one should expect? In my opinion it is at least very annoying!


