by community-syndication | Nov 30, 2007 | BizTalk Community Blogs via Syndication
For those of you who are unaware, XPath is a powerful query language for XML (ignoring
XQuery for now).
In my experience I’ve worked with a lot of BizTalk developers who have come from a
C# (and usually VB before that) background, and so haven’t always had the background
in XML, XSLT, XSD, and XPath needed to fully appreciate BizTalk.
Because let’s face it: before you were working on BizTalk, how often did you need
to deal directly with Xml? When writing ASP.NET web services, the .NET framework abstracts
away the need to understand XML, leaving you with classes which are handily serialised/de-serialised
across the wire for you.
Note: I have come across a similar pattern in the J2EE world – ask
many Java developers about an Xml document they received as a request in a J2EE Web
Service, and they’ll only know about Beans, as the framework looks after the de-serialization
from Xml into a Bean for them).
However, BizTalk is a different beastie: it works predominantly with data streams
containing Xml.
Therefore the ability to know how to query this Xml without having to resort to C#
code is very very important.
BizTalk 2004 and 2006/2006R2 support XPath 1.0 – as at this time, there is no support
for XPath 2.0 in BizTalk.
You can get a good idea of the functions available in XPath 1.0 here (which
is a useful summary of the W3
Recommendation)
(as a comparison, here’s what XPath
2.0 gives you – here’s hoping we get this in BizTalk sometime soon!)
For a good primer on XPath, look here.
Every time you use a Distinguished Field in BizTalk, you’re actually using XPath.
Every time you create a map you’re generating XSLT which uses XPath.
Using XPath to select an element/attribute value from an Xml instance is very easy.
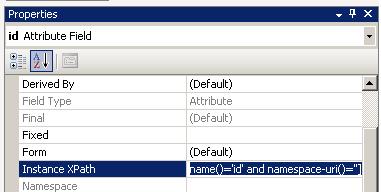
To see the XPath for the given element/attribute, open the Schema in the BizTalk Schema
Editor, select the element/attribute you want to get a value for, and in the properties
window select the value for Instance XPath:

This will give you an XPath statement something like:
/*[local-name()=’Employees’ and namespace-uri()=”]/*[local-name()=’Employee’
and namespace-uri()=”]
In an orchestration, you can make use of XPath through the use of the xpath() function:
xpath(message, string)
or
xpath(string)
The xpath() function can be used to
both write and read information to/from a message (although to write information to
a message, you need to call it from a Message Assignment shape, and the element/attribute
you’re setting the value of must already exist in the message).
Note that if you’re reading information from a message, you have to cast the result
back to an appropriate type, or use an XmlNode/XmlNodeSet variable.
For example, to get a string value you could use:
myXPath = “/*[local-name()=’Employees’
and namespace-uri()=”]/*[local-name()=’Employee’ and namespace-uri()=”]/@*[local-name()=’status’
and namespace-uri()=”]”;
myValue = System.Convert.ToString(xpath(MyMessage, myXPath));
Note: if you tried the above on an XPath query which returned a node
or node set, then instead of the element value in myValue, you’d get the text “System.Xml.XmlNodeSet” or
similar
This happens when your XPath selects an element, as opposed to the element’s value
(this doesn’t apply to attributes).
In this case you have to modify your XPath to select the value of the element, instead
of the actual element itself. You can do this by using the text() XPath
function:
/*[local-name()=’Employees’ and namespace-uri()=”]/*[local-name()=’Employee’
and namespace-uri()=”]/@*[local-name()=’status’ and namespace-uri()=”]/text()
The beauty of XPath is that you can use it to operate across node-sets, and then filter
(or query) the results through the use of predicates – similar to using a SQL query
to select values from a database table.
For example, using a predicate of [1] will give you the first occurrence of something
e.g.
/*[local-name()=’Employees’ and namespace-uri()=”]/*[local-name()=’Employee’
and namespace-uri()=”][1]
will give you the first Employee element
Correspondingly, [2] will give you the second, [3] the third, etc.
If you want to get a count of elements, you can use the count() function:
count(/*[local-name()=’Employees’ and namespace-uri()=”]/*[local-name()=’Employee’
and namespace-uri()=”])
And to use this in BizTalk:
myCount = System.Convert.ToInt32(xpath(MyMessage,
“count(/*[local-name()=’Employees’ and namespace-uri()=”]/*[local-name()=’Employee’
and namespace-uri()=”])“))
I use this all the time when I call a web service, and get back a response which contains
a collection of elements and I want to know how many I have.
You can even filter to find the number of elements which have a certain value.
For example, given the following XML:
<Employees xmlns:emp=”urn:schema.mine.com:employees”>
<Employee id=”1″ status=”Active”>
<FirstName>Sam</FirstName>
<LastName>Smith</LastName>
</Employee>
<Employee id=”2″ status=”Active”>
<FirstName>Jane</FirstName>
<LastName>Smith</LastName>
</Employee>
<Employee id=”2″ status=”Deceased”>
<FirstName>John</FirstName>
<LastName>Doe</LastName>
</Employee>
</Employees>
I might want to get a count of Active employees:
count(/*[local-name()=’Employees’ and namespace-uri()=”]/*[local-name()=’Employee’
and namespace-uri()=”]/@*[local-name()=’status’ and namespace-uri()=”][. = ‘Active’])
Note: because status is
an attribute and not an element, I used “.” to reference the value of the attribute,
rather than text() which I would use
for an element.
In my time I’ve seen a lot of developers create a class representation of a message
(using the xsd.exe tool), and de-serialise
a message into this class just so that they could get a value e.g. a count – why take
the hit of de-serialisation when you can just pull the value out of the message directly?
One of the tricky things about writing XPath queries is that it’s difficult to test
them – you need a tool like Altova
XmlSpy or Stylus Studio which
can test an XPath statement on an instance of an Xml document.
There’s no built-in support in Visual Studio for testing XPath queries.
Which is why I wrote DanSharp
XmlViewer.
This tool lets you get the XPath to select a given element/attribute from an Xml instance
document but more importantly acts as an XPath scratchpad so you can test your XPath
queries:
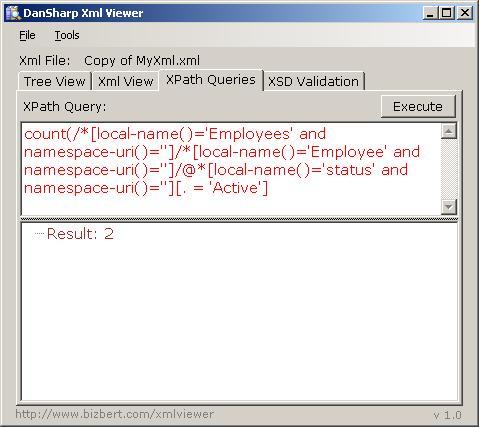
It even shows you when your syntax is incorrect (as in the above, highlighted red
– you can hover over the text to see the error).
I use this tool all the time to write XPath queries as I can test them before putting
them into BizTalk.
Get the tool here.
by community-syndication | Nov 30, 2007 | BizTalk Community Blogs via Syndication
I’ve spent this week in Minneapolis at some BizTalk training and while I was there
had a chance to sit down with Delbert and
talk about the Microsoft
Certified Architect program, I think you’ll learn something about the program
I know I did.
Tim Rayburn is a consultant for Sogeti in the Dallas/Fort
Worth market.
by community-syndication | Nov 29, 2007 | BizTalk Community Blogs via Syndication
For me at least :-). I’m off to India for my annual vacation tomorrow and will be there for Christmas and New Year. So unless I’m really bored, there wont be any posts from me for a long time.
Theres news on the BizUnitExtensions front though. I finally got some time to cleanup and reorganise the […]
by community-syndication | Nov 29, 2007 | BizTalk Community Blogs via Syndication
People have been asking, so here they are. I’ve attached all of the presentations that were presented during the recent Canadian Business Process/SOA Conference. All of the presentations from both technical days and the business day are included in the three attached ZIP files.
http://peterkelcey.com/downloads/businesspresentations.zip
http://peterkelcey.com/downloads/technicaltrack_1.zip
http://peterkelcey.com/downloads/technicaltrack_2.zip
Cheers and keep on BizTalking
by Richard | Nov 29, 2007 | BizTalk Community Blogs via Syndication
cXML (commerce eXtensible Markup Language) is a XML based standard for communication of data related to electronic commerce. The problem from a BizTalk perspective is that they don’t publish any XML schemas (XSD), only Document Type Definition (DTD).
When trying to generate a schema based on a DTD using the functionality in BizTalk (via Add Generated Items) one ends up with a schema split of three files that really doesn’t make any sense (XmlSpy doesn’t do a very good job either …). So after a while I found Nick Heppleston schema repository! After some tweaking I actually had a cXML Order schema in the version I was looking for! Thanks Nick!
The next set of problems was to handle the lack of XML namespace and the DOCTYPE declaration that messages validating against DTD carries on top.
<div><span style="color: #0000FF; "><?</span><span style="color: #FF00FF; ">xml version="1.0" standalone="no"</span><span style="color: #0000FF; ">?></span><span style="color: #000000; ">
</span><span style="color: #0000FF; "><!</span><span style="color: #FF00FF; ">DOCTYPE cXML SYSTEM "http://xml.cxml.org/schemas/cXML/1.2.014/cXML.dtd"</span><span style="color: #0000FF; ">></span><span style="color: #000000; ">
</span><span style="color: #0000FF; "><</span><span style="color: #800000; ">cXML </span><span style="color: #FF0000; ">xml:lang</span><span style="color: #0000FF; ">="en-US"</span><span style="color: #FF0000; "> payloadID</span><span style="color: #0000FF; ">="2007117.25919@Contempus"</span><span style="color: #FF0000; "> timestamp</span><span style="color: #0000FF; ">="2007-11-07T11:06:16+01:00"</span><span style="color: #0000FF; ">></span></div>
To handel these two issues I set up a receive pipeline that looked like the one below.
Remove the DOCTYPE declaration
First I created a pipeline component to remove the DOCTYPE node. It’s simple code using regular expression to find the DOCTYPE node, replace it with an empty string and return the message.
<div><span style="color: #0000FF; ">public</span><span style="color: #000000; "> IBaseMessage Execute(IPipelineContext pc, IBaseMessage inmsg)
{
   </span><span style="color: #0000FF; ">string</span><span style="color: #000000; "> messageString </span><span style="color: #000000; ">=</span><span style="color: #000000; "> </span><span style="color: #0000FF; ">new</span><span style="color: #000000; "> StreamReader(inmsg.BodyPart.Data).ReadToEnd();
   Regex doctypePattern </span><span style="color: #000000; ">=</span><span style="color: #000000; "> </span><span style="color: #0000FF; ">new</span><span style="color: #000000; "> Regex(</span><span style="color: #000000; ">"</span><span style="color: #000000; "><!DOCTYPE.+?></span><span style="color: #000000; ">"</span><span style="color: #000000; ">);
   messageString </span><span style="color: #000000; ">=</span><span style="color: #000000; "> doctypePattern.Replace(messageString, </span><span style="color: #0000FF; ">string</span><span style="color: #000000; ">.Empty);
   MemoryStream memStream </span><span style="color: #000000; ">=</span><span style="color: #000000; "> </span><span style="color: #0000FF; ">new</span><span style="color: #000000; "> MemoryStream();
   </span><span style="color: #0000FF; ">byte</span><span style="color: #000000; ">[] data </span><span style="color: #000000; ">=</span><span style="color: #000000; "> Encoding.UTF8.GetBytes(messageString);
   memStream.Write(data, </span><span style="color: #000000; ">0</span><span style="color: #000000; ">, data.Length);
   memStream.Seek(</span><span style="color: #000000; ">0</span><span style="color: #000000; ">, SeekOrigin.Begin);
   inmsg.BodyPart.Data </span><span style="color: #000000; ">=</span><span style="color: #000000; "> memStream;
   </span><span style="color: #0000FF; ">return</span><span style="color: #000000; "> inmsg;
}</span></div>
Set an XML namespace
Secondly I used Richard Seroter’s post on how to change the SetNSForMsg component to add a XML namespace. That’s the second component showing in the decode stage of the pipeline.
Arrow number 3 shows how the SetMsgNS exposes a property that allows us to set the namespace that we can configure per pipeline. In this case I’ve set it to http://schemas.modhul.com/cXML/1.2.014/OrderRequest__ which is the namespace of the cXML schema I’m currently working agains.
In the end we’ll have a message with the following declaration and root node.
<div><span style="color: #0000FF; "><?</span><span style="color: #FF00FF; ">xml version="1.0" encoding="utf-16" standalone="no"</span><span style="color: #0000FF; ">?></span><span style="color: #000000; ">
</span><span style="color: #0000FF; "><</span><span style="color: #800000; ">cXML </span><span style="color: #FF0000; ">xml:lang</span><span style="color: #0000FF; ">="en-US"</span><span style="color: #FF0000; "> payloadID</span><span style="color: #0000FF; ">="2007117.25919@Contempus"</span><span style="color: #FF0000; "> xmlns</span><span style="color: #0000FF; ">="http://schemas.modhul.com/cXML/1.2.014/OrderRequest"</span><span style="color: #FF0000; "> timestamp</span><span style="color: #0000FF; ">="2007-11-07T11:06:16+01:00"</span><span style="color: #0000FF; ">></span></div>
Now we’re ready to start mapping!
by community-syndication | Nov 29, 2007 | BizTalk Community Blogs via Syndication
In
recent weeks all of the buzz in the world of BizTalk has been about Oslo, the project
which encompasses updates to many products, but specifically to BizTalk Server.
As you can imagine there is a great deal Microsoft is not talking about in regards
to Oslo, but today I’m lucky enough to be the first person to announce that the details
of one sub-project of Oslo, code named Fjord.
Fjord is the code name for the Microsoft Surface integration pieces to the Modeling
commitments of Oslo. As you know, Oslo has two key components, Services and
Modeling. Microsoft Surface, the revolutionary multi-touch display and device
integration platform demonstrated by Bill Gates at CES several years ago. Obviously
the enterprise of the future will need a robust manipulation environment for the complex
models that Oslo will host, and the Oslo team is looking to Surface for those answers.
As you can see above in this as yet unreleased publicity shot, BizTalk Mapper is the
first piece of Oslo to be integrated with Surface, because unlike many other pieces
the code base for the Mapper is already complete.
I can’t disclose any of my sources, here are some of the things I’ve heard will be
included in this update:
-
BizTalk Mapper will now require a multi-touch interface and as such will require a
Microsoft Surface table.
-
Mapping from one field to another will be accomplished by “touch and hold” on each
field, then the link will be automatically created.
-
Scripting Functoids will now be editable in a full screen editor with intellisense.
-
Multiple fields can be touched per side of the schema, and when a destination is touched
an analysis engine will suggest possible functoid combinations. For instance,
touch “FirstName” and “LastName” from the source, then touch “Name” on the left and
the Mapper will suggest the use of a Concatenation functoid.
Further details are sketchy, and as I’m under an NDA with Microsoft there is little
more I can say at this time, but needless to say I think we can expect a lot more
from Project Fjord in the future. I’ll post more details in the future as I
can.
Tim Rayburn is a consultant for Sogeti in the Dallas/Fort
Worth market.
by community-syndication | Nov 29, 2007 | BizTalk Community Blogs via Syndication
cXML (commerce eXtensible Markup Language) is a XML based standard for communication of data related to electronic commerce. The problem from a BizTalk perspective is that they don’t publish any XML schemas (XSD), only Document Type Definition (DTD).
When trying to generate a schema based on a DTD using the functionality in BizTalk (via Add Generated […]
by community-syndication | Nov 29, 2007 | BizTalk Community Blogs via Syndication
Came across Microsoft Knowledge Base Article 832017 – Service overview and network port requirements for the Windows Server system – today while researching required firewall ports for UNC share access. A good one to have in your back-pocket if you ever need to know what port is required to allow obscure protocols such as the […]
by community-syndication | Nov 28, 2007 | BizTalk Community Blogs via Syndication
Just got this email from the user group…. get to it if you want to learn about MS RFID services…. (but more importantly, play some XBOX!!!!).
Hi Chris Vidotto,
Welcome to our last meeting of the year.
I know its Christmas soon and we’re all checking out the best gifts to get…….well I got thinking….. why don’t we have a ‘try before you buy’ session with a xbox360/media extender etc??
We also need to make it Educational as well, so here’s the line up for next Dec 5th.
Where:
Microsoft, North Ryde
1 Epping Road
When:
6pm – Beer + Pizza
6.30pm – Kick off
Dec 5th 2007
(Add to calendar)
1. Introduction to BizTalk RFID Services – 101
Presenter: Scott Scovell – Scott has extensive experience in EDI and BizTalk RFID Services.
He has recently been part of a team that has created the Microsoft BizTalk RFID Courseware, and is always eager to share his knowledge and lend an ear.
Session Outline:
BizTalk RFID Services is new to the BizTalk Product Suite, being able to enable production lines, track and trace and various other scenarios with RFID technology is key for companies to maintain a competitive edge.
This presentation will cover:
1. Setting up and configuring BizTalk RFID Services
2. Plugging in a real RFID Reader Device
3. Reading/Writing Tags within a BizTalk RFID Process.
4. Extending and customising RFID Services.
2. XBOX 360 ‘Christmas Evaluation’ Session
Come along and road test some XBOX 360’s with us for Christmas!
We’re now just shy of 80 registered members – you guys are great! Well done and keep all the feedback coming.
I’m looking forward to a great meeting and hope to see you all there.
Many thanks,
Mick.
p.s. Let me know if you’re coming (so I know how many xbox controllers to put out)
by community-syndication | Nov 28, 2007 | BizTalk Community Blogs via Syndication
I recently created a retry activity that I’ve been wanting to write for some time now, and had a few features that I wanted to add. I was teaching a class a couple of weeks ago and took the opportunity to add a retry interval to the activity. The activity is designed as a composite activity which can retry its child activities if it detects that a fault/exception has occurred. Rather than retrying immediately, I wanted the consumer of my activity to be able to specify a TimeSpan indicating how long to wait between retry attempts.
The simplest part was adding a property that allowed people to specify the interval.
private TimeSpan retryInt;

public TimeSpan RetryInterval
{
    get { return retryInt; }
    set { retryInt = value; }
}
The next step was to actually use this information. When the child activity closes, my Retry activity checks if it faulted and then needs to reschedule the child activity for execution. With the interval, I need a way to wait for a duration and then schedule the activity for execution. Since my workflow could be persisted during this interval, I have to use a mechanism that will both support passivation, and allow for the workflow to be resumed automatically when the duration has been reached. To support this I used the same mechanism that the delay activity uses, which is to create timer subscription and then wait for an event signaling the time has expired.
In my event handler for closing child activities, if I determine that I should retry the child activity, I use the following code to 1) create a new workflowqueue where the timer can signal completion, 2)register for data arriving on the queue, 3) create a TimerEventSubscription with my duration and my queue information and 4) add my timer subscription the collection on the workflow.
DateTime expires = DateTime.UtcNow.Add(RetryInterval);
SubscriptionID = Guid.NewGuid();
thisContext.GetService<WorkflowQueuingService>().CreateWorkflowQueue(SubscriptionID, false).QueueItemAvailable += new EventHandler<QueueEventArgs>(RetryActivity_QueueItemAvailable);
TimerEventSubscription subscription = new TimerEventSubscription(SubscriptionID, WorkflowInstanceId, expires);
TimerEventSubscriptionCollection timers = GetTimerSubscriptionCollection();
timers.Add(subscription);
The GetTimerSubscriptionCollection simply grabs the collection from the parent workflow by recursively climbing the parent hierarchy.
private TimerEventSubscriptionCollection GetTimerSubscriptionCollection()
{
    Activity parent = this;
    while (parent.Parent != null)
    {
        parent = parent.Parent;
    }
    TimerEventSubscriptionCollection timers = (TimerEventSubscriptionCollection)parent.GetValue(TimerEventSubscriptionCollection.TimerCollectionProperty);
    return timers;
}
Finally, I have the event handler for when data arrives on the queue for the timer. I simply empty and delete the queue, then begin my next iteration on the child activity.
void RetryActivity_QueueItemAvailable(object sender, QueueEventArgs e)
{
    ActivityExecutionContext ctx = sender as ActivityExecutionContext;
    ctx.GetService<WorkflowQueuingService>().GetWorkflowQueue(e.QueueName).Dequeue();
    ctx.GetService<WorkflowQueuingService>().DeleteWorkflowQueue(e.QueueName);

    BeginIteration(ctx);
}
So adding a retry interval turned out to be pretty simple and I was also able to provide a good example of how you can put your own delay into your activities. In a later post, I’m going to talk about the other issue I had to manage which is how to deal with exceptions and control whether or not my Retry activity got put into the faulting state.
The updated retry activity can be found here, and has been updated for Visual Studio 2008. If you want the updates for 2005, just download the original, and then copy the class file for the retry activity from the new project. I didn’t use any new features of 2008, just updated the project and solution files, so it should work fine.