This post was originally published here
This is the third post in my series on Integration of Things. In my previous post I explained how you could send and receive data on a Raspberry Pi 2 to Azure. Today I will explain how you can use an Azure cloud service as a worker role for retrieving the data from Event Hubs using the Event Processor Host library. We will save the retrieved data in an Azure Table Storage, which is a great service for working with large amounts of structured, non-relational data. Azure Table Storage is very fast, and cost efficient especially when working with lots of data, which makes it ideal for our scenario. The code for this blogpost can be found here.
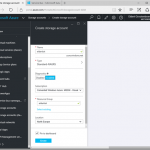
The Event Processor Host library will be used to retrieve the data from our event hub, and load it into Azure Table Storage. This library will distribute Event Hubs partitions accross our instances of the worker role, keeping track of leases and snapshots. This library really makes working with Event Hubs from .NET code a breeze to go through. We will need a blob storage for for the table and for the library to store its data, so let’s start by setting one up via the Azure Portal.
Our application will read from the event hub we created in the previous blogpost. To be able to access it, we need create a Shared Access Policy for this application with Listen permissions.
When working with Azure Table Storage, we need a class which represents the object which will be saved to the table. This class should derive from the TableEntity class, so it can be mapped into Table Storage. As we will be using this object in multiple project, we will create a new Class Library project for it.
We will need to add a reference to the WindowsAzure.Storage NuGet package in order to work with Azure Storage.
Add the class to the project which holds our object to be inserted into the table. We’ll use a method to set the partition and row key, which are used to shard the data and query the data. We use the same fields as we defined in the EngineInformation class used in the fieldhub project, so we can deserialize the objects we receive in the event hub directly into an object for the database. Unfortunatly it’s not possible to create a shared class library which can be used both by our worker role and the fieldhub UWP application, due to the incompatibility between Win32 and WinRT class libraries.
using System; using Microsoft.WindowsAzure.Storage.Table; namespace Eldert.IoT.Data.DataTypes { /// <summary> /// Represents an engine information object for Azure Table Storage. /// </summary> public class EngineInformation : TableEntity { public Guid Identifier { get; set; } public string ShipName { get; set; } public string EngineName { get; set; } public double Temperature { get; set; } public double RPM { get; set; } public bool Warning { get; set; } public int EngineWarning { get; set; } public DateTime CreatedDateTime { get; set; } public void SetKeys() { PartitionKey = ShipName; RowKey = Identifier.ToString(); } } } |
Next we are going to create a Cloud Service project containing a worker role, which we’re going to publish to Azure later on.
When the project is created, we will have two projects, one for the worker role, the other for the cloud service itself. Let’s start by setting up our worker role. As mentioned, we will implement the event processor library, for which we need to add the EventProcessorHost NuGet package to our project, as well as the WindowsAzure.Storage NuGet package for working with the table.
For this we will create a new class, which implements the IEventProcessor interface.
using System; using System.Collections.Generic; using System.Diagnostics; using System.Text; using System.Threading.Tasks; using Eldert.IoT.Data.DataTypes; using Microsoft.Azure; using Microsoft.ServiceBus.Messaging; using Microsoft.WindowsAzure.Storage; using Microsoft.WindowsAzure.Storage.Table; internal class ShipEventProcessor : IEventProcessor { } |
This interface implements three methods. The first is OpenAsync, which gets called when the event processors are started for the partitions in our event hub. In this call we will also create the table to which we want to save our data in case it does not yet exist.
public Task OpenAsync(PartitionContext context) { // Create the table if it doesn't exist yet if (_table.CreateIfNotExists()) { Trace.TraceInformation("Table for EngineInformation has been created."); } Trace.TraceInformation($"EventProcessor started. Partition: {context.Lease.PartitionId}, Current offset: {context.Lease.Offset}"); return Task.FromResult<object>(null); } |
The second one is CloseAsync, which is called when the event processor is being shutdown. We will set a checkpoint here in case we are shutting down, so next time the event processor is started up for this partition, processing will resume from the last processed message.
public async Task CloseAsync(PartitionContext context, CloseReason reason) { Trace.WriteLine($"EventProcessor is shutting down: Partition: {context.Lease.PartitionId} Reason: {reason}"); // Place a checkpoint in case the event processor is shutting down if (reason == CloseReason.Shutdown) { await context.CheckpointAsync(); } } |
The last method is ProcessEventsAsync, which is where the processing of the messages that are being received is done. As the messages were UTF8 serialized JSON strings, we will use the JSON library from Newtonsoft to deserialize the messages. To do so, we first need to install its NuGet package.
Now we will loop through the messages we received from our event hub, get the message string, and deserialize it to an EngineInformation object. Because event hubs works in a streaming manner, where we set checkpoints every x messages, we could receive messages more then once. To handle this, we will have to have some idempotency in place. I choose to just replace the existing object in the database, but for different scenarios this is something to think about. The reason we don’t place a checkpoint every message is due to performance reasons. Event Hubs are meant for large loads of messages, so it would be unwise to checkpoint every message. The storage account used for checkpointing probably wouldn’t handle this load, but more importantly checkpointing every single event indicates of a queued messaging pattern for which a Queue may be a better option than an Event Hub. The idea behind Event Hubs is that you will get at least once delivery at great scale. We therefor make our application idempotent so we can easily recover from failures or restarts that result in the same events being received multiple times.
/// <summary> /// Processing of the messages received on the event hub. /// </summary> public async Task ProcessEventsAsync(PartitionContext context, IEnumerable<EventData> messages) { try { // Gather the table operations to be performed var tableOperations = new TableBatchOperation(); // Loop through received messages foreach (var eventData in messages) { // Get the message received as a JSON string var message = Encoding.UTF8.GetString(eventData.GetBytes()); Trace.TraceInformation($"Message received - Partition: {context.Lease.PartitionId} - Machine: {Environment.MachineName} Message: {message}"); try { // Deserialize the JSON message to an engine information object var engineInformation = JsonConvert.DeserializeObject<EngineInformation>(message); engineInformation.SetKeys(); // We have to take care of idempotency ourself, as we might get the same message multiple times // To do so, we will insert new items, and replace existing items (which will replace the item with the same item) // For extra performance we gather the table operations here, and will apply them later on in a batch Trace.TraceInformation($"Adding {engineInformation.Identifier} to table"); tableOperations.Add(TableOperation.InsertOrReplace(engineInformation)); } catch (Exception) { Trace.TraceWarning("Could not deserialize as EngineInformation object"); } } // Apply table operations if needed if (tableOperations.Count > 0) { await _table.ExecuteBatchAsync(tableOperations); Trace.TraceInformation("Saved data to database"); } // Keep track of number of received messages, place a checkpoint after having processed 50 messages. // Make sure the messages are persisted in the table before placing the checkpoint if (++_messageCounter > 50) { Trace.TraceInformation("Checkpoint placed"); await context.CheckpointAsync(); _messageCounter = 0; } } catch (Exception exception) { Trace.TraceError(exception.ToString()); throw; } } |
We are now done with implementing the interface, the next step is to hook it into our WorkerRole class. Start by adding a reference to the ServiceBus Messaging namespace, which is used to work with the Event Processor Host, and adding a field for its instance. We will also need a reference to the Azure library, which will be used to retrieve our settings from the configuration we specify on our cloud service.
using System; using System.Diagnostics; using System.Net; using System.Threading; using System.Threading.Tasks; using Microsoft.Azure; using Microsoft.WindowsAzure.ServiceRuntime; using Microsoft.ServiceBus.Messaging; namespace Eldert.IoT.Azure.EventHubsProcessor.WorkerRole { public class WorkerRole : RoleEntryPoint { private EventProcessorHost _eventProcessorHost; . . . } } |
Now we are going to add the settings we need to connect to our event hub and storage. We will store these in the settings of our cloud service, so that once it’s deployed, we can change these settings from the Azure Portal. Open the Cloud Service project, expand the Roles and double-click on the WorkerRole. Go to the settings tab, and add settings for the consumer group name, event hub name, storage connection string and event hubs connection string. Note that the settings only allow you to specify storage connection string as a connection string type, so for the event hubs connection string just use type string.
Back to our worker role project, when the worker role starts, we want the Event Processor Host to be initialized, so we will add this to the OnStart method. We need to set an identifier for the host, which will be used by the library to keep track which host is handling each partition. This will be used in loadbalancing the processing of the partitions, as each partition can be handled by a different host. We also need to specify the connection settings, which we just stored in the settings of the cloud service. Using CloudConfigurationManager.GetSetting() we can retrieve the settings to create an instance of the event processor host.
public override bool OnStart() { // Create the event processor host // Create a unique identifier, which will be used to determine which partitions this processor is handling _eventProcessorHost = new EventProcessorHost(Guid.NewGuid().ToString(), CloudConfigurationManager.GetSetting("EventHub"), CloudConfigurationManager.GetSetting("ConsumerGroup"), CloudConfigurationManager.GetSetting("EventHubsConnectionString"), CloudConfigurationManager.GetSetting("IoTStorageConnectionString")); // Set the maximum number of concurrent connections ServicePointManager.DefaultConnectionLimit = 12; var result = base.OnStart(); Trace.TraceInformation("Eldert.IoT.Azure.EventHubsProcessor.WorkerRole has been started"); return result; } |
When the application starts running, we have to register the ShipEventProcessor we created earlier with the Event Processor Host, so it knows what actions to take on the messages. We’ll add this to the Run method.
public override void Run() { Trace.TraceInformation("Eldert.IoT.Azure.EventHubsProcessor.WorkerRole is running"); try { // Register the processor, at this point one or more partitions will be registered with the client, and it will start processing _eventProcessorHost.RegisterEventProcessorAsync<shipeventprocessor>().Wait(); RunAsync(_cancellationTokenSource.Token).Wait(); } finally { _runCompleteEvent.Set(); } } |
And finally, when the application is being stopped, we have to unregister the event processor, to let it clean up and make the necesarry checkpoints. This should be added in the OnStop method.
public override void OnStop() { Trace.TraceInformation("Eldert.IoT.Azure.EventHubsProcessor.WorkerRole is stopping"); _cancellationTokenSource.Cancel(); _runCompleteEvent.WaitOne(); // Unregister the processor _eventProcessorHost.UnregisterEventProcessorAsync().Wait(); base.OnStop(); Trace.TraceInformation("Eldert.IoT.Azure.EventHubsProcessor.WorkerRole has stopped"); } |
Now that all is in place, we can setup the application for publishing. As you have noticed, we use Trace to log information about our progress. As this application will be running in Azure, we will want to make this information accessible. Luckily this can be done easily by opening the worker role in our cloud service project, opening Configure for the diagnostics and setting the Log level to All in the Application logs tab, or a different setting if we would like less information to be logged, f.e. just errors.
We will also need to set a storage account where we want to log to. The logging will be stored in an Azure Table called in this WADLogsTable under this storage account. Currently this just the classic storage accounts, so create a new storage account for this.
Finally make sure to set the number of instances and VM size you will want to use.
Now we can go and publish our cloud service with the worker role to Azure. Right click on your cloud service project, and select Publish. Select the subscription to which you want to deploy.
Set the name of your service, along with the properties for it’s region and replication.
Next choose the storage account you just created for your logging.
And finally review your settings, and if all is ok, publish your service.
The Azure activity log will now open, where you can check on the progress of your deployment, and also will see if anything is not going right.
Once the deployment is done, you can use the Cloud Explorer from Visual Studio to check the logging in the WADLogsTable.
And the same can be used to check our data in the Azure Storage Table, remember to switch to the correct storage account. As you will see, the table was automatically created, and data is filled according to the format we set in our EngineInformation object.
We have now finished our worker role which retrieves the data from the event hub, and stores it in the database. In my next blogpost I will show how you can use Entity Framework to setup a Azure SQL database.
Code