
This post was originally published here
After having shown how to send our custom events to Event Grid in my previous blog post, we will now see how we can create custom subscribers. Event Grid will be integrated with all Azure services, but by allowing us to create our own custom subscribers as well, we can truly route events to any service or application. And what’s more, we will also see how we can use the API to create a subscription from our subscriber, allowing us to quickly onboard new services, which can then start listening to the events which are of interest to them. In this sample, we will create an Azure API App, which will receive the events from our previous blog post, and store them in Azure Table Storage. On starting, the API App will check if the subscriptions it uses are created, and if not, it will create them and point them to the various endpoints the API App exposes.
Azure Event Grid
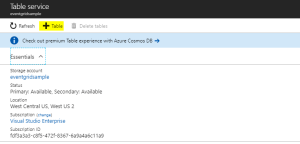
As we will be using Table Storage to store the data from the events, we will start by creating this in a storage account. I am using the storage account I created in this post, but of course you can also set up a new account for this.
Create Table Storage
Add Table Storage
Now we will create the API App which will subscribe to our events. Start by creating a new ASP.NET Web Application project.
Create ASP.NET Web Application project
Now choose the Azure API App template.
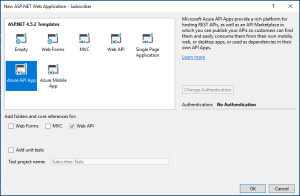
Create Azure API App
Connect Storage Account
As we will be connecting to Table Storage, we will add Azure Storage as a connected service on the overview pane.
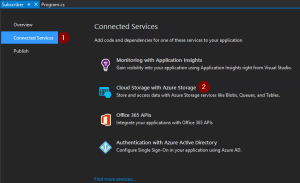
Add Azure Storage
Choose the storage account in which we created the Table Storage. Optionally you can also create a new Storage Account from here.
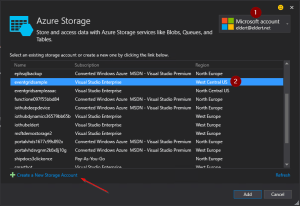
Choose Storage Account
Application Settings
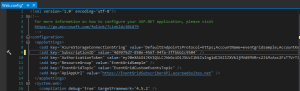
We can now start implementing our API App. Let’s start by adding some application settings in the web.config file. These will be needed later on in our application. Once the API App has been deployed we will recreate these settings on the API App’s application settings as well. These are the settings which need to be created.
- AzureStorageConnectionString
- This is the connection string for the Storage Account, which can be retrieved in the Azure Portal.
- SubscriptionID
- GUID with your subscription ID, can also be retrieved from the Azure portal.
- AuthorizationToken
- In this sample I will be using a bearer token to connect to the Azure management API. Instructions on how to get this token can be found in this blogpost by Toon, follow the instructions under Authenticate With Service Principal.
In a production environment you would implement this using the Azure AD SDK, as the bearer token will expire after a few hours.
- In this sample I will be using a bearer token to connect to the Azure management API. Instructions on how to get this token can be found in this blogpost by Toon, follow the instructions under Authenticate With Service Principal.
- ResourceGroup
- The name of the resource group in which the Event Grid Topic has been created.
- EventGridTopic
- The name of the Event Grid Topic to which we want to subscribe.
- ApiAppUrl
- URL on which the API App can be reached, which will be used in the subscription endpoints. We will know this once the API App has been deployed, at which time we can update this in the API App’s application settings. Keep in mind that we need an https endpoint for our Event Grid subscriptions, as http will throw an error when creating the subsciption. Luckily API Apps come with a https endpoint out of the box.
Add application settings
Data Classes
We now will create two new classes, which will be be used to receive the repair and order events we sent in in the previous blog post. The first class is the data we sent in our Data node in our custom event.
/// <summary> /// Data which can be sent with various ship events. /// </summary> public class ShipEventData { /// <summary> /// Name of the ship. /// </summary> public string Ship { get; set; } /// <summary> /// Type of event. /// </summary> public string Type { get; set; } /// <summary> /// Device received in the event. /// </summary> public string Device { get; set; } /// <summary> /// Description received in the event. /// </summary> public string Description { get; set; } /// <summary> /// Product received in the event. /// </summary> public string Product { get; set; } /// <summary> /// Amount received in the event. /// </summary> public int? Amount { get; set; } } |
And the second class is the event we will receive this from Event Grid.
/// <summary> /// Class used to receive ship event values. /// </summary> public class ShipEventValue { /// <summary> /// Time when event was created. /// </summary> public string EventTime; /// <summary> /// Data of the event. /// </summary> public ShipEventData Data; } |
Now let’s implement the Subscription class, which will be used to create the subscriptions we need for our sample when the API App starts.
/// <summary> /// Defines a subscription with its filters. /// </summary> public class Subscription { /// <summary> /// Name of the subscription. /// </summary> public string Name; /// <summary> /// Filter which will look at the start of the subscription's subject. /// </summary> public string PrefixFilter; /// <summary> /// Filter which will look at the end of the subscription's subject. /// </summary> public string SuffixFilter; } |
We will also need a class which will be used to insert our data into the Table Storage.
/// <summary> /// Used to insert ship events to Table Storage. /// </summary> public class ShipEventEntity : TableEntity { /// <summary> /// Constructor. /// </summary> public ShipEventEntity(string ship, string dateTime) { PartitionKey = ship; RowKey = dateTime; } /// <summary> /// Type of event. /// </summary> public string Type { get; set; } /// <summary> /// Device received in the event. /// </summary> public string Device { get; set; } /// <summary> /// Description received in the event. /// </summary> public string Description { get; set; } /// <summary> /// Product received in the event. /// </summary> public string Product { get; set; } /// <summary> /// Amount received in the event. /// </summary> public int? Amount { get; set; } } |
Controller
The controller is used to expose our methods to the outside world. In this case, we will provide four endpoints for different types of subscriptions. Each method will be called by the subscribtion on different events, and write the data it received to it’s own table in Table Storage. In a production implementation, this would probably be four different services, and for different parties who are interested in the events (for example, a specific ship might have to get it’s orders from supplier, while another ship gets it’s orders from supplier B).
We will change the name of the default ValuesController class to SubscriberController to better represent our scenario, and instantiate a CloudStorageAccount used to communicate with our Table Storage.
public class SubscribersController : ApiController { /// <summary> /// Storage account used to store to Table Storage. /// </summary> private readonly CloudStorageAccount _storageAccount = CloudStorageAccount.Parse(CloudConfigurationManager.GetSetting("AzureStorageConnectionString")); } |
Add the following method to the class, which will take the data we receive on our endpoints, and store it into Table Storage.
/// <summary> /// Insert Ship Event into table storage. /// </summary> private async Task InsertToTable(IReadOnlyList<ShipEventValue> value, string tableName) { // Check if any events were received if (value == null || value.Count == 0) { return; } // Create the table client var tableClient = _storageAccount.CreateCloudTableClient(); // Retrieve a reference to the table var table = tableClient.GetTableReference(tableName); // Create the table if it doesn't exist table.CreateIfNotExists(); // Create a new ship event entity var shipEventEntity = new ShipEventEntity(value[0].Data.Ship, value[0].EventTime) { Type = value[0].Data.Type, Product = value[0].Data.Product, Amount = value[0].Data.Amount, Device = value[0].Data.Device, Description = value[0].Data.Description }; // Create the TableOperation object that inserts the customer entity var insertOperation = TableOperation.Insert(shipEventEntity); // Execute the insert operation await table.ExecuteAsync(insertOperation); } |
And the final piece in this class are the methods for the endpoints. Notice the ActionName attributes, which we will use to have various endpoints in our API.
/// <summary> /// Receives all events. /// </summary> [ActionName("All")] public async Task<StatusCodeResult> PostAll([FromBody] List<ShipEventValue> value) { await InsertToTable(value, "All"); return new StatusCodeResult(HttpStatusCode.Created, this); } /// <summary> /// Receives all types of events for the ship Hydra. /// </summary> [ActionName("Hydra")] public async Task<StatusCodeResult> PostHydra([FromBody] List<ShipEventValue> value) { await InsertToTable(value, "Hydra"); return new StatusCodeResult(HttpStatusCode.Created, this); } /// <summary> /// Receives repairs for all ships. /// </summary> [ActionName("Repairs")] public async Task<StatusCodeResult> PostRepairs([FromBody] List<ShipEventValue> value) { await InsertToTable(value, "Repairs"); return new StatusCodeResult(HttpStatusCode.Created, this); } /// <summary> /// Receives orders for the ship Aeris. /// </summary> [ActionName("AerisOrders")] public async Task<StatusCodeResult> PostAerisOrders([FromBody] List<ShipEventValue> value) { await InsertToTable(value, "AerisOrders"); return new StatusCodeResult(HttpStatusCode.Created, this); } |
Configure Routes
Now hop on over to the WebApiConfig class, and implement the following code. This will generate the different endpoints for our Controller actions.
public static class WebApiConfig { public static void Register(HttpConfiguration config) { // Web API routes config.MapHttpAttributeRoutes(); config.Routes.MapHttpRoute(name: "routes", routeTemplate: "api/{controller}/{action}"); } } |
Subscriptions Creation
Finally we need to implement the Global.asax class, in which we will create our Event Grid Subscriptions on start up of the API App. This is where we define the subscriptions to be created, including their filters. Event Grid allows us to filter on the subject’s prefix and suffix, as well as the event type.
public class WebApiApplication : HttpApplication { /// <summary> /// Subscriptions to be created. /// </summary> private readonly List<Subscription> _subscriptions = new List<Subscription> { new Subscription { Name = "All" }, new Subscription { Name = "Hydra", PrefixFilter = "Hydra" }, new Subscription { Name = "Repairs", SuffixFilter = "Repair" }, new Subscription { Name = "AerisOrders", PrefixFilter = "Aeris", SuffixFilter = "Order" } }; } |
Currently we don’t have a SDK available to work with Event Grid, so we will be using a HttpClient to work directly against its API.
/// <summary> /// Create HTTP client used to communicate with Azure. /// </summary> /// <returns></returns> private static HttpClient CreateHttpClient() { // Create a HTTP client var httpClient = new HttpClient(); // Add key in the request headers httpClient.DefaultRequestHeaders.Add("Authorization", $"Bearer {CloudConfigurationManager.GetSetting("AuthorizationToken")}"); // Return the HTTP client return httpClient; } |
For each subsription, we will need to check if it does not already exist. This allows us to add new subscriptions whenever we want.
/// <summary> /// Check if subscription exists. /// </summary> private static async Task<bool> SubscriptionExists(string subscription) { // Check if subscription exists var result = await CreateHttpClient() .GetAsync( $"https://management.azure.com/subscriptions/{CloudConfigurationManager.GetSetting("SubscriptionID")}/resourceGroups/{CloudConfigurationManager.GetSetting("ResourceGroup")}/providers/Microsoft.EventGrid/topics/{CloudConfigurationManager.GetSetting("EventGridTopic")}/providers/Microsoft.EventGrid/eventSubscriptions/{subscription}?api-version=2017-06-15-preview"); return result.IsSuccessStatusCode; } |
If the specific subscription does not yet exist, we will create it using the following code.
/// <summary> /// Create subscription with filters. /// </summary> private static async Task CreateSubscription(string subscription, string prefixFilter, string suffixFilter) { // Set up create subscription message var createSubscription = new { properties = new { destination = new { endpointType = "webhook", properties = new { endpointUrl = $"{CloudConfigurationManager.GetSetting("ApiAppUrl")}/api/Subscribers/{subscription}" } }, filter = new { includedEventTypes = new[] { "shipevent" }, subjectBeginsWith = prefixFilter, subjectEndsWith = suffixFilter, subjectIsCaseSensitive = "false" } } }; // Create content to be sent var json = JsonConvert.SerializeObject(createSubscription); var content = new StringContent(json, Encoding.UTF8, "application/json"); // Create subscription await CreateHttpClient() .PutAsync( $"https://management.azure.com/subscriptions/{CloudConfigurationManager.GetSetting("SubscriptionID")}/resourceGroups/{CloudConfigurationManager.GetSetting("ResourceGroup")}/providers/Microsoft.EventGrid/topics/{CloudConfigurationManager.GetSetting("EventGridTopic")}/providers/Microsoft.EventGrid/eventSubscriptions/{subscription}?api-version=2017-06-15-preview", content); } |
And finally implement the method which will loop over our subscriptions, creating the ones we need. Call this method whenever the application is started.
/// <summary> /// Entry point of application. /// </summary> protected async void Application_Start() { GlobalConfiguration.Configure(WebApiConfig.Register); await CreateSubscriptions(); } /// <summary> /// Create subscriptions that don't exist. /// </summary> private async Task CreateSubscriptions() { // Check if subscriptions can be created, this will only be done if the endpoint of this API App has been updated in the settings if (CloudConfigurationManager.GetSetting("ApiAppUrl").ToLowerInvariant().Contains("tobereplaced")) { return; } // Loop through subsriptions foreach (var subscription in _subscriptions) { // Check if subscription already exists if (await SubscriptionExists(subscription.Name)) { continue; } // Create subscription await CreateSubscription(subscription.Name, subscription.PrefixFilter, subscription.SuffixFilter); // Wait for a while, to prevent throttling Thread.Sleep(5000); } } |
Deployment
Now that our API App has been completed, we can deploy it to Azure. Rightclick on the project, and select Publish. This will create the publishing wizard. Create a new API App, and set the properties where you want it to be deployed.
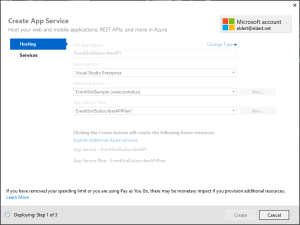
Publish API App
Once it has been deployed, we need to add the application settings for the API App in the portal.
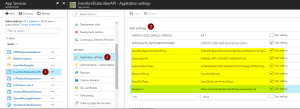
Add application settings
After the settings have been added, restart the API App. This will now start the creation of the subscriptions, which you should be able to see in the Event Grid blade after a minute or so.

Event Grid Subscriptons have been created by the API App
Testing
Now that we have our events set up end to end, we can use the application from this blog post to start generating events. These will then be routed by Event Grid to the endpoints of our subscriptions, which trigger the API App’s different methods. And finally, they will be stored into the various tables in our table storage. The complete code with this blog post can be found here.
Events stored in Table Storage