This post was originally published here
In this post I will showing how to use Bamboo to create Azure Virtual machine from existing disk image and to do deployment of the projects/artefacts on the newly created virtual machine. The Idea was to create a Dev/Test environment in the cloud with all the application installed.
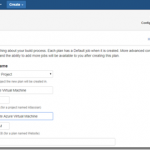
- Create New Plan in Bamboo.

2. Click on Configure Plan.
Add Task – Choose Script. Enter the PowerShell script as per the below. The script will ask for Azure Login details, enter your azure subscription login details. The below script will create a txt file VirtualMachine.txt with the value “BizTalkIpAddress=<IPAddress>” of the newly created Virtual machine

Login-AzureRmAccount
Get-AzureRmSubscription
Select-AzureRmSubscription -SubscriptionId “<your subscription id>”
Set-AzureSubscription -SubscriptionId “<your subscription id”
$resourceGroupName = “Dev-BizTalk-VM-ResourceGroup”
$sourceUri = “https://<storage Name>.blob.core.windows.net/vhds/bt2013R2Lab01btOSDisk.vhd” #Link to your existing disk image vhd file.
$location = “australiasoutheast”
$snapshotName = “bt2013R2Lab01btOSDisk_snapshot”
$StorageName = “btdevstorage”
$StorageType = “StandardLRS”
## Network
$InterfaceName = “btNetworkInterface0” + ${bamboo.buildNumber}
Write-Host “Inteface:”,${bamboo.buildNumber}
$Subnet1Name = “btSubnet01”
$VNetName = “btVNet01”
$VNetAddressPrefix = “10.0.0.0/16”
$VNetSubnetAddressPrefix = “10.0.0.0/24”
## Compute
$VMName = “bt2013R2Lab0” + ${bamboo.buildNumber}
$ComputerName = “bt2013R2Lab0” + ${bamboo.buildNumber}
$VMSize = “Standard_DS2_v2”
$OSDiskName = $VMName + “btOSDisk”
$disk = Get-AzureRmDisk -ResourceGroupName $resourceGroupName -DiskName $dataDiskName
$osDiskName = “bt2013R2Lab0” + ${bamboo.buildNumber} + “btOSDisk”
Write-Host “OSDiskName:”,$osDiskName
$osDisk = New-AzureRmDisk -DiskName $osDiskName -Disk `
(New-AzureRmDiskConfig -AccountType StandardLRS -Location $location -CreateOption Import `
-SourceUri $sourceUri) `
-ResourceGroupName $resourceGroupName
$storageacc = Get-AzureRmStorageAccount -ResourceGroupName $ResourceGroupName
# Network
$vnet = Get-AzureRMVirtualNetwork -Name $VNetName -ResourceGroupName $ResourceGroupName
$pip = New-AzureRmPublicIpAddress -Name $InterfaceName -ResourceGroupName $ResourceGroupName -Location $Location `
-AllocationMethod Dynamic
$nic = New-AzureRmNetworkInterface -Name $InterfaceName -ResourceGroupName $ResourceGroupName `
-Location $location -SubnetId $vnet.Subnets[0].Id -PublicIpAddressId $pip.Id -NetworkSecurityGroupId $nsg.Id
$user = “admin”
$password = ”
$securePassword = ConvertTo-SecureString $password -AsPlainText -Force
$Credential = New-Object System.Management.Automation.PSCredential ($user, $securePassword)
$vmConfig = New-AzureRmVMConfig -VMName $vmName -VMSize “Standard_A2”
$vm = Add-AzureRmVMNetworkInterface -VM $vmConfig -Id $nic.Id
# Create the VM in Azure
$vm = Set-AzureRmVMOSDisk -VM $vm -ManagedDiskId $osDisk.Id -StorageAccountType $StorageType `
-DiskSizeInGB 128 -CreateOption Attach -Windows
New-AzureRmVM -ResourceGroupName $ResourceGroupName -Location $location -VM $vm
Set-AzureRmVMAccessExtension -ResourceGroupName $resourceGroupName -VMName $VMName `
-Name $ComputerName -Location $location -UserName $Credential.GetNetworkCredential().Username `
-Password $Credential.GetNetworkCredential().Password -typeHandlerVersion “2.0”
$net=Get-AzureRmPublicIpAddress -ResourceGroupName $resourceGroupName -Name $InterfaceName
$ipAddress = $net.IpAddress
$Content = “BizTalkIpAddress=$ipAddress”
Write-Host $Content
write-output $Content | add-content ${bamboo.build.working.directory}PackagesVirtualMachine.txt
3. Create Deployment Steps.
- Artifact Download

- Inject Bamboo Variables. This is used to get the IP Address of the newly created virtual machine.

- Copy Package to the Azure VM. This is used to copy the downloaded packages to the newly created virtual machine.
$biztalkmachineIP = ${bamboo.Azure.BizTalkIpAddress}
Write-Host “BizTalkIpAddress:”,${bamboo.Azure.BizTalkIpAddress}
$user = “admin”
$password = ”
$securePassword = ConvertTo-SecureString $password -AsPlainText -Force
$Credential = New-Object System.Management.Automation.PSCredential ($user, $securePassword)
$InstallerFile = “C:SRCSTT.Common.IaaS.TestSTT.Common.IaaS.TestMSISTT.Common.IaaS.msi”
New-PSDrive -Name Y -PSProvider filesystem -Root “${bamboo.Azure.BizTalkIpAddress}C$” -Credential $Credential
Copy-Item $InstallerFile -destination Y: -recurse
Remove-PSDrive Y
#$session = New-PSSession -ComputerName ${bamboo.Azure.BizTalkIpAddress} -Credential $Credential -ConfigurationName Microsoft.Powershell32
#$LASTEXITCODE = Invoke-Command -Session $session -ScriptBlock {msiexec.exe /i “C:STT.Common.IaaS.msi” /passive /log “c:log.txt”}

- Install Application : This script will execute the installer package. This is just to prove that the packages are getting installed on the new machine.
Write-Host “BizTalkIpAddress:”,${bamboo.Azure.BizTalkIpAddress}
$user = “admin”
$password = ”
$securePassword = ConvertTo-SecureString $password -AsPlainText -Force
$Credential = New-Object System.Management.Automation.PSCredential ($user, $securePassword)
$session = New-PSSession -ComputerName ${bamboo.Azure.BizTalkIpAddress} -Credential $Credential -ConfigurationName Microsoft.Powershell32
$LASTEXITCODE = Invoke-Command -Session $session -ScriptBlock {msiexec.exe /i “C:STT.Common.IaaS.msi” /passive /log “c:log.txt”}
$exit_status = $LASTEXITCODE
exit $exit_status

The whole idea is to how create instant environment in the Cloud. Once the environment is created we can download/build the packages from any repository and deploy to the new machine. I’ve just used bamboo because to give visual touch and use as an continuous Integration and deployment.
Note: This is not the BizTalk environment, with BizTalk there is still few things to be done on the machine.
Thanks.