The ASP.NET team just released the first public preview of ASP.NET MVC Version 2. You can download it here.
Today’s preview works with .NET 3.5 SP1 and VS 2008, and can be installed side-by-side on the same machine as ASP.NET MVC 1.0 (meaning they don’t conflict and your existing ASP.NET MVC 1.0 projects will not be impacted if you install it). If you have both ASP.NET MVC 1.0 and ASP.NET MVC 2.0 installed you’ll see two ASP.NET MVC project templates within Visual Studio 2008’s “New Project” dialog:

The release notes that come with the ASP.NET MVC 2 Preview release detail how to upgrade existing ASP.NET MVC 1.0 projects to use V2 if you’d like to migrate them forward to take advantage of the new features.
New Features
ASP.NET MVC V2 will include a bunch of new capabilities and features (some of these have already been called out on the ASP.NET MVC roadmap page). Today’s “Preview 1” release contains a first look at some of the new features. Many more features will show up in future preview builds. The Preview 1 bits are still relatively early – the team is releasing today’s build to start receiving and incorporating feedback.
Below are some quick details about some of the new Preview 1 capabilities:
Areas Support
ASP.NET MVC 2 includes support for a new feature called “areas” that allow you to more easily partition and group functionality across an MVC application.
Areas provide a means of grouping controllers and views to allow building subsections of a large application in relative isolation to other sections. Each area can be implemented as a separate ASP.NET MVC project which can then be referenced by the main application. This helps manage the complexity when building a large application and facilitates multiple teams working together on a single application together.
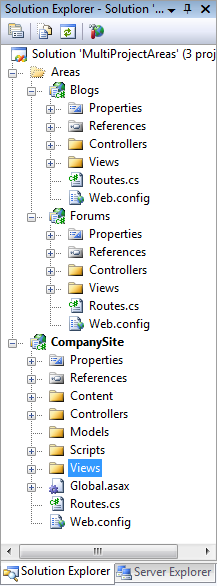
Below is a screen-shot that shows a single solution that has three projects. One of the projects is named “CompanySite” and includes the core site content, layout and controllers and views. There are then two separate “Area” projects – “Blogs” and “Forums”. These projects implement the functionality that exists under the /Blogs and /Forums URL sections of the site – and encapsulate all of the routing rules, controllers and views implementing these sections:
The Preview 1 release includes the first part of the areas feature implementation. It doesn’t include any tool support yet (right now you need to manually add a build task to create an area project and set it up). Future preview releases will include tooling support, and expand and refine the feature-set further.
DataAnnotation Validation Support
ASP.NET MVC 2 now includes built-in support for the DataAnnotation validation support that first shipped with .NET 3.5 SP1 – and which is used with ASP.NET Dynamic Data and .NET RIA Services. DataAnnotations provides an easy way to declaratively add validation rules to Model and ViewModel classes within an application, and have automatic binding and UI helper validation support within ASP.NET MVC.
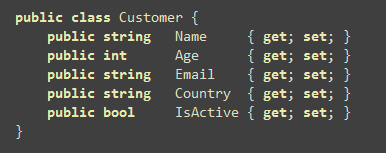
To see this feature in action, we can create a new “Customer” ViewModel class like below that has five properties on it (implemented using the C# automatic property feature).
We can then decorate the properties with appropriate validation rules using the DataAnnotation attributes implemented within the System.ComponentModel.DataAnnotations namespace. The code below uses 4 different built-in validation rules – [Required], [StringLength], [Range], and [RegularExpression]. The namespace also includes a base class (ValidationAttribute) that you can subclass to create your own custom validation attributes.

We can then create a CustomersController class that has two Create action methods on it. The first Create action method handles HTTP GET requests to the “/Customers/Create” URL, and renders a view template based on an empty Customer object. The second Create action method handles HTTP POST requests to the same URL (and takes a Customer object as a method parameter). It checks if there are any model binding errors to the input submitted, and if there are errors it redisplays the view template using the already entered data. If there are no errors it displays a success view to the user:

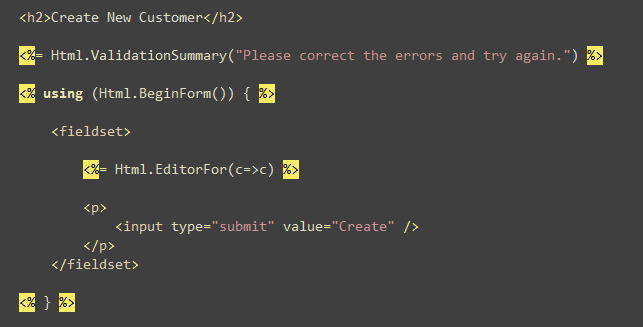
Finally, we can right-click within either of the Create action methods above, choose the “Add View” context menu command, and automatically “scaffold” a “create” view template that is based on the Customer object. When we do this the generated scaffolded view template will contain the below HTML <form> for our Customer:

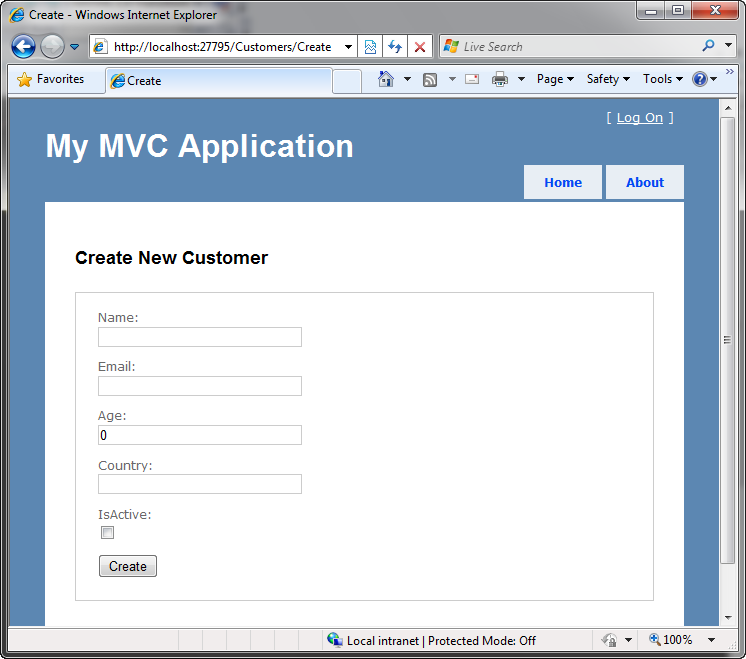
And now when we request the “/Customers/Create” URL in our browser we’ll get an initial empty form like below:
If we enter invalid input and perform a post to the server, the ASP.NET MVC 2 model binder will detect that there are DataAnnotations attributes on our Customer class, and automatically validate the posted form input using them. If there are errors our controller action method redisplays the form – which will cause the appropriate validation error messages to be rendered to the user like below. Note how the validation property error message strings we specified using the DataAnnotation attributes are displayed to the user by the Html.Validation helper methods. No extra code is required to enable this.

The above form will redisplay with error messages each time the user enters invalid input and attempts to perform a form post.
In a future ASP.NET MVC 2 preview we are planning to ship the jQuery Validation plugin as part of the default project template, and add support for the automatic client-side JavaScript enforcement of DataAnnotation validation rules as well. This will enable developers to easily add validation rules in one place on either a Model or ViewModel object, and have them be enforced both client and server-side everywhere it is used within the application.
If you do not wish to annotate your model or viewmodel classes directly, you can alternatively create a “buddy class” that accompanies your model class and encapsulates the DataAnnotaton rules separately. This capability is also useful for scenarios where VS is code-generating/updating the properties on a class directly and you cannot easily add attributes to the generated code (for example: classes generated by the LINQ to SQL or LINQ to Entities designers).
In addition to providing built-in support for DataAnnotations, the DefaultModelBinder class in ASP.NET MVC V2 now has new virtual methods that can be overridden to easily integrate other validation frameworks as well (for example: Castle Validator, EntLib Validation, etc). The validation UI helper methods in ASP.NET MVC are designed to support any type of validation framework (they have no direct knowledge of DataAnnotations).
Strongly Typed UI Helpers
ASP.NET MVC V2 includes new HTML UI helpers that enable you to use strong-typed lambda expressions when referencing the view template’s model object. This enables better compile-time checking of views (so that bugs can be found at build-time as opposed to runtime), and also enables better code intellisense support within view templates.
You can see an example of the better intellisense in action below – notice how I am getting a full listing of the customer model object’s properties when using the new Html.EditorFor() helper method:

Preview 1 has built-in support for new Html.EditorFor(), Html.LabelFor(), and Html.DisplayFor() helpers. An updated MVC futures assembly that we are shipping this week adds additional Html.TextBoxFor(), Html.TextAreaFor(), Html.DropDownListFor(), Html.HiddenFor(), and Html.ValidationMessageFor() helper methods as well (overtime these will move into the core ASP.NET MVC 2 assembly too).
Below you can see an updated version of the “create” view template for our customer creation scenario. Notice how instead of using string expressions to reference the customer object we are instead using strongly-typed lambda expressions with the UI helpers. We can get full intellisense and compile-time checking with all of them:

The Html.LabelFor() helper method above generates <label for="Name">Name:</label> HTML markup.
The Html.EditorFor() helper method can be used for any datatype value. By default it is smart and will output an appropriate HTML <input/> element based on the type to be edited. For example, it will generate <input type=”text”/> elements for the first four properties above (which are strings and integers). It will generate a <input type=”checkbox”/> element for the final “IsActive” property – which is of type boolean.
In addition to supporting simple data-types, the Html.EditorFor() helper method also allows you to pass more complex objects with multiple properties to it. By default it will loop over the public properties of the object and generate a <label>, <input/> element, and any appropriate validation message for each property it finds. For example, we could re-write the above view to have just a single Html.EditorFor() call for the Customer object to conceptually output the same markup as above:
The strongly typed helpers allow you to optionally decorate the properties of the Customer ViewModel class with [DisplayName] attributes to control the label string that is output for each property used (for example: instead of having a label text of “IsActive” we could apply a [DisplayName(“Is Active Customer:”)] attribute).
You can also add [ScaffoldColumn(false)] attributes to indicate that a particular property shouldn’t be rendered at all in scenarios like above where complex objects are passed to Html.EditorFor().
UI Helper Templating Support
The Html.EditorFor() and Html.DisplayFor() helper methods have built-in support for rendering both standard data-types as well as complex objects with multiple properties. As noted above, they also support basic customization of rendering by applying attributes like [DisplayName] and [ScaffoldColumn] to the ViewModel.
Often developers want to be able to customize the output from UI helpers even further, though, and have total control over what is generated. The Html.EditorFor() and Html.DisplayFor() helper methods support this via a templating mechanism that allows you to define external templates that can override and completely control the output rendered. Better yet, you can customize the content rendered on a per-datatype/class basis.
With Preview 1 you can now optionally add an “EditorTemplates” and/or “DisplayTemplates” folder underneath either a \Views\[controllername] directory (if you want to customize the rendering for views used by a specific controller) or underneath the \Views\Shared folder (if you want to customize the rendering for all views and controllers in an application).
You can then add partial template files to these folders to customize the output rendering performed on an individual datatype and/or class basis. For example, below I have added an EditorTemplates folder underneath the \Views\Shared folder – and added three custom template files to it:

The “Customer.ascx” template above indicates that I want to customize the output anytime Html.EditorFor() is passed a Customer object (for example: I could customize the exact ordering/layout of the Customer properties). The “DateTime.ascx” template above indicates that I want to customize the output anytime Html.EditorFor() is passed a DateTime property (for example: I might want to use a JavaScript datepicker instead of a plain textbox). I could optionally add an “Object.ascx” template to the folder if I wanted to override the default rendering of all objects.
In addition to customizing rendering on a per-type basis, you can also add “named templates” to the folder. A common scenario might be a “CountryDropDown” template that handles a string datatype – but instead of providing a standard textbox instead renders a <select> dropdownlist of country values that a user can pick from. Below is what this editor template might look like:

We can explicitly indicate that we want to use the above template by passing its name as an argument when we invoke the Html.EditorFor() helper method. For example, below in addition to specifying a lambda expression for our Country property, we are also specifying the name of the editor template to use when rendering it:

Alternatively, you can specify “UIHint” attributes on your ViewModel properties and types. This allows you to indicate the default editor or display template to use in a single place, and have it be used in all views across your application (without having to explicitly pass it as an argument to Html.EditorFor).
Below is an example of how to indicate using a UIHint attribute that the Customer.Country property (which is of type string) should by default use the CountryDropDown template when being rendered:
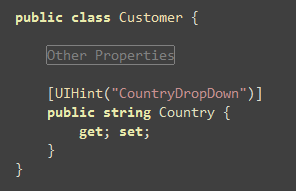
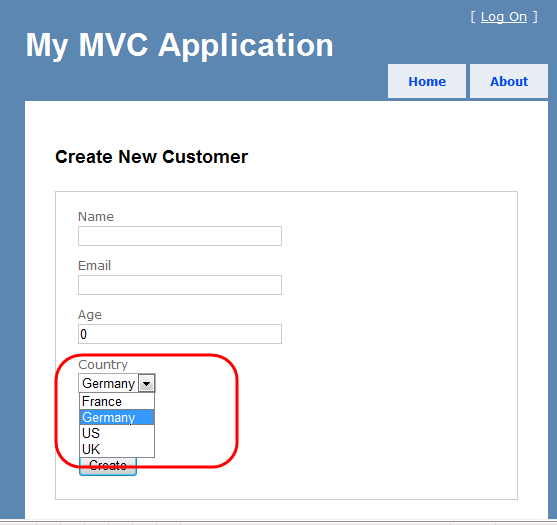
Once we set the above attribute on our ViewModel we no longer need to specify a template name explicitly when we use that property with Html.EditorFor(). And now when we hit refresh on our /Customers/Create URL our Country property will be rendered as a dropdown instead of a standard textbox:
Other Cool Features
ASP.NET MVC 2 Preview 1 includes a number of other small, but really nice, feature additions. A few of my favorites include:
New [HttpPost] Attribute
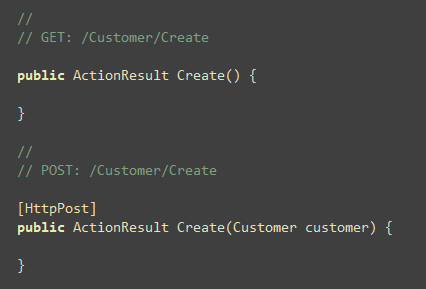
It is pretty common with ASP.NET MVC to split up the handling of a URL across two action methods – one that handles GET requests and one that handles POST requests.
With ASP.NET MVC 1 you used an [AcceptVerbs(HttpVerbs.Post)] attribute to indicate the “Post” version of an action method:

This still works with ASP.NET MVC 2. Alternatively, though, you can also now take advantage of a terser [HttpPost] attribute that does the same thing:
Default Parameter Values
Handling optional parameters is a pretty common web scenario. With ASP.NET MVC 1 you could handle optional parameters either by registering a custom routing rule and specifying a default value with it, or by marking an action method parameter as nullable and then adding code within your action method to handle whether it was null (and if so provide a default value).
ASP.NET MVC 2 Preview 1 now supports decorating action method parameters with the DefaultValueAttribute from the System.ComponentModel namespace. This allows you to specify a parameter value that ASP.NET MVC should pass in if it is not present as part of the request. For example, below is an example of how we could handle both the /Products/Browse/Beverages and /Products/Browse/Beverages?page=2 URLs – and have the “page” parameter value be “1” if it isn’t provided as part of the querystring:

VB today allows you to specify default parameter values directly within the VB language (avoiding the need to explicitly specify the DefaultValue attribute like above). C# in VS2010 will also support default values with optional parameters – which will enable you to rewrite the above code simply as:

This should make handling default/optional scenarios really easy and clean.
Binding Binary Data
ASP.NET MVC Preview 1 adds support for binding base64-encoded string values to properties of type byte[] and System.Data.Linq.Binary. There are now two overloaded versions of Html.Hidden() that can take these data-types. These can be useful for scenarios where you want to enable concurrency control within your application and want to roundtrip timestamp values of database rows within your forms.
Summary
Click here to download a .zip file that contains a ASP.NET MVC 2 project that implements the sample code I demonstrated in the above walkthrough.
Today’s build of ASP.NET MVC 2 is just a first preview. More features will be coming in future previews, and the team expects to get a lot of feedback on ways to improve and enhance the release.
The goal with doing these regular previews is to help make sure that this feedback process is open and that anyone who wants to participate can easily get involved. Please post any feedback, suggestions or problems you have to the ASP.NET MVC Forum on www.asp.net. You can also learn more about the release from Phil Haack’s MVC2 post, and from the Channel9 video Phil did with Scott Hanselman about the Preview 1 release.
Hope this helps,
Scott
P.S. I have been using Twitter more recently to-do quick posts and share links. You can follow me on Twitter at: http://www.twitter.com/scottgu (@scottgu is my twitter name)