After the release of a set of Azure Functions that will help us minimize or completely remove the need for an Integration Account:
Today, I’m going to release a new function – validate XML against DTD – that will bring additional capabilities to Logic App Consumption and Standard since this functionality is not currently supported in either of the tiers nor with the support of the Integration Account.
DTD? What is a DTD?
Yes, this is probably old school, which is not often used nowadays. But DTD, which stands for Document Type Definition, allows you to define the structure and the legal elements and attributes of an XML document.
This is a sample of a DTD file:
And this is a sample of an XML message with a reference to a DTD:
   My stock
   nine
   (099) 999-9999
The DOCTYPE declaration above contains a reference to a DTD file.
Although the use of DTDs is not very frequent to see these days, it is still very common to encounter this in RosettaNet PIPs.
Validate XML against DTD
A Document Type Definition (DTD) is a document that describes the structure of an XML document, what elements and attributes it contains, and what values it may have. DTDs form part of the W3C’s XML Standard but are typically considered to be a separate schema technology and are not typically used in conjunction with other schema formats like XSD and so on.
A DTD document can be embedded within an XML file or can exist on its own. When it is not embedded, normally, there are two ways to reference the DTD:
Using the PUBLIC keyword: This format is generally used to declare publicly available DTDs, standard character sets, and commonly used notations
Or using the SYSTEM keyword: These entities are not assumed to be known to a receiving system. Thus, such entities require a full declaration of system identification (path, etc.) when they are exchanged.
The SYSTEM identifier specifies the location of the DTD file. Since it does not start with a prefix like http:/or file:/, the path is relative to the location of the XML document.
This Azure Function allows you to perform XML validations against a DTD file. The function only accepts DTDs defined using the SYSTEM keyword.
To trigger this function, you need to:
In the Body, the XML payload that you want to be validated.
You should specify the following mandatory headers:
Content-Type as text/xml (or application/xml).
DTDFileName with the name of the DTD file present in the storage account.
The response will be a:
200 OK – Validation successful. If it’s a valid message.
Or 400 Bad Request with a list of errors if there is something invalid.
Where can I download it?
You can download the complete Azure Functions source code here:
Hope you find this helpful! So, if you liked the content or found it useful and want to help me write more, you can buy (or help me buy) my son a Star Wars Lego!
Author: Sandro Pereira
Sandro Pereira lives in Portugal and works as a consultant at DevScope. In the past years, he has been working on implementing Integration scenarios both on-premises and cloud for various clients, each with different scenarios from a technical point of view, size, and criticality, using Microsoft Azure, Microsoft BizTalk Server and different technologies like AS2, EDI, RosettaNet, SAP, TIBCO etc.
He is a regular blogger, international speaker, and technical reviewer of several BizTalk books all focused on Integration. He is also the author of the book “BizTalk Mapping Patterns & Best Practices”. He has been awarded MVP since 2011 for his contributions to the integration community.
View all posts by Sandro Pereira
After the release of our previous XML Validation Functions:
It is now time to release our last Azure Function under the same context: an Azure Function to Apply XML Validation (Advanced).
As I explained in my previous posts, all the out-of-the-box Azure Integration Services capabilities to validate XMLs have a huge limitation: they don’t allow us tohave a chain of XML Schemas! As I also mentioned, this is a common feature present in many Enterprise XML Schemas definitions. EDI or RosettaNet Schemas may have 2 or more schemas that define the overall structures of the messages. Blocking this way many enterprise scenarios that we need to address in our Azure integration solutions.
Our previous Azure Function allows us to solve many of those scenarios, and it can be used inside Logic Apps Consumption or Standard or even inside API Management. However, it also has a limitation: it only allows first-level chain support for XML Schemas (meaning that it will only take into consideration all the import schemas of the main XML Schema).
However, for example, in RosettaNet Schemas, it is very common that our main schema imports a “child” XML Schema and that child schema imports or includes other XML Schemas itself.
Apply XML Validation (Advanced)
What does this Azure Function do?
This Azure Function allows you to perform XML validations against an XML Schema, including support for all chains of XML Schemas. That means that it will take into consideration all depth of importation for a specific type of message. It will recursively include or import all XML Schemas, supporting this way all types of XML message validation.
To trigger this function, you need to:
In the Body, the XML payload that you want to be validated.
You should specify the following mandatory headers:
Content-Type as text/xml (or application/xml).
SchemaFileName with the name of the XML Schema (XSD) file present in the storage account.
The response will be a:
200 OK – Validation successful. If it’s a valid message.
Or 400 Bad Request with a list of errors if there is something invalid.
Notice that by default, if you send a message to be validated against a schema that doesn’t have the same target namespace and root node, the response will be an OK. This function also validates that type of message, so if you send a message that doesn’t correspond to that schema, you will get a 400 Bad Request.
Where can I download it?
You can download the complete Azure Functions source code here:
Hope you find this helpful! So, if you liked the content or found it useful and want to help me write more, you can buy (or help me buy) my son a Star Wars Lego!
Thanks to my team member Luís Rigueira for helping me realize and implement this idea.
Author: Sandro Pereira
Sandro Pereira lives in Portugal and works as a consultant at DevScope. In the past years, he has been working on implementing Integration scenarios both on-premises and cloud for various clients, each with different scenarios from a technical point of view, size, and criticality, using Microsoft Azure, Microsoft BizTalk Server and different technologies like AS2, EDI, RosettaNet, SAP, TIBCO etc.
He is a regular blogger, international speaker, and technical reviewer of several BizTalk books all focused on Integration. He is also the author of the book “BizTalk Mapping Patterns & Best Practices”. He has been awarded MVP since 2011 for his contributions to the integration community.
View all posts by Sandro Pereira
After the release of our Azure Function to Apply XML Validation (Basic), it is now time for another Azure Function under the same context: an Azure Function to Apply XML Validation (Intermedium).
You may be wondering why a new Azure Function is required to archive the same?And why not only one with all capabilities?
Both are good questions that I will be happy to respond to. First of all, in my last blog post, I mentioned that, in the next few days, we will be releasing two additional versions of this function with more functionalities/capabilities. And to answer the second question, the main reason why I decided to do 3 different versions is performance. The basic function has fewer capabilities, but it will have better performance. Of course, the advanced function will have all the capabilities, but it will have a small overhead in the overall performance.
The previous Azure Function is great for basic validations, similar to what we can archive using the default out-of-the-box capabilities inside:
Logic Apps Standard;
Logic Apps Consumption using the Integration Account;
Or in API Management
Of course, the basic XML Validation Function it is a good approach to replace the dependency of the Integration Account in Logic App Consumption.
But all of them have a huge limitation! None of those services allow a chain of XML Schemas!
What do you mean by a chain of XML Schemas?
XML Schema provides mechanisms to include or import other XML Schema documents, enabling the reuse and extension of schema definitions across multiple files. This capability is essential for managing complex schemas in a modular and maintainable manner.
Include: The include element is used when you want to incorporate definitions from another schema that is in the same target namespace. By using include, you can split your schema definitions into separate, smaller files for better manageability and readability while treating them as part of a single schema during validation. The included schema essentially becomes a subset of the including schema, allowing for the extension or redefinition of elements and types within the same namespace.
Import: The import element is used to incorporate definitions from another schema that is in a different target namespace or from no namespace into the current schema. This allows you to reference and use types and elements defined in an external schema within your current schema document. Importing is crucial when you need to integrate or reference types defined in a completely separate schema, possibly managed by a different organization or standard body.
Both include and import mechanisms facilitate the construction of complex XML schemas from modular components, promoting reuse and simplifying the management of schema definitions. They enable schema designers to build upon existing standards and to organize their schema definitions logically and efficiently.
This a common feature present in many Enterprise XML Schemas definitions. EDI or RosettaNet Schemas may have 2 or more schemas that define the overall structures of the messages.
Apply XML Validation (Intermedium)
What does this Azure Function do?
This Azure Function allows you to perform XML validations against an XML Schema, including first-level chain support for XML Schemas. That means that it will take into consideration all the import schemas of the main XML Schema
To trigger this function, you need to:
In the Body, the XML payload that you want to be validated.
You should specify the following mandatory headers:
Content-Type as text/xml (or application/xml).
SchemaFileName with the name of the XML Schema (XSD) file present in the storage account.
The response will be a:
200 OK – Validation successful. If it’s a valid message.
Or 400 Bad Request with a list of errors if there is something invalid.
Notice that by default, if you send a message to be validated against a schema that doesn’t have the same target namespace and root node, the response will be an OK. This function also validates that type of message, so if you send a message that doesn’t correspond to that schema, you will get a 400 Bad Request.
Where can I download it?
You can download the complete Azure Functions source code here:
Hope you find this helpful! So, if you liked the content or found it useful and want to help me write more, you can buy (or help me buy) my son a Star Wars Lego!
Thanks to my team member Luís Rigueira for helping me realize and implement this idea.
Author: Sandro Pereira
Sandro Pereira lives in Portugal and works as a consultant at DevScope. In the past years, he has been working on implementing Integration scenarios both on-premises and cloud for various clients, each with different scenarios from a technical point of view, size, and criticality, using Microsoft Azure, Microsoft BizTalk Server and different technologies like AS2, EDI, RosettaNet, SAP, TIBCO etc.
He is a regular blogger, international speaker, and technical reviewer of several BizTalk books all focused on Integration. He is also the author of the book “BizTalk Mapping Patterns & Best Practices”. He has been awarded MVP since 2011 for his contributions to the integration community.
View all posts by Sandro Pereira
After the release of our two previous Azure Functions that will help us minimize or completely remove the need for an Integration Account:
Today is the correct time to release another Azure Function that will replace another Integration Account functionality: an Azure Function to Apply XML Validation.
Of course, you can apply out-of-the-box this functionality in:
Logic App Standard (without the need for an Integration Account)
However, Logic App Consumption requires an Integration Account to provide those same capabilities out of the box.
Once again, our main objective in creating this specific version of this function was to use it inside Logic Apps Consumption to avoid needing an Integration Account. But that we will address later on in another blog post.
If you are wondering what I mean by this specific version of this function, well, in the next few days, we will be releasing two additional versions of this function with more functionalities. But, once again, that we will address later on in another blog post.
Apply XML Validation (Basic)
XML (Extensible Markup Language) validation is the process of checking an XML document against a set of rules to ensure its structure and content adhere to a specific format or standard. This process is crucial for ensuring that the XML document is both well-formed and valid.
Well-formed XML: This means that the XML document follows the basic syntax rules laid out by the XML specification. These rules include proper nesting of elements, correct use of opening and closing tags, attribute value quoting, and more. A well-formed XML document is one that can be correctly parsed and understood by an XML parser.
Valid XML: Beyond being well-formed, a valid XML document also adheres to a specific schema or Document Type Definition (DTD) that defines the structure, content, and relationships within the document. Validation against a schema or DTD ensures that the XML document contains the expected elements, attributes, and data types, and that these components are organized in a defined way.
There are several schema languages used for XML validation, with the most common being:
DTD (Document Type Definition): An older schema language that defines the structure and allowed content within an XML document. – Not supported in the Azure Function.
XML Schema (also known as XSD): A more powerful and expressive schema language that allows for more detailed specifications of the content and structure, including data types and namespace support.
XML validation is performed using XML parsers or validation tools, which can programmatically check a document against its DTD or XSD to ensure compliance. This is a critical step in many data exchange, configuration management, and content authoring workflows, ensuring that the data is correctly structured and interpretable by receiving systems or applications.
What does this Azure Function do?
This Azure Function allows you to perform basic XML validations against an XML Schema.
To trigger this function, you need to:
In the Body, the XML payload that you want to be validated.
You should specify the following mandatory headers:
Content-Type as text/xml (or application/xml).
SchemaFileName with the name of the XML Schema (XSD) file present in the storage account.
The response will be a:
200 OK – Validation successful. If it’s a valid message.
Or 400 Bad Request with a list of errors if there is something invalid.
Notice that by default, if you send a message to be validated against a schema that doesn’t have the same target namespace and root node, the response will be an OK. This function also validates that type of message, so if you send a message that doesn’t correspond to that schema, you will get a 400 Bad Request.
Where can I download it?
You can download the complete Azure Functions source code here:
Hope you find this helpful! So, if you liked the content or found it useful and want to help me write more, you can buy (or help me buy) my son a Star Wars Lego!
Thanks to my team member Luís Rigueira for helping me realize and implement this idea.
Author: Sandro Pereira
Sandro Pereira lives in Portugal and works as a consultant at DevScope. In the past years, he has been working on implementing Integration scenarios both on-premises and cloud for various clients, each with different scenarios from a technical point of view, size, and criticality, using Microsoft Azure, Microsoft BizTalk Server and different technologies like AS2, EDI, RosettaNet, SAP, TIBCO etc.
He is a regular blogger, international speaker, and technical reviewer of several BizTalk books all focused on Integration. He is also the author of the book “BizTalk Mapping Patterns & Best Practices”. He has been awarded MVP since 2011 for his contributions to the integration community.
View all posts by Sandro Pereira
Last week, we posted a Logic App, Best Practices, Tips, and Tricks, about the ability to resubmit multiple runs at once and how that process can be a tedious and sometimes complicated process. Luckily for us, new features appeared recently, and that process was somehow minimized. Nevertheless, a little confused.
At the time we were investigating those capabilities, we were finalizing the development of a tool to achieve that goal. Since this tool had already been developed, we decided to make it available.
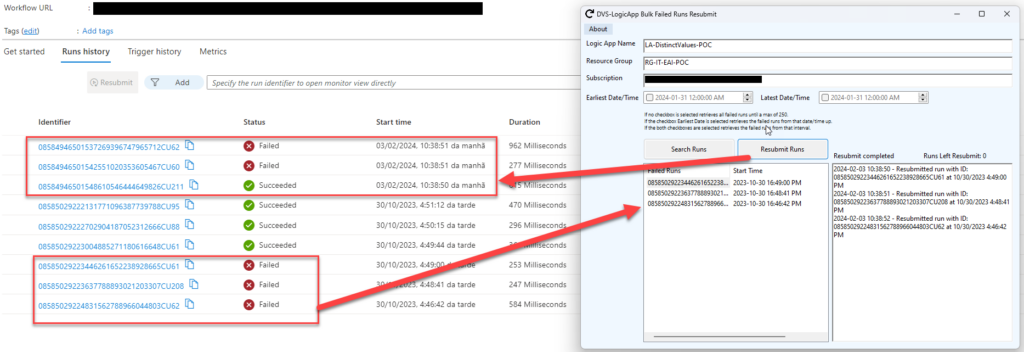
This is a simple .NET Windows application that allows you to easily resubmit multiple Logic App Consumption runs at once.
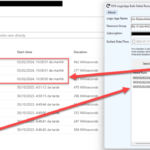
To archive that, you need to be already authenticated on your Azure Portal, and you need to provide the following parameters:
Logic App name;
Resource Group;
and Subscription ID;
Optionally, you can select a DateTime range to filter the failed runs you need to resume.
If you don’t select a range, all failed runs until a max of 250 will be presented.
Where can I download it?
You can download the complete Logic App Consumption Bulk Failed Runs Resubmit tool source code here:
Hope you find this helpful! So, if you liked the content or found it useful and want to help me write more, you can buy (or help me buy) my son a Star Wars Lego!
Thanks to my team member Luís Rigueira for being the mentor of this idea.
Author: Sandro Pereira
Sandro Pereira lives in Portugal and works as a consultant at DevScope. In the past years, he has been working on implementing Integration scenarios both on-premises and cloud for various clients, each with different scenarios from a technical point of view, size, and criticality, using Microsoft Azure, Microsoft BizTalk Server and different technologies like AS2, EDI, RosettaNet, SAP, TIBCO etc.
He is a regular blogger, international speaker, and technical reviewer of several BizTalk books all focused on Integration. He is also the author of the book “BizTalk Mapping Patterns & Best Practices”. He has been awarded MVP since 2011 for his contributions to the integration community.
View all posts by Sandro Pereira
Azure Cost Optimizations is a very complex topic, and depending on the services you are using, it will require different skills and knowledge. Today, I’m going to speak about Logic App Consumption and skipped triggers.
Of course, when you think about optimizing Logic App Consumption costs, it is very important to understand all the cost calculations and how your flow design affects these costs. Once you understand those topics, you will be faced with different solutions to optimize the costs. Some of them require redesigning your workflows; others are a matter of monitoring, automation, and configuration.
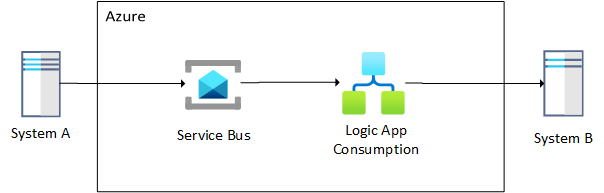
But first, let’s add some context and provide a common example that I will assume that many customers will find it familiar:
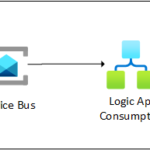
We have one or more systems sending messages to a Service Bus Topic or Queue;
And we have a Logic App that is pulling messages each X amount of time;
Process them and send them to other systems.
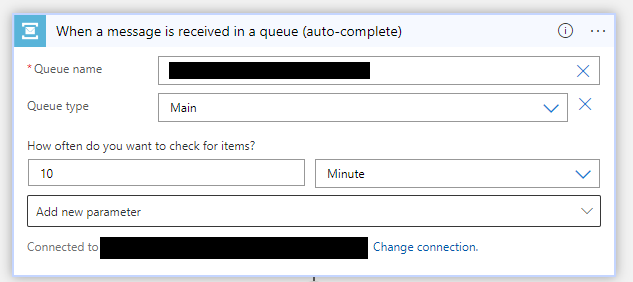
I found it very common to see the configuration of the Service Bus trigger and see that the polling interval is configured to be 30 seconds.
I ask you not to get me wrong. This configuration itself is not bad, and in many scenarios, it can be exactly what we want and need. But in some cases, it may be too aggressive.
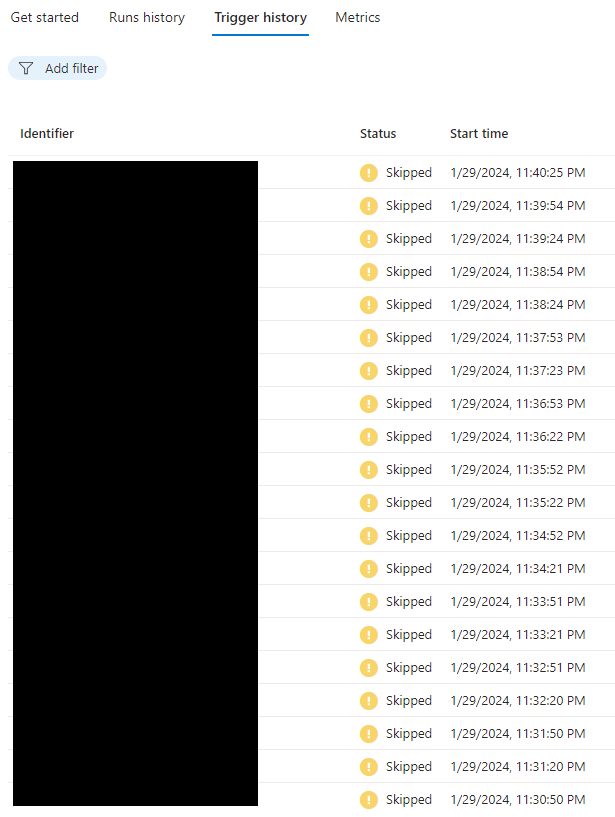
The ideal scenario is to analyze the integration run history, speak to all parties involved, and adjust these values. When I was reviewing one of these cases in one of my clients, I noticed that every day, the pulling only occurred between 5:00 AM and 5:01 AM. Actually, in many cases, it took 9 seconds to process all the messages:
At first, I didn’t give it much importance, but when I checked the pulling configuration and the trigger history, I realized that every 30 seconds, there was a skipped trigger occurrence:
Why is this important?
As I mentioned in the beginning, it is essential to understand all the cost calculations inside Logic Apps correctly. For example:
Per subscription, you will have the first 4,000 actions for free each day!
Notice that this is not 4000 per Logic App. This is the combination of all action executions of all Logic Apps within a subscription.
A good benefit of Logic Apps is that the action costs are quite cheap. For example, 600.000 action executions per day will cost you an average of $14,90 per month.
On the other hand, despite not being too expensive, connection executions are a little bit more costly, and you don’t have free executions.
Another thing that you need to be aware of is that Azure Logic Apps meters all successful and unsuccessful actions as executions. However, Logic Apps don’t meter these actions:
Actions that get skipped due to unmet conditions
Actions that get skipped due to unmet conditions
However, it is important for you to be aware that skipped triggers are billable.
Now, you may be wondering: why should I care? That’s just a few dollars a month!
Let’s do a small exercise:
Knowing that one day is 86400 seconds and you have one Logic App configured with the polling interval to be 30 seconds. That gives you a total of 2,880 trigger executions per day for that single Logic App.
That makes a total of $0.36 per month, $4.32 per year. That’s nothing, right?
Assuming that we have 4 environments: Development, test, QA, and Production, that makes a total of $17.28 per year. It’s still very decent.
But that could also be $0.48 per year if properly configured!
Now, we know that we will have many of those scenarios, so let’s assume that we have 10 Logic Apps in this same situation.
10 Logic Apps x 2,880 trigger executions each = 28800 trigger executions each per day, making a total of $3.60 per month, $43.20 per year.
Once again, assuming that we have 4 environments: Development, test, QA, and Production, that makes a total of $172.80 per year. Well, it is already some money. It is nothing really expensive, but it is not a few dollars anymore.
But what if I tell you that the total cost could also be $4.80 per year if properly configured? That’sThat’s a $168 saving each year in 10 Logic Apps.
Now, if we go to more enterprise scenarios, where we find 100 Logic Apps doing this behavior, and trust me, it is a small number. Then you will have a different picture because:
100 Logic Apps x 2,880 trigger executions each = 288000 trigger executions each per day, making a total of $36.00 per month, $432.00 per year.
If we assume the same number of environments, then that makes a total of $1,728.00 per year.
That can easily be $48.00 per year if properly configured! That’s a huge saving.
So, it can make a difference just by controlling the pulling strategy.
How can we improve this and optimize the costs?
Depending on the scenarios and requirements, you may find several approaches:
The first and straightforward approach is to have a less aggressive pulling period, passing, for example, from every 30 seconds to every 10 minutes or more.
This doesn’t require any redesign of the solution, only a different configuration.
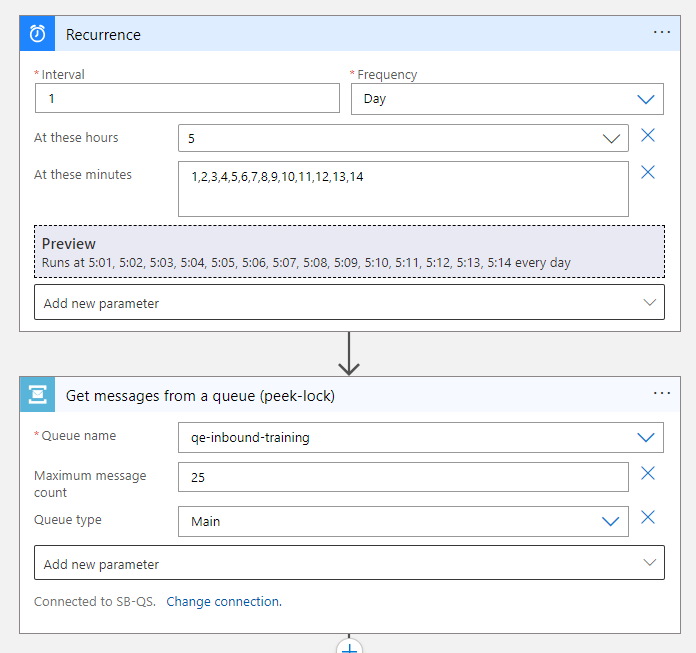
The second approach, for example, is that instead of having the Service Bus trigger, modify it to a Recurrence trigger with a fixed interval and get the messages from the Service Bus.
In this case, the Logic App will run at 5:01, 5:02, 5:03, 5:04, 5:05, 5:06, 5:07, 5:08, 5:09, 5:10, 5:11, 5:12, 5:13, 5:14 every day and try to pull 25 messages.
The third approach can be having the non-production environments disabled at all time and enabled when needed. Something that doesn’t happen often. Normally, all environments are running.
The fourth approach, and one of the most elegant approaches, is to set up a trigger condition. These conditions act as gatekeepers, allowing your Logic App to fire only when specific criteria are met.
On the trigger, click on the three dots (…) and then select the Settings option.
In the Settings for panel, go down to the Trigger Conditions section and add your condition.
How can Serverless360 help you save costs in these scenarios?
Among many other features available in Serverless360to analyze and optimize the costs of your applications, Serveless360 brings you a feature to configure and automate the time of life of specific resources like the Logic Apps. In this particular configuration case, I’m saying that the Logic App will only be enabled daily from 8 PM to 9 PM – a total of 7 hours weekly.
The tool also provides me a total estimated savings of this particular configuration: 95.83% of savings! For me, this is absolutely awesome! And I’m not in charge of controlling costs for my customers, only helping them find ways to optimize their costs and hoping to allow them to save some money.
I hope you enjoy this cost reduction tip, and stay tuned for more content.
Hope you find this helpful! So, if you liked the content or found it useful and want to help me write more, you can buy (or help me buy) my son a Star Wars Lego!
Author: Sandro Pereira
Sandro Pereira lives in Portugal and works as a consultant at DevScope. In the past years, he has been working on implementing Integration scenarios both on-premises and cloud for various clients, each with different scenarios from a technical point of view, size, and criticality, using Microsoft Azure, Microsoft BizTalk Server and different technologies like AS2, EDI, RosettaNet, SAP, TIBCO etc.
He is a regular blogger, international speaker, and technical reviewer of several BizTalk books all focused on Integration. He is also the author of the book “BizTalk Mapping Patterns & Best Practices”. He has been awarded MVP since 2011 for his contributions to the integration community.
View all posts by Sandro Pereira
Welcome again to another BizTalk Server to Azure Integration Services blog post. In my previous blog post, I discussed how to send zipped messages or files. Today, we will discuss a classic requirement in BizTalk Server solutions: How do we migrate Dynamic Ports?
It is not that hard to find BizTalk Server solutions/processes that need to send messages to partners, but in some cases, based on the type of the message or the content of these messages, in runtime, we need to define the port configurations or communication channels. Classic examples of those scenarios are:
Sending an email notification or the message through email. In runtime, we will specify all the properties of that channel, like To, CC, From, SMTP server, and authentication.
Sending a file to a partner FTP, where in runtime, we will define what the partner is and set up all the properties of that channel, like FTP Server, authentication, folder, and file name.
In BizTalk Server, we can archive that to all adapters. Basically, in BizTalk Server, there are two ways to define what communication we will be using in runtime:
The first option, and the most common option, is to use BizTalk Server Dynamic ports.
The second, and less used, is a combination of Message Box direct bound ports and filters on send ports, basically routing.
Implementing the BizTalk Server solutions
Using dynamic ports.
A BizTalk Server dynamic port is a type of port used in Microsoft BizTalk Server to send messages to various destination endpoints without having to pre-configure the specific address details in the port configuration. Unlike static ports, where the address is fixed and known at design time, dynamic ports allow BizTalk to decide at runtime where to send the message based on the message context or other runtime considerations.
Key aspects of BizTalk Server dynamic ports include:
Runtime Resolution: The destination address and transport properties of a dynamic port are set at runtime using message context properties. This allows for a high degree of flexibility in message routing.
Adaptability: Dynamic ports are particularly useful in scenarios where the destination endpoints may change frequently or when messages need to be routed to multiple endpoints based on the content of the message or business rules.
Orchestration Support: Normally, this type of port is used inside BizTalk orchestrations, where the orchestration can set the destination of the message dynamically based on logic implemented within the orchestration.
Dynamic ports are an essential feature for complex integration scenarios where the destination of messages cannot be determined upfront and may vary based on the message itself or the outcome of business processes.
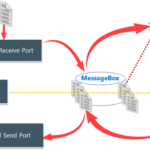
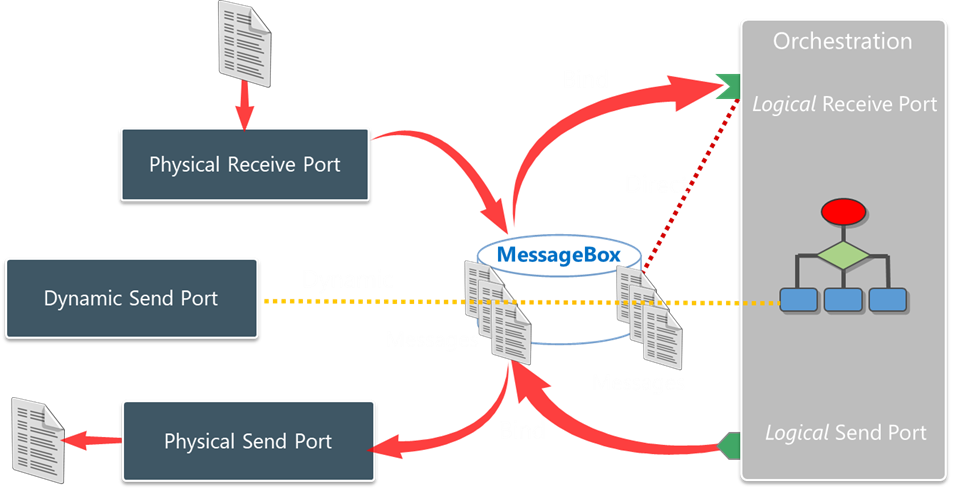
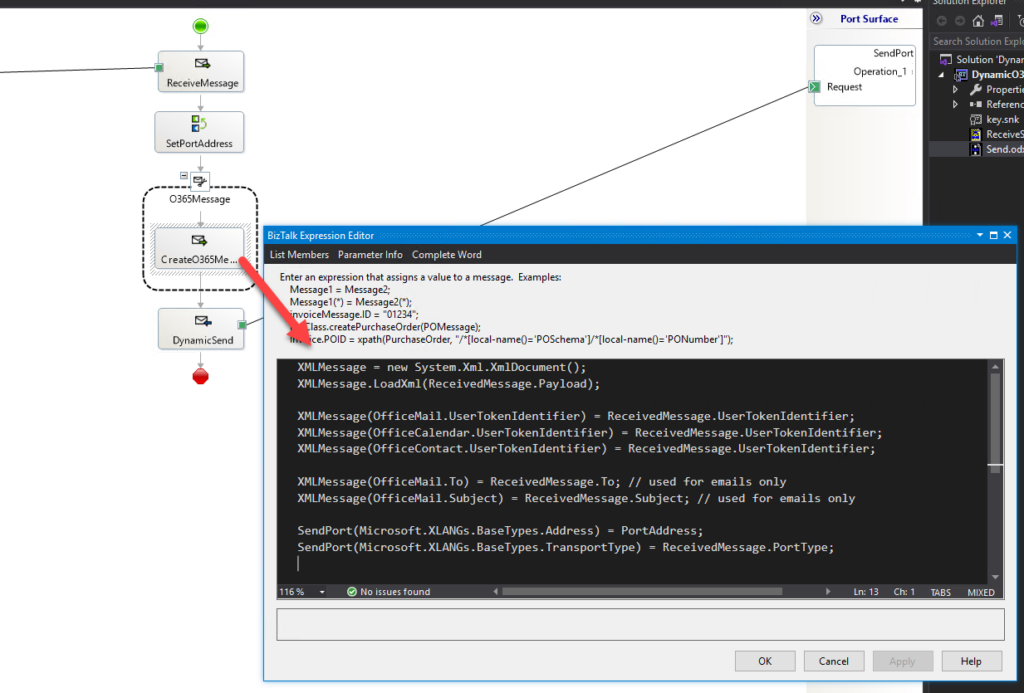
And basically, this is how it looks our BizTalk Server solution inside the orchestration:
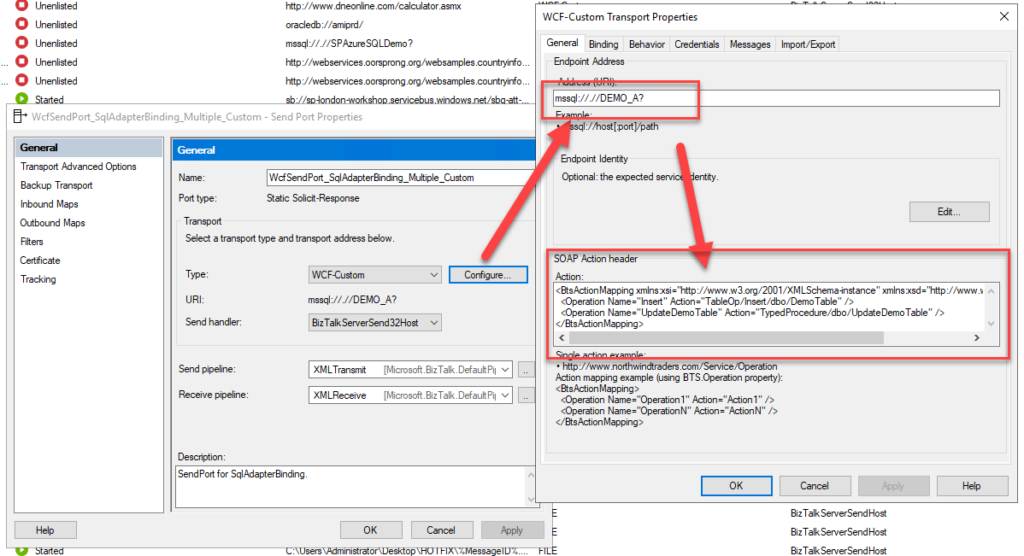
We will configure the adapter properties in the context of the message. And, of course, those properties will change based on the adapter we use. For example, this is for connecting to a SQL database:
There are also ways to create a static port with dynamic behavior, but I will leave that for another day.
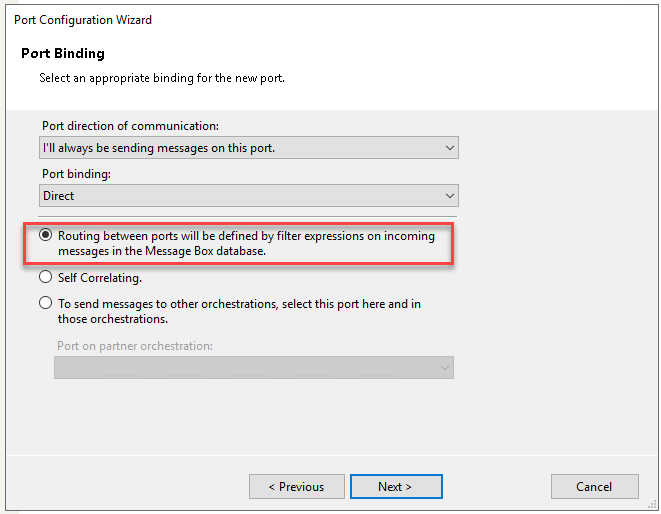
Using a combination of Message Box direct bound ports and filters.
Now, some adapters can be quite difficult to configure in runtime, like the SQL Adapter. So, in order to minimize that developer effort and to better maintain the port configuration and security. We can apply the same principles without using Dynamic ports.
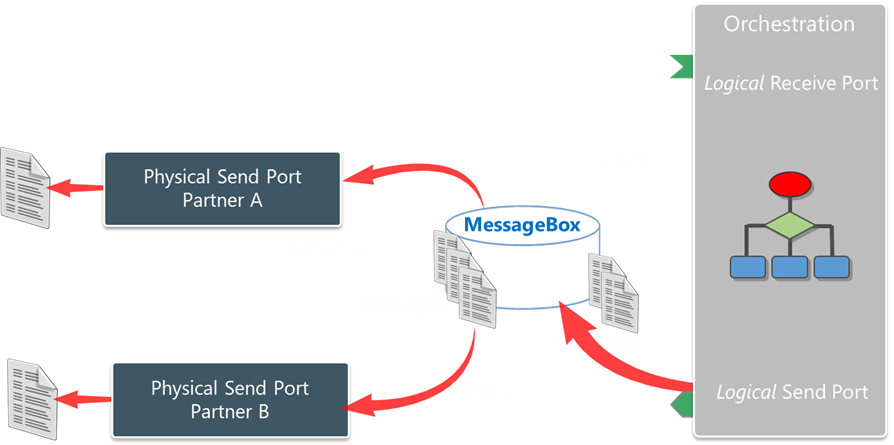
In this approach, we will replace that Dynamic port by:
Several physical send ports are configured for each partner and system we will want to exchange messages.
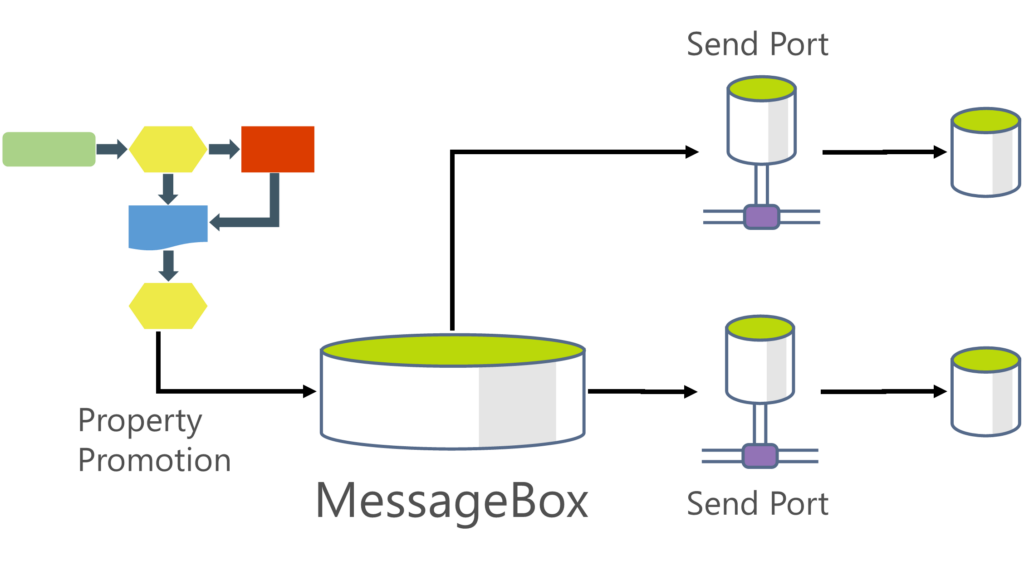
On the orchestration, the logical port, instead of using a dynamic port binding, will use a Message Box direct bound, which means we will be publishing the messages directly to the BizTalk Server Message Box – this is the database where all pub-sub magic of BizTalk Server happens.
In the orchestration, it will be important to promote some kind of metadata to the context of the message that will allow us to identify and subscribe the messages to each partner or system.
Finally, on each physical send port, we need to apply a filter to subscribe to those messages.
The real case scenario where I added to implement this approach was on a client where we had several processes running, and depending on which internal company inside the organization that messages were related to, we had to communicate with a different database, but all those databases were equal.
The challenge
The biggest challenge in implementing this type of requirements in Azure Integration Services is that, with the exception of a few connectors like the HTTP connector, connectors don’t allow us in runtime to set up the configurations of the channel dynamically. Instead, we need to have an API Connection already established. If you use BizTalk nomenclature, we can only use physical ports without dynamic behavior!
You can say: Hey Sandro, we can dynamically configure the TO, email body, CC, and other properties in the Outlook connector, for example.
Yes, you can. But you cannot dynamically define the FROM! You can use the SQL connector, but you cannot in runtime, define which SQL Server you will be using.
So, how can we migrate this to Azure Integration Services?
Building the Logic App Consumption Solution
As I always say, there are many ways to achieve the same goal. Here I’m going to present one that I think is an elegant one. But depending on the requirements, or if this communication is One-way send communication (doesn’t require a response) or two-way (request-response), you will find different approaches.
If it is a one-way send communication, you will find a solution in one of my previous blog posts: Migrating BizTalk Platform one-way routing solutions. But today, we are going to address a most complex scenario, which is the one I present above, in which we need to communicate with different equal databases. How do we migrate those scenarios if SQL Connector doesn’t allow us to specify the server dynamically?
The solution I will present will be inspired by the SQL Server ports in BizTalk Server, where we specify what is the SQL Server, the database, authentication, and many other properties of that channel in order for us to perform that communication but also what are the operations we will be doing on that database.
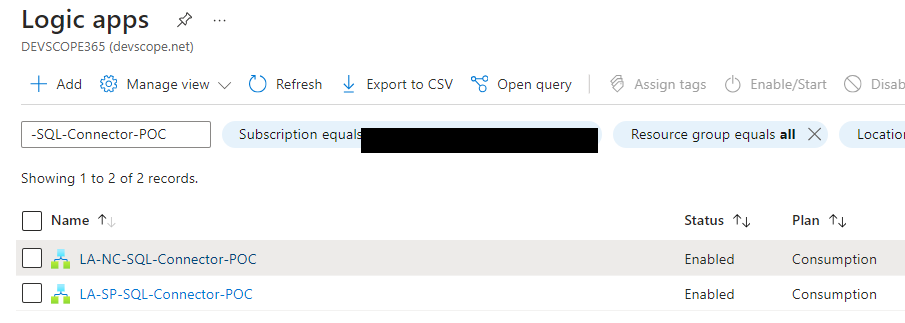
So, to start this solution migration we will be creating two or more Logic Apps that will act as the BizTalk Server SQL Send Port. I have called them:
LA-NC-SQL-Connector-POC
And LA-SP-SQL-Connector-POC
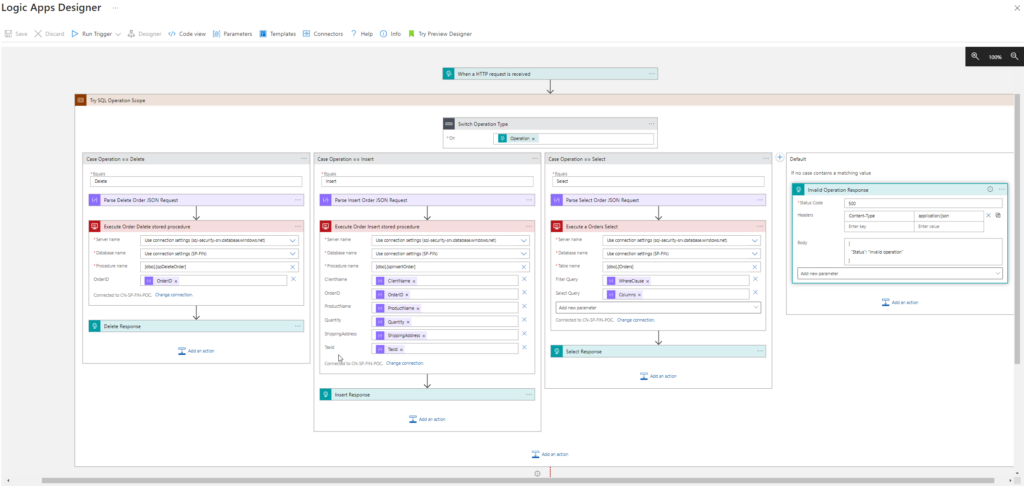
These Logic Apps will have:
A Request – When a HTTP request is received trigger.
And based on the operation we will define, we will perform the corresponding SQL operation.
Of course, each Logic App is configured with a different SQL Server database, but they will implement the same business logic.
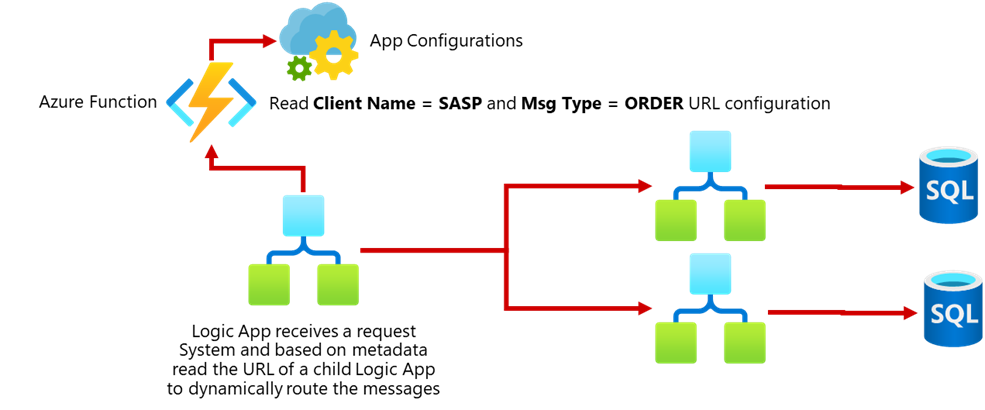
Now that we have our “SQL Server custom connector” or “SQL Server ports,” we need to create the main process to use them dynamically based on the context of the message.
I call this process LA-ProcessOrderRequests-POC. Now, knowing that:
The only connector that really allows us to configure dynamically is the HTTP connector.
This is a request-response communication, so we cannot use the Service Bus to route these messages. (we may, but it will be complex and expensive)
And that our “SQL Server custom connector” or “SQL Server ports” Logic Apps are triggered by HTTP calls.
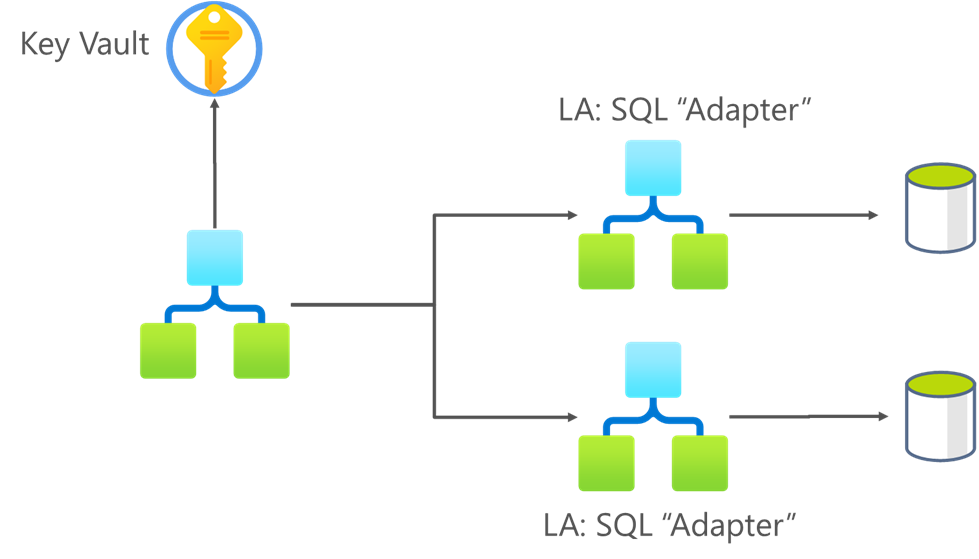
We need to find a place to store those trigger URLs in order to fetch those In runtime based on some metadata of the message, in the context of the message, or in the body, and route them inside the Logic App. For this, we could use:
Or, because those URLs contain some secrets, to increase security, we could use Azure Key Vault to store that information.
In this sample, we decided that the following payload will be received by the main Logic App:
Based on the company, it will read a secret from Key Vault that contains the URL of the child Logic App.
The secrets name convention is composed of static and dynamic data and, in our case, will always be “LA–URL
If we successfully retrieve the URL from Key Vault we will route the request to the correct database.
Otherwise, we will send an error message back to the system.
And this is how we bring some BizTalk Server out-of-the-box capabilities to Azure. And also why it is important for you to have a good knowledge of BizTalk Server to perform those migrations.
I hope you find these architecture samples useful, and stay tuned for more BizTalk Server to Azure Integration Services.
Hope you find this helpful! So, if you liked the content or found it useful and want to help me write more, you can buy (or help me buy) my son a Star Wars Lego!
Author: Sandro Pereira
Sandro Pereira lives in Portugal and works as a consultant at DevScope. In the past years, he has been working on implementing Integration scenarios both on-premises and cloud for various clients, each with different scenarios from a technical point of view, size, and criticality, using Microsoft Azure, Microsoft BizTalk Server and different technologies like AS2, EDI, RosettaNet, SAP, TIBCO etc.
He is a regular blogger, international speaker, and technical reviewer of several BizTalk books all focused on Integration. He is also the author of the book “BizTalk Mapping Patterns & Best Practices”. He has been awarded MVP since 2011 for his contributions to the integration community.
View all posts by Sandro Pereira
It is really important for companies to have implemented strategies and policies defined before starting to implement integration solutions on Azure or give decision design power to external consultant companies, such as:
Which services are part of the middleware solution in Azure?
What are they for, and when can we use them?
How can we handle requirement exceptions?
Naming conventions, CI/CD, and tag policies
And so on.
I’m about to tell a real story about how I saved more than 20K a year for one of my clients and why those reasons above are so important. I should have asked for a bonus since they have already saved more than 100K because of me.
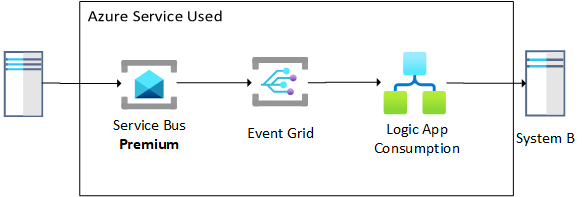
One of my clients decided to do a POC on Azure Integration using Logic Apps and Service Bus, and during that period, I was busy working on a critical application for that client. So, they decided not to initially involve me and delegated this POC to another partner. The requirements were quite simple:
They would like to have an async process to integrate HR information between the two systems.
They would want to use a no-code, low-code approach using Azure Integration Services as much as possible.
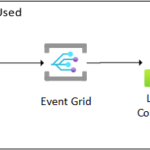
And they did it! They actually implemented a very good solution, looking only at the technical implementation. They decided to design a push implementation that allowed an almost real-time integration.
Once my client contacted me to help them deploy it to production, I only knew that this was a POC and, if everything went well, would be used in production as a real solution. So, if they were asking me to help them deploy to production, that meant at that point that:
Everything worked well and as expected.
The requirements were accomplished.
And they already accepted that solution.
However, I asked if I could do a minor assessment of the solution, mainly to understand how the pieces were built and how we could deploy them to production, and since I was doing it, validate if everything was according to best practices.
And after analyzing the solution, I became curious, so I went to my client and asked the following questions:
Is this a mission-critical application?
Client: No, this is not a mission-critical application.
Do you need almost real-time integration?
Client: No. Even if they are not integrated today, they will be resent tomorrow or in the next synchronization.
On average, how many messages do you send per day?
Typically, close to 100 or less.
Are they big messages (more than 256 KB)?
No, they are small.
Of course, I already expected this type of response and had my homework done. Tools like Serverless360 are used to analyze the cost of the application, and the Azure Calculator is used to predict the costs. I had a rough estimation of how much this solution would cost my client monthly and yearly.
I know they are a big company, but I asked the most obviously logical question in this situation:
Do you know how much this solution costs to you?
Client: Not really, but I know that we have already exceeded the planned budget. Do you know how much?
They were shocked when I told them: ~$677 per month.
But that was worse because they have four environments: DEV, TEST, QA, and PROD, so they need to multiply that by 4, meaning ~2.7Kper month, which means close to 32.5K per year! To process 100 messages per day on a non-critical application!
Is there a better approach?
Well, I don’t say that there is a better approach. An approach is good when it will fulfill the technical and financial expectations. In many cases, the previous approach will be the better approach. Especially if you already have Service Bus premium in your organization and several applications are using that.
Now, if you are starting your journey with Azure or want to control the cost, you should opt for a significantly cheaper approach that also fulfills all the technical requirements.
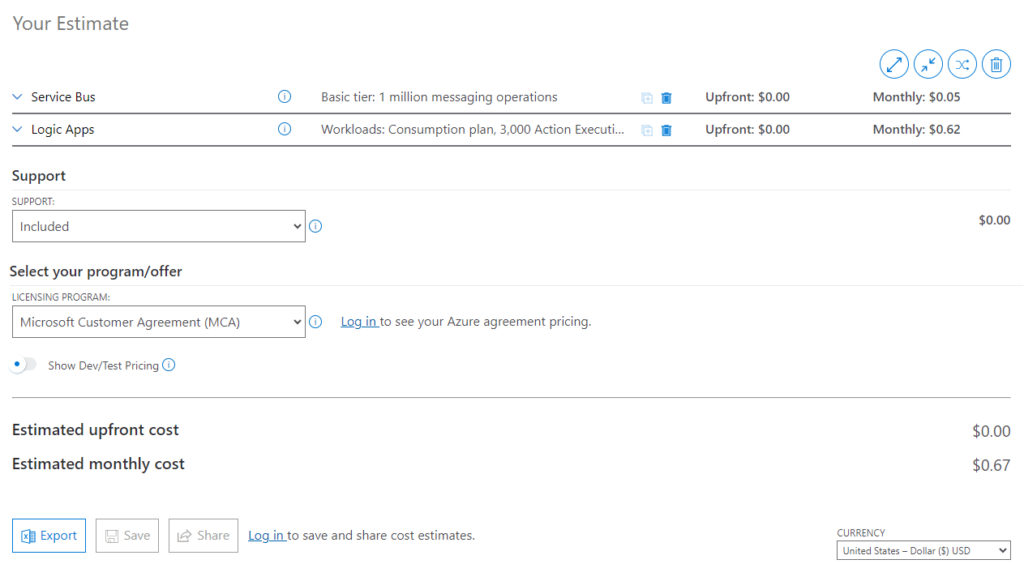
So, how can we reduce the costs of this solution by 99%?
Yes, you are reading correctly. Actually, it is more than 99% since by the time we end refactoring, the estimated monthly cost was $2.68 (don’t forget we had four environments) or $128.64 per year!
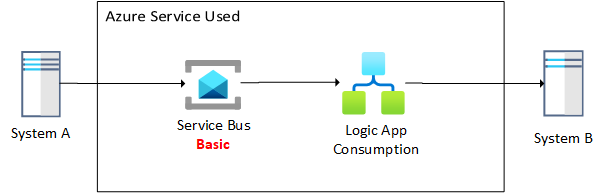
Basically, the only drastic difference in the design of the solution was to transform it into a pull architecture.
Because we only needed a queue, we have downgraded our Service Bus from Premium to Basic.
We removed the Event Grid from the equation since it requires Service Bus Premium.
And finally, we change the trigger of the Logic App to pull messages from the Service Bus queue each X minutes.
All the requirements were accomplished with this new architecture. The costs were surprisingly cheap, which motivated the client, who was already concerned about Azure costs, to adopt more cloud integration solutions.
The solution is still running in production without any changes or improvements.
I hope you enjoy this cost reduction tip, and stay tuned for more content.
Hope you find this helpful! So, if you liked the content or found it useful and want to help me write more, you can buy (or help me buy) my son a Star Wars Lego!
Author: Sandro Pereira
Sandro Pereira lives in Portugal and works as a consultant at DevScope. In the past years, he has been working on implementing Integration scenarios both on-premises and cloud for various clients, each with different scenarios from a technical point of view, size, and criticality, using Microsoft Azure, Microsoft BizTalk Server and different technologies like AS2, EDI, RosettaNet, SAP, TIBCO etc.
He is a regular blogger, international speaker, and technical reviewer of several BizTalk books all focused on Integration. He is also the author of the book “BizTalk Mapping Patterns & Best Practices”. He has been awarded MVP since 2011 for his contributions to the integration community.
View all posts by Sandro Pereira
Welcome again to another BizTalk Server to Azure Integration Services blog post, this time on my personal blog post. Today, we will address a common scenario and requirement in Enterprise Integration solutions that are quite simple to accomplish with BizTalk Server solutions: How do we validate XML messages before executing the business logic or processing them?
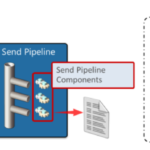
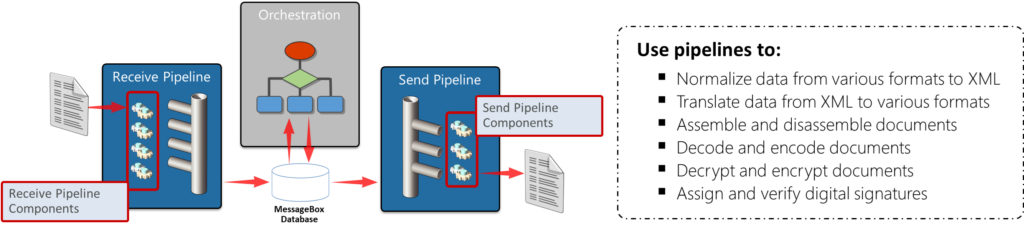
For simplicity, let’s assume that the BizTalk Server internally processes only XML messages, which is not completely true. That means that when we receive a message through an adapter specified in a specific receiving location, the first thing we need to do is normalize data from various formats to XML. For that, we will need to use a BizTalk Server artifact called Pipeline.Pipelines are software components that can process messages, either as the messages are received or just before they are sent out through a send port. A pipeline divides processing into categories of work called processingstages and specifies the sequence in which each stage of work is performed. Each stage of a pipeline contains one or more pipeline components (Microsoft .NET objects or COM objects) that can be configured to work with the specific requirements of the messaging solution or orchestrated business process.
In this particular case, we are interested in using a Receive Pipeline to validate messages against known schema(s). The Receive Pipeline is composed of four stages. Each of the four stages in a receive pipeline performs a specific function and can contain only components specified for use in that stage. Each receive pipeline stage can contain up to 255 components, which will all be executed in order, with the exception of the disassemble stage, in which only one component will execute. The four stages are as follows:
Decode: This stage is used for components that decode or decrypt messages. For example, there is a built-in MIME/SMIME decoder pipeline component that can be used to decode MIME-encoded messages. Custom components for this stage could include a component to decode a compressed (zipped) file before further processing.
Disassemble: Use this stage if you need to parse or disassemble the inbound message. The components within this stage probe the message to see if the message format is recognized, and then, if the message format is recognized, one of the components disassembles the message. Tasks performed in this stage include conversions of flat-file messages to XML format and splitting of messages. In order for property promotion to occur, an appropriate (flat-file or XML) disassembler must be specified at this stage.
Validate: In this stage, messages are validated against a collection of schemas. Pipelines process only messages that conform to the schemas specified in this component, if present. If a message whose schema is not associated with any component in the pipeline is received by the pipeline, the message is not processed. Depending on the adapter, the message is either suspended or an error is issued to the sender. This stage runs once per message created by the Disassemble stage. The built-in validate component can be used in this stage as well as in other stages.
Resolve Party: In this stage, the certificate associated with the sender’s security identifier (SID) is mapped to the corresponding configured BizTalk Server party. If the message was digitally signed, the component uses the signature to look up a Microsoft Windows® identity in the BizTalk Server 2010 Configuration database. If the message carries the authenticated SID of a Windows user, this identity is used. If neither mechanism succeeds, the sender is assigned a default anonymous identity. Party resolution is an important feature for managing trading partner relationships. Not all adapters support party resolution.
In simpler terms, BizTalk Pipelines are the helpful assistants that take care of the stuff coming into BizTalk, tidy it up, and hand it over to other parts of the system so everything runs smoothly. They’re like the backstage crew making sure the show (or data flow) goes on without a hitch.
BizTalk Server solution: Create a custom receive pipeline to validate messages against known schema(s)
Of course, as always, there are multiple ways to accomplish this solution. But one of the most simple and elegant solutions to achieve this is by:
Create a custom receive pipeline that contains at least these two out-of-the-box components:
The XML Disassembler pipeline component in the Disassemble stage. In this scenario, its primary function will be to promote the content properties from individual document levels to the message context.
Then, the XML Validator pipeline component in the Validate stage. This component validates the message against the specified schema or schemas, and if the message does not conform to these schemas, the component raises an error, and Messaging Engine places the message in the suspended queue.
Assuming that we already have created our BizTalk Server project and our schema representing this simple message:
 Sandro
 Pereira
 1978-04-04
 Portugal
 4415
Where all fields are mandatory, with the exception of ZipCode, which is optional. Also, DateOfBirth is a xs:date. The rest are simple strings.
In order to accomplish our requirements inside the BizTalk Server, we just need in our solution to create a custom receive pipeline. To do so, we need to:
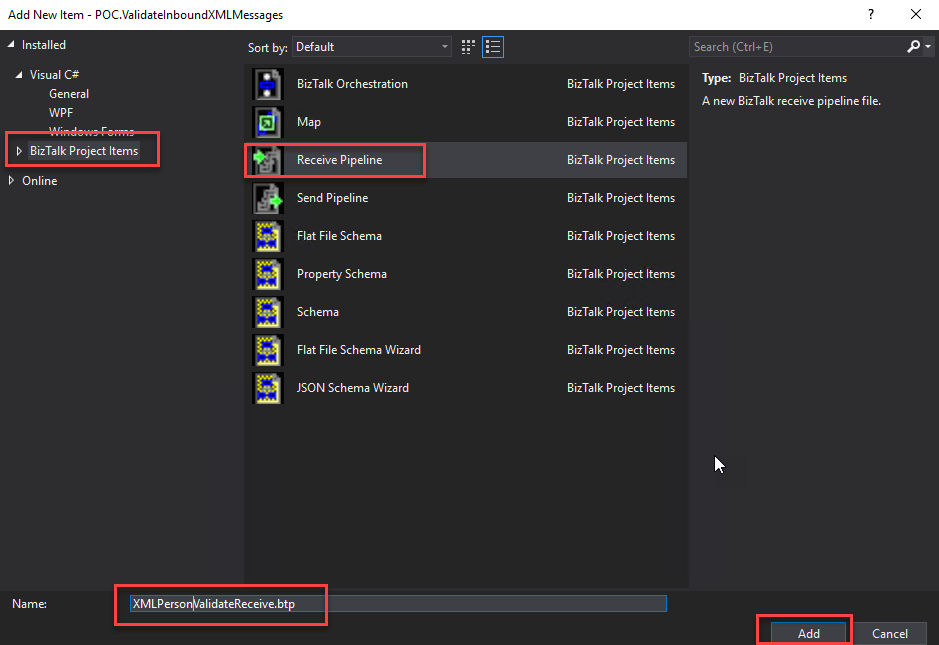
Right-click on the project name and select the option Add > New Item…
On the Add New Item window, on the left tree, select BizTalk Project Items and then select Receive Pipeline. Give it a proper name and click Add.
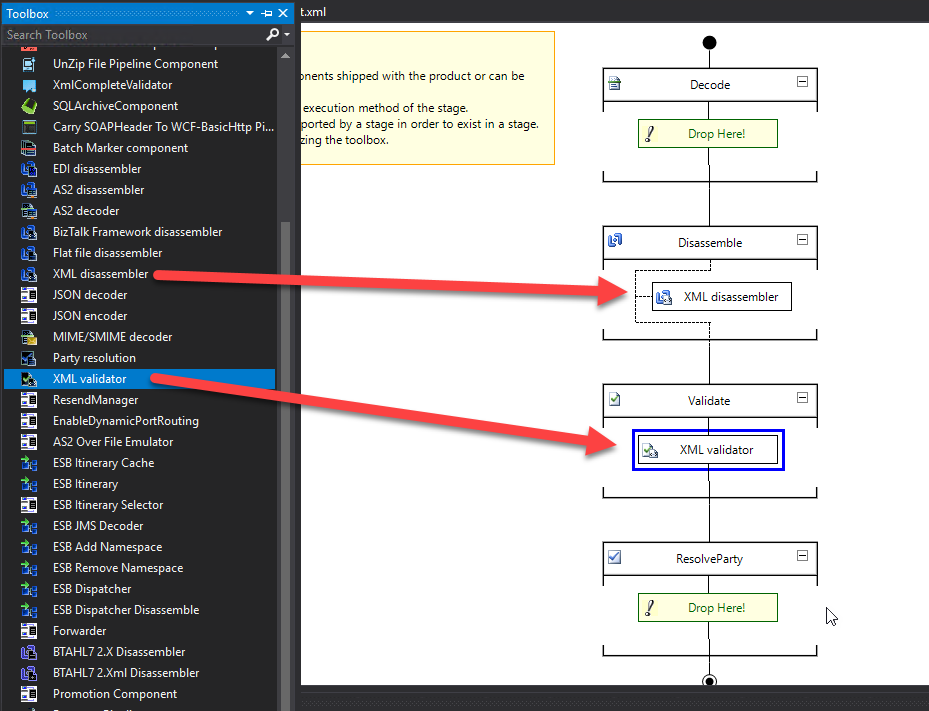
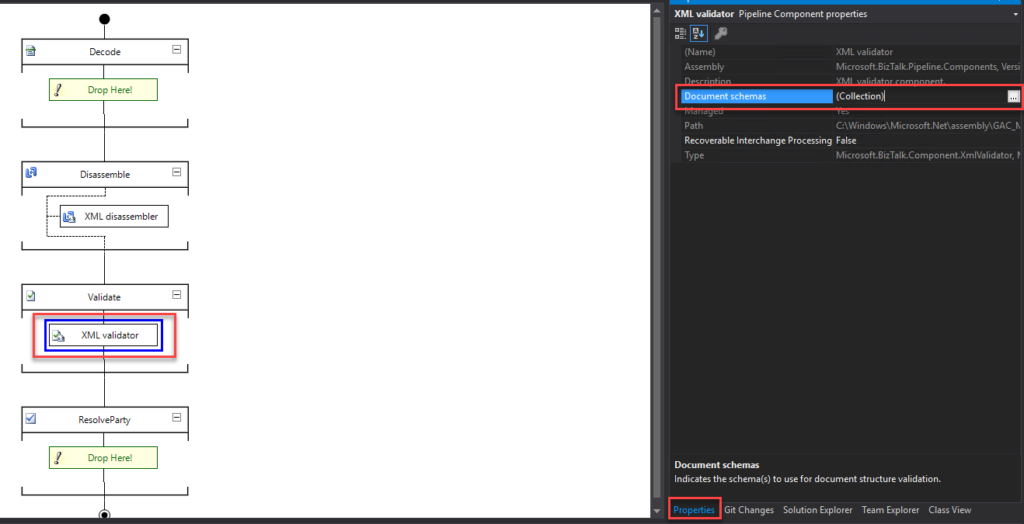
From the Toolbox, drag and drop the XML Disassembler pipeline component in the Disassemble stage and the XML Validator pipeline component in the Validate stage.
In this scenario, we will leave the default configuration of the XML Disassembler pipeline component.
Now, select the XML Validator pipeline component, and in the Properties windows (normally present on the right side of the Visual Studio Editor), click on the three dots (…) of the Document schemas property.
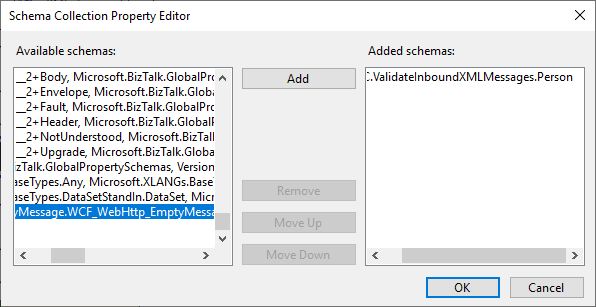
On the Shema Collection Property Editor window, on the Available schemas panel, select your schema, in this case, Person, and then click Add. Click OK.
Save your pipeline. Build your project and deploy it. That’s it!
Now, when you deploy the solution into your BizTalk Server environment and configure a physical receive port and location associating this receive pipeline you have created, what happens is that:
If the port receives a Person XML, it will deeply validate the instance of that message against the schema, and if the message does not conform to these schemas, the component will raise an error.
If we receive any other type of XML message, the port will consume them without deeply validating the instance against the schema since it is not a Person.
The challenge
This is a common request that we will find in many solutions, and it is fully supported inside Logic Apps. It is not in the same way as BizTalk Serve since we do not have a concept of Receive Ports and Receive Location in Logic App or any other service in Azure, but it is still fairly easy to accomplish.
The main challenge here is that depending on which type of Logic App you will use, we will have different approaches:
If we use Consumption to have XML “premium” capabilities, we need to have an Integration Account to store the schemas and perform validation (and many other features). However, this will have an additional cost.
If we use Standard, we already have built-in XML capabilities, and for these requirements, we will not need an Integration Account.
The good news is that BizTalk Server Schemas are fully supported in Logic Apps, both Consumption and Standard, so we don’t need to worry about generating or recreating them. We can just copy them from our BizTalk Server solution and use them in our Azure Integration Service (AIS) solution.
Building the Logic App Consumption Solution
In this Proof-of-Concept (POC), first, we need to copy our schema to our Integration Account. If you don’t have one, you can create it by:
In the Azure portal search box, enter Integration accounts, and select Integration accounts.
Under Integration accounts, select Create.
On the Create an integration account pane, provide the following information about your integration account like, Subscription, Resource Group, Integration Account Name, Pricing Tier, Storage account, and so on.
When you’re done, select Review + create.
To import the schema into our Integration Account, we need to:
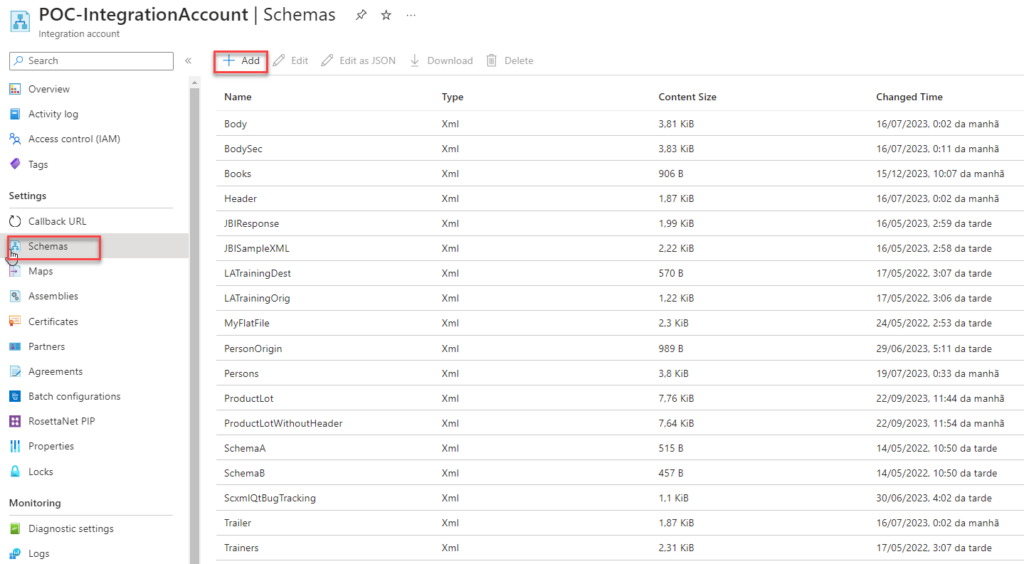
Access the integration account, and under the Settings section, select Schemas and then click + Add.
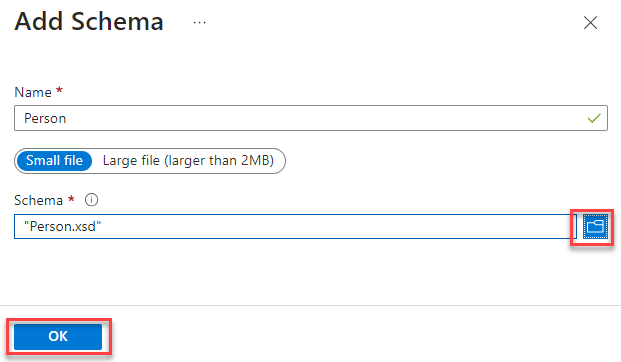
On the Add Schema panel, browse for our XML Schema, leave the default settings, and click OK.
Now that we have our schema, the next thing we need to do is create our Logic App that will act as our BizTalk Server Receive Pipeline. To accomplish that, you need to:
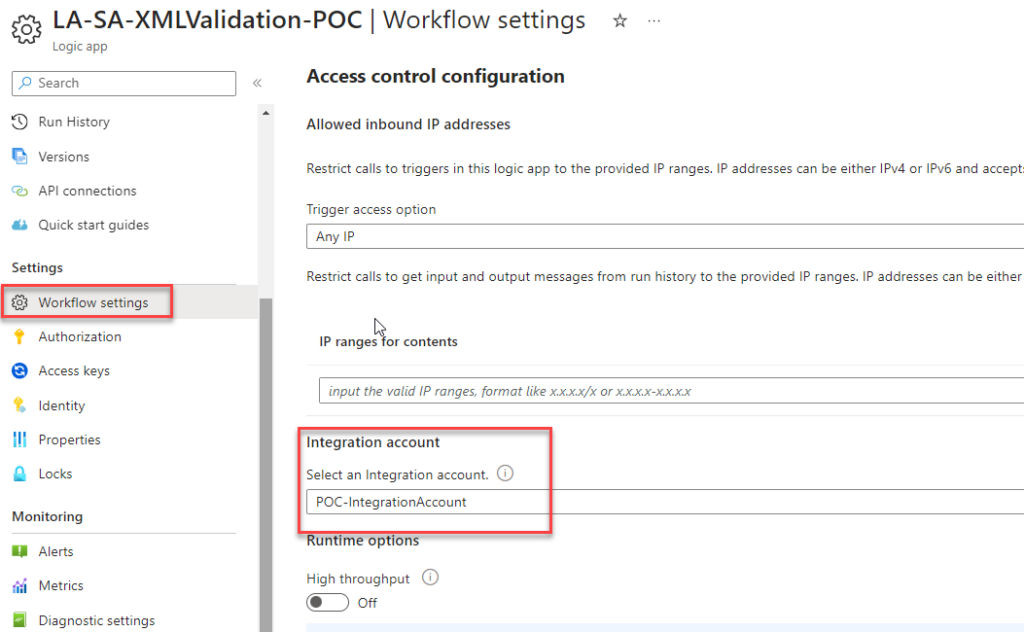
On the Azure Portal, create a new Logic App Consumption and give it a proper name, in our case: LA-SA-XMLValidation-POC.
Before we start to create our logic, we first need to associate the Integration account with this Logic App by selecting Workflow settings under the Settings section. In the Integration account property, select your Integration account.
Click Save.
Now, click on the Logic App designer under the Development Tools section. From the Templates, select Blank Logic App.
Note: We could use any connector as input, like File or OneDrive, but for simplicity of this POC, we will use the Request.
For the trigger, select Request > When a HTTP request is received trigger and leave it as default.
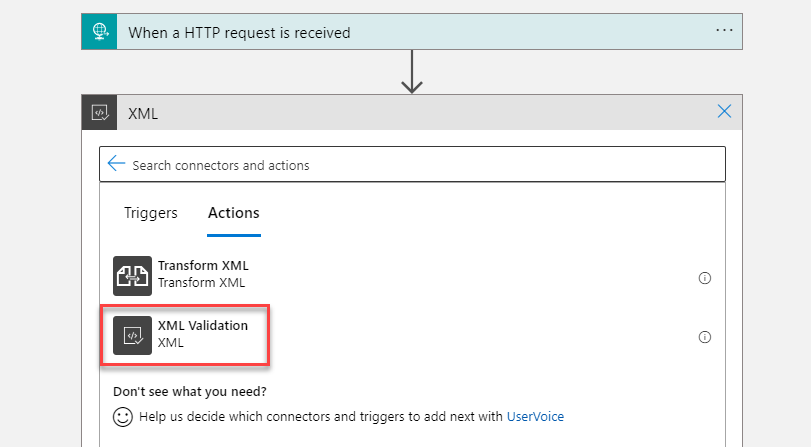
Next, click on + New step, select the XML connector, and then the XML Validation action.
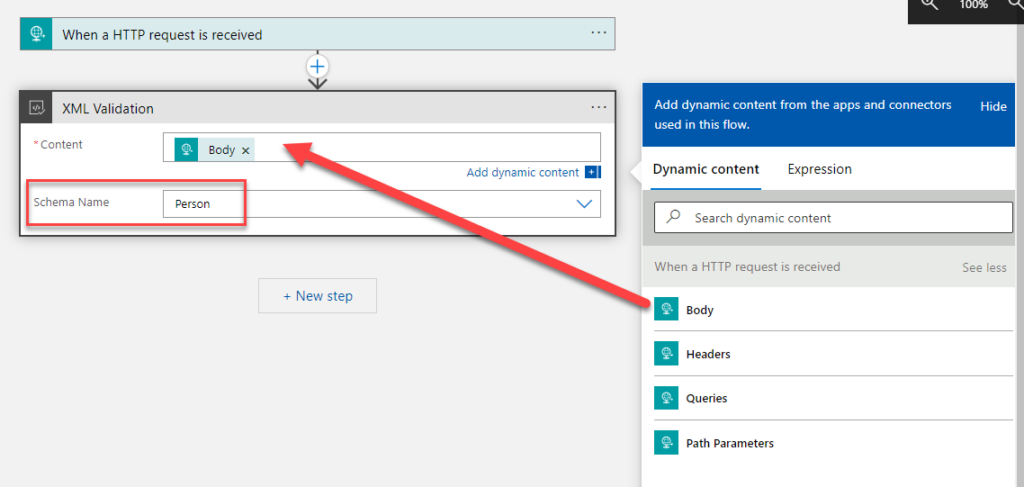
On the XML validation action, perform the following configurations:
On the Content property, set it to be the body of the When a HTTP request is received trigger.
On the Schemaname property, select the correct schema from your integration account. In our case, Person.
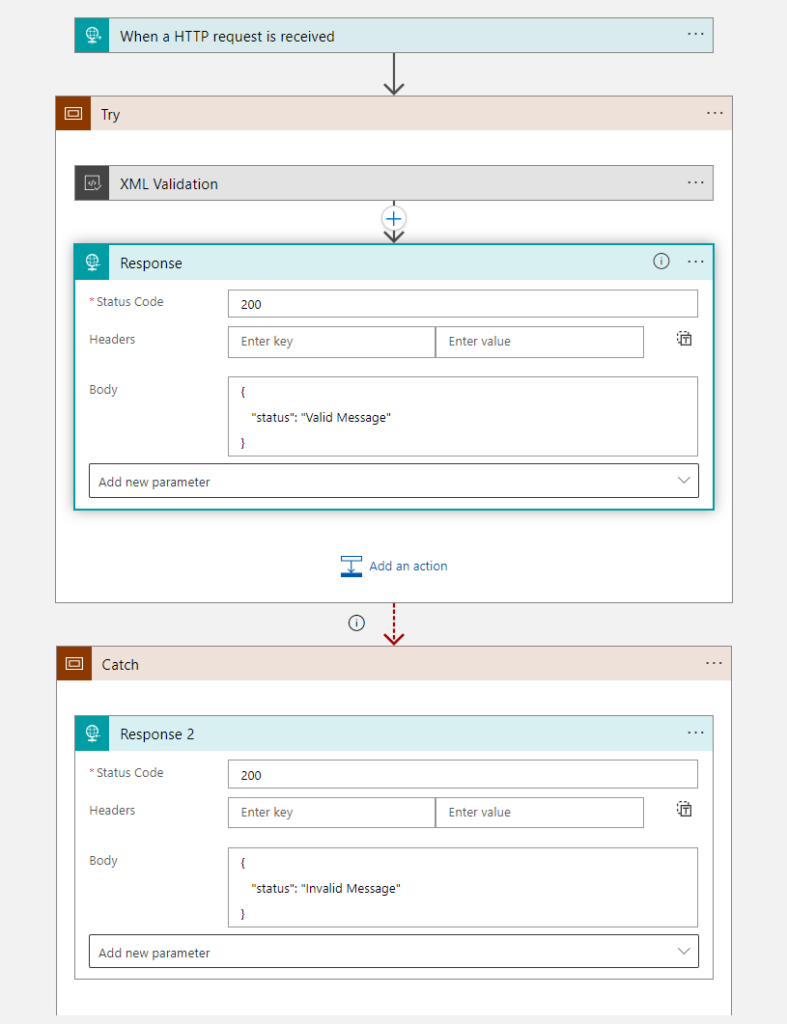
And, of course, now you need to implement your business logic or call a child Logic App.
I endup creating a try-catch statement just to prove this functionality.
Now, you just need to test your solution.
Building the Logic App Standard Solution
Making the same solution in Standard will be easier since Logic App Standard already has out-of-the-box support for XML Schemas and maps. We just need to add them to our logic app resource. Once again, the BizTalk Server XML Schemas will be fully supported, so we just need to copy them from our BizTalk Server solution.
Let’s create our Logic App Standard Solution. To do that, you need the following:
In Visual Studio Code, close all open folders.
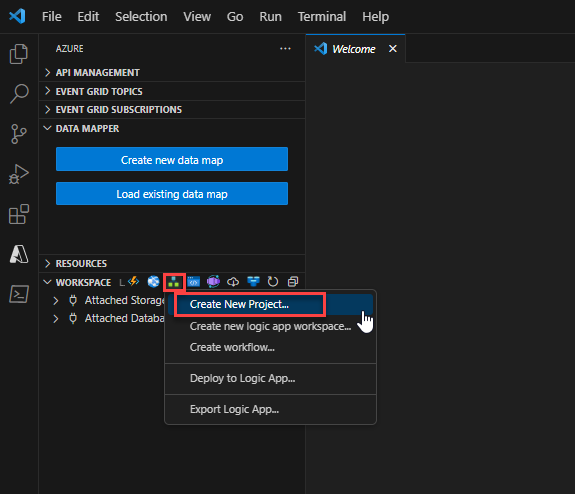
In the Azure window, on the Workspace section toolbar, from the Azure Logic Apps menu, select Create New Project.
Define the folder of the project or browse to the location where you created your project folder, select that folder, and continue.
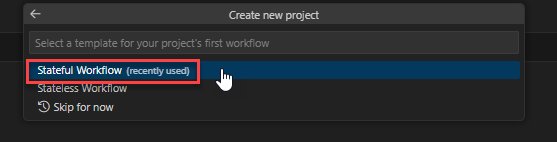
From the templates list that appears, select either Stateful Workflow or Stateless Workflow. This example selects Stateful Workflow.
Provide a name for your workflow and press Enter. This example uses LA-XMLValidation-POC as the name.
From the Visual Studio Activity Bar, open the Explorer pane if it is not already open.
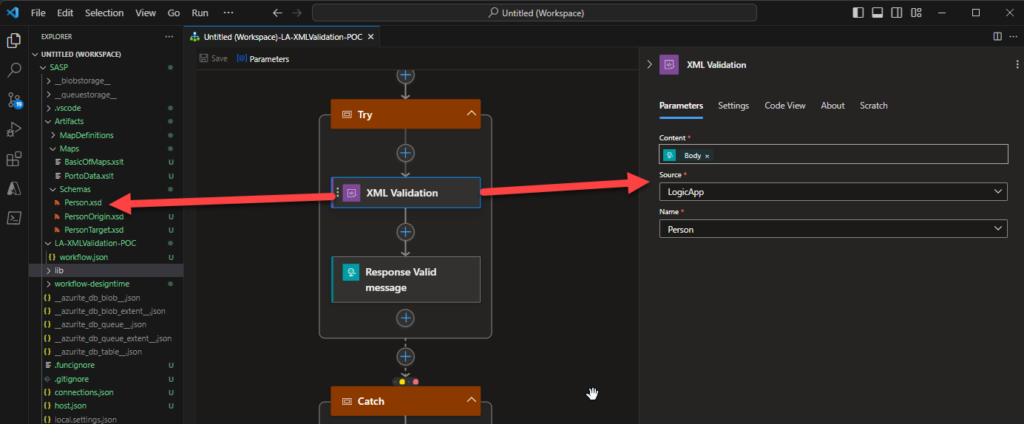
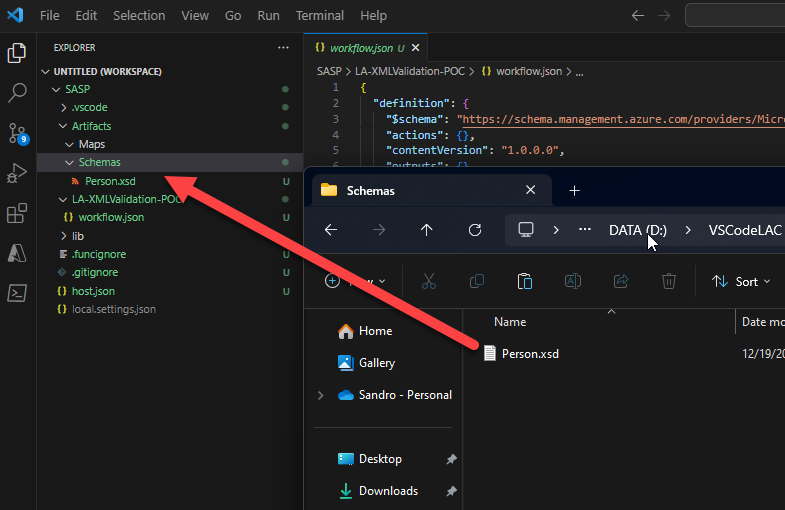
Now, the first thing we will do is add our Schema to our project. To do that, you need to:
Access the project folder using File Explorer, enter the Artifacts > Schemas folder, and copy the schema into this folder. And you will automatically see it on the Visual Studio Code Explorer.
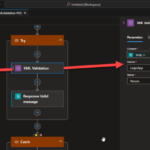
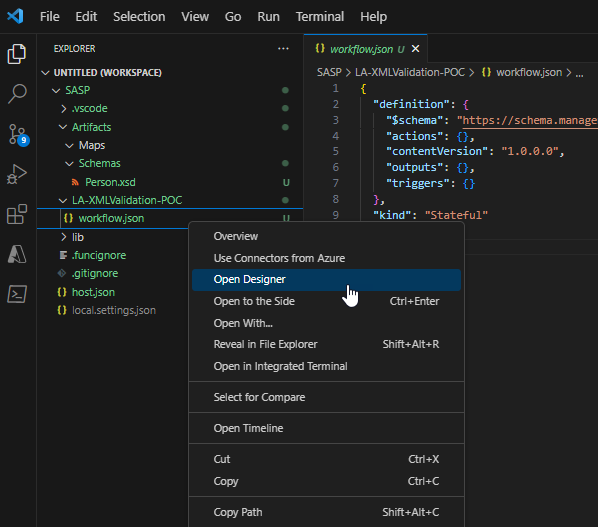
Now, we need to create the business logic of our Logic App.
Right-click on our LA-XMLValidation-POC workflow.json file and select Open Designer.
And we are going to implement the same business logic we did with Consumption.
Start adding a Request > When a HTTP request is received trigger and leave it as default.
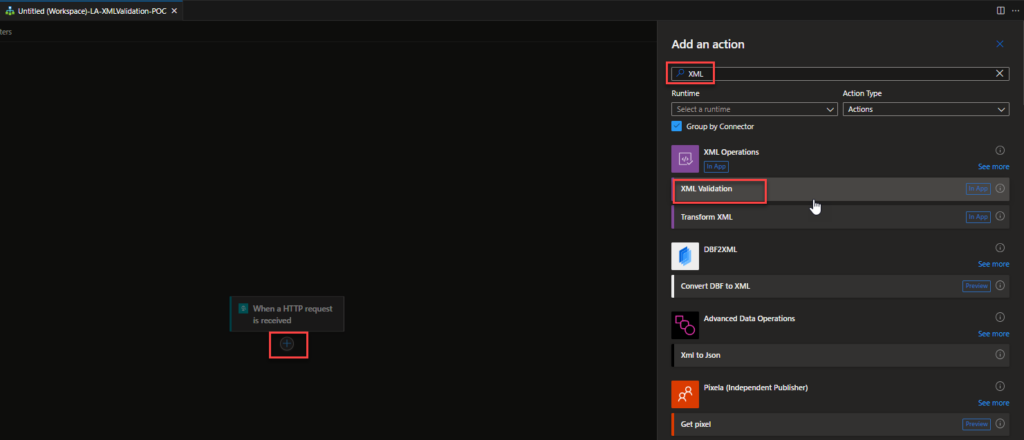
Next, click on + Add an action, select the XML connector, and then the XML Validation action.
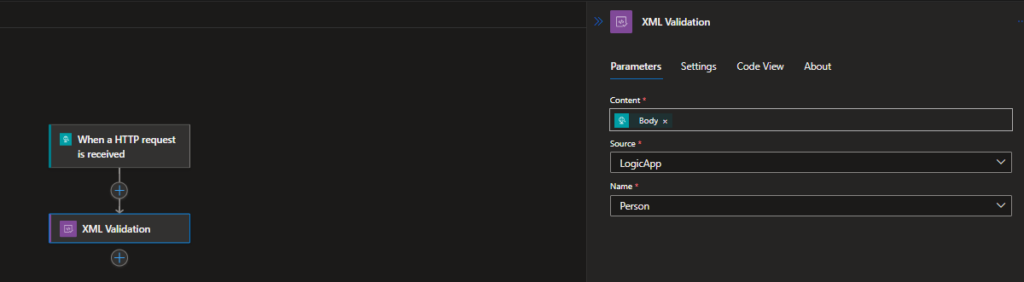
On the XML validation action, perform the following configurations:
On the Content property, set it to be the body of the When a HTTP request is received trigger.
On the Source property, leave LogicApp.
On the Schemaname property, select the correct schema from your project. In our case, Person.
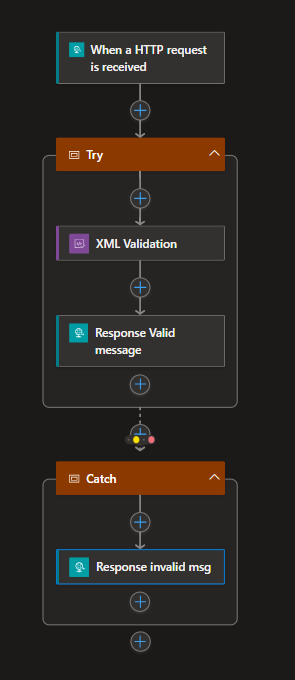
And, of course, now you need to implement your business logic or call a child Logic App.
I endup creating a try-catch statement just to prove this functionality.
Now, you just need to test your solution.
I hope you find these architecture samples useful, and stay tuned for more BizTalk Server to Azure Integration Services.
Hope you find this helpful! So, if you liked the content or found it useful and want to help me write more, you can buy (or help me buy) my son a Star Wars Lego!
Author: Sandro Pereira
Sandro Pereira lives in Portugal and works as a consultant at DevScope. In the past years, he has been working on implementing Integration scenarios both on-premises and cloud for various clients, each with different scenarios from a technical point of view, size, and criticality, using Microsoft Azure, Microsoft BizTalk Server and different technologies like AS2, EDI, RosettaNet, SAP, TIBCO etc.
He is a regular blogger, international speaker, and technical reviewer of several BizTalk books all focused on Integration. He is also the author of the book “BizTalk Mapping Patterns & Best Practices”. He has been awarded MVP since 2011 for his contributions to the integration community.
View all posts by Sandro Pereira
INTEGRATE 2024 was recently announced, and although we still don’t have a list of speakers, I’m super excited about it. The event will occur between 10 & 11 June 2024 at Kings Place, London. You can do an early register and know more about the event here: https://www.serverless360.com/events/integrate-2024.
This is one of my favorite tech conferences, and talking about it is like taking a memory lane full of great memories, and it all started because of a pizza! At a time when there weren’t too many international tech events, a group of 5 tech guys from different countries in Europe – Nino Crudele (Italy), Saravana Kumar (UK), Steef-Jan Wiggers (Netherlands), Tord Glad Nordahl (Norway) and me (Portugal) – decided to gather in Piacenza to eat a pizza and since we were there why not do an event about integration. At least this way, we had an excuse/reason to go. And that, my friends, was the premise and the real reason behind one of the world’s biggest events on integration!
That pizza reunion gave birth to what we call “The BizTalk Crew” and our first event on May 24, 2012, in the OVERNET office in Milan, Italy (check this blog post). Four months later, we were traveling again, this time To Stavanger, Norway, to do our second event, where we had our first guest speaker, Lex Hegt. (see blog post). We call these events BID’s (BizTalk Innovation Day)!
As the UK was a more central and strategic country, Saravana convinced us to do a major event that we would call the BizTalk Summit (now known as INTEGRATE), and on January 16, 2013, we did our first BizTalk Summit at Microsoft Office in London, Victoria where we had 128 attendees, more than 70 different companies across 16 countries (Austria, Belgium, Denmark, France, Germany, Italy, India, Ireland, Netherlands, Norway, Portugal, Spain, Sweden, Switzerland, UK, USA), more than 10 Microsoft Integration MVP’s present (speakers, Q&A members and attendees) and 3 members of Microsoft Product group.
Fact: I was the first speaker to speak about cloud integration technologies at INTEGRATE in a session about BizTalk Azure Service EAI/EDI capabilities
We made this round trip in several countries (Portugal, Italy, the UK, and Norway) for a few years until we dedicated it to this single event: INTEGRATE. Saravana and his team took charge of this event and put it to another level! The rest is the story that most of us already know.
Here is a glimpse of my story on the INTEGRATE conference:
Why should you attend this event?
Learn from the experts in the field.
The #1 reason people should come to this event is to make themselves more valuable to their companies by learning new ideas and techniques from experts in the field. I’m not only talking about the speakers but also the attendees, your peers with real-world implementation experience from around the world, with similar or different approaches and needs. This conference will provide valuable information on integration topics, new trends, and technologies that will benefit your firm and your clients.
As I usually say, this conference has a 360 coverage on enterprise integration topics! There is something for everyone regardless of job role: developers, administrators, architects, decision-makers, and so on, both on brand new topics on the cloud and more legacy components on-premise like BizTalk Server and Host Integration Server.
Last year, over 700 people worldwide joined INTEGRATE, so get insight and answers to your questions from these real-world experts.
The knowledge and experience of all the attendees, speakers, and product group members at these events was unreal!!! You will not find an opportunity like this every day.
At these events, speakers are usually available to chat and answer questions. And if you are bold, remember to pull out your camera and ask if you can take a photo with them.
Take this opportunity to connect face-to-face with experts and peers who will give you valuable insight into industry trends, meet influential colleagues, and generate new solutions to common problems, like increasing profitability and solving staffing challenges.
I love being around great thinkers…it can really get your mind flowing. We always have something new to learn from one another and take back with us.
Interact with Microsoft Product Group and Most Value Professionals.
There is no other Integration conference in the world with 12+ Microsoft Product Group members and 13+ Microsoft Most Value Professionals (MVPs) focused on Integration in a single conference.
DO NOT BE SHY and take this opportunity to have one-on-one inspiring conversations with the product group – they are eager to get your feedback – and with MVPs,
Network, Connect, and Reconnect with Colleagues.
Take this fantastic opportunity to meet the people you have been following on Twitter and blogs and network with others interested in the same things you are. This is another chance for return attendees to hang out with the most intelligent people you know – and I’m not talking about the speakers! – and meet new ones.
Please don’t be afraid or shy, don’t wait for them and take your chances. Engage the people you want to meet by easily saying, “Hi, my name is… “. This experience can be a great morale booster for you. Lifelong friendships and connections have evolved from such conferences – I’m speaking from personal experience!
The next big thing…
What we can expect for the future… Connect directly with the Microsoft Product Team to gain exclusive insights into Microsoft’s upcoming plans. Engage in conversation and ask your burning questions. Discover how Microsoft is shaping the future.
Refresh and recharge… and have some fun.
This will be two days off busy work schedules to learn, refresh, and recharge. And most importantly, have some fun!
Once you’ve soaked in all the knowledge from the speakers and breakout sessions, your day will be far from over. Use the evenings to connect with colleagues and experts in a relaxed, fun environment like a Bar, speaker dinner, or restaurant. Sometimes, the most interesting conversations happen at the end of each day in the Lobby Bar.
And then return to work reinvigorated.
This is one conference you can’t afford to miss! What are you waiting for? Go ahead and book it!
I will be there… and don’t hesitate to reach me and say hi! It doesn’t matter that it is to say hi to get to know each other, to ask a question, or a business opportunity.
See you there!
Hope you find this helpful! So, if you liked the content or found it useful and want to help me write more, you can help us buy a Star Wars Lego for Sandro’s son!
Author: Sandro Pereira
Sandro Pereira lives in Portugal and works as a consultant at DevScope. In the past years, he has been working on implementing Integration scenarios both on-premises and cloud for various clients, each with different scenarios from a technical point of view, size, and criticality, using Microsoft Azure, Microsoft BizTalk Server and different technologies like AS2, EDI, RosettaNet, SAP, TIBCO etc.
He is a regular blogger, international speaker, and technical reviewer of several BizTalk books all focused on Integration. He is also the author of the book “BizTalk Mapping Patterns & Best Practices”. He has been awarded MVP since 2011 for his contributions to the integration community.
View all posts by Sandro Pereira