One could argue that creating good documentation for an integration solution is harder than with other types of software projects. The reason is that integration solutions almost always span over many systems and services and that we often talk about hundreds of integrations, touching almost every part of your architecture.
Keeping track of such a complex system is literally impossible without the right documentation. ?
An example of bad documentation …
Basic principles of good documentation for an integration architecture
1. Visualizations and diagrams are more important than textual documentation.
Textual documentation has its place and is important. But when it comes to trying to describe complex scenarios, visualizations in the form of architectural diagrams are easier to quickly understand and therefore arguably the most important part of your documentation.
2. Focus on the high-level diagrams.
As developers, we’re good at documenting all the little technical details in our solutions. But we often document things we end up looking up in the live code and configurations. Focus on high-level documentation, the overall picture, and how the different parts of your solutions relate to each other.
3. Make it readable for everyone.
UML and complex notations are great – if you understand them fully. The C4 model formalized the idea of a much simpler notation, based on boxes and arrows – easier to understand and work with.
Use a dead simple notation that everybody can write and read.
4. Make it useful for everyone.
Besides a simple notation, the C4 model describes a few different diagrams with increasing levels of detail. Using different levels makes it possible to drill down from an overview into more detailed diagrams. Similar to zooming in and out of a digital map.
Utilizing the levels and the simple notation in the C4 model, diagrams can have information useful for non-technical business users and describe large parts of architecture without cluttering them down with too many details.
The C4 levels in an integration context
Let’s look at the three levels that make up good integration documentation.
C4 model diagrams levels with increasing detail.
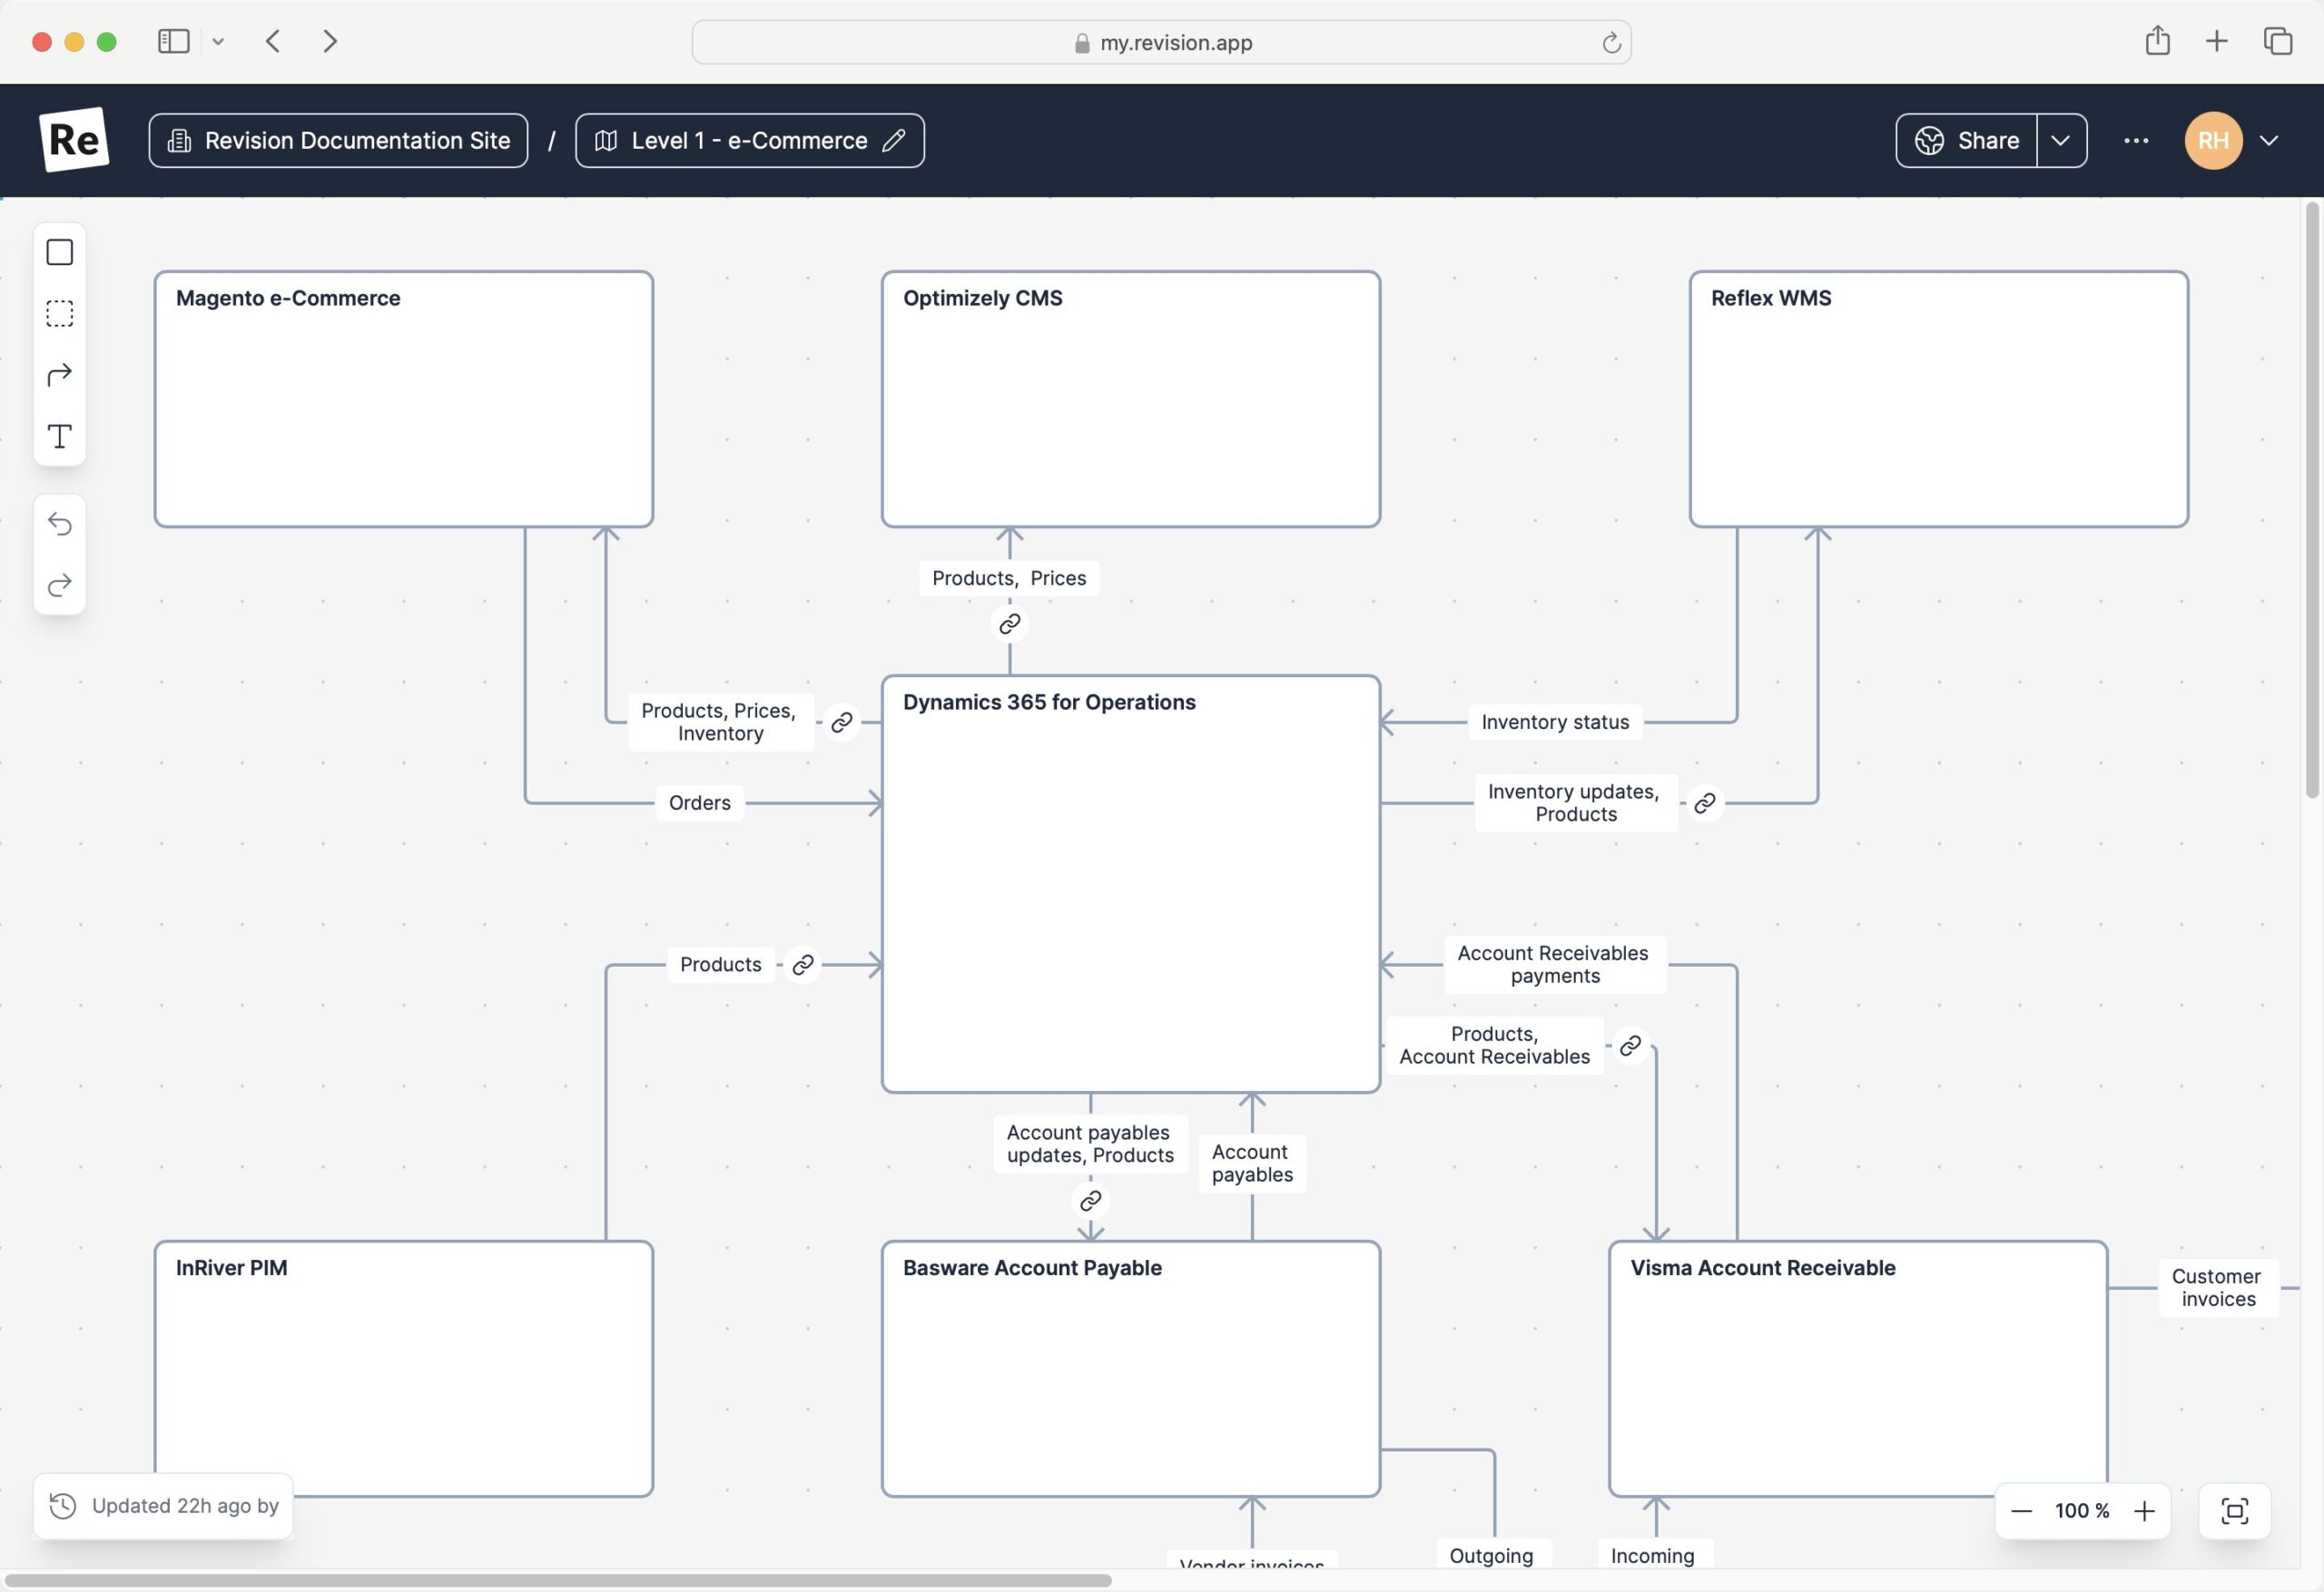
Level 1 (Context) – The Overall picture
For quickly understanding an integration architecture the most important part of documentation is the high-level documentation. It shows all the systems and the data-flows between them. Not the nitty-gritty details, just what systems are involved and what data is transferred between them.
In smaller architectures, it’s possible to describe all systems and data-flows in a single level 1 diagram. In large ones, we need to choose a context to avoid too large and hard-to-read diagrams. In this example, the context is the e-Commerce part of the architecture.
It’s important to keep these diagrams as simple as possible. It’s often tempting to include more details than necessary. Try to skip everything besides concrete systems and what type of data that’s transferred. The reason for this is that these diagrams otherwise get too complicated, hard to work with and hard to understand.
This part of the documentation is important. This is information that often is hard to understand by looking at the code and configuration.
This is also the part of the documentation that business users will understand. As we all know, getting the business users involved is critical for making the right decisions and in the end creating solutions that actually help the business in the right way.
Even though most people would agree that the overall picture is important to have documented, I’ve found that this is the part most developers tend to skip.
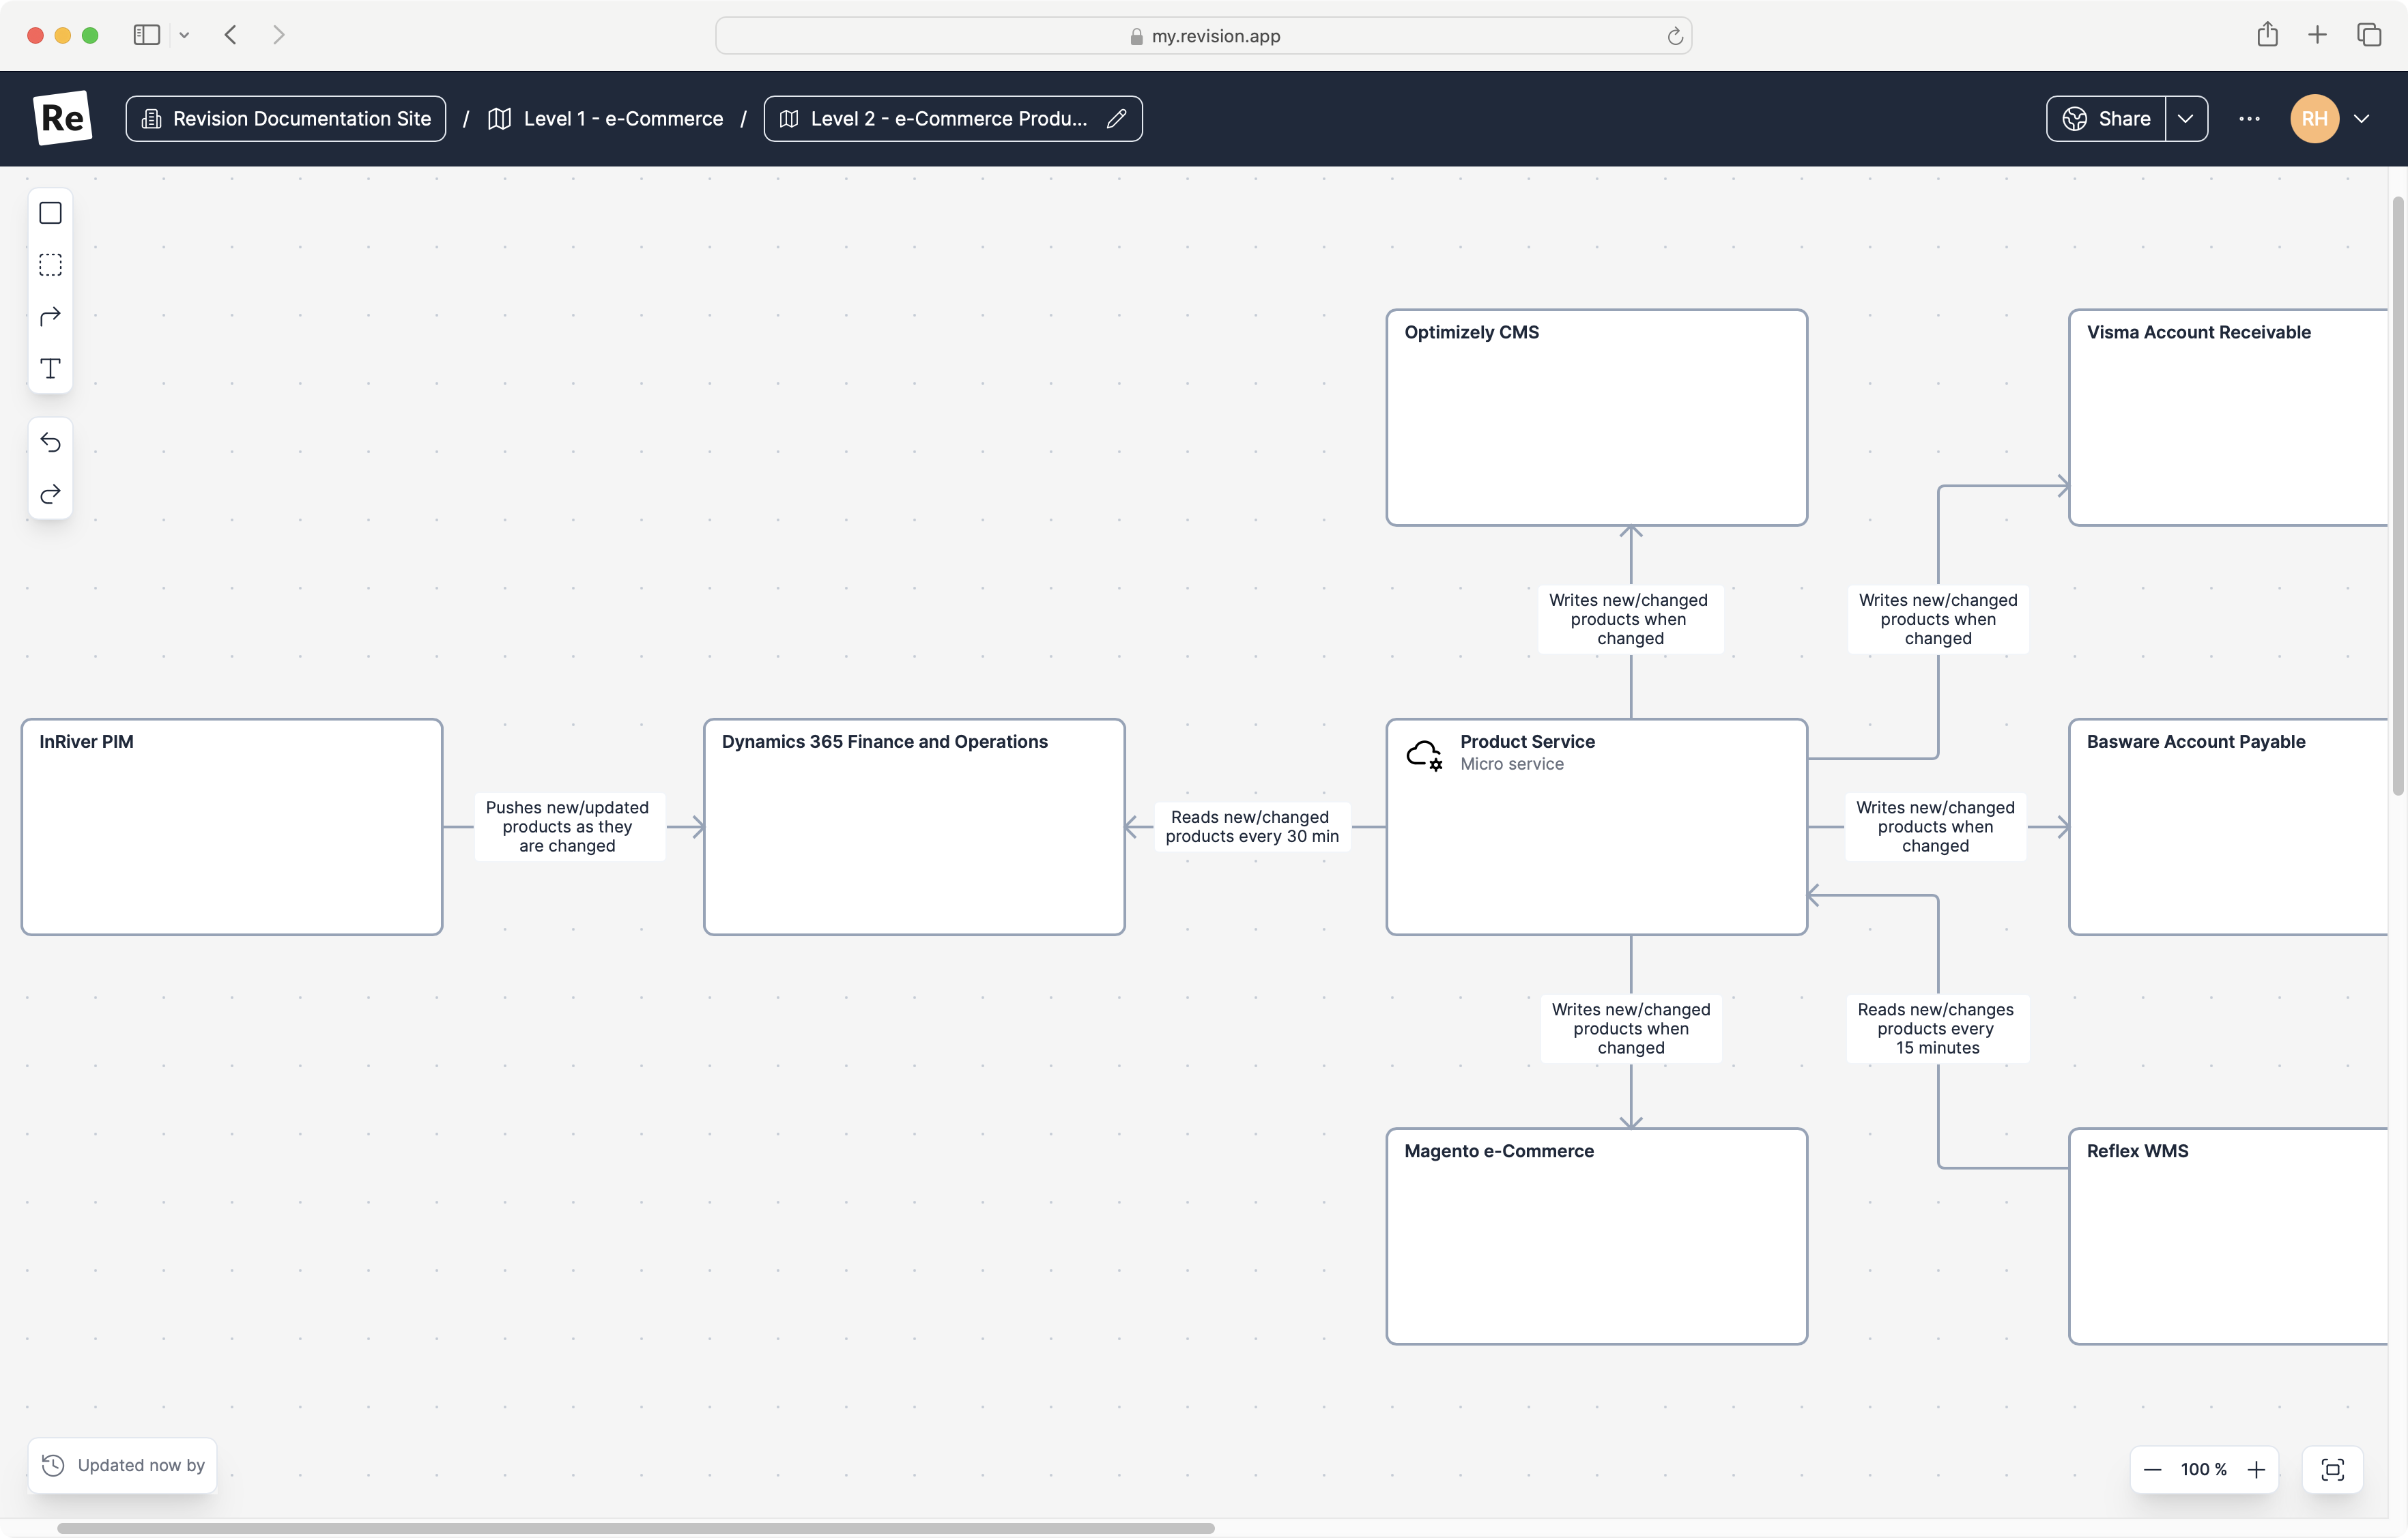
Level 2 (Container) – The Integration Processes
It’s hard to define an integration. In the overall picture product data are moved between several systems. Is the integration the part that moves the products between InRiver PIM and Dynamics 365 PO? Or is the integration the overall process that makes sure the products end up in all the destination systems?
Leaving that discussion aside we can agree that the purpose of an integration is to support some sort of business process. In this case, the handling of product master data.
Documenting how we support a business process is the second level of diagrams.
The difference between this and the level 1 diagram is that we’ll zoom in to a specific area and that we’ll here include more details – things that we didn’t want to include in the overall picture to keep it easy to understand. In the example, we’re showing that product master data actually is distributed using a product service. We’re also including other details we didn’t show in the level 1 diagram.
Again this is information that is hard to get from reading code and configuration and that is important for getting the business users to understand what we’re actually building.
It’s important to try and keep purely technical details out of this diagram and try and focus on more business rules like information. Information that is useful for a business user.
Example of information we might include on level 2;
what’s triggering the transfer
duplication checks
conversions
transformations of data, and so on
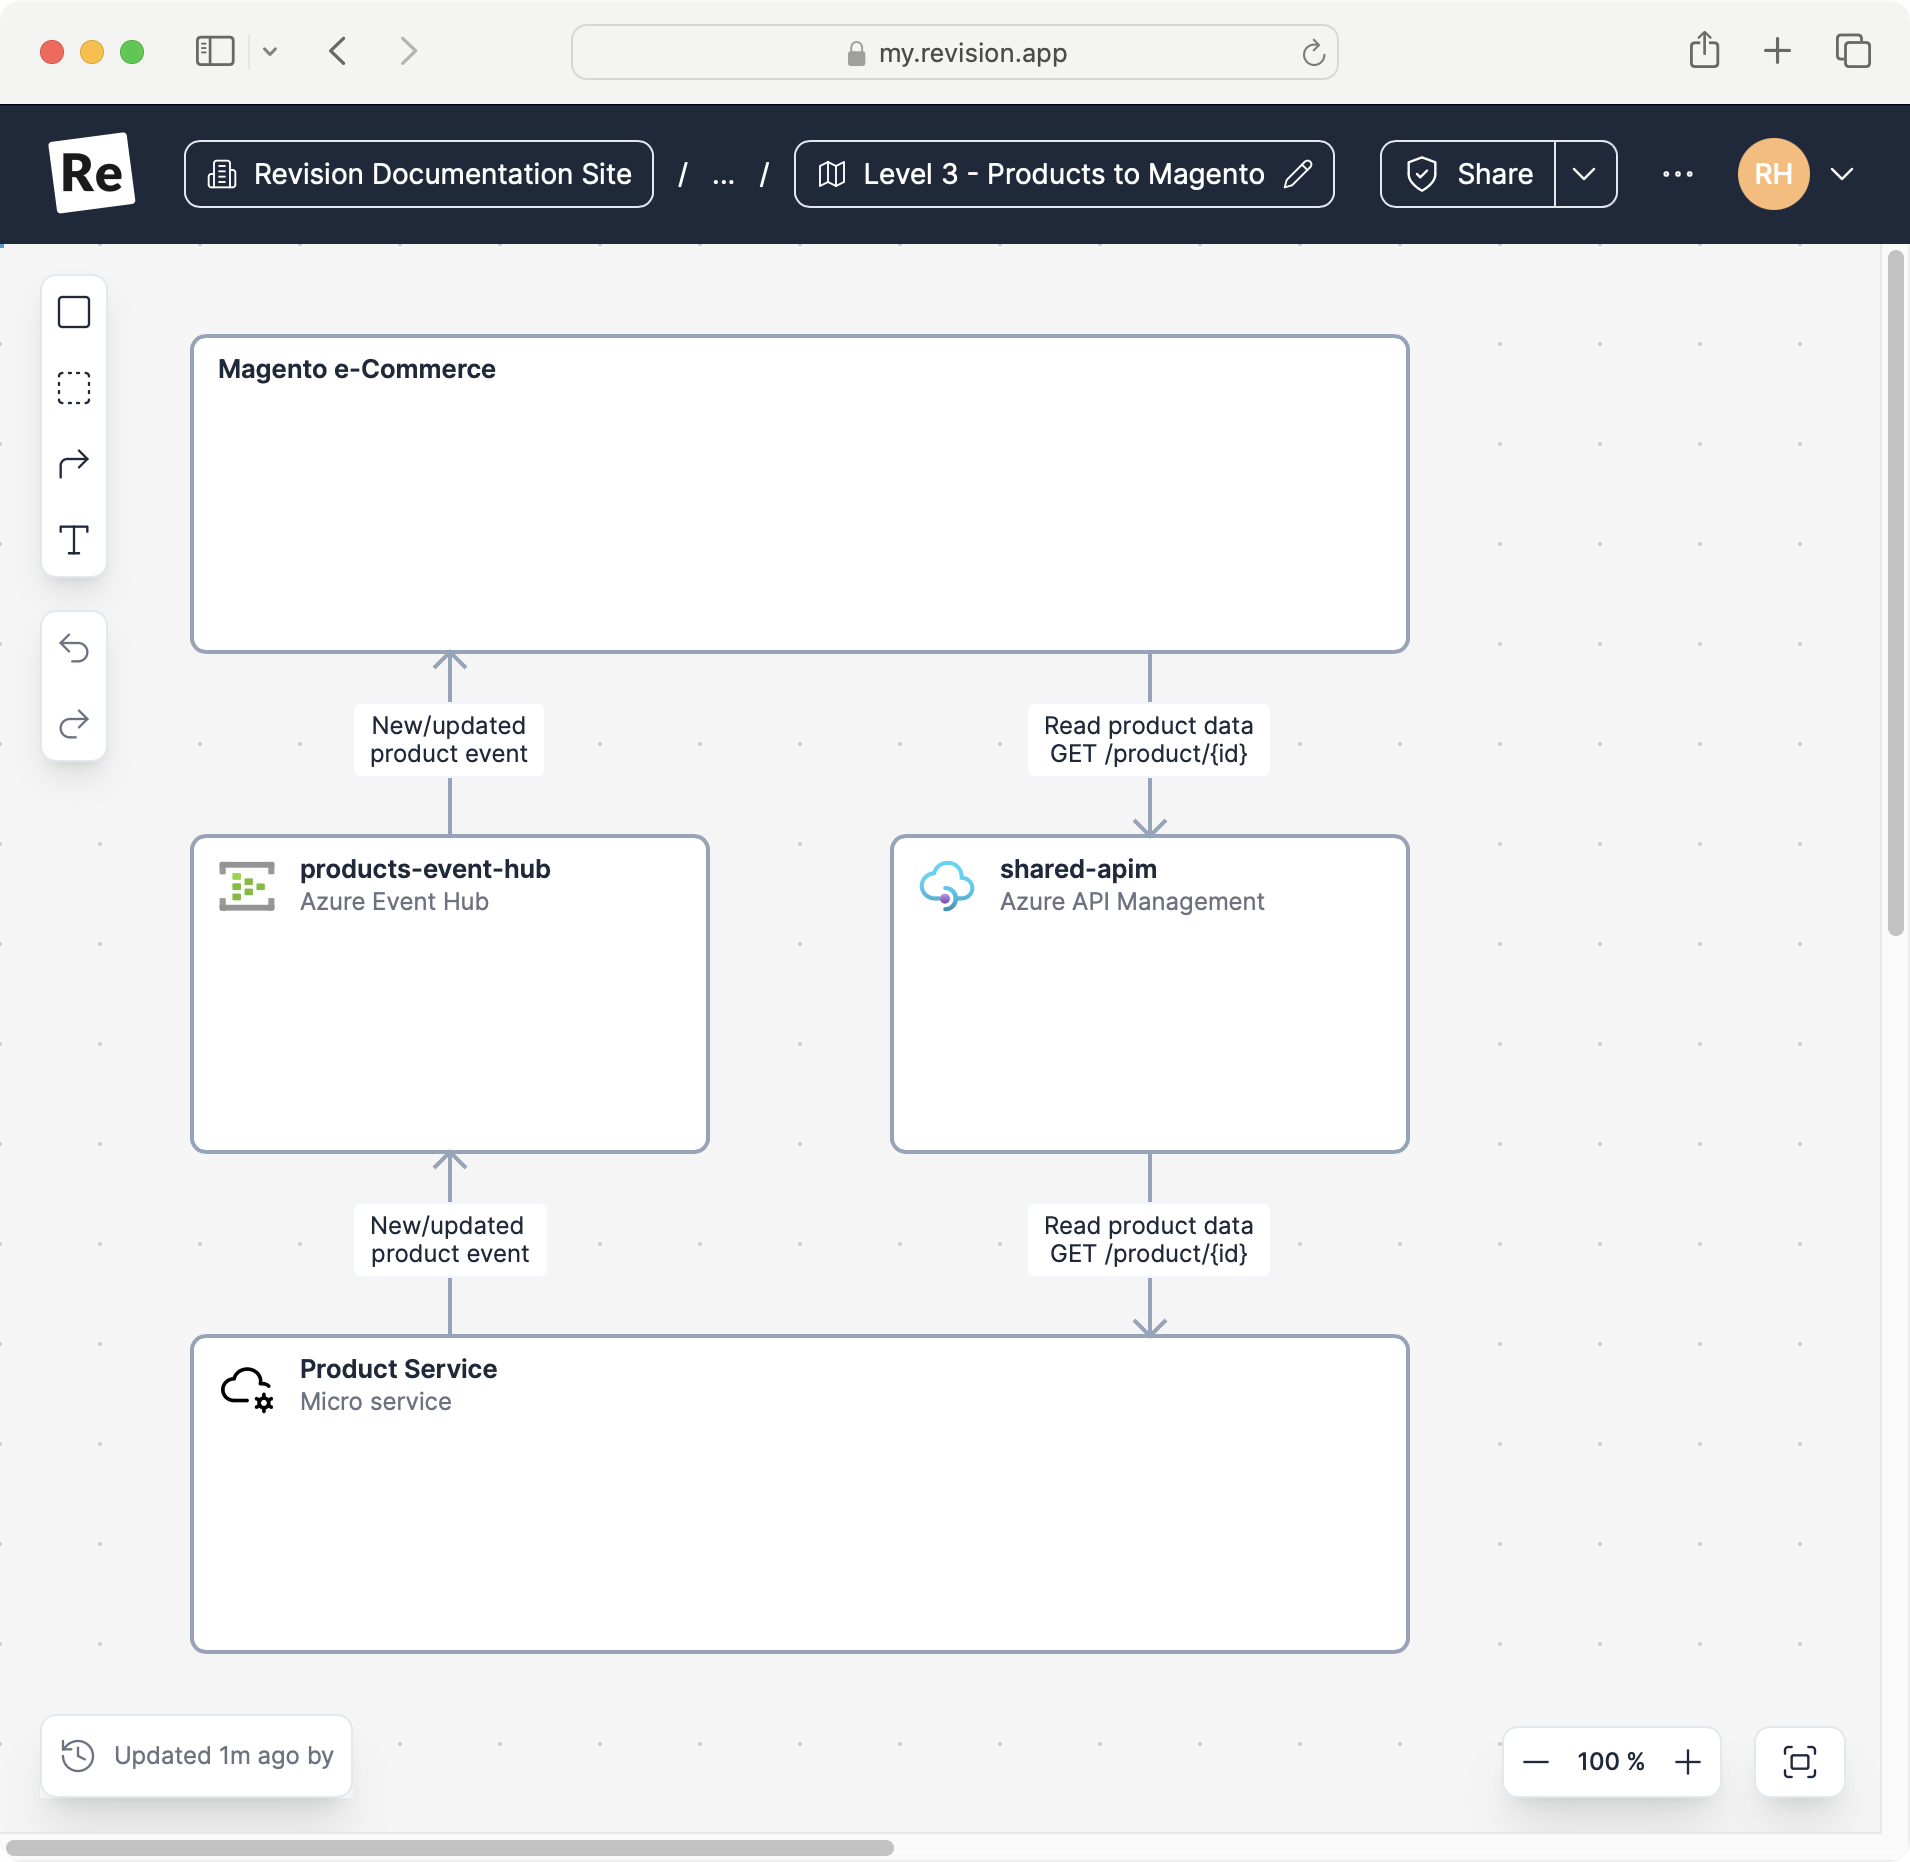
Level 3 – The Integration Details
This is probably the diagram that needs the least explanation. This is the part I often find well-documented and maintained. Here we document all the technical components and implementation details.
This is however also the part that doesn’t always require that much documentation. Much of the details at this level can easily be found in code and configuration and it’s easy to spend time documenting things that in the end developers will look up code and configuration instead.
As most know a BizTalk Solution has two major parts – its resources in form of dlls, and its configuration in form of bindings.
In an previous post
I described how to build and pack resources into an MSI using Team Foundation Server (TFS) Build Services. Managing the configuration in a similar way is equally important.
So let’s see how we can build environment specific binding files using TFS Build Services and some config transformations syntax goodness!
Creating a simple binding example for development and test environment
Let’s start with a simple example of a simple binding with a receive port, receive location and a
send port for two different environments – one called “Test” and one “Production”.
Port type
Name
Destination path in Test
Destination path in Production
Receive Port
BtsSample_ReceivePort_A
N/A
N/A
Receive Location
BtsSample_ReceivePort_A_Location (File)
C:TempIn*.xml
C:TempIn*.xml
Send Port
BtsSample_SendPort_A (File)
C:TempTESTOut%MessageID%.xml
C:TempPRODOut%MessageID%.xml
As one can see there’s a small difference between the send ports destinations paths in Test and Production.
Exporting a binding template
Next we’ll create a binding template. The binding template will hold all information that is shared between the different environments.
This is achieved this by an ordinary export of the application binding from the BizTalk Administration Console – as you’ve probably done many times before.
Creating environment specific bindings using web.config Transformation Syntax
The Web.config Transformation Syntax is feature that showed up in Visual Studio 2010 and
is often used to transform app.config and web.config files between different versions and environments – but it will of course work on any type
of configuration file. Including BizTalk binding files!
So for each environment we’ll then create an environment specific config file that only contains the values that differs between the template and
the values for that environment. We use the Web.config Transformation Syntax to match the nodes and values that we like to update in the template.
Below is the Test environment specific file matching the send port and replacing the value with the value specific for Test.
The Production specific file also matches the send port but with a different value for the Destination path.
Using MSBuild to execute the transformation
As part of the Visual Studio installation an MSBuild target is installed for executing the transform.
The target is installed into the standard MSBuild Extensions Path
which usally mean something lilke C:Program Files (x86)MSBuildMicrosoftVisualStudiov10.0WebMicrosoft.Web.Publishing.targets
depending a Visual Studio version etc.
Finally we’ll add a small .proj file to pass some parameters to the MSBuild process. We need to tell the process what file to use as
template and what different environment specific files we like to use.
Next we can kick of MSBuild and point it to the cretated proj file. C:WindowsMicrosoft.NETFrameworkv4.0.30319MSBuild build.proj.
Voila! MSBuild has performed our transformation and created two complete environment specific binding file by combining the template with the specific environment files – one of test and one for production.
Generating the file using TFS Build Services
Start by setting up a TFS build definition as described in previous post on
Generating BizTalk MSI using TFS Build Services.
We then need to add the $(DestinationPath) property to our Destination path to make sure the outputted binding files are written to the same
path as the rest of the resources.
Once we have our build template all that’s needed is to add the build.proj file to the files to compile as shown below.
When finally running the build our two complete binding files are written to the deployment area and ready for installation!
Using a build server and leveraging continuous integration is good practice in any software
development project. The idea behind automated build and continuous integrations is to have a server that
monitors one’s source code repository and builds the solution as changes occur. This separate build
activity alone will ensure that all artifacts are checked in and that a successful build doesn’t depend on any artifacts or settings on the development machines.
Today build servers do a lot more as part of the build – the build process usually involves execution of
tests, labeling the source as well as packing the solution into a deployable artifact.
In this post we’ll see how a build process can be achieved using Team Foundation (TFS) Build Services, building a BizTalk project that results in
a deployable MSI artifact.
TFS Build Services
TFS Build services is a component that is part of the standard TFS install media.
Each TFS build controller controls a number of “Build Agents” that will perform the actual build process. For each solution to build one has to
define its process. These processes are described in a “Build Template” that tells the agent what steps to go through
and in what order.
“Build Templates” in TFS Build Services are defined using Visual Studio. The image below shows a build template accessed through Visual Studio Team Explorer.
Major steps in a build template
As one creates a new build template for a solution one has to go through the following major steps:
1. Define a trigger
Decides what should trigger the build. Should it be triggered manually, should it be a scheduled build or should it
be triggered at a check-in of new code?
2. Source Setting
This will tell the build process what part of the source tree the build template is relevant for. When queueing
a new build this is the part of the source tree that will be downloaded to the staging area. It also tells the build
services where on disk the source should be downloaded to.
3. Process
This is where all the steps and activities that the build service should perform are defined. Team Foundation Build
Services comes with a number of standard templates and custom ones can be added. In this post we’ll however stick with the default one.
Build your first BizTalk solution
Building BizTalk Server solution using TFS Build Services is straight forward.
In this post I will use this sample BizTalk solution. After checking it into Team
Foundation Source Control (I’ll use TFS Source control in this post but it’ll work similarly using Git) I’ll create a new build template for the solution. All that’s
needed to change is the MsBuild platform setting property, so we’re using x86 when executing MsBuild as shown below.
After queuing a build we can in the TFS Build Explorer see a successful build!
We can also download the output from the build where we can see all our build artifacts!
Using BtsMsiTask to create a MSI as part of the build
So far so good, but we started the article by saying that what we wanted was a deployable artifact. In the case of
BizTalk this means a BizTalk MSI. Let’s see what we need to change to also have the build process create a MSI.
1. Install BtsMsiTask
Download and install BtsMsiTask. This will install a MsBuild task for generating the MSI.
2. Add a MsBuild project file
Add a MsBuild project file (build.proj) to the solution
The project file will tell the BtsMsiTask process what artifacts to include.
Add the created project file to the solution and check it in as part of the solution.
3. Add the MsBuild project file to the TFS build template
Add the created MsBuild project file to the TFS build template by adding it to the list of projects to build.
After another successful build we can see that we also created a MSI as part of the build!
Adding build information to the MSI
File name
As we can see the MSI we just created ended up with the default BtsMsiFile name that is a combination of the BizTalk application name property and the
current date and time. Wouldn’t it be nice of we instead could the build number as part of the name?
BtsMsiTask has an optional property called FileName that we for
example can set to <FileName>$(TF_BUILD_BUILDNUMBER).msi</FileName>
Source location
When installing the artifact to BizTalk Server we can see that the source location property in the BizTalk Administration Console is set to
where the artifact was built on the staging area.
It’d be nice to also have information about what build that produced these artifacts. This will give the required information to know exactly what builds that are used for all the installed artifacts.
We can change what is set in the source location by using the SourceLocation property of BtsMsiTask <SourceLocation>c:$(TF_BUILD_BUILDNUMBER)</SourceLocation>
So after setting the property as below, queue another build, reinstall using the MSI and we’ll get the following result with the build number in the source location property.
And finally this is the MsBuild project file we ended up with in our example.
Federated security is a great way of accomplishing single-sign-on (SSO) security for your applications. It’s also a technique that is becoming increasingly relevant as things move to the cloud and we’re starting to get more hybrid situation with some applications on premise and some in the cloud.
Active Directory Federated Security (ADFS) is an implementation of federated security and is used by a number of Microsoft Applications, Microsoft Dynamics CRM being one of them.
Windows Communication Foundation (WCF) has a few techniques to simplify federated security communication and this post will show an example of using Microsoft BizTalk Server and WCF to communicate with an ADFS secured CRM installation.
What is federated security?
Federated security at its core is pretty simple. In our scenario BizTalk Server (client) wants to login in and authenticate itself with the CRM system.
Traditionally the CRM system then had to manage the credentials for the client and verify these as login happened. There a number of drawback to this, the main one being that it doesn’t scale that well when we’re getting many separated systems that need access to each other as login information and login logic is spreads out across a number of systems.
When using federated security each part instead chooses to trust a common part (in this case the ADFS and AD), and as long as someone provide a token that can be validated with the trusted part, the CRM system will trust that it already has been authenticated and that everything is ok.
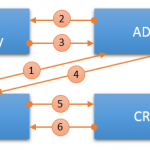
Authentication and requesting token
Authentication against AD
Login authenticated
ADFS token response
ADFS token based authentication
Response from CRM
So basically a federated security model allows for separating all authentication and authorization out to a separate system.
As mentioned ADFS is just an implementation of federated security were Active Directory acts as the main repository with a Security Token Service implementation on top of it.
BizTalk and ADFS
As BizTalk has great WCF support we can use the WCF stack to handle all of communication with ADFS and CRM. But it does involve a fair bit of configuration. BizTalk and Visual Studio will help in most mainstream WCF scenario where one can point Visual Studio at the WSDL location and a basic binding file is generated for us. However, in the case of and ADFS based WSDL this will just result in an empty binding file that doesn’t help much.
Lots of projects I’ve seen makes the decision at this point to use custom code and create a facade to solve authentication. As Microsoft Dynamics CRM comes with a nice SDK including a C# library to handle authentication is easy to understand how one would end up using that. The problem is however that this creates another code base that again needs to be maintained over time. One could also argue that using custom code that is called by BizTalk further complicates the overall solution and makes it harder to maintain.
So let’s configure the authentication from scratch using Windows Communication Foundation.
Choosing the right WCF binding
First thing to do is to choose the right WCF binding. Let’s create a WCF-Custom Static Solicit-Response send port and choose the ws2007FederationHttpBinding.
Adding the Issuer
First thing we need to add is information on how to connect to the Issuer. The Issuer is the one issuing the ticket, in our case that’s the ADFS.
First we need to add information about the address of the Issuer. The WSDL tells us that the mex endpoint for the ADFS server is located at https://adfs20.xxx.yy/adfs/trust/mex.
Browsing the WSDL for the ADFS server shows a number of different endpoints. Which one to use depends on what kind of authentication being used when requesting the token. In our case we’re using a simple username and password so we’re using the usernamemixed endpoint (https://adfs20.xxx.yy/adfs/services/trust/2005/usernamemixed).
Secondly we need to add information about the binding and the binding configuration for communication with the ADFS service.
What this basically means is that we need to add information to a second, or an inner, binding configuration. The BizTalk Server WCF configuration GUI doesn’t provide a way to set this so the only way is to configure this is to use one of the relevant configuration files (“machine.config” or the BizTalk config) and ad a binding manually.
Once this is setup we can point our BizTalk Server WCF configuration to the correct URL and reference the WCF inner binding we just configured.
Finally we need to provide the username and password to authenticate ourselves to the ADFS server.
We now have communication setup to the ADFS service and should be able to get a valid ticket that we then can use to authenticate ourselves to the CRM system!
We now however also need to provide information on how to connect to the actual CRM system.
Configure communication to CRM
The rest is easy. Let’s start with adding the URL to the end service we want to call. As with any other service call we’ll also add the SOAP Action Header that in this case is the Update service (http://schemas.microsoft.com/xrm/2011/Contracts/Services/IOrganizationService/Update) of the OrganizationService service.
As out service also uses SSL for encryption we need to tell the binding to use TransportWithMessageCredentials.
Establishing a Security Context – or not
Finally there is a little tweak that is needed. WCF supports establishing a Security Context. This will cache the token and avoid asking the STS for a new token for each call to the CRM system. BizTalk Server however doesn’t seem to support this so we need to turn it off.
Conclusion
Understanding federated security is important and will become increasingly important as we move over to systems hosted in the cloud – federated security is the de facto authentication standard used by hosted systems in the cloud. Avoiding custom code and custom facades is a key factor in building maintainable large scale BizTalk based systems over time. BizTalk has great WCF support and taking full advantage of it is important to be able to build solutions that easy to oversee and possible to maintain not just by those familiar and comfortable in custom code.
Digital certificates and asymmetric security is notoriously hard to get right in a Windows environment. Getting it right in a BizTalk context isn’t exactly easier.
In this scenario a BizTalk Server act as a client and communicates with a service over https. The service also uses a client certificate for client authentication.
Long story short
Third party root certificates always needs to be places under “Third-Party Root Certification Authorities” or directly under the “Trusted Root Certification Authorities” folder on Local Machine level in Windows. When however also configuring the “WCF-BasicHttp” adapter to also use client certificate authorization the BizTalk Administration console requires the thumbprint id of a specific server certificate (in addition to the client certificate thumbprint). This makes the runtime also look for the for the public certificates under “Trusted People” folder and causes an error if we don’t also place it that folder.
In the end this requires us to add the public root certificate in two different places.
Server certificate
Let’s start by getting the server certificate right.
After configuring everything in BizTalk using a standard WCF-BasicHttp port and selecting Transport security I encountered the following error message.
A message sent to adapter “WCF-BasicHttp” on send port “SP1” with URI “https://skattjakt.cloudapp.net/Service1.svc” is suspended.
Error details: System.ServiceModel.Security.SecurityNegotiationException: Could not establish trust relationship for the SSL/TLS secure channel with authority ‘skattjakt.cloudapp.net’. —> System.Net.WebException: The underlying connection was closed: Could not establish trust relationship for the SSL/TLS secure channel. —> System.Security.Authentication.AuthenticationException: The remote certificate is invalid according to the validation procedure.
The error message is pretty straightforward: Could not establish trust relationship for the SSL/TLS secure channel with authority.
The first thing that happens when trying to establish SSL channel is that a public server certificate is sent down the client for the client to use when encrypting further messages to the server. This certificate is validated so it hasn’t been revoked, that it’s Valid to date hasn’t passed, that the Issued to name actually matches the services domain and so on.
But to be able to trust the information in the certificate it needs to be issued by someone we trust, a certificate authority (CA).
If we take an example of a request to Google we actually don’t trust the information in the Google server certificate, neither do we trust the intermediate certificate they use to sign their public server certificate. The root certificate that issued the intermediary Google Certificate is however one of the preinstalled trusted certificate authorities in Windows.
What authorities and certificates to trust is in Windows based on what certificates exists in the Certificate Store under the Trusted Root Certificate Authorities folder.
In our case the service didn’t use a certificate from one of the trusted authorities but had based their certificate on a root certificate they created themselves.
Further the Certificate Manager in Windows has three different levels: “Local Machine”, “Service” and “Current User”. The top level is the “Local Machine” and certificates added on this level are available for all users. “Service” and “Current User” are more specific and only available for specific services and users. From a BizTalk perspective it’s important to place the certificate so it’s accessible for the user running the BizTalk host instance.
So after requesting the used root certificate and placing it in the trusted authorities folder for the Local Machine we’re able to successfully establish an SSL session!
Client certificate
As the server however required a client certificate for authorization I reconfigured the send port to use Certificate as client credential type.
The BizTalk Administration Console then requires one to enter the thumbprint of the private client certificate to use. When browsing for picking the client certificate the console will look for certificates to choose from in the “Personal” folder on the “Current User” level. So for the certificate to show up one has to add the client certificate to the “Personal” folder running as the user that eventually will hit the browse button in the console. Adding it only to the “Personal” folder of “Local Machine” will not make it show up in the console. As the “Current User” level also is separate for each user it’s very important to add it to the “Personal” folder for the user that eventually will run the BizTalk process as this user otherwise won’t find the certificate at runtime. In this case just pasting the thumbprint id from the certificate will work fine.
When selecting Certificate client credential type the BizTalk Administration console also requires one to pick what public server certificate to use – even though we still just want to use the same root certificate as just added to the trusted store on machine level ..? When locating server certificates to display the console will look in the “Other People” folder on “Local Computer” level. So for making our root certificate show up in the console we also have to this to this folder. It turns however out that when having a pinpointed specific server certificate the BizTalk runtime will throw an error if the server certificate is not placed in the “Other People” folder. Likewise will an error we be thrown if the certificate is placed only in one of the trusted authorities folders.
A message sent to adapter “WCF-BasicHttp” on send port “SP1” with URI “https://skattjakt.cloudapp.net:444/Service42.svc” is suspended.
Error details: System.InvalidOperationException: Cannot find the X.509 certificate using the following search criteria: StoreName ‘AddressBook’, StoreLocation ‘LocalMachine’, FindType ‘FindByThumbprint’, FindValue ’70A9899E6CF89B014E6195ADE6E1BA12BEA58728′.
So in this case we need to add the public CA certificate in two different places for the communication to work.
Frankly I don’t see the point of having to point out a server certificate at all in this case – all I want is to configure what client certificate to use for authorization and the runtime to validate the server certificate against all CA I have in the trusted folders.
Let’s start with a summary for those who don’t feel like reading the full post.
Using NuGet to handle BizTalk dependencies for shared schemas, pipeline components and so on works fine today.
As .btproj files however aren’t supported by NuGet (as shown in this pull request) and are not in the current white list of allowed project types Package Restore will not work (issue closed as by design here).
Not having Package Restore of course is a problem as one now is forced to check in all packages as part of the solutions, something that in the end leads to bloated and messy solutions.
So please reach out to your Microsoft contacts and let’s get this fixed!
NuGet
As most people know NuGet is the package management solution from Microsoft for .NET. It started off as an initiative to further boost open source within the .NET community and NuGet packages uploaded to the NuGet.org platform are open and available directly within Visual Studio through the NuGet add-in. Currently there are well over 20 000 open packages for everyone to download and use.
Lately there has however been lots of discussions within the community to use NuGet as a package manager for internal shared resources as well (by Hanselman and others). Solutions like MyGet allows for private NuGet feeds – only available to those within your organization but still levering all the ease and control offered by NuGet.
Using NuGet for references has a number of of advantages:
Communication
All available resources are directly visible in Visual Studio and when updates to a used library is a available a notification is shown. No more spam mails about changes and never read list of available libraries.
Versioning
A NuGet package has it’s own versioning. This is useful as it isn’t always optimal to change the dll version, but by using the NuGet package version one can still indicate that something has changed.
As you also reference a specific version of a NuGet package from your solution you always have full control of exactly what version you’re targeting and where to find the built and ready bits.
Efficiency
When starting to work on a project with many references one first have to get the source code from source control for the references, build these (hopefully in the right version … hopefully you have your tags and labels in order …) until all the broken references are fix.
With NuGet references this just works straight away and you can be sure you get the right version as the resource isn’t the latest from source control but the actual built dlls that’s part of the referenced NuGet package.
NuGet Feeds
As mentioned NuGet feeds can be public or private. A NuGet feed is basically a RSS feed with available resources and versions of these. A feed and a NuGet server can be a hosted web based solution or something as simple as a folder where you write your NuGet packages to. The NuGet documentation covers these options in depth.
The point being that creating your own private NuGet feed is very simple!
So if you haven’t already realized it by now – NuGet is not only a great tool to manage all public external dependencies but can add a a lot a value for internal references as well.
Couple of relevant NuGet features
NuGet Package Restore NuGet Package Restore enables NuGet to download the used referenced package from the package area. The goal is to avoid having to check in the actual references in source control as this will bloat the version control system and in the end the create a messy solution.
NuGet Specification (nuspec) metadata token replacements
All packages are based on a nuspec file that dictates the version, package description and other meta information.
NuGet has the capability to by using replacement tokens (such as $version$ for example) read some of this information from the AssemblyInfo files.
This is far from a critical feature but nice to have and avoid having to repeat oneself and have the same information in a number of places.**
BizTalk and NuGet?
A typical BizTalk solution has a number of shared resources such as shared schemas, shared libraries and pipeline components. As the resources usually are shared between a number of project they often live in a separate development cycle. So when opening a BizTalk project with such resources it’s not only a lot of work getting the referenced code and building the references, there’s also this nagging feeling that it might not be in the right version and that the source might have changed since the first time the reference was added.
Another reference issue occurs when using a build server for a solution with references. As the solution has a dependency to the referenced project one has to make sure not only that the main solution is fetched to the build workarea by the build server, but also that all the referenced project are fetched from version control – and again, hopefully the latest version in the attended version …
This kind of works using TFS Build Service and common TFS Source Control. If however one’s using Git and have resources in separate repositories this becomes impossible as TFS Build Service currently only supports fetching a single repository per build definition to the build workarea …
(This issue does not apply for TeamCity that has a number of different options for dependency management)
All the these issues are actually solved when using NuGet references instead of traditional references as we can be sure we’re getting the packaged dlls as part of the NuGet package in the version that one referenced and not the latest checked in version.
A NuGet reference also makes things a bit easier when it comes to managing the workarea for the TFS Build Service as one only have to sure the NuGet package is available (either as checked in as part of the solution or by using Package Restore).
But …
NuGet doesn’t support BizTalk projects!
As disused here NuGet currently doesn’t support .btproj files. As BizTalk project files are are basically a standard .NET project file with some extra information a two line change in the NuGet whitelist is needed as in this pull request.
So the main issue it that by not having full support of .btproj files Package Restore won’t work and we’re for now force to check in all the NuGet packages as part of our solutions.
An other minor issue is that the token replacement feature also doesn’t work. I also think that if we could actually get full BizTalk support we’d see more BizTalk specific open shared packages for things like useful libraries and pipeline components.
Call for action: Reach out to the NuGet Team or other Microsoft connections and let’s get those two lines added to the white list!
Back in February I and my college Robin did an presentation on ALM and BizTalk for the BizTalk User Group in Stockholm. In the two hour presentation we talked about things like:
Pros and cons on distributed version control handling systems and BizTalk (more specially Git).
Identifying the right level of automated test – what are the differences between integration and unit tests and how and what should one use when in a BizTalk context.
Using NuGet and BizTalk to handle dependencies and packages. How can we use the NuGet infrastructure to handle all BizTalk dependencies and also distribute artifacts like pipeline components within our company and teams?
How, in our opinion, are Continuous Integration and Delivery best handled when developing with BizTalk. In the presentation we’re looking at everything from build servers to how to handle BizTalk automated builds and packing with minimal amount of work.
So, now we doing the presentation all over again for the newly started BizTalk User Group in Gothenburg the 24 of Mars. The presentation will be in Swedish and packed with demos.
Getting a full Continuous Integration (CI) process working with BizTalk Server is hard!
One of the big advantages in a working CI process is to always have tested and verified artifacts from the build server to deploy into test and production. Packaging these build resources into a deployable unit is however notorious hard in BizTalk Server as a Visual Studio build will not provide a deployable artifact (only raw dlls). The only way to get a deployable MSI package for BizTalk Server is to first install everything into the server and then export – until now.
Why Continuous Integration?
Continuous Integration is a concept first described by Martin Fowler back in 2006. At its core its about team communication and fast feedback but also often leads to better quality software and more efficient processes.
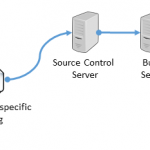
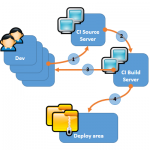
A CI process usually works something like the above picture.
A developer checks in code to the source control server.
The build server detects that a check in has occurred, gets all the new code and initiates a new build while also running all the relevant unit tests.
The result from the build and the tests are sent back to the team of developers and provides them with a up to date view of the “health” in the project.
If the build and all the test are successful the built and tested resources are written to a deploy area.
As one can see the CI build server acts as another developer on the team but always builds everything on a fresh machine and bases everything on what is actually checked in to source control – guaranteeing that nothing is build using artifacts that for some reasons is not in source control or that some special setting etc is required to achieve a successful build.
In step 4 above the CI server also writes everything to a deploy area. A golden rule for a CI workflow is to use artifacts and packages from this area for further deployment to test and production environments – and never directly build and move artifacts from developer machines!
As all resources from each successful build is stored safely and labeled one automatically achieves versioning and the possibility to roll back to previous versions and packages if needed.
What is the problem with CI and BizTalk?
It is important to have the build and feedback process as efficient as possible to enable frequent checkins and to catch possible errors and mistake directly. As mentioned it is equally as important that the resources are written to the deploy area are the ones used to deploy to test and production so one gets all the advantages with versioning and roll back possibilities etc.
The problem with BizTalk Server is however that only building a project in Visual Studio does not gives us a deployable package (only raw dlls)!
There are a number of different ways to get around this. One popular option is to automate the whole installation of the dlls generated in the build. This not only requires a whole lot of scripting and work, it also requires a full BizTalk Server installation on the build server. The automated process of installation also takes time and slows down the feedback loop back to development team. There are however great frameworks as for example the BizTalk Deployment Framework to help with this (this solution of course also enables integration testing using BizUnit and other framework).
Some people would also argue that the whole script package and the raw dlls could be moved onto test and production and viewed on as a deployment package. But MSI is a powerful packaging tool and BizTalk Server has a number of specialized features around MSI. As MSI also is so simple and flexible it usually the preferred solution by IT operations.
A final possibility is of course to directly add the resources one by one using BizTalk Server Administration console. In more complex solutions this however takes time and requires deeper knowledge into the solution as one manually has to know in what order the different resources should be added.
Another option in BtsMsiTask
Another option is then to use BtsMsiTask to directly generate a BizTalk Server MSI from the Visual Studio build and MsBuild.
The BtsMsiTask uses same approach and tools as the MSI export process implemented into BizTalk Server but extracts it into a MSBuild task that can be directly executed as part of the build process.
BtsMsiTask enables the CI server to generate a deployable MSI package directly from the Visual Studio based build without having to first install into BizTalk Server!
I’ve talked a lot about efficient documentation previously on this blog, both when in comes to splitting the documentation up in different layers as here, but also in relation to tools BizTalk Documenter and BizTalk Web Documenter for automatically generation technical documentation as here.
Last week I however had the pleasure to present on the BizTalk User Group Sweden meeting and got to talk all documentation for a whole hour! You can find the PPT from the meeting here.
I ended the presentation by presenting the ten commandments for efficient system integration documentation:
I. Thou shall not manually document anything that can be automatized!
II. Thou shall keep it simple & make it look nice
III. Thou shall use a wiki based platform
IV. Thou shall use pictures whenever appropriate
V. Thou shall have well defined guidelines for your documentation
VI. Thou shall have a well defined target audience for your documentation
VII. Thou shall document continuously in your project
VIII. Thou shall have a common vocabulary and common icons defined
IX.Thou shall test your documentation with target audience
X. Thou as the developer of an integration should document it
About a year ago I published a project that helps automating documentation for BizTalk Server – much like BizTalk Documenter but with the difference that this tools instead generates a dynamic web site. I’ve called in Config Explorer, a name I knew was sh*t from the start but the best I could come up with at the time.
After a while however, when enough people told me that they also thought the name was crap I decided to change it to BizTalk Web Documenter. I’ve also moved the whole project to GitHub.
I’ll try and spend a bit more time on the project than I have the last year and will update the documentation, wiki and roadmap as well as implement a few new features.