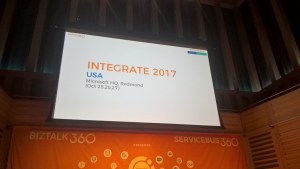
by Eldert Grootenboer | Oct 26, 2017 | BizTalk Community Blogs via Syndication
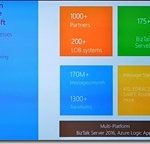
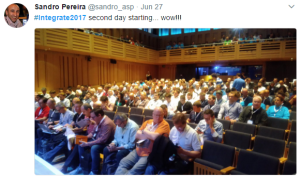
And so the second day of Integrate 2017 USA is a fact, another day of great sessions and action packed demos. We started the day with Mayank Sharma and Divya Swarnkar from Microsoft CSE, formerly Microsoft IT, taking us through their journey to the cloud. Microsoft has an astounding amount of integrations running for all their internal processes, communicating with 1000+ partners. With 175+ BizTalk servers running on Azure IaaS, doing 170M+ messages per month, they really need a integration platform they can rely on.

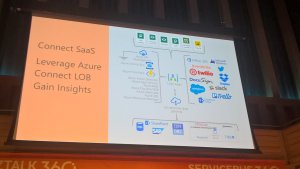
Like most companies, Microsoft is also looking into ways to modernize their application landscape, as well as to reduce costs. To accomplish this, they now are using Logic Apps at the heart of all their integrations, using BizTalk as their bridge to their LOB systems. By leveraging API Management they can test their systems in production as well as in their UAT environments, ensuring that all systems work as expected. By using the options the Azure platform provides for geo replication they ensure that even in case of a disaster their business will stay up and running.
")
Adopting a microservices strategy, each Logic App is set up to perform a specific task, and meta data is used to execute or skip specific parts. To me this seems like a great setup, and definitely something to look into when setting up your own integrations.

Manage API lifecycle sunrise to sunset with Azure API Management
The second session of the day we had Matthew Farmer and Anton Babadjanov showing us how we can use API Management to set up an API using a design first approach. Continuing on the scenario of Contoso Fitness, they set up the situation where you need to onboard a partner to an API which has not been built yet. By using API Management we can set up a façade for the API, adding it’s methods and mock responses, allowing consumers to start working with the API quickly.

Another important subject is how you handle new versions of your API. Thanks to API Management you can now have versions and revisions of your API. Versions allow you to have different implementations of your API living next to each other publically available to your consumers, where revisions allow you to have a private new version of your API, in which you can develop and test changes. Once you are happy with the changes done in the revision, you can publish it with a click of the button, making the new revision the public API. This is very powerful, as it allows us to safely test our changes, and easily roll back in case of any issues.

Thanks to API Management we have the complete lifecycle of our API’s covered, going from our initial design, through the ALM story, all the way up to updating and deprovisioning.

Azure Logic Apps – Advanced integration patterns
Next up are Jeff Hollan and Derek Li, taking us behind the scenes of Logic Apps. Because the massive scale these need to run on, there are many new challenges which needed to be solved. Logic Apps does this by reading in the workflow definition, and breaking it down into a composition of tasks and dependencies. These tasks are then distributed across various workers, each executing their own piece of the tasks. This allows for a high degree of parallelism, which is why they can scale out indefinitely. Having this information, it’s important to take this with us in our scenarios, thinking about how this might impact us. This includes keeping in mind tasks might not be processed in order, and at high scale, so we need to take this into account on our receiving systems. Also, as Logic Apps provides at-least-once delivery, so we should look into idempotency for our systems.

Derek Li showed us different kinds of patterns which can be used with Logic Apps, including parallel processing, exception handling, looping, timeouts, and the ability to control the concurrency, which will be coming to the portal in the coming week. Using these patterns, Derek created a Logic App which sent out an approval email, and by adjusting the timeout and setting up exception handling on this, escalating to the approver’s manager in case the approval was not processed within the timeout. These kinds of scenarios show us how powerful Logic Apps has become, truly allowing for a customized flow.

Bringing Logic Apps into DevOps with Visual Studio and monitoring
After some mingling with like minded people during the break at Integrate 2017 USA, it’s now time for another session by Kevin Lam and Jeff Hollan, which is always a pleasure to see. In this session we dive into the story around DevOps and ALM for Logic Apps. These days Logic Apps is a first class citizen within Visual Studio, allowing us to create and modify them, pulling in and controlling existing Logic Apps from Azure.

As the Logic Apps designer creates ARM templates, we can also add these to source control like VSTS. By using the CI/CD possibilities of VSTS, we can then automatically deploy our Logic Apps, allowing for a completely automated deployment process.

Integrating the last mile with Microsoft Flow
As pro-integrators Microsoft Flow might not be the first tool coming to mind, but actually this is a very interesting service. It allows us to create light weight integrations, giving room to the idea of democratization of integration. There is a plethora of templates available for Flow, allowing users to easily automate tasks, accessing both online and on-premises data. With custom connectors give us the option to expose any system we want to. And being categorized in verticals, users will be able to quickly find templates which are useful for them.

Flow also has the option to use buttons, which can be both physical buttons, from Flic or bttn, or programmatic in the Flow app. This allows for on-demand flows to be executed by the click of a button, and sharing these within your company. For those who want more control over the flows that can be built, and the data that can be accessed, there is the Admin center, which is available with Flow Plan 2.

Looking at the updates which has happened over the last few months, it’s clear the team has been working hard, making Flow ready for your enterprise.

And even more great things are about to come, so make sure to keep an eye on this.

Deep dive into BizTalk technologies and tools
Yesterday (on Day 1 on Integrate 2017 USA), we heard the announcement of Feature Pack 2 for BizTalk. For me, one of the coolest features that will be coming is the ability to publish BizTalk endpoints through Azure API Management. This will allow us to easily expose the endpoint, either via SOAP pass-through or even with SOAP to REST, and take advantage of all the possibilities API Management brings us, like monitoring, throttling, authentication, etc. And all this, with just a right click on the port in BizTalk, pretty amazing.

As we had seen in the first session of today, Microsoft has a huge integration landscape. With that many applications and artifacts, migration to a new BizTalk version can become quite the challenge. To overcome this, Microsoft IT created the BizTalk Server Migration Tool, and published the tool for us as well. The tool takes care of migrating your applications to a new BizTalk environment, taking care of dependencies, services, certificates and everything else.

Looking at the numbers, we can see how much effort this saves, and minimizing the risks of errors. The tool supports migration to BizTalk 2016 from any version from BizTalk 2010, and is certainly a great asset for anyone looking into migration. So if you are running an older version of BizTalk, remember to migrate in time, to avoid running out of the support timelines we have seen yesterday.

What’s there & what’s coming in BizTalk360
Next up we had Saravana Kumar, CEO of BizTalk360 and founding father of Integrate, guiding us through his top 10 features of BizTalk360. Having worked with the product since its first release, I can only say it has gone through an amazing journey, and has become the de-facto monitoring solution for BizTalk and its surrounding systems. It helps solving the challenges anyone who has been administrating BizTalk, giving insights in your environment, adding monitoring and notifications, and giving fine-grained security control.

So Saravana’s top 10 of BizTalk360 is as following, and I pretty much agree on all of them.
1. Rich operational dashboards, showing you the health of your environment in one single place
2. Fine grained security and auditing, so you can give your users access to only those things they need, without the need to opening up your complete system
3. Graphical message flow, providing an end to end view of your message flows
4. Azure + BizTalk Server (single management tool), because Azure is becoming very important in most integrations these days
5. Monitoring – complete coverage, allowing us monitor and, even more importantly, be notified on any issue in your environment
6. Data (no events) monitoring, giving us monitoring on what’s not happening as well, for example expected messages not coming in
7. Auto healing – from failures, to make sure your environment keeps running, automatically coming back up after issues, either from mechanical or human causes
8. Scheduled reporting, which will be coming in the next version, creating reports about your environment on a regular basis
9. Analytics & messaging patterns, giving even more insights in what is happening using graphical charts and widgets
10. Throttling analyser, because anyone who has ever needed to solve a throttling problem knows how difficult this can be, having to keep track of various performance counters, this feature allows a nice graphical overview and historical insights
11. Team knowledgebase, so one more bonus feature that should really be addressed, the knowledgebase is used to link articles to specific errors and faults, making sure this knowledge is readily available in your company
Of course, this is not all, BizTalk360 has a lot more great features, and I can recommend anyone to go and check it.

Give your Bots connectivity, with Azure Logic Apps
Kent Weare, former MVP and now Principal Program Manager within Microsoft on Flow team, takes us on a journey into bots, and giving them connectivity with Logic Apps and Flow. First setting the stage, we all have heard about digital transformation, but what is it all about? Digital transformation has become a bit of a buzzword, but the idea behind it is actually quite intriguing, which is using digital means to provide more value and new business models. The following quote shows this quite nicely.
“Digital transformation is the methodology in which organizations transform, create new business models and culture with digital technologies” – Ray Wang, Constellation Research
An important part here is the culture in the organization will need to change as well, so go out and become a change agent within your organization.
")
Next we go on to bots, which can be used to reduce barriers and empower users through conversational apps. With the rise of various messenger applications like WhatsApp and Facebook Messenger, there is a huge market to be reached here. There are many different kinds of bots, but they all have a common way of working, often incorporating cognitive services like Language Understanding Intelligence Service (LUIS) to make the bot more human friendly.
")
When we want to build our own bots, we have different possibilities here as well, depending on your background and skills. Kent had a great slide on this, making it clear you don’t have to be a pro integrator anymore to make compelling bots.
")
In his demos, Kent showed the different implementations on how to build a bot. The first is using the bot framework with Logic Apps and Cognitive Services to make a complex bot, allowing for a completely tailored bot. For the other two demos, he used Microsoft flow in combination with Bizzy, a very cool connector which allows us to create a “question-answer bot”, analyzing the input from the user and making decisions on it. Finally the ability to migrate Flow implementations to Logic Apps was demonstrated, allowing users to start a simple integration in Flow, but having the ability to seamlessly migrate these to Logic Apps when more complexity is needed over the lifecycle of the integration.

Empowering the business using Logic Apps
And closing this second day of Integrate 2017 USA, we had Steef-Jan Wiggers, with a view from the business side on Logic Apps. A very interesting session, as instead of just going deep down into the underlying technologies, he actually went and looked for the business value we can add using these technologies, which in the end is what it is all about. Serverless integration is a great way to provide value for your business, lowering costs and allowing for easy and massive scaling.

Steef-Jan went out to several companies who are actually using and implementing Azure, including Phidiax, MyTE, Mexia and ServiceBus360. The general consensus amongst them, is Logic Apps and the other Azure services are indeed adding value to their business, as it gives them the ability to set up new powerful scenarios fast and easy.

With several great demos and customer cases Steef-Jan made very visible how he has already helped many customers with these integrations to add value to their business. The integration platform as a service is here to stay, and according to Gartner iPaaS will actually be the preferred option for new projects by 2019. And again, he has gone out and this time went to the community leaders and experts, to get their take on Logic Apps. The conclusion here is these days Logic Apps is a mature and powerful tool in the iPaaS integration platform.

So that was the end of the second day at Integrate 2017 USA, another day full of great sessions, inspiring demos, and amazing presenters. With one more day to go, Integrate 2017 USA is again one of the best events out there.
Check out the recap of Day 1 and Day 3 at Integrate 2017 USA.
Author: Eldert Grootenboer
Eldert is a Microsoft Integration Architect and Azure MVP from the Netherlands, currently working at Motion10, mainly focused on IoT and BizTalk Server and Azure integration. He comes from a .NET background, and has been in the IT since 2006. He has been working with BizTalk since 2010 and since then has expanded into Azure and surrounding technologies as well. Eldert loves working in integration projects, as each project brings new challenges and there is always something new to learn. In his spare time Eldert likes to be active in the integration community and get his hands dirty on new technologies. He can be found on Twitter at @egrootenboer and has a blog at http://blog.eldert.net/. View all posts by Eldert Grootenboer
by Eldert Grootenboer | Sep 4, 2017 | BizTalk Community Blogs via Syndication
When implementing software, it’s always a good idea to follow existing patterns, as these allow us to use proven and reliable techniques. The same applies in integration, where we have been working with integration patterns in technologies like BizTalk, MSMQ etc. These days we are working more and more with new technologies in Azure, giving us new tools like Service Bus, Logic Apps, and since recently Event Grid. But even though we are working with new tools, these integration patterns are still very useful, and should be followed whenever possible. This post is the first in a series where I will be showing how we can implement integration patterns using various services in Azure.
Message Router Pattern
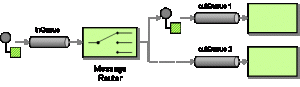
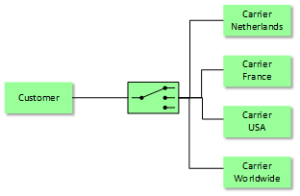
The first pattern which will be shown is the Message Router, which is used to route a message to different endpoints depending on a set of conditions, which can be evaluated against the contents or metadata of the message. We will implement this pattern with different technologies, where we will focus on Logic Apps in this post. For this sample we will implement a scenario where we receive orders, and depending on the city where the order should be delivered we will route it to a specific carrier.
Scenario
When using Logic Apps, we can easily route a message based on its contents to various endpoints. Using a Logic in combination with the Message Router pattern is especially useful when we have the following requirements:
- Different types of endpoints; the power of Logic Apps lies in the many connectors we get out of the box, allowing us to easily integrate with various systems like SQL, Dynamics CRM, Salesforce, etc.
- Small amount of endpoints; as we will be using a switch in our Logic App, managing these becomes cumbersome when we have many endpoints.
In this sample we write the messages to Github Gists, but you could easily replace this with other destinations. We use a HTTP Trigger, meaning we receive the message on a http endpoint, where the message format is as the following.
{
    "Address":"Kings Cross 20",
    "City":"New York",
    "Name":"Eldert Grootenboer"
}
|
We use a switch to determine the endpoint to which we will send our message based on the city inside the message body, and send out the message to our endpoint, in this case using a HTTP action. Of course we could send the message to any other type of endpoint from our cases inside the switch as well. Finally we will respond the location of the Gist where the message was placed.
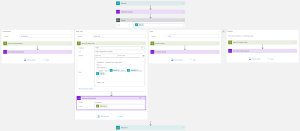
Logic App Implementation
You can easily deploy this solution from the Azure Quickstart Templates site, or use the below button to directly deploy this to your own Azure environment.

by Eldert Grootenboer | Aug 23, 2017 | BizTalk Community Blogs via Syndication
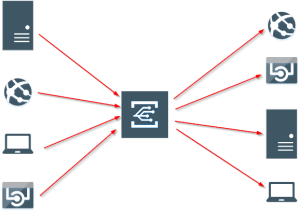
After having shown how to send our custom events to Event Grid in my previous blog post, we will now see how we can create custom subscribers. Event Grid will be integrated with all Azure services, but by allowing us to create our own custom subscribers as well, we can truly route events to any service or application. And what’s more, we will also see how we can use the API to create a subscription from our subscriber, allowing us to quickly onboard new services, which can then start listening to the events which are of interest to them. In this sample, we will create an Azure API App, which will receive the events from our previous blog post, and store them in Azure Table Storage. On starting, the API App will check if the subscriptions it uses are created, and if not, it will create them and point them to the various endpoints the API App exposes.
Azure Event Grid
As we will be using Table Storage to store the data from the events, we will start by creating this in a storage account. I am using the storage account I created in this post, but of course you can also set up a new account for this.
Create Table Storage
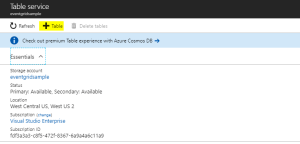
Add Table Storage
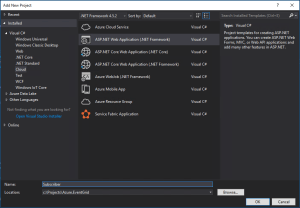
Now we will create the API App which will subscribe to our events. Start by creating a new ASP.NET Web Application project.
Create ASP.NET Web Application project
Now choose the Azure API App template.
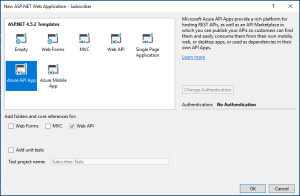
Create Azure API App
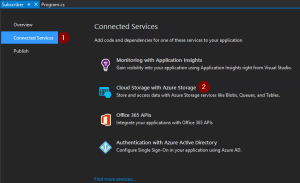
Connect Storage Account
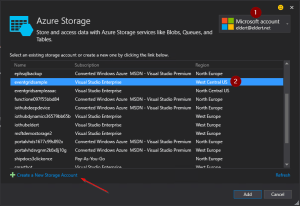
As we will be connecting to Table Storage, we will add Azure Storage as a connected service on the overview pane.
Add Azure Storage
Choose the storage account in which we created the Table Storage. Optionally you can also create a new Storage Account from here.
Choose Storage Account
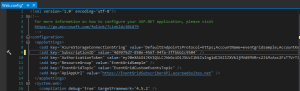
Application Settings
We can now start implementing our API App. Let’s start by adding some application settings in the web.config file. These will be needed later on in our application. Once the API App has been deployed we will recreate these settings on the API App’s application settings as well. These are the settings which need to be created.
- AzureStorageConnectionString
- This is the connection string for the Storage Account, which can be retrieved in the Azure Portal.
- SubscriptionID
- GUID with your subscription ID, can also be retrieved from the Azure portal.
- AuthorizationToken
- In this sample I will be using a bearer token to connect to the Azure management API. Instructions on how to get this token can be found in this blogpost by Toon, follow the instructions under Authenticate With Service Principal.
In a production environment you would implement this using the Azure AD SDK, as the bearer token will expire after a few hours.
- ResourceGroup
- The name of the resource group in which the Event Grid Topic has been created.
- EventGridTopic
- The name of the Event Grid Topic to which we want to subscribe.
- ApiAppUrl
- URL on which the API App can be reached, which will be used in the subscription endpoints. We will know this once the API App has been deployed, at which time we can update this in the API App’s application settings. Keep in mind that we need an https endpoint for our Event Grid subscriptions, as http will throw an error when creating the subsciption. Luckily API Apps come with a https endpoint out of the box.
Add application settings
Data Classes
We now will create two new classes, which will be be used to receive the repair and order events we sent in in the previous blog post. The first class is the data we sent in our Data node in our custom event.
/// <summary>
/// Data which can be sent with various ship events.
/// </summary>
public class ShipEventData
{
        /// <summary>
        /// Name of the ship.
        /// </summary>
        public string Ship { get; set; }

        /// <summary>
        /// Type of event.
        /// </summary>
        public string Type { get; set; }

        /// <summary>
        /// Device received in the event.
        /// </summary>
        public string Device { get; set; }

        /// <summary>
        /// Description received in the event.
        /// </summary>
        public string Description { get; set; }

        /// <summary>
        /// Product received in the event.
        /// </summary>
        public string Product { get; set; }

        /// <summary>
        /// Amount received in the event.
        /// </summary>
        public int? Amount { get; set; }
}
|
And the second class is the event we will receive this from Event Grid.
/// <summary>
/// Class used to receive ship event values.
/// </summary>
public class ShipEventValue
{
        /// <summary>
        /// Time when event was created.
        /// </summary>
        public string EventTime;

        /// <summary>
        /// Data of the event.
        /// </summary>
        public ShipEventData Data;
}
|
Now let’s implement the Subscription class, which will be used to create the subscriptions we need for our sample when the API App starts.
/// <summary>
/// Defines a subscription with its filters.
/// </summary>
public class Subscription
{
        /// <summary>
        /// Name of the subscription.
        /// </summary>
        public string Name;

        /// <summary>
        /// Filter which will look at the start of the subscription's subject.
        /// </summary>
        public string PrefixFilter;

        /// <summary>
        /// Filter which will look at the end of the subscription's subject.
        /// </summary>
        public string SuffixFilter;
}
|
We will also need a class which will be used to insert our data into the Table Storage.
/// <summary>
/// Used to insert ship events to Table Storage.
/// </summary>
public class ShipEventEntity : TableEntity
{
        /// <summary>
        /// Constructor.
        /// </summary>
        public ShipEventEntity(string ship, string dateTime)
        {
                PartitionKey = ship;
                RowKey = dateTime;
        }

        /// <summary>
        /// Type of event.
        /// </summary>
        public string Type { get; set; }

        /// <summary>
        /// Device received in the event.
        /// </summary>
        public string Device { get; set; }

        /// <summary>
        /// Description received in the event.
        /// </summary>
        public string Description { get; set; }

        /// <summary>
        /// Product received in the event.
        /// </summary>
        public string Product { get; set; }

        /// <summary>
        /// Amount received in the event.
        /// </summary>
        public int? Amount { get; set; }
}
|
Controller
The controller is used to expose our methods to the outside world. In this case, we will provide four endpoints for different types of subscriptions. Each method will be called by the subscribtion on different events, and write the data it received to it’s own table in Table Storage. In a production implementation, this would probably be four different services, and for different parties who are interested in the events (for example, a specific ship might have to get it’s orders from supplier, while another ship gets it’s orders from supplier B).
We will change the name of the default ValuesController class to SubscriberController to better represent our scenario, and instantiate a CloudStorageAccount used to communicate with our Table Storage.
public class SubscribersController : ApiController
    {
        /// <summary>
        /// Storage account used to store to Table Storage.
        /// </summary>
        private readonly CloudStorageAccount _storageAccount = CloudStorageAccount.Parse(CloudConfigurationManager.GetSetting("AzureStorageConnectionString"));
}
|
Add the following method to the class, which will take the data we receive on our endpoints, and store it into Table Storage.
/// <summary>
/// Insert Ship Event into table storage.
/// </summary>
private async Task InsertToTable(IReadOnlyList<ShipEventValue> value, string tableName)
{
        // Check if any events were received
        if (value == null || value.Count == 0)
        {
                return;
        }

        // Create the table client
        var tableClient = _storageAccount.CreateCloudTableClient();

        // Retrieve a reference to the table
        var table = tableClient.GetTableReference(tableName);

        // Create the table if it doesn't exist
        table.CreateIfNotExists();

        // Create a new ship event entity
        var shipEventEntity = new ShipEventEntity(value[0].Data.Ship, value[0].EventTime)
        {
                Type = value[0].Data.Type,
                Product = value[0].Data.Product,
                Amount = value[0].Data.Amount,
                Device = value[0].Data.Device,
                Description = value[0].Data.Description
        };

        // Create the TableOperation object that inserts the customer entity
        var insertOperation = TableOperation.Insert(shipEventEntity);

        // Execute the insert operation
        await table.ExecuteAsync(insertOperation);
}
|
And the final piece in this class are the methods for the endpoints. Notice the ActionName attributes, which we will use to have various endpoints in our API.
/// <summary>
/// Receives all events.
/// </summary>
[ActionName("All")]
public async Task<StatusCodeResult> PostAll([FromBody] List<ShipEventValue> value)
{
        await InsertToTable(value, "All");
        return new StatusCodeResult(HttpStatusCode.Created, this);
}

/// <summary>
/// Receives all types of events for the ship Hydra.
/// </summary>
[ActionName("Hydra")]
public async Task<StatusCodeResult> PostHydra([FromBody] List<ShipEventValue> value)
{
        await InsertToTable(value, "Hydra");
        return new StatusCodeResult(HttpStatusCode.Created, this);
}

/// <summary>
/// Receives repairs for all ships.
/// </summary>
[ActionName("Repairs")]
public async Task<StatusCodeResult> PostRepairs([FromBody] List<ShipEventValue> value)
{
        await InsertToTable(value, "Repairs");
        return new StatusCodeResult(HttpStatusCode.Created, this);
}

/// <summary>
/// Receives orders for the ship Aeris.
/// </summary>
[ActionName("AerisOrders")]
public async Task<StatusCodeResult> PostAerisOrders([FromBody] List<ShipEventValue> value)
{
        await InsertToTable(value, "AerisOrders");
        return new StatusCodeResult(HttpStatusCode.Created, this);
}
|
Configure Routes
Now hop on over to the WebApiConfig class, and implement the following code. This will generate the different endpoints for our Controller actions.
public static class WebApiConfig
{
        public static void Register(HttpConfiguration config)
        {
                // Web API routes
                config.MapHttpAttributeRoutes();
                config.Routes.MapHttpRoute(name: "routes", routeTemplate: "api/{controller}/{action}");
        }
}
|
Subscriptions Creation
Finally we need to implement the Global.asax class, in which we will create our Event Grid Subscriptions on start up of the API App. This is where we define the subscriptions to be created, including their filters. Event Grid allows us to filter on the subject’s prefix and suffix, as well as the event type.
public class WebApiApplication : HttpApplication
{
        /// <summary>
        /// Subscriptions to be created.
        /// </summary>
        private readonly List<Subscription> _subscriptions = new List<Subscription>
        {
                new Subscription { Name = "All" },
                new Subscription { Name = "Hydra", PrefixFilter = "Hydra" },
                new Subscription { Name = "Repairs", SuffixFilter = "Repair" },
                new Subscription { Name = "AerisOrders", PrefixFilter = "Aeris", SuffixFilter = "Order" }
        };
}
|
Currently we don’t have a SDK available to work with Event Grid, so we will be using a HttpClient to work directly against its API.
/// <summary>
/// Create HTTP client used to communicate with Azure.
/// </summary>
/// <returns></returns>
private static HttpClient CreateHttpClient()
{
        // Create a HTTP client
        var httpClient = new HttpClient();

        // Add key in the request headers
        httpClient.DefaultRequestHeaders.Add("Authorization", $"Bearer {CloudConfigurationManager.GetSetting("AuthorizationToken")}");

        // Return the HTTP client
        return httpClient;
}
|
For each subsription, we will need to check if it does not already exist. This allows us to add new subscriptions whenever we want.
/// <summary>
/// Check if subscription exists.
/// </summary>
private static async Task<bool> SubscriptionExists(string subscription)
{
        // Check if subscription exists
        var result = await CreateHttpClient()
                .GetAsync(
                        $"https://management.azure.com/subscriptions/{CloudConfigurationManager.GetSetting("SubscriptionID")}/resourceGroups/{CloudConfigurationManager.GetSetting("ResourceGroup")}/providers/Microsoft.EventGrid/topics/{CloudConfigurationManager.GetSetting("EventGridTopic")}/providers/Microsoft.EventGrid/eventSubscriptions/{subscription}?api-version=2017-06-15-preview");
        return result.IsSuccessStatusCode;
}
|
If the specific subscription does not yet exist, we will create it using the following code.
/// <summary>
/// Create subscription with filters.
/// </summary>
private static async Task CreateSubscription(string subscription, string prefixFilter, string suffixFilter)
{
        // Set up create subscription message
        var createSubscription = new
        {
                properties = new
                {
                        destination = new { endpointType = "webhook", properties = new { endpointUrl = $"{CloudConfigurationManager.GetSetting("ApiAppUrl")}/api/Subscribers/{subscription}" } },
                        filter = new { includedEventTypes = new[] { "shipevent" }, subjectBeginsWith = prefixFilter, subjectEndsWith = suffixFilter, subjectIsCaseSensitive = "false" }
                }
        };

        // Create content to be sent
        var json = JsonConvert.SerializeObject(createSubscription);
        var content = new StringContent(json, Encoding.UTF8, "application/json");

        // Create subscription
        await CreateHttpClient()
                .PutAsync(
                        $"https://management.azure.com/subscriptions/{CloudConfigurationManager.GetSetting("SubscriptionID")}/resourceGroups/{CloudConfigurationManager.GetSetting("ResourceGroup")}/providers/Microsoft.EventGrid/topics/{CloudConfigurationManager.GetSetting("EventGridTopic")}/providers/Microsoft.EventGrid/eventSubscriptions/{subscription}?api-version=2017-06-15-preview",
                        content);
}
|
And finally implement the method which will loop over our subscriptions, creating the ones we need. Call this method whenever the application is started.
/// <summary>
/// Entry point of application.
/// </summary>
protected async void Application_Start()
{
        GlobalConfiguration.Configure(WebApiConfig.Register);
        await CreateSubscriptions();
}

/// <summary>
/// Create subscriptions that don't exist.
/// </summary>
private async Task CreateSubscriptions()
{
        // Check if subscriptions can be created, this will only be done if the endpoint of this API App has been updated in the settings
        if (CloudConfigurationManager.GetSetting("ApiAppUrl").ToLowerInvariant().Contains("tobereplaced"))
        {
                return;
        }

        // Loop through subsriptions
        foreach (var subscription in _subscriptions)
        {
                // Check if subscription already exists
                if (await SubscriptionExists(subscription.Name))
                {
                        continue;
                }

                // Create subscription
                await CreateSubscription(subscription.Name, subscription.PrefixFilter, subscription.SuffixFilter);

                // Wait for a while, to prevent throttling
                Thread.Sleep(5000);
        }
}
|
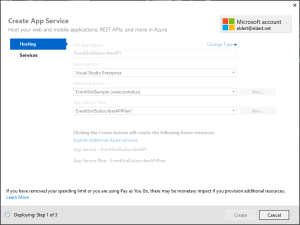
Deployment
Now that our API App has been completed, we can deploy it to Azure. Rightclick on the project, and select Publish. This will create the publishing wizard. Create a new API App, and set the properties where you want it to be deployed.
Publish API App
Once it has been deployed, we need to add the application settings for the API App in the portal.
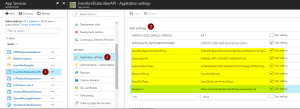
Add application settings
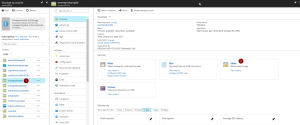
After the settings have been added, restart the API App. This will now start the creation of the subscriptions, which you should be able to see in the Event Grid blade after a minute or so.

Event Grid Subscriptons have been created by the API App
Testing
Now that we have our events set up end to end, we can use the application from this blog post to start generating events. These will then be routed by Event Grid to the endpoints of our subscriptions, which trigger the API App’s different methods. And finally, they will be stored into the various tables in our table storage. The complete code with this blog post can be found here.
Events stored in Table Storage
by Eldert Grootenboer | Aug 23, 2017 | BizTalk Community Blogs via Syndication
In my previous post I showed how we can use the recently announced Event Grid service to integrate Azure services with each other. In this post, I will show how we can send custom events from any application or service into Event Grid, allowing us to integrate any service. My next post will show you in detail how we can subscribe to these custom events.
Integrate any service or application
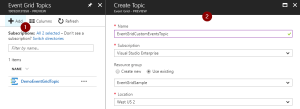
We will start by creating a new Event Grid Topic in the portal. Go to the Event Grid Topics blade, add a new Topic, and provide the details.
Create Event Grid Topic
We will now create an application, which will send custom events into our topic. By setting the subject and event type, we can later on subscribe to specific events. I used an application I have built for a shipping company as inspiration, which they use for their day to day work. In this sample, we build a console app, which will generate events when an order has been placed, as well as when a repair has been requested.
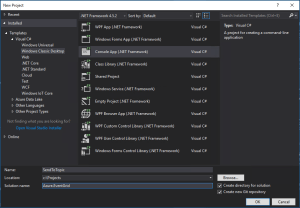
Create Console App
Data Classes
Once created, we will first add the classes which will represent the data of the orders and repairs. Both of these inherit from the ShipEvent class, which holds the common data.
/// <summary>
/// Event sent for a specific ship.
/// </summary>
public class ShipEvent
{
        /// <summary>
        /// Name of the ship.
        /// </summary>
        public string Ship { get; set; }

        /// <summary>
        /// Type of event.
        /// </summary>
        public string Type { get; set; }
}
|
/// <summary>
/// Used to place an order.
/// </summary>
public class Order : ShipEvent
{
        /// <summary>
        /// Name of the product.
        /// </summary>
        public string Product { get; set; }

        /// <summary>
        /// Number of items to be ordered.
        /// </summary>
        public int Amount { get; set; }

        /// <summary>
        /// Constructor.
        /// </summary>
        public Order()
        {
                Type = "Order";
        }
}
|
/// <summary>
/// Used to request a repair.
/// </summary>
public class Repair : ShipEvent
{
        /// <summary>
        /// Device which needs to be repaired.
        /// </summary>
        public string Device { get; set; }

        /// <summary>
        /// Description of the defect.
        /// </summary>
        public string Description { get; set; }

        /// <summary>
        /// Constructor.
        /// </summary>
        public Repair()
        {
                Type = "Repair";
        }
}
|
Custom Event Class
Now we will create our custom Event class, which follows the structure of the Event Grid events schema. In this sample, we will only send out shipevent types of events, but you could easily expand this with other event types as well. We use the UpdateProperties property to update the Subject, which will later on be used to filter our messages in our subscriptions. Here we also include our Data, which is our payload of the Order or Repair we are sending.
/// <summary>
/// Event to be sent to Event Grid Topic.
/// </summary>
public class Event
{
        /// <summary>
        /// This will be used to update the Subject and Data properties.
        /// </summary>
        public ShipEvent UpdateProperties
        {
                set
                {
                        Subject = $"{value.Ship}/{value.Type}";
                        Data = value;
                }
        }

        /// <summary>
        /// Gets the unique identifier for the event.
        /// </summary>
        public string Id { get; }

        /// <summary>
        /// Gets the publisher defined path to the event subject.
        /// </summary>
        public string Subject { get; set; }

        /// <summary>
        /// Gets the registered event type for this event source.
        /// </summary>
        public string EventType { get; }

        /// <summary>
        /// Gets the time the event is generated based on the provider's UTC time.
        /// </summary>
        public string EventTime { get; }

        /// <summary>
        /// Gets or sets the event data specific to the resource provider.
        /// </summary>
        public ShipEvent Data { get; set; }

        /// <summary>
        /// Constructor.
        /// </summary>
        public Event()
        {
                Id = Guid.NewGuid().ToString();
                EventType = "shipevent";
                EventTime = DateTime.UtcNow.ToString("o");
        }
}
|
Settings
In the Program class, add two properties. The first will hold the endpoint of the Event Grid Topic we just created, while the second will hold the key used to connect to the topic.
Grab the Topic endpoint and key
/// <summary>
/// Send events to an Event Grid Topic.
/// </summary>
public class Program
{
        /// <summary>
        /// Endpoint of the Event Grid Topic.
        /// Update this with your own endpoint from the Azure Portal.
        /// </summary>
        private const string TOPIC_ENDPOINT = "https://eventgridcustomeventstopic.westcentralus-1.eventgrid.azure.net/api/events";

        /// <summary>
        /// Key of the Event Grid Topic.
        /// Update this with your own key from the Azure Portal.
        /// </summary>
        private const string KEY = "1yroJHgswWDsc3ekc94UoO/nCdClNOwEuqV/HuzaaDM=";
}
|
Send To Event Grid
Next we will add the method to this class, which will be used to send our custom events to the Topic. At this moment, we don’t have a SDK available yet, but luckily Event Grid does expose a powerful API which we can leverage using a HttpClient. When using this API, we will need to send in a aeg-sas-key with the key we retrieved from the portal.
/// <summary>
/// Send events to Event Grid Topic.
/// </summary>
private static async Task SendEventsToTopic(object events)
{
        // Create a HTTP client which we will use to post to the Event Grid Topic
        var httpClient = new HttpClient();

        // Add key in the request headers
        httpClient.DefaultRequestHeaders.Add("aeg-sas-key", KEY);

        // Event grid expects event data as JSON
        var json = JsonConvert.SerializeObject(events);

        // Create request which will be sent to the topic
        var content = new StringContent(json, Encoding.UTF8, "application/json");

        // Send request
        Console.WriteLine("Sending event to Event Grid...");
        var result = await httpClient.PostAsync(TOPIC_ENDPOINT, content);

        // Show result
        Console.WriteLine($"Event sent with result: {result.ReasonPhrase}");
        Console.WriteLine();
}
|
Main Method
And finally we will implement the main method. In this method, the user specifies what they want to do, and provides the data for that action. We will then send this data to our Topic.
/// <summary>
/// Main method.
/// </summary>
public static void Main(string[] args)
{
        // Set default values
        var entry = string.Empty;

        // Loop until user exits
        while (entry != "e" && entry != "exit")
        {
                // Get entry from user
                Console.WriteLine("Do you want to send an (o)rder, request a (r)epair or (e)xit the application?");
                entry = Console.ReadLine()?.ToLowerInvariant();

                // Get name of the ship
                Console.WriteLine("What is the name of the ship?");
                var shipName = Console.ReadLine();

                // Order
                var events = new List<Event>();
                switch (entry)
                {
                        case "e":
                        case "exit":
                                continue;
                        case "o":
                        case "order":
                                // Get user input
                                Console.WriteLine("What would you like to order?");
                                var product = Console.ReadLine();
                                Console.WriteLine("How many would you like to order?");
                                var amount = Convert.ToInt32(Console.ReadLine());

                                // Create order event
                                // Event Grid expects a list of events, even when only one event is sent
                                events.Add(new Event { UpdateProperties = new Order { Ship = shipName, Product = product, Amount = amount } });
                                break;
                        case "r":
                        case "repair":
                                // Get user input
                                Console.WriteLine("Which device would you like to get repaired?");
                                var device = Console.ReadLine();
                                Console.WriteLine("Please provide a description of the issue.");
                                var description = Console.ReadLine();

                                // Create repair event
                                // Event Grid expects a list of events, even when only one event is sent
                                events.Add(new Event { UpdateProperties = new Repair { Ship = shipName, Device = device, Description = description } });
                                break;
                        default:
                                Console.Error.WriteLine("Invalid entry received.");
                                continue;
                }

                // Send to Event Grid Topic
                SendEventsToTopic(events).Wait();
        }
}
|
Testing
Now when we run our application, we can start sending in events to Event Grid, after which we can use subscriptions to pick them up. More on these subscriptions can be found in my previous post and next post. The complete code with this blog post can be found here.
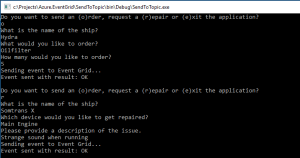
Send events from the application

by Eldert Grootenboer | Jul 6, 2017 | BizTalk Community Blogs via Syndication
Last week, June 26th to 28th, Integrate 2017 was once again held in London. This is the largest integration centered event, and a great way to have fun with the community, see amazing sessions, and get to meet the product groups. I have been to these events since the beginning, and have seen it grow into one of the best events around.
Last year at Integrate, we got introduced to the vision of Hybrid Integration, a way of seamlessly integrating across the cloud and on-premises. This year, what we saw was a matured vision, with all the bits and pieces falling into place, and giving us the tools to build great solutions. I think Microsoft made a good bet on this, as we see more and more of these hybrid integrations being built at our customers, where some of the data or logic will remain on premises, but they do want to leverage the power and flexibility of Azure.
The Microsoft teams as well as the MVP’s had very engaging sessions, which truly inspired people to get their hands on all the parts of the hybrid platform.
I always love seeing the sessions, getting the latest information, and being inspired, but the best part of these events to me is the interaction with the community. I think we have one of the best communities around, and so it’s great to catch up with old friends from around the globe, and of course making a lot of new friends as well. I recommend anyone to visit one of these events for themselves, and just say hi to people you do not know yet. People are always willing to have a chat, share their inspiration and experiences, and catch a beer afterwards.
And for those who can’t wait another year for Integrate, there’s good news, as we will be having an Integrate in Redmond, on October 25th to 27th. If you could not come to London, or just can’t get enough of Integrate and our amazing community, be sure to come. I’m looking forward to seeing you there, so come and say hi.
As one of the global organizers of the Global Integration Bootcamp, I am proud to say we have also presented next year’s version of this global event. We will be holding GIB2018 on March 24th 2018, if you want to host your own location just drop us a line. The website will be updated soon, but you can already find our contact details there.
Of course, I am not the only one posting about this year’s amazing Integrate, there are already a couple of great recaps out there, here are some you cannot miss.
BizTalk360
Kent Weare
Steef-Jan
Daniel Toomey
Wagner Silveira
Codit

by Eldert Grootenboer | May 27, 2017 | BizTalk Community Blogs via Syndication
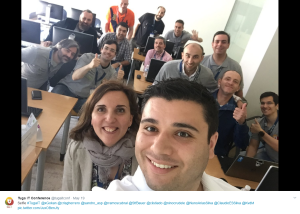
Last week I was in Lisbon for TUGA IT, one of the greatest events here in Europe. A full day of workshops, followed by two days of sessions in multiple tracks, with attendees and presenters from all around Europe. For those who missed it this year, make sure to be there next time!
On Saturday I did a session on Industrial IoT using Azure IoT Hub. The industrial space is where we will be seeing a huge growth in IoT, and I showed how we can use Azure IoT Hub to manage our devices and do bi-directional communication. Dynamics 365 was used to give a familiar and easy to use interface to work with these devices and visualize the data.
And of course, I was not alone. The other speakers in the integration track, are community heroes and my good friends, Sandro, Nino, Steef-Jan, Tomasso and Ricardo, who all did some amazing sessions as well. It is great to be able to present side-by-side with these amazing guys, to learn and discuss.
There were some other great sessions as well in the other tracks, like Karl’s session on DevOps, Kris‘ session on the Bot Framework, and many more. At an event like this it’s always so much content being presented, that you can’t always see every session you would like, but luckily the speakers are always willing to have a discussion with you outside of the sessions as well. And with 8 different tracks running side-by-side, there’s always something interesting going on.
One of the advantages of attending all these conferences, is that I get to see a lot of cities as well. This was the second time I was in Lisbon, and Sandro has showed us a lot of beautiful spots in this great city. We enjoyed traditional food and drinks, a lot of ice cream, and had a lot of fun together.


by Eldert Grootenboer | May 16, 2017 | BizTalk Community Blogs via Syndication
In the previous blog posts of this IoT Hub series, we have seen how we can use IoT Hub to administrate our devices, and how to do device to cloud messaging. In this post we will see how we can do cloud to device messaging, something which is much harder when not using Azure IoT Hub. IoT devices will normally be low power, low performance devices, like small footprint devices and purpose-specific devices. This means they are not meant to (and most often won’t be able to) run antivirus applications, firewalls, and other types of protection software. We want to minimize the attack surface they expose, meaning we can’t expose any open ports or other means of remoting into them. IoT Hub uses Service Bus technologies to make sure there is no inbound traffic needed toward the device, but instead uses per-device topics, allowing us to send commands and messages to our devices without the need to make them vulnerable to attacks.
Send Message To Device
When we want to send one-way notifications or commands to our devices, we can use cloud to device messages. To do this, we will expand on the EngineManagement application we created in our earlier posts, by adding the following controls, which, in our scenario, will allow us to start the fans of the selected engine.
To be able to communicate to our devices, we will first implement a ServiceClient in our class.
private readonly ServiceClient serviceClient = ServiceClient.CreateFromConnectionString("HostName=youriothubname.azure-devices.net;SharedAccessKeyName=iothubowner;SharedAccessKey=yoursharedaccesskey");
Next we implement the event handler for the Start Fans button. This type of communication targets a specific device by using the DeviceID from the device twin.
private async void ButtonStartFans_Click(object sender, EventArgs e)
{
var message = new Microsoft.Azure.Devices.Message();
message.Properties.Add(new KeyValuePair&lt;string, string&gt;("StartFans", "true"));
message.Ack = DeliveryAcknowledgement.Full; // Used for getting delivery feedback
await serviceClient.SendAsync(comboBoxSerialNumber.Text, message);
}
Process Message On Device
Once we have sent our message, we will need to process it on our device. For this, we are going to update the client application of our simulated engine (which we also created in the previous blog posts) by adding the following method.
private static async void ReceiveMessageFromCloud(object sender, DoWorkEventArgs e)
{
// Continuously wait for messages
while (true)
{
var message = await client.ReceiveAsync();
// Check if message was received
if (message == null)
{
continue;
}
try
{
if (message.Properties.ContainsKey("StartFans") &amp;&amp; message.Properties["StartFans"] == "true")
{
// This would start the fans
Console.WriteLine("Fans started!");
}
await client.CompleteAsync(message);
}
catch (Exception)
{
// Send to deadletter
await client.RejectAsync(message);
}
}
}
We will run this method in the background, so update the Main method, and insert the following code after the call for updating the firmware.
// Wait for messages in background
var backgroundWorker = new BackgroundWorker();
backgroundWorker.DoWork += ReceiveMessageFromCloud;
backgroundWorker.RunWorkerAsync();
Message Feedback
Although cloud to device messages are a one-way communication style, we can request feedback on the delivery of the message, allowing us to invoke retries or start compensation when the message fails to be delivered. To do this, implement the following method in our EngineManagement backend application.
private async void ReceiveFeedback(object sender, DoWorkEventArgs e)
{
    var feedbackReceiver = serviceClient.GetFeedbackReceiver();

    while (true)
    {
        var feedbackBatch = await feedbackReceiver.ReceiveAsync();

        // Check if feedback messages were received
        if (feedbackBatch == null)
        {
            continue;
        }

        // Loop through feedback messages
        foreach(var feedback in feedbackBatch.Records)
        {
            if(feedback.StatusCode != FeedbackStatusCode.Success)
            {
                // Handle compensation here
            }
        }

        await feedbackReceiver.CompleteAsync(feedbackBatch);
    }
}
And add the following code to the constructor.
var backgroundWorker = new BackgroundWorker();
backgroundWorker.DoWork += ReceiveFeedback;
backgroundWorker.RunWorkerAsync();
Call Remote Method
Another feature when sending messages from the cloud to our devices is to call a remote method on the device, which we call invoking a direct method. This type of communication is used when we want to have an immediate confirmation of the outcome of the command (unlike setting the desired state and communicating back reported properties, which has been explained in the previous two blog posts). Let’s update the EngineManagement application by adding the following controls, which would allow us to send an alarm message to the engine, sounding the alarm and displaying a message.
Now add the following event handler for clicking the Send Alarm button.
private async void ButtonSendAlarm_Click(object sender, EventArgs e)
{
var methodInvocation = new CloudToDeviceMethod("SoundAlarm") { ResponseTimeout = TimeSpan.FromSeconds(300) };
methodInvocation.SetPayloadJson(JsonConvert.SerializeObject(new { message = textBoxMessage.Text }));
CloudToDeviceMethodResult response = null;
try
{
response = await serviceClient.InvokeDeviceMethodAsync(comboBoxSerialNumber.Text, methodInvocation);
}
catch (IotHubException)
{
// Do nothing
}
if (response != null &amp;&amp; JObject.Parse(response.GetPayloadAsJson()).GetValue("acknowledged").Value&lt;bool&gt;())
{
MessageBox.Show("Message was acknowledged.", "Information", MessageBoxButtons.OK, MessageBoxIcon.Information);
}
else
{
MessageBox.Show("Message was not acknowledged!", "Warning", MessageBoxButtons.OK, MessageBoxIcon.Warning);
}
}
And in our simulated device, implement the SoundAlarm remote method which is being called.
private static Task&lt;MethodResponse&gt; SoundAlarm(MethodRequest methodRequest, object userContext)
{
// On a real engine this would sound the alarm as well as show the message
Console.ForegroundColor = ConsoleColor.Red;
Console.WriteLine($"Alarm sounded with message: {JObject.Parse(methodRequest.DataAsJson).GetValue("message").Value&lt;string&gt;()}! Type yes to acknowledge.");
Console.ForegroundColor = ConsoleColor.White;
var response = JsonConvert.SerializeObject(new { acknowledged = Console.ReadLine() == "yes" });
return Task.FromResult(new MethodResponse(Encoding.UTF8.GetBytes(response), 200));
}
And finally, we need to map the SoundAlarm method to the incoming remote method call. To do this, add the following line in the Main method.
client.SetMethodHandlerAsync("SoundAlarm", SoundAlarm, null);
Call Remote Method On Multiple Devices
When invoking direct methods on devices, we can also use jobs to send the command to multiple devices. We can use our custom tags here to broadcast our message to a specific set of devices.
In this case, we will add a filter on the engine type and manufacturer, so we can, for example, send a message to all main engines manufactured by Caterpillar. In our first blog post, we added these properties as tags on the device twin, so we now use these in our filter. Start by adding the following controls to our EngineManagement application.
Now add a JobClient to the application, which will be used to broadcast and monitor our messages.
private readonly JobClient jobClient = JobClient.CreateFromConnectionString("HostName=youriothubname.azure-devices.net;SharedAccessKeyName=iothubowner;SharedAccessKey=yoursharedaccesskey");
To broadcast our message, update the event handler for the Send Alarm button to the following.
private async void ButtonSendAlarm_Click(object sender, EventArgs e)
{
var methodInvocation = new CloudToDeviceMethod("SoundAlarm") { ResponseTimeout = TimeSpan.FromSeconds(300) };
methodInvocation.SetPayloadJson(JsonConvert.SerializeObject(new { message = textBoxMessage.Text }));
if (checkBoxBroadcast.Checked)
{
try
{
var jobResponse = await jobClient.ScheduleDeviceMethodAsync(Guid.NewGuid().ToString(), $"tags.engineType = '{comboBoxEngineTypeFilter.Text}' and tags.manufacturer = '{textBoxManufacturerFilter.Text}'", methodInvocation, DateTime.Now, 10);
await MonitorJob(jobResponse.JobId);
}
catch (IotHubException)
{
// Do nothing
}
}
else
{
CloudToDeviceMethodResult response = null;
try
{
response = await serviceClient.InvokeDeviceMethodAsync(comboBoxSerialNumber.Text, methodInvocation);
}
catch (IotHubException)
{
// Do nothing
}
if (response != null &amp;&amp; JObject.Parse(response.GetPayloadAsJson()).GetValue("acknowledged").Value&lt;bool&gt;())
{
MessageBox.Show("Message was acknowledged.", "Information", MessageBoxButtons.OK, MessageBoxIcon.Information);
}
else
{
MessageBox.Show("Message was not acknowledged!", "Warning", MessageBoxButtons.OK, MessageBoxIcon.Warning);
}
}
}
And finally, add the MonitorJob method with the following implementation.
public async Task MonitorJob(string jobId)
{
JobResponse result;
do
{
result = await jobClient.GetJobAsync(jobId);
Thread.Sleep(2000);
}
while (result.Status != JobStatus.Completed &amp;&amp; result.Status != JobStatus.Failed);
// Check if all devices successful
if (result.DeviceJobStatistics.FailedCount &gt; 0)
{
MessageBox.Show("Not all engines reported success!", "Warning", MessageBoxButtons.OK, MessageBoxIcon.Warning);
}
else
{
MessageBox.Show("All engines reported success.", "Information", MessageBoxButtons.OK, MessageBoxIcon.Information);
}
}
Conclusion
By using IoT Hub we have a safe and secure way of communicating from the cloud and our backend to devices out in the field. We have seen how we can use the cloud to device messages in case we want to send one-way messages to our device or use direct methods when we want to be informed of the outcome from our invocation. By using jobs, we can also call out to multiple devices at once, limiting the devices being called by using (custom) properties of the device twin. The code for this post can be found here.
IoT Hub Blog Series
In case you missed the other articles from this IoT Hub series, take a look here.
Blog 1: Device Administration Using Azure IoT Hub
Blog 2: Implementing Device To Cloud Messaging Using IoT Hub
Blog 3: Using IoT Hub for Cloud to Device Messaging
Author: Eldert Grootenboer
Eldert is a Microsoft Integration Architect and Azure MVP from the Netherlands, currently working at Motion10, mainly focused on IoT and BizTalk Server and Azure integration. He comes from a .NET background, and has been in the IT since 2006. He has been working with BizTalk since 2010 and since then has expanded into Azure and surrounding technologies as well. Eldert loves working in integration projects, as each project brings new challenges and there is always something new to learn. In his spare time Eldert likes to be active in the integration community and get his hands dirty on new technologies. He can be found on Twitter at @egrootenboer and has a blog at http://blog.eldert.net/. View all posts by Eldert Grootenboer

by Eldert Grootenboer | May 5, 2017 | BizTalk Community Blogs via Syndication
Just under two weeks away, TUGA IT will be held once again in beautiful Lisbon. TUGA IT is three days full of sessions, workshops, meeting the experts, and having a great time. After having visited last year as a participant, I am honored to have been selected as one of the speakers this year.

On saturday I will be giving a session where we will be going into industrial IoT on Azure. The industrial space is where we will be seeing a huge growth in IoT, and I will be showing how we can use Azure IoT Hub to manage our devices and do bi-directional communication. I will also be showing how we can use Dynamics 365 to give a familiar and easy to use interface to work with these devices and visualize the data. And of course, Azure’s stack will be used to extend on the solution.
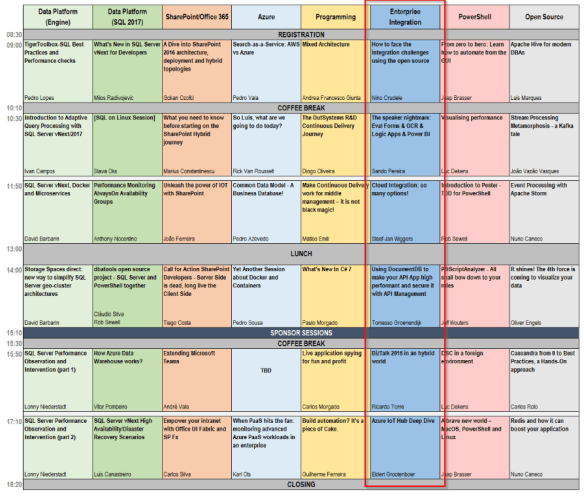
Integration is everywhere, and TUGA IT is no exception. We will have a full integration track on saturday where I will be joined by fellow integrators and good friends, Steef-Jan, Sandro, Nino, Tomasso and Ricardo to give a day full of integration sessions.

Schedule overview Saturday including Integration track
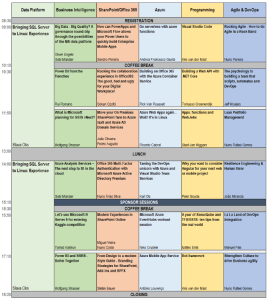
But there is more than just integration going on. On thursday there are several workshops, where you can learn about various Microsoft products and get hands-on experience. On friday there are also multiple tracks with sessions on many topics like Azure, .NET and more.

Schedule overview Thursday

Schedule overview Friday
As you can see, there is something for everyone at TUGA IT, whether you want to do workshops, attend sessions, or just want to meet with MVP’s and experts from various countries. Be sure to be there as well, registrations are open, and they only ask a small fee for lunch.

by Eldert Grootenboer | May 5, 2017 | BizTalk Community Blogs via Syndication
Just under two weeks away, TUGA IT will be held once again in beautiful Lisbon. TUGA IT is three days full of sessions, workshops, meeting the experts, and having a great time. After having visited last year as a participant, I am honored to have been selected as one of the speakers this year.

On saturday I will be giving a session where we will be going into industrial IoT on Azure. The industrial space is where we will be seeing a huge growth in IoT, and I will be showing how we can use Azure IoT Hub to manage our devices and do bi-directional communication. I will also be showing how we can use Dynamics 365 to give a familiar and easy to use interface to work with these devices and visualize the data. And of course, Azure’s stack will be used to extend on the solution.
Integration is everywhere, and TUGA IT is no exception. We will have a full integration track on saturday where I will be joined by fellow integrators and good friends, Steef-Jan, Sandro, Nino, Tomasso and Ricardo to give a day full of integration sessions.
Schedule overview Saturday including Integration track
But there is more than just integration going on. On thursday there are several workshops, where you can learn about various Microsoft products and get hands-on experience. On friday there are also multiple tracks with sessions on many topics like Azure, .NET and more.

Schedule overview Thursday
Schedule overview Friday
As you can see, there is something for everyone at TUGA IT, whether you want to do workshops, attend sessions, or just want to meet with MVP’s and experts from various countries. Be sure to be there as well, registrations are open, and they only ask a small fee for lunch.

by Eldert Grootenboer | May 5, 2017 | BizTalk Community Blogs via Syndication
Just under two weeks away, TUGA IT will be held once again in beautiful Lisbon. TUGA IT is three days full of sessions, workshops, meeting the experts, and having a great time. After having visited last year as a participant, I am honored to have been selected as one of the speakers this year.
On saturday I will be giving a session where we will be going into industrial IoT on Azure. The industrial space is where we will be seeing a huge growth in IoT, and I will be showing how we can use Azure IoT Hub to manage our devices and do bi-directional communication. I will also be showing how we can use Dynamics 365 to give a familiar and easy to use interface to work with these devices and visualize the data. And of course, Azure’s stack will be used to extend on the solution.

Integration is everywhere, and TUGA IT is no exception. We will have a full integration track on saturday where I will be joined by fellow integrators and good friends, Steef-Jan, Sandro, Nino, Tomasso and Ricardo to give a day full of integration sessions.

Schedule overview Saturday including Integration track
But there is more than just integration going on. On thursday there are several workshops, where you can learn about various Microsoft products and get hands-on experience. On friday there are also multiple tracks with sessions on many topics like Azure, .NET and more.

Schedule overview Thursday

Schedule overview Friday
As you can see, there is something for everyone at TUGA IT, whether you want to do workshops, attend sessions, or just want to meet with MVP’s and experts from various countries. Be sure to be there as well, registrations are open, and they only ask a small fee for lunch.