by Daniel probert | Feb 23, 2016 | BizTalk Community Blogs via Syndication
Updated 2016-02-25: I’ve clarified the section on setting access to your API App to Public Anonymous – you can still use Zumo tokens, but it’s better to use AD Auth to restrict access to your v1 API Apps – see this link for more info: http://aka.ms/logicapps-customapi.
Jeff Hollan (Microsoft) has also expanded on my blog post about using BizTalk/v1 connectors in the new designer, and has included details on how to add the Swagger/Swashbuckle details to your API App so that the new designer will be able to list any BizTalk/v1 API Apps you have defined in your Resource Group – you can read Jeff’s post here: http://blogs.msdn.com/b/logicapps/archive/2016/02/25/accessing-v1-apis-and-biztalk-apis-from-logic-apps.aspx.
Microsoft today released the Logic Apps preview refresh – which means a new designer and new connectors.
However, those BizTalky people amongst you might notice that there’s no mention of the BizTalk connectors in the list of actions you see in the new designer:
There’s an apparent reason for that: with the new refresh, Microsoft have migrated to managed connectors – and so the only connectors you see in the list are the new v2 managed connectors. And none of the BizTalk connectors have (yet) been migrated – they’re still v1 connectors.
However, fear not – you can still use them – you just have to manually add them (this applies to all v1 connectors and API apps).
This is a 3 step process:
1) Create the BizTalk Connector/v1 API App
This is really easy – just find the API App in the marketplace (you have to select the See All option), create an instance of it, and upload any resources it requires e.g. transforms for the Transform Service.
2) Enable CORS policies, get Swagger URL, and set authentication
a) Once the API app is created, open it, and click on the Host option:
This opens the API Host blade (which is the web site that hosts your API App).
b) Take a copy of the URL to your API App Host:
We’ll need that URL in a moment.
c) Now click on the All Settings option, and in the settings blade, scroll down till you come to the API section – click on the CORS link.
d) In the CORS blade, under Allowed Origins, type “*” (without the quotes!) press Save.
The blade should look like this:
e) Now we create the Swagger URL – the correct way to do this is to add /swagger/ui to the end of the Host URL you copied in step b) above and navigating to the Swagger UI page, but you can also do it by taking that URL, changing it to https, and adding :443/swagger/docs/1.0 to the end.
So for example, this URL:
http://flatfileencoderaab3a9a1a4d94e3d9b7d0b398a3e2744.azurewebsites.net
becomes
https://flatfileencoderaab3a9a1a4d94e3d9b7d0b398a3e2744.azurewebsites.net:443/swagger/docs/1.0
That’s the Swagger URL that you need.
f) One last step needed : we need to change the Access Level to be Public Anonymous, and setup authentication via Active Directory – see here for more details: http://aka.ms/logicapps-customapi. Previously we would get the logic app to use Zumo tokens to access the API app – you can still do this, but it means you’d be going through the old, deprecated Gateway server technology. For the purposes of this post, we’ll use Public Anonymous with no AD authentication, as it’s the easiest way to get this working. In your main API App blade, click All Settings then Application settings, and choose Public (Anonymous) and click save:
3) Create a new Logic App and reference your API App
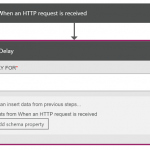
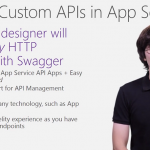
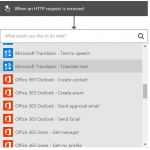
In your new Logic App (using the new designer), whenever you add an action you can choose “HTTP + Swagger” and provide a URL to the Swagger that describes the API.
So that’s all we do – in our case, as we’re using a connector that is not a trigger (i.e. the Flat File Encoder) then we need to add a trigger (HTTP in our case) and then we can add an HTTP + Swagger action and specify the URL from step 2):
Once we click Next, then we get a list of the operations available on this API App:
And when we select one, we see the usual parameters for the API App, which we can populate from previous steps/actions/variables in our Logic App:
I’ll do a full demo video showing how you could use this method to use a number of BizTalk connectors in your Logic App in a later post.
by Daniel probert | Jan 21, 2016 | BizTalk Community Blogs via Syndication
So a few months ago, I was trying to work out how to create an instance of a marketplace API App via code. There was no API or samples for this at the time. API Apps (like Logic/Mobile/Web apps) can be deployed using ARM templates, so it was just a matter of working out what to put in the template.
Since then, the AAS team have released a guide on what needs to go in the template, what the contract looks like, and supplied a sample on GitHub:
https://azure.microsoft.com/en-gb/documentation/articles/app-service-logic-arm-with-api-app-provision/
https://github.com/Azure/azure-quickstart-templates/tree/master/201-logic-app-api-app-create
But their example requires you to supply *all* the information – and for an API App, that’s quite a lot e.g. gateway name, secret etc. Especially as your gateway host name needs to be unique.
Note: Just as a primer, when you deploy an API App, you’re actually deploying two web sites: a gateway app (which is how you interact with the API App, and which handles security, load balancing, etc.) and then the actual API App itself.
I found an easier way to do all this: you can ask the Azure API for an instance of an API App deployment template, with everything all filled out for you.
The TL;DR version is that there is an API you can call to get a completed deployment template for any marketplace API App, and then you just need to wrap this in a Resource Group template and deploy it – see further down this article for the details.
The technique for working this out can be used to figure out other undocumented APIs in Azure. Not that when I say “undocumented” here, I don’t mean as in the sense of the Win32 API, where undocumented APIs are subject to change and use of them is frowned upon: here I just mean APIs that have yet to be documented, or which are documented poorly.
First things first: the Azure Portal is just a rich RESTful-client running in your browser. Whenever you do anything in the portal, it makes REST calls against the Azure APIs. By tracing those calls, we can recreate what the portal does.
Most modern browsers have some sort of developer option you can turn on which captures those network calls and lets you examine them (e.g. Dev Tools for Internet Explorer).
Alternatively, you can download a tool such as Fiddler (https://www.telerik.com/download/fiddler), which acts as a local proxy to capture all the requests your browser makes.
In my case, I used Internet Explorer, and pressed F12 to open the dev tools dialog.
What I wanted to know was: how do I create an instance of the FlatFileEncoder API App?
Here are the steps I took to work it out.
Step 1: Open the Portal to the point just before you create your resource
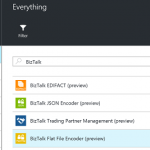
When you start the dev tools, all requests (called Sessions) are logged. The portal makes a *lot* of requests, as it’s always updating the data displayed. In order to cut down the number of requests we have to sort through, it’s best to navigate to the correct screen before starting dev tools – in my case, I navigated to the New option, then to Marketplace, then chose the Everything option, and searched for “BizTalk” – this showed me a list of integration API Apps, including the BizTalk Flat File Encoder:
At this point, I would normally select the API App and click Create, but I stopped and moved to Step 2.
Step 2: Open Dev Tools (or Fiddler) and clear the sessions
In IE, you open Dev Tools by pressing F12. You get a new window at the bottom. Select the Network tab.
In Chrome, it’s also F12 (or Ctrl-Shift-I) to open Dev Tools, and again you select the Network tab.
In Fiddler, just start Fiddler and ensure File/Capture Traffic is enabled.
Clear the list of current sessions: In IE, click the Clear Session button:
In Chrome, it’s the clear button:

And in Fiddler, click the Edit menu, then Remove, then All Sessions (or press Ctrl-X).
Step 3: Take the actions in the portal to create your resource
Leaving Dev Tools open (or Fiddler running), in the portal create your resource – in my case, I selected the BizTalk Flat File Encoder item, selected Create, typed in values (I chose a new App Service Plan and Resource Group), then clicked OK:
Step 4: Stop the Network trace and save it
Once the portal has finished (which takes about 2 minutes for a new API App) we can stop the network trace so we don’t end up with a lot more information than necessary.
We stop the trace by pressing the Stop Button in Dev Tools (IE and Chrome) or deselecting the Capture Traffic option in Fiddler.
Now save the results file – in IE or Chrome, click the Save button, or in Fiddler click File/Export Sessions/All Sessions.
Step 5: Filter the results file
Both IE and Chrome save the results file as an HAR file – an HTTP Analysis Results file. Although you can just look at the file in your browser (in the Dev Tools window) I prefer to open it up in Fiddler, as there is more choice for decoding requests and responses.
Open the file in Fiddler by selecting File, then Import Sessions, then choosing the HTTPArchive (HAR) file type, and clicking Next to select the file.
You should end up with a window that looks a bit like this:
You’ll probably have over 500 items in your list, depending on when you started your trace and when you stopped it, and what you created.
And now the fun part: analysing the results.
Luckily Fiddler makes this easier for us, by displaying a little icon in the left (which tells us the type of HTTP Verb and content type) – and even better, we can filter the list of sessions so that we only see JSON responses (which is what the Azure Management APIs use): on the right side of the window, select the Filters tab, then under Response Type and Size, select “Show only JSON”. Then click the Actions button (top right of the Filters tab) and select “Run filterset now”:
The list of sessions should now be drastically reduced – in my case, I only had 86:
And now we can start analysing those API calls!
Step 6: Analysing the API calls
This is probably the hardest step – looking at all the calls, seeing what they do. An easy search is to just look for the words FlatFileEncoder in the URL or request data, but I like to go through the calls seeing what each do.
The majority of the early calls are to do with populating the dialog displayed when you create a new API App i.e. a list of App Service Plans (ASPs), Resource Groups, Regions, etc.
For example, there is a bunch of calls one after another that look like this:
They all do a POST against the Microsoft.Web provider API, supplying an api-version, and optionally the type of data we want:
- The first call asks for serverfarms – this is the old name for App Service Plans (and helps you understand what an App Service Plan is, as it’s implemented as a server farm: a collection of web servers – the number of servers and their capabilities are determined by the pricing tier).
A GET request is issued on this URL:
https://management.azure.com/subscriptions/(subId)/providers/Microsoft.Web/serverfarms?api-version=2015-04-01&_=1452592242795
Note: the suffix at the end of that URL (the _=1452592242795 part) is a sequence number, used to differentiate multiple identical requests from each other.
If you have any ASPs you’ll see a response similar to this:
- The second call doesn’t ask for a particular type of data, which means all generic data is returned e.g. details on mobile sites, site pools, available hosting locations, etc.
A GET request is issued on this URL:
https://management.azure.com/subscriptions/(subid)/providers/Microsoft.Web?api-version=2015-01-01&_=1452592242797
The response will look something like this:
- The third call asks for deploymentLocations – and this is what is returned, along with a sort order (interestingly the Indian regions are always given a sort order of Int32.Max (sortOrder=2147483647) so they always appear at the end of the list, if you’re able to see them.
A GET request is issued on this URL:
https://management.azure.com/subscriptions/(subid)/providers/Microsoft.Web/deploymentLocations?api-version=2015-04-01&_=1452592242798
The response looks like this:
- The fourth call is for gateways – this returns a list of any API App gateways that exist already.
A GET request is issued on this URL:
https://management.azure.com/subscriptions/(subid)/providers/Microsoft.AppService/gateways?api-version=2015-03-01-preview&_=1452592242801
The response will look something like this:
- The fifth call is for sites – this returns any mobile, web, API or Logic Apps you have deployed, as they’re all deployed as web sites.
A GET request is issued on this URL:
https://management.azure.com/subscriptions/(subid)/providers/Microsoft.Web/sites?api-version=2015-04-01&_=1452592242804
The response will look something like this:
The above is all well and good – it’s useful to know how to get this data. But it doesn’t help us in our aim of creating a new API App.
But by looking through the rest of the calls, we can spot 3 calls that are key:
- Getting the version number or internal name for the Flat File Encoder.
This is the first call we can see that has the words FlatFileEncoder in the request:

(ignore the seemingly duplicate call above it (session 156), that’s an HTTP OPTIONS call used to check what actions this endpoint supports – the portal uses this pattern a lot of issuing an OPTIONS call before doing a POST).
As per the request, we can see that we’ve requested metadata for the FlatFileEncoder. Let’s look at the response:
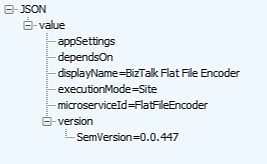
We can see that the response gives us the current version of the API App, the type of app, the display name, and the microServiceId i.e. the name of the API App we have to use to create it (although we actually needed to know that part in order to request the metadata!).
We can also see that there are no specific app settings, and no dependencies needed for the API App.
- Getting a deployment template for the FlatFileEncoder
This is the request I found most interesting.
We create a request that looks like this:
Here’s that in text format:
{
“microserviceId”: “FlatFileEncoder”,
“settings”: {
},
“hostingPlan”: {
“subscriptionId”: “subid”,
“resourceGroup”: “Api-App-0”,
“hostingPlanName”: “FFASPNew”,
“isNewHostingPlan”: “true”,
“computeMode”: “Dedicated”,
“siteMode”: “Limited”,
“sku”: “Standard”,
“workerSize”: “0”,
“location”: “West Europe”
},
“dependsOn”: [
]
}
The request is saying that we’d like to create a new FlatFileEncoder microservice (i.e. API App), and we’d like to use a new ASP called FFASPNew, and we’re using a Resource Group called API-App-0 (which is obviously a temp name).
We POST this request to this URL:
https://management.azure.com/subscriptions/(subid)/resourcegroups/(resourcegroupname)/providers/Microsoft.AppService/deploymenttemplates/FlatFileEncoder/generate?api-version=2015-03-01-preview
I wasn’t sure what to expect from the response, but look at this:
It’s a really long response… but what’s in there is a complete ARM template to create an API App – all you need to do is wrap it in the template to create a Resource Group.
What’s interesting is that not only does it use variables (which are passed to the template) to define things such as the gateway name, or ASP name, it also supplies us with a unique gateway name, plus the secrets to use for the API App:
- Deploying the FlatFileEncoder
Deploying the API App now becomes a simple matter of wrapping the response from the last call in a new ARM template for the resource group.
The request looks like this:
In text, that looks like:
{
“resourceGroupLocation”: “West Europe”,
“resourceGroupName”: “(resource group name)”,
“resourceProviders”: [
“Microsoft.Web”,
“Microsoft.AppService”
],
“subscriptionId”: “(subid)”,
“deploymentName”: “FlatFileEncoder”,
“templateLinkUri”: null,
“templateJson”: “(api app template)”,
“parameters”: {
“FlatFileEncoder”: {
“value”: {
“$apiAppName”: “FlatFileEncoder”
}
},
“location”: {
“value”: “West Europe”
}
}
}
The response you got from the previous step (i.e. the context of the value field) is supplied in the templateJson field, but it is escaped – that is, any double-quotes (“) are escaped (“) and any single backslashes are escaped (i.e. becomes ).
This request is POSTed against this URL:
https://portal.azure.com/AzureHubs/api/deployments
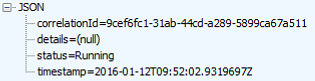
The response you get back will give you details about the provisioning of the API App, including a CorrelationId you can use to check progress.
This is a snippet of the response:
“mode”: “Incremental”,
“provisioningState”: “Accepted”,
“timestamp”: “2016-01-12T22:55:41.6680867Z”,
“duration”: “PT0.4716789S”,
“correlationId”: “30f8ddc6-a44d-4afc-9b03-9c2645c569b4”,
- Checking the status of the deployment
The portal then issues multiple calls to check the status of the deployment.
A GET request is made to this URL:
https://portal.azure.com/AzureHubs/api/deployments?subscriptionId=(subid)&resourceGroupName=(resource group name)&deploymentName=(api app name)&_=1452592189872
This will return a response like this:
Once the deployment has finished, it will change to this:
And if it fails, you’ll get a failure response.
This is how the portal knows to show you a tile with a “deploying” animation on it, and how it knows to stop showing that when the deployment has finished.
- Bonus: Finding recommended items in Azure
I noticed this little request whilst looking through the calls that the portal makes.
A GET request is made to this URL:
https://recommendationsvc.azure.com/Recommendations/ListFrequentlyBoughtTogetherProducts?api-version=2015-11-01
This will return a response like this:
This appears to be a way for the portal to recommend other items that you might be interested in. I haven’t noticed this functionality before!
And that’s it – there’s really only two steps involved: get the deployment template, and then deploy it.
All the rest is useful if you’re creating a UI where a user can select from a list of existing Resource Groups and ASPs and Locations etc., but not necessary if you already have all that information or are creating new ASPs and Resource Groups.
The techniques I showed here can be used for lots of different activities in the portal – you don’t have to wait until Microsoft creates .NET management libraries or publish details of management APIs, you can go find out how to do it yourself. Go get to it!
I’m hoping this has all been useful.
by Daniel probert | Jan 7, 2016 | BizTalk Community Blogs via Syndication
Recently I was asked by a client: how do I deploy an API App or a Logic App to a Virtual Network (VNet)?
If you’ve ever used BizTalk Services (MABS) then you’ll know one of the biggest limitations with MABS was that it didn’t support VNets: a lot of companies create VNets, and hook them up to their on-premises network, so that their Azure environment becomes a secure extension of their on-premises network.
VNets can also be set to only allow trusted connections from external users through the use of firewalls, network appliances or network configuration.
At the date of writing, there is currently no support for running Logic Apps in a VNet (yet, but watch this space) but there is for the other parts of Azure App Service (AAS): the problem is solved through the use of App Service Environments (ASEs).
Introduction to App Service Environments (ASEs)
ASEs have been around for a while (they previewed in April 2015, just after AAS went into preview, and Logic Apps/API Apps were announced) but there hasn’t been too much coverage of them, hence my client’s question. ASEs are part of Azure App Service.
An ASE is effectively a private deployment of all the VMs and services needed to run your AAS apps. Instead of running on either shared VMs (Free and Standard Plans) or dedicated VMs in the public portions of your subscription, ASEs give an entire deployment of everything needed to host AAS apps but in a VNet – with the added benefit that you get a lot of control over the scale up/scale out options.
When you create an ASE it *has* to exist in a VNet: you can’t create one outside of a VNet. The VNet is either created for you (with default values) or you can select a pre-existing VNet when you create the ASE.
Configuration of an ASE can look a bit daunting, but it becomes easier if you think of it as your own set of virtual servers, with a set of front-end servers and 3 groups of processing servers running in your VNet. All of the supported AAS goodies (web apps, api apps, etc.) are deployed onto these servers, and you get to control the number of servers available to handle load.
Servers are grouped into either Front-End, Worker Pool 1, Worker Pool 2, or Worker Pool 3.
You can set the number of instances per group – so the default is for a front-end group with 2 servers, and single worker pool group with 2 servers, plus one allocated IP address. Note that these aren’t the actual number of instances assigned to your API App (or Web or Mobile) when you deploy it – this is the just the number of instances that exist in the group that can be used. When you deploy your AAS app, you choose which group it uses.
In ASE terminology, each group is known as a pool, and the servers as instances: so if you want two servers running on a worker process group, you’d have two worker pool instances running in your worker pool.
Technically, each pool instance is a compute resource: you can have a maximum of 55 compute resources spread across your front-end pool and worker pools, and a maximum of 10 IP addresses e.g. 5 front-end instances, and 2 worker pools each with 25 instances (the Azure portal has some pretty nifty code in it which adjusts the ratio on the sliders as you adjust the numbers!).
ASEs are part of the Premium tier, which means they can get expensive: even at the default settings the per hour cost is reasonably high, even with nothing running in the ASE and no storage. As you add more instances, or more pools, the price per day increases.
How to create an ASE
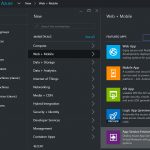
The option to create an ASE can be found under Web + Mobile, right under the Logic App item, when you click New in the Azure portal:
When you select App Service Environment you’ll be given the option to give it a name, select or create the Resource Group the ASE will belong to, select or create a VNet, and choose scaling options:
On this screen you specify:
-
Your ASE name – note that your ASE is given a name on the domain p.azurewebsites.net – you’ll have to make your ASE name unique amongst all other ASE names.
-
The subscription your ASE will be created in.
-
The Resource group your ASE will belong to (this can be a new one or an existing one).
-
The Virtual Network/Location for your ASE (by default a new VNet is created for you, but you either choose an existing VNet, or change the options of the default VNet that is created).
-
Scalability i.e. how many pools and pool instances you want.
Note the information box that indicates it will take a minimum of 2 hours to create your ASE – this is accurate, as I’ve found from experience.
Selecting the Scale option shows this screen:
Here you can specify what pricing tier you want to use for your pools (each pool can be set to a different pricing tier, although the Front End Pool must be at P2 at minimum).
After this, you can set the number of instances in each pool, and how many IP Addresses you need.
If you select one of the tier options for a pool, you’ll see a screen like this:
What this lets you do is set the number of cores available for each of your instances i.e. the number of cores for each of your virtual servers.
Looking at those numbers, and knowing the defaults for an ASE, you can see that the default settings will cost you a minimum of £272.70/month (about US$400/mo), and that’s without any additional storage or traffic charges.
Note: ASEs can be expensive, but they’re in the Premium tier for a reason: they’re designed to handle very high load (if necessary) for customers that need an isolated environment within a virtual network e.g. 50 8-core virtual servers. Plus, there’s one thing you can do with ASEs that is difficult to do otherwise: you can provide automated geographic redundancy (more on this later).
After you click the Create button, Azure goes off and creates your ASE – this will take a minimum of 2 hours.
How to deploy an API App to an ASE
OK, so now you have your shiny new ASE – how do we deploy an API App to it? Well this is the really easy part: Your ASE will show up in your list of Locations when you create your API App (as long as you select the correct subscription).
For example, if I create an instance of the BizTalk Flat File Encoder, my location happens to automatically default to the ASE I created earlier:
Note that we now have a new option available – Worker Pool Size. This lets us select the worker pool to use with the API App (remember setting up Worker Pools when you created the ASE?). You use this to select which worker pool you want to use (i.e. Worker Pool 1, Worker Pool 2, etc.).
Also, I note that you can select an existing resource group, or create a new one, although the facility to choose an existing one wasn’t working correctly at the time of this post.
If we select the Location option, we can see that the ASE appears in the list of locations:
Benefits of deploying API Apps or Logic Apps to an ASE
The two main benefits of an ASE are these:
-
Ability to deploy to a VNet.
-
Ability to scale worker instances beyond that which is available in AAS outside on an ASE.
The VNet argument should be easy: if you have an on-premises network which you are connecting to Azure (either by VPN or ExpressRoute or similar), then an ASE allows you to both access your AAS apps from your on-premises servers as well as allowing your AAS apps to access on-premises server – no hybrid connectivity or service bus relay needed! Plus you can use network security groups to restrict traffic access to your AAS apps on an IP level.
The ability to scale is essential if your workload is going to go beyond the capabilities offered by vanilla AAS: up to 55 dedicated compute resources, each with up to 8 cores. The ability for your ASE to autoscale as demand requires it is also essential for enterprise apps.
Why can’t we add Logic Apps to an ASE?
When ASEs first came out, there was a bit of confusion about whether Logic Apps and API apps were supported: the initial announcements indicated they were, but there appeared to be no way of adding API Apps and Logic Apps to ASEs. That has changed, with the official guidance now updated to indicate that Web Apps, Mobile Apps, and API apps are all supported, but not Logic Apps.
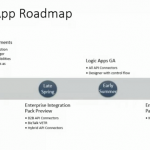
Given that Logic Apps are still in preview, this is perhaps not surprising – and I wouldn’t be surprised if we find Logic Apps gaining ASE support before the GA of Logic Apps next year (perhaps even during one of the earlier updates mentioned in the Logic Apps Roadmap).
Further Resources
There’s a wealth of information from Microsoft on ASEs – here’s a partial list, including a very cool use of geographic scaling using multiple ASEs: