Let’s go for the third PowerShell sample in a series of posts that, once again, I will be addressing some of the real case scenarios that we may face daily:
How can we easily export a binding file from a BizTalk Application?
How can we easily export a binding file for a specific assembly?
Using the fully qualified name (FQName) of the assembly
Using only the assembly name
How can we easily export a binding file from a list of assemblies?
How can we easily export a binding file from a Receive Port?
How can we easily export a binding file from a Send Port?
And many more
Today’s blog post will be about: How to Export BizTalk Server Resource Bindings by Assembly Name (instead of the FQName) with PowerShell.
This is extremely similar to the previous one, but instead of using the fully qualified name (FQName) of the assembly, we will be using only the assembly name. Nevertheless, this small change will have a significant technical impact on the way we can archive this goal.
Just for getting started, and for you to be aware, this is impossible to do out-of-the-box with the standard tools:
BizTalk Server Administration Console
Or even with BTSTask command-line tool included with BizTalk Server. This tool provides the option for you to export binding information to a .xml file by using the ExportBindings command:
/ApplicationName: Name of the application from which to export bindings.
/AssemblyName: a Locally unique identifier (LUID) of the assembly from which to export bindings.
So, if you want to do something outside the box this is were the fun and challenges really start to appear and the question that we may ask is: Is there any way that we can accomplish this and at the same time improve the experience, similar to the previous examples? The response is that yes, all of this can be fully automated using, for example, PowerShell scripts.
Like the previous samples, we could fully automate this Binding generation for each environment, but once again, let’s keep it simple and address what is mandatory and easily forgotten. With this PowerShell sample, we will be able to generate a binding file for a specific assembly which is deployed in my BizTalk Server environment.
Generate a Binding file for 3 environments DEV, QA and PRD:
Changing the NT Group Name for each different environment
Generate a Binding file for each version of the assembly name found deployed
Do you feel difficult to keep up to date on all the frequent updates and announcements in the Microsoft Integration platform?
Integration weekly update can be your solution. It’s a weekly update on the topics related to Integration – enterprise integration, robust & scalable messaging capabilities and Citizen Integration capabilities empowered by Microsoft platform to deliver value to the business.
If you want to receive these updates weekly, then don’t forget to Subscribe!
I think I’ve been present since the first edition of this event, except for last year… so, I’m super excited for presenting once again on this fantastic event! In 2015 I spoke for the first time about Logic Apps:
And later on in 2016…. And I will return this year with a mix session about Logic Apps and Microsoft Flow on a session about: “How we are using Logic Apps (and/or Microsoft Flow): Real cases scenarios.”
I have been presenting a similar talk on my last events (online events, Porto.Data, and Madrid) and this may be the last time I do it in this format.
Abstract
We know that all business problem can be solved with a variety of technologies and different solutions. However, sometimes developing that type of solutions has traditionally been too costly and time-consuming for many of the need’s teams and departments face, especially those projects that are internally for organizations to use or for a short period. As a result, many of these projects or solutions will be on the shelf or in the imaginary of the collaborators.
In this session, I will show you real live scenarios on how we at DevScope are using Microsoft Integration features like Logic Apps, API Management, API’s and Microsoft Flows. Using also a variety of related Azure technologies like PowerApps and Power BI to:
First, improve our internal processes like expenses reports, time reports and so on;
And, secondly, how the first step helps us out to extend our product and our business by exporting these same approaches and concepts to our clients
This will be a lightweight talk addressing some real scenarios and show these in action
Global Azure Bootcamp 2019 Lisbon Agenda
8:30 – 09:00 – Welcome and accreditation
09:00 – 09:15 – Introduction + Housekeeping by Tiago Costa and Virgilio Esteves
09:15 – 09:45 – Best Practices for Real-time Data by Viviane Ribeiro
09:45 – 10:15 – Azure Serverless by Virgilio Esteves
10:15 – 10:30 – Coffee Break
10:30 – 11:00 – ARM your Azure Infrastructure by Tiago Costa
11:00 – 12:00 – Let’s talk about: Azure Monitor by Pedro Sousa
12:00 – 13:00 – TBA by Luis Calado
13:00 – 14:00 – Lunch Break
14:00 – 15:00 – Extend your Identity to the Cloud by Nuno Árias Silva
15:00 – 16:00 – Azure SQL Database Managed Instance is so much more than just a full-fledged SQL Server in the Cloud! by Niko Neugebauer
16:00 – 16:15 – Coffee Break
16:15 – 17:15 – How we are using Logic Apps (and/or Microsoft Flow): Real case scenarios by Sandro Pereira
17:15 – 18:00 – Security? Whose problem is it, really? by Tiago Pascoal
18:00 – 18:30 – Prizes and Closing
This is a free event with very limited seats that you will not want to miss, register now!
Recently on Integration Monday, I presented a chat bot which can be used to administer BizTalk, hosted on premises, using a chat bot, Logic Apps and the On Premises Data Gateway. The session can be found at Administering BizTalk Server with a Chatbot. This blog post is aimed at discussing the session.
Context
For a product company serving its customer, there are few areas where the company executives need to work with their customers. These activities can be broadly classified into two categories:
Customer Service
Brand Loyalty and Awareness
Let us take a brief look at each of these categories.
Customer Service: Executives of the company might need to converse with customers to:
Account management: Help customer manage their services, subscriptions, payments etc.
FAQ: Answer the common questions about the product
Issue Resolution: Solve the issues customers face with the product
Brand Awareness and Loyalty: Executives of the company can converse with customers to:
Seek Feedback: Understand how customers like the product. What the general sentiment for the product is?
New Features/Products: Inform customers about the new features or the products that the company is launching
For the conversation in the customer service category, the general mode of conversation is use of emails, phone calls or support websites. While in the Brand Awareness category it is generally emails and calls.
Now consider what if the conversations are delivered to the customers at their fingertips? This is possible by creating virtual assistants tailored for the functions specific to the product. These virtual assistants, when imbibed with the power of Natural Language Processing and Cognitive services, help customers converse with the company and get their intended work done.
This not only makes conversation available to customers at their fingertips, but also saves a lot of money for the company by automating most of the before mentioned tasks.
This concept of providing “Conversation” as a service to the customers through virtual assistants is generally termed as “Conversation as a Service”.
Chat bots are the starting point of Conversation as a Service as they pave a way to build full-fledged virtual assistants.
What Are Chat Bots?
Now that we have seen what Conversation as a Service is and how bots fit into this, let us analyse how the chat bots are different from a regular web application. Consider a scenario where you want to buy a laptop. In such scenario in normal web application, you would generally follow below steps:
Navigate to the Home page of the website
Enter the search details for the laptop. This search then leads to a new web page which displays the result
After selecting a particular laptop, to place the order the website redirects to a new page where details like name, address and payment details are collected and the order is finally placed
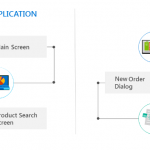
Now let us try to convert these steps to how a chat bot would process the laptop request. Following image shows the comparison between the web application and the chat bot.
A chat bot does not have a traditional UI where the user navigates from one page to another, bots have dialogs that correspond to a particular web page in a web application. So, to order a laptop the chat bot would use following dialogs:
A root dialog which greets the user and asks them what they want to do
Once the user confirms they want to buy a laptop, the bot initiates the Product Search Dialog and collects the search parameters from the user. Once that is done, the bot returns the result to the user in the form of carousel cards
Once the user confirms the laptop, the bot initiates an Order dialog which would then collect name, address and payment details and then place an order for the laptop
In a nutshell, chat bots are just like normal web applications but instead of having a breadcrumb-based web page approach, bots use dialogs to collect and display information. Each dialog only supports a single responsibility akin to the single responsibility principle of software design.
Tools and Frameworks Used
Now that we know what Conversation as Service is and how and what chat bots are, let us take a look at the tools and frameworks we use to build the chat bot.
Visual Studio 2017/ Visual Studio Code – Any one of these IDE’s can be used to build the bot code. I prefer to use Visual Studio 2017 as it provides a bot skeleton project which takes care of basic plumbing of the bot code, we just need to add our logic in it. Visual Studio Code does not provide that flexibility, we have to create an empty web app and add the code ourselves.
MS Bot Framework SDK 4.x – This is the official Microsoft released SDK to develop bots. This SDK works with ASP.NET Core 2.x and makes the framework a cross platform development framework. We can develop the code on Windows, Linux or Mac
Asp.Net Core 2.x – The cross platform open source .Net framework by Microsoft
Adaptive Cards – This framework is used to author and render the cards using a standard Json format. Brings uniformity in the way information is exchanged between the channel and the bot
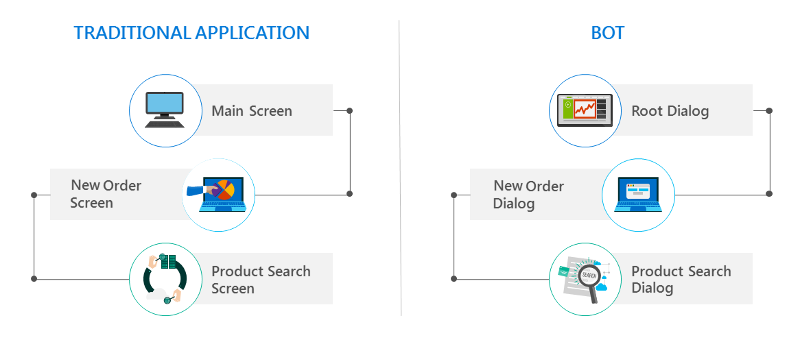
Bot Framework Emulator – Used to emulate the actual conversation between the user and the bot. Helps to debug the bots hosted locally and also on Azure The following image shows the basic building blocks in a typical bot. All of these blocks are from Microsoft Azure perspective.
Typical Bot Architecture
Let us take a look at each of the blocks in brief.
Bot Service – This a central piece which connects the different communication channels to the actual bot code. It allows us to manage the connection to the communication channels. It allows to implement authentication to the back-end services used by the bot code. E.g. If we want the user to be authenticated to use the MS Graph API, we add the OAuth connection to the Graph API in the bot service.
Identity Management – The Bot Framework provides out of the box connection to various OAuth providers like Uber, Gmail, LinkedIn, Fitbit, MS Graph API etc. It also allows to map our custom OAuth system to the bot code.
Channels – Various channels are available for us to integrate the bot with, they are FaceBook, Email, Slack, Kik, Skype, Skype For Business etc. Each registration of the channels needs to be done with the Bot Service.
Bot Code – The bot code can be hosted as a Web App or a function App when we use the SDK V3 and as Web App for now for SDK V4.
State and Conversation Management – The bot framework allows us to manage the state and the conversation history using several out of the box options. We can use CosmosDb, Blob Storage or Azure SQL Database. The Azure Search Service can be used with the conversation History store to fetch history from the store.
NLP and Sentiment Analysis – These features are used to Introduce more complex and rich features into bot which enables it to converse with the user in a more natural form and detect the sentiment of the user as the conversation continues on. This provides a lot of information to companies to understand how their chat bot is faring with the task of solving problems of their customers.
Integrators – The bot can communicate with the other SaaS products and Machine Learning Models, QnA maker services and Cognitive Services using Integration offerings like Logic Apps and Azure Functions.
Repositories – The Web/ Function App in which the bot code is deployed can be hooked to different repositories and configured to use Continuous Deployment.
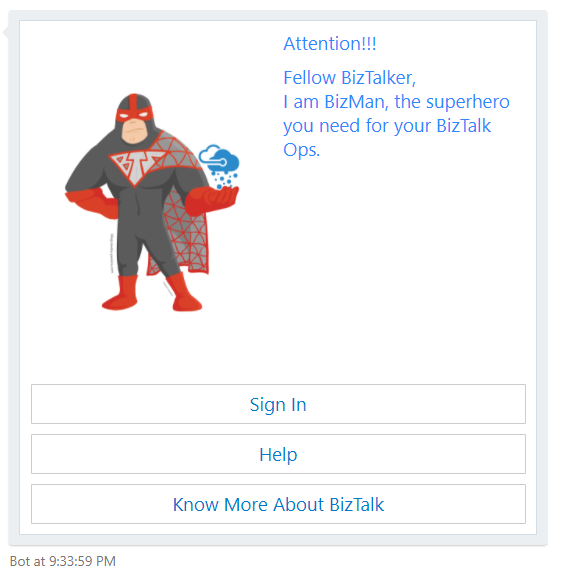
The BizMan
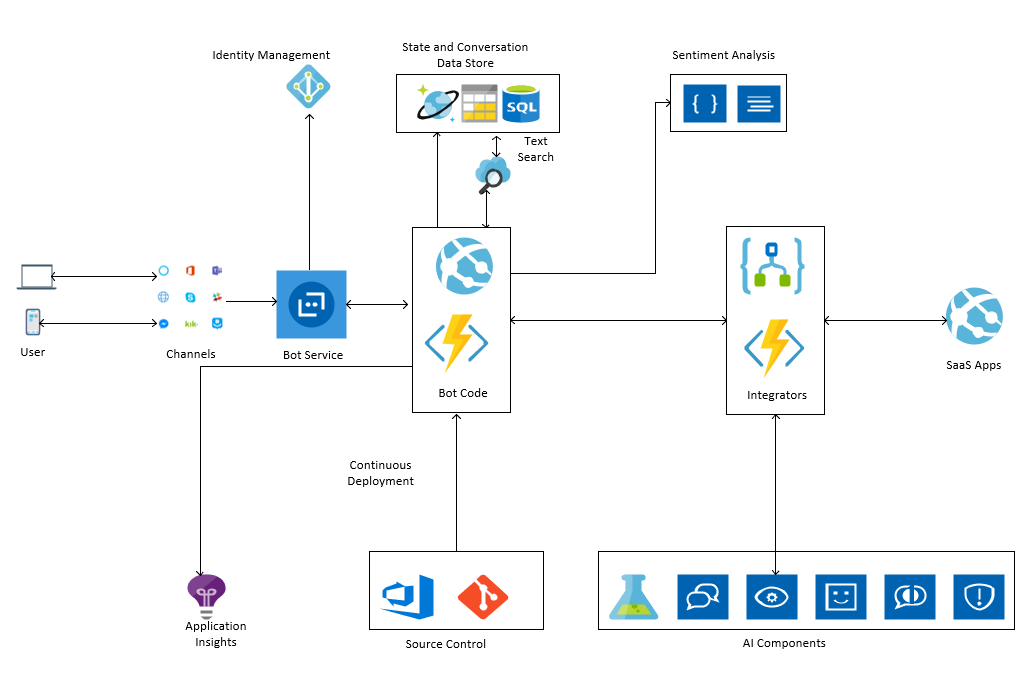
Now that we have seen what a typical bot looks like, let us move on to the BizTalk Admin Bot. I have named this Bot “The BizMan” as it administers the BizTalk server. The name and the superhero persona were conceived by Sandro Pereira . The post is available on his blog at BizMan, The BizTalk Server SuperHero Sticker
The architecture for BizMan is almost similar to the bot architecture discussed above. The following image shows the architecture for BizMan.
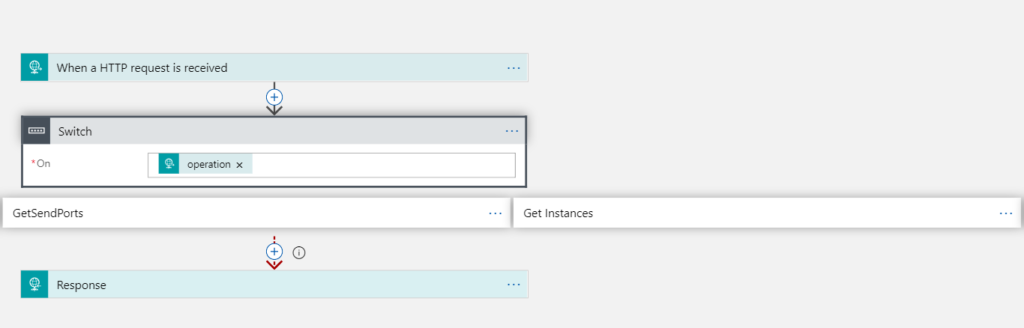
BizMan Requires that the user is a valid user in the Azure Active Directory and can be authenticated successfully. BizMan uses Blob Storage to store the logs and suspended instances reports. It uses Logic Apps to communicate with the BizTalk Management service (which comes with the BizTalk 2016 Feature Packs). This communication takes place using the On Premises Data Gateway.
The Management service that comes with Feature Pack 1 for BizTalk 2016, allows us to administer BizTalk Server using the Web API. This service also comes with a pre-authored Swagger definition which gives us the details about the various operations available in the service. This enables us to create a custom Logic Apps connector to communicate with this Web API. So, we just upload the Json file containing the Swagger information of the API and set up Windows authentication using an account which is part of “BizTalk Administrators Group”. This allows us to easily consume various operations in the Web API in a Logic App. A sample snapshot of the Logic App is shown below.
As will be clear, it is very easy to create the Logic App and add new operations, if we use a Custom Logic Apps connector.
The typical flow for the bot is shown below.
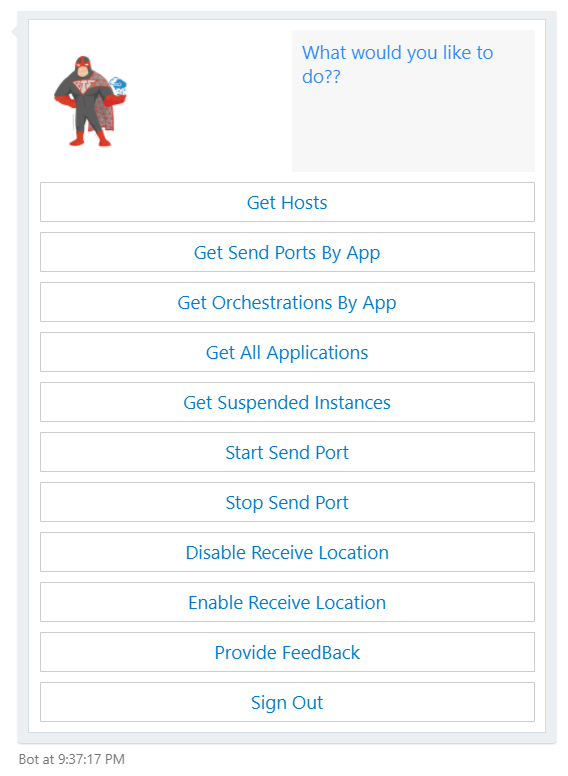
The BizMan is able to perform following tasks:
Greet the User
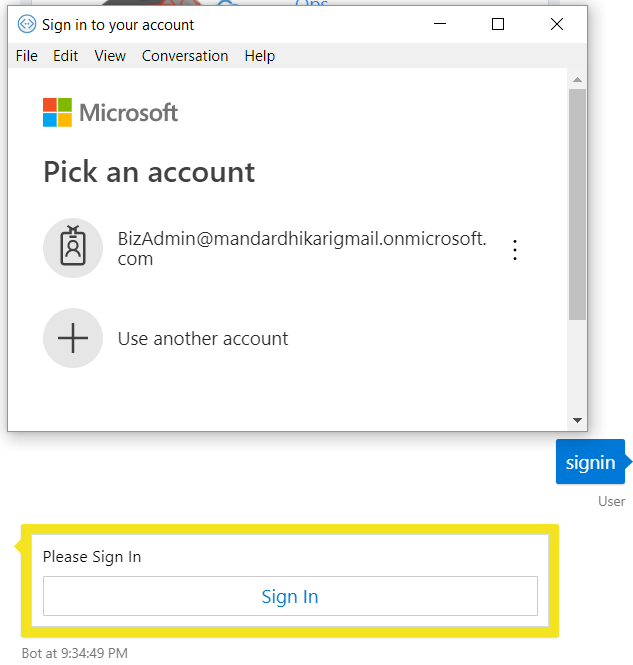
Authenticate the user against the AAD
Get Hosts
Get the Applications deployed in the BizTalk environment
Get the List of Orchestrations, Send Ports by application
Stop/ Start Send ports
Enable / Disable Receive Location
Get Suspended Instances
Get Feed Back from the user
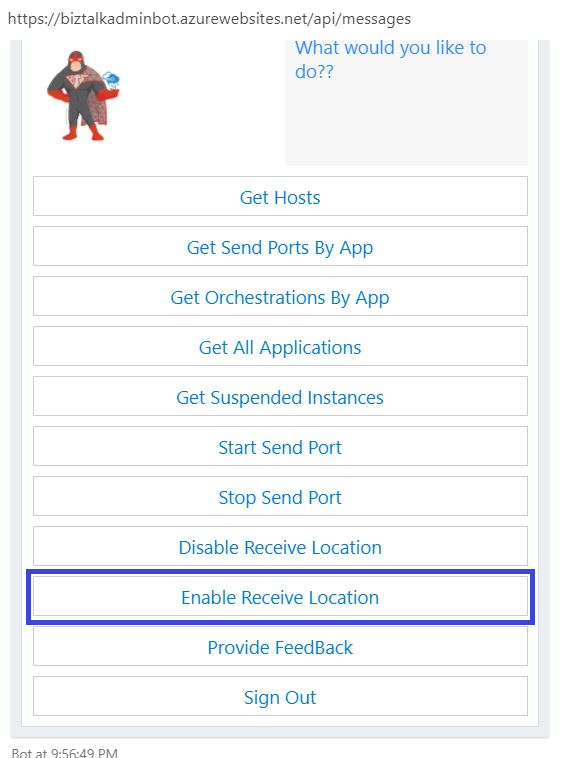
The options are presented to user as a big adaptive card as shown below.
Let us take a look at some of the operations available in the bot.
Greet the User:
Authenticate the User:
Enable Receive Location:
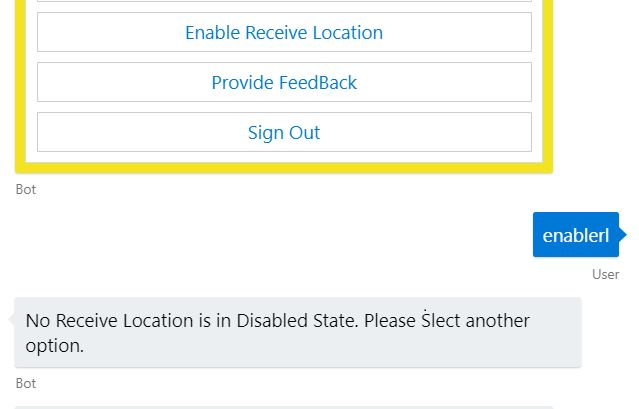
Let us explore this operation in detail. In this operation, the User initiates the command by clicking on the Enable Receive Location option available from the operation card as shown below.
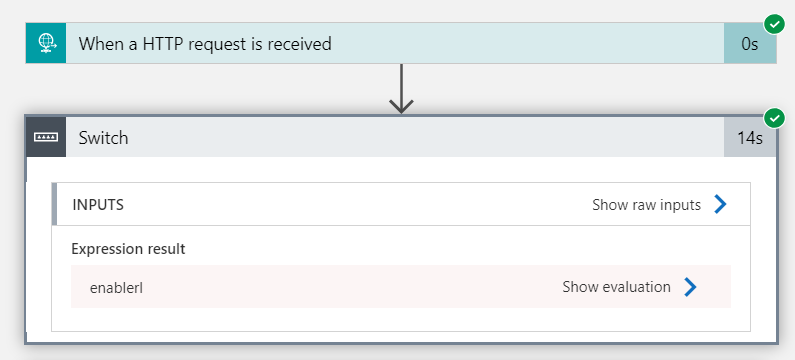
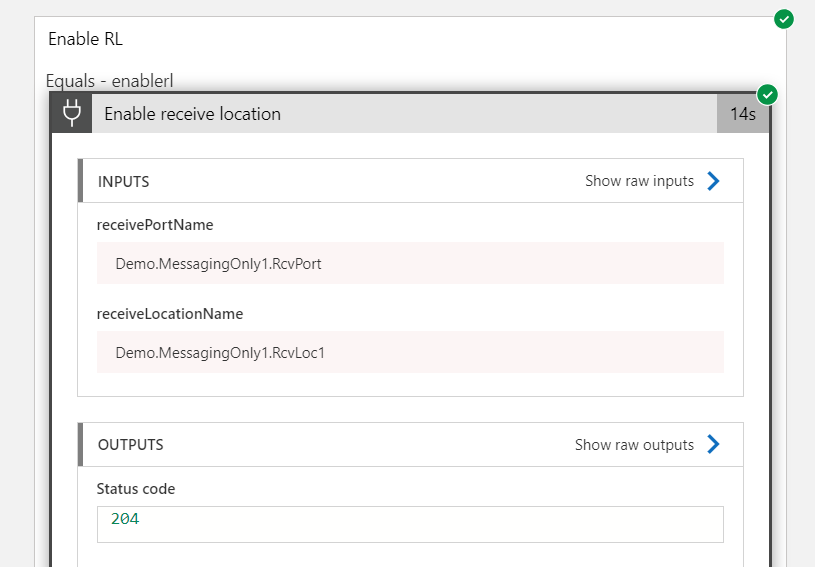
This initiates a call with the command “enablerl” to the bot web app. The first step in enabling any receive location is to get the list of all the receive locations that are disabled on the environment. The bot code first checks if there is a list of receive locations in the cache (gets refreshed every 1 min).
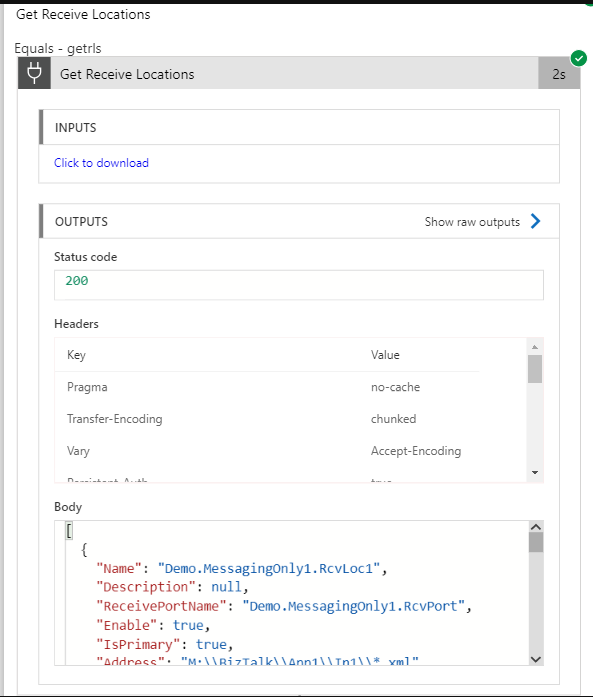
If the cache does not have the list, the bot code in turn initiates a call to the Logic App which fetches the list of the receive locations from the on premises BizTalk environment using the BizTalk management service. Following is a request response sample that Logic App receives and returns to the bot respectively.
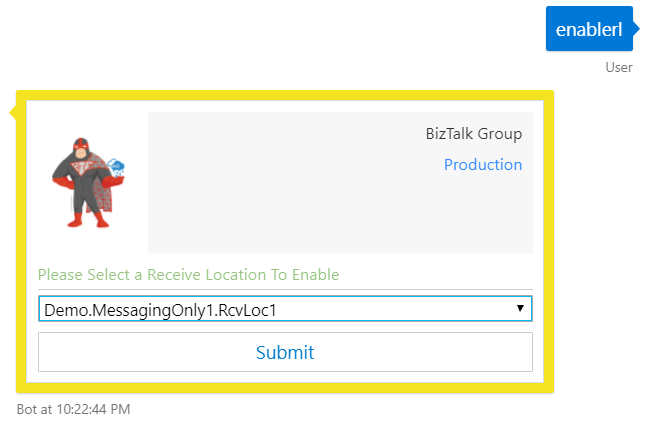
Once the list of the receive locations is available, the bot filters the list based upon the “Enable” flag received in response. So, for the “Enable Receive Location” operation, only the disabled receive locations are populated and the user is presented with a drop-down list to select a location from. A sample is shown below.Once the user clicks on the Submit button, the bot code initiates another call to the Logic App which in turn calls the On Premises BizTalk management service and enables the receive location. The Logic App Request response is shown below.
Once the receive location is enabled, the user gets a response that the “Operation Completed Successfully.”
In case there are no disabled receive locations in the BizTalk environment, then the bot code will notify the user that there are no disabled receive locations in the BizTalk environment.
Note: Similar logic is applied in following operations available in the bot:
Disable Receive Location
Start Send Port
Stop End Port
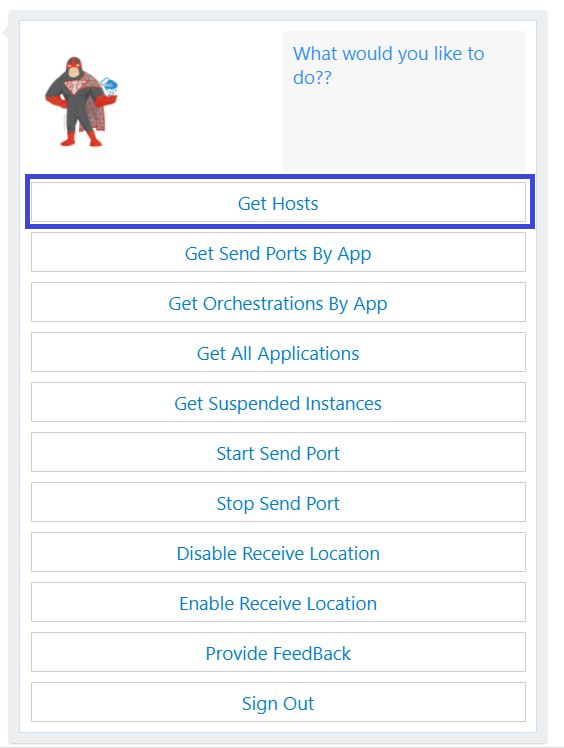
4. Get Hosts:
The operation is initiated when the user selects the Get Hosts operation from the list of available operation.
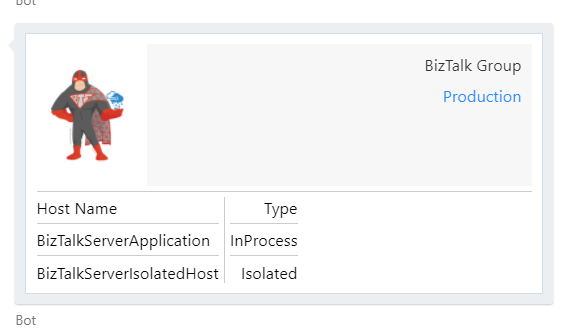
This initiates a command “gethosts” to the bot code. The code checks its cache to check if there is a list of hosts available with it. If it finds the list, the hosts are displayed to the user. In case the list is not available, the bot will initiate a call to the Logic App which calls the On Premises BizTalk management service and gets the list of the hosts. The response displayed to the user as an adaptive card shown below.
Note: Similar approach is taken while implementing following operations:
Get Send Ports by App
Get Orchestrations by App
Get All Applications
5. Get Suspended Instances Report
This operation, as the name suggest, brings the list of the Suspended Instances from the On Premises BizTalk environment. In this case, no caching is implanted as the number of suspended instances can change on a per second basis in a high load environment. In this operation, a small report is displayed to the user which contains the suspended instances grouped together as shown below.
This card gives the user an option to view a detailed report and provides a button to open the report. Once the user clicks on the button, it directs the user to a HTML web page which contains details about the suspended instances. In this case, the detailed report is stored as block blob in the azure storage account. This blob is available only until the point the user is actually logged in the session in the bot. The blob is deleted upon the end of the session.
In similar fashion, additional features can be added to the bot by adding new switch cases to the logic app and accounting for them in the bot code.
Further Scope
The BizMan can be made more functional by expanding on the Logic App and the bot code to assimilate more functions.
Natural Language Processing and Sentiment Analysis can be implemented in the bot to enable it to communicate more freely with the users.
Functions to control and monitor the Logic Apps can also be implemented in the same chat bot.
Reading Sources
In order to get started with building chat bots, the following MSDN documentation are the go-to links.
This is the second PowerShell sample in a series of samples that I will do on this topic addressing some of the real case scenarios that we may face daily:
How can we easily export a binding file from a BizTalk Application?
How can we easily export a binding file from a specify assembly?
How can we easily export a binding file from a list of assemblies?
How can we easily export a binding file from a Receive Port?
How can we easily export a binding file from a Send Port?
And many more
Today’s blog post will be about: How to Export BizTalk Server Resource Bindings by Assembly FQ Name with PowerShell.
Exporting a BizTalk Server Application binding is, at first sight, a simple and quick task that can be done using the BizTalk Server Administration Console:
Click Start, click All Programs, click Microsoft BizTalk Server 20xx, and then click BizTalk Server Administration
In the console tree, expand BizTalk Server Administration, expand the BizTalk Group, and then expand Applications
Right-click the application whose assembly is associated, and you want to export the bindings, or simply right-click on the Applications, point to Export, and then click Bindings…
On the Export Bindings page, in Export to file, type the absolute path of the .xml file to which to export the bindings
Ensure that Export bindings from the select assembly is selected, and then click OK
But, again, even in all simple tasks we may encounter challenges that require us to perform some monotonous and boring manual operations that consume some of our precious time and are always subject to failures.
Once again, the steps that I described above only generate the binding files from that specific environment, maybe or normally this all start in development, but we also will need to generate the same bindings for production, and for that we normally need to open the binding file and replace/fix the differences for each different environment… which is normally a tedious operation. What we need to replace is mainly:
The URI’s – it should be fixed but it is not mandatory you can fix them directly on the environment after you import the Binding if you know what you are doing
The host instances – not mandatory if you have the same host and host instances names across all your different environments as best practices will tell you to do
The NT Group Name associated in the Services (Orchestrations) – according to security best practices you shouldn’t use the same BizTalk Groups in different environments, so in this case, if you follow this best practice, you need mandatory to change these parameters in your binding file
Normally, everyone changes the URI’s but neglecting the other parameters may be causing problems during the Binding import.
So, the question is: Is there any way that we can improve this experience? And the response is that yes, all of this can be fully automated by using, for example, PowerShell scripts.
Like the previous sample, we could fully automate this Binding generation for each environment, but once again, let’s keep it simple and address what is mandatory and easily forgotten. With this PowerShell sample for a specific assembly, with a fully qualified name, deployed in my BizTalk Server environment, I can easily:
Generate a Binding file for 3 environments DEV, QA and PRD
Changing the NT Group Name for each different environment
Do you feel difficult to keep up to date on all the frequent updates and announcements in the Microsoft Integration platform?
Integration weekly update can be your solution. It’s a weekly update on the topics related to Integration – enterprise integration, robust & scalable messaging capabilities and Citizen Integration capabilities empowered by Microsoft platform to deliver value to the business.
If you want to receive these updates weekly, then don’t forget to Subscribe!
One of the components of BizTalk360 is a SQL Server database. This database is used for all kind of configuration like user permissions and all the monitoring settings. When that data got corrupted or lost, you would have to do all the configuration all over from scratch. To prevent this from happening, you should frequently take backups of that database. Besides creating manual backups, you can also have these backups being created automatically.
There are two different approaches to making automated backups of this database, both are shown below:
Create a SQL Server Maintenance Plan
Extend the Backup BizTalk Server job
The difference between these 2 methods is, that with the Maintenance Plan approach you’ll have a backup which is not in sync with the backup of your BizTalk databases, while with the latter option your BizTalk360 backup will be in sync with the BizTalk backups. This could make restoring your databases in one go easier.
In a previous post, Rochelle has already explained how to create a Maintenance Plan to take care of the BizTalk360 database backups. In this article, we’ll explain how to add the BizTalk360 database to the Backup BizTalk Server job.
Adding custom databases to the BizTalk Server Backup job
What we basically are going to do is using a feature from BizTalk Server. As you probably are aware of, BizTalk Server contains multiple databases and to be able to restore them in sync, the backup needs to be created in sync. The only by Microsoft supported way to create such backups, is by using the Backup BizTalk Server job, which is a SQL Server Agent job. You can read more about that topic in the below articles:
BizTalk users can extend the backup job with other databases which are considered important to the integrations which are deployed in BizTalk Server. This is exactly what we will be doing with the BizTalk360 database.
The process exists of the following steps:
Prepare the BizTalk360 database
Add the BizTalk360 database to the BizTalk Server backup job
Start making backups
Let’s take these steps one by one and have that database added to the BizTalk Server backup job!
Prepare the BizTalk360 database
In this first step, we’ll make sure a table and some Stored Procedures will be created in the BizTalk360 database. The table which becomes created is called MarkLog. You will find this table in all the databases which are being backed up via the BizTalk Server backup job.
Perform below steps to create that table and the needed Stored Procedures:
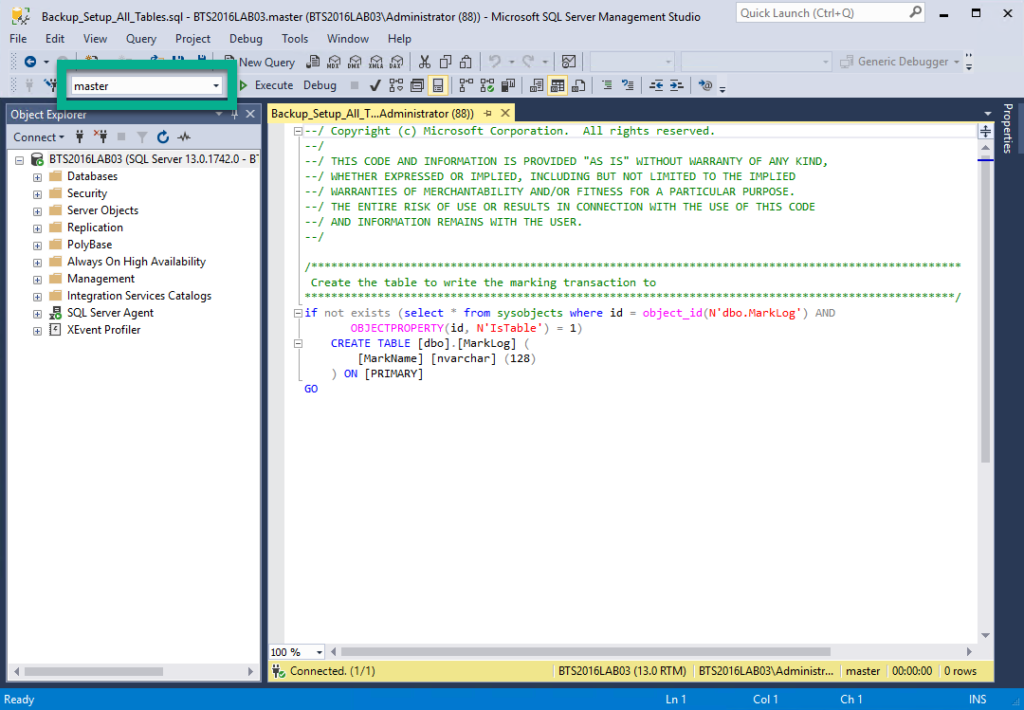
Open SQL Server Management Studio and connect to the SQL Server instance which contains the BizTalk360 database
Click Open File, navigate to folder C:Program Files (x86)Microsoft BizTalk Server 2016Schema and select query Backup_Setup_All_Tables.sql
From the Databases dropdown, select the BizTalk360 database
Click the Execute button or hit F5 to execute the script. If the database has been created successfully, you can proceed with the next step
Click Open File, navigate to folder C:Program Files (x86)Microsoft BizTalk Server 2016Schema and select query Backup_Setup_All_Procs.sql
If not yet selected, select the BizTalk360 database from the Databases dropdown
Click the Execute button or hit F5 to execute the script
If both SQL scripts have been executed successfully, an important part of the configuration has been completed. The BizTalk360 database is ready and in the next step, it will be added to the BizTalk Server backup job!
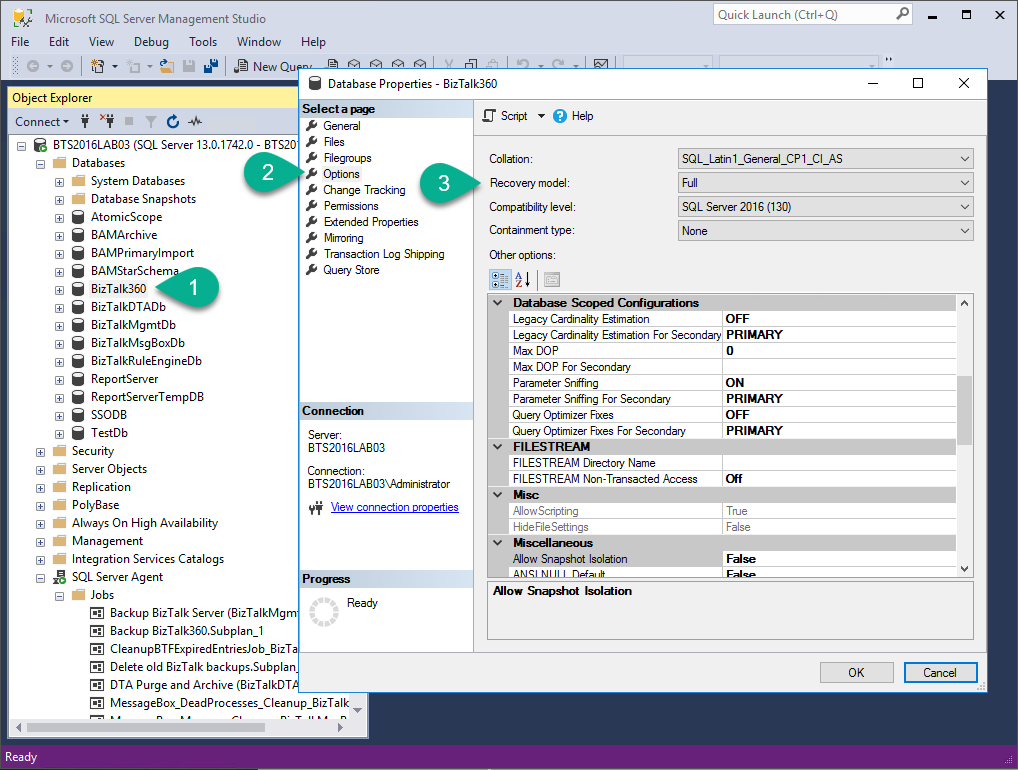
Important: Ensure yourself that the BizTalk360 is in Full Recovery Model, otherwise the backup will fail! You can check this by:
Right-click the database then select Properties
Select Options
Check if the Recovery Model is set to Full
Add the BizTalk360 database to the BizTalk Server backup job
In the previous step, we prepared the BizTalk360 database to be able to be backed up by the BizTalk Server backup job. In this step, we’ll make sure that that database becomes added to a table in BizTalk Server’s management database, which will make sure that the database will be picked up by the BizTalk Server backup job.
Follow below steps, to make sure that the BizTalk360 database will be picked up by the BizTalk Server backup job:
In SQL Server Management Studio, connect to the SQL Server instance which contains the BizTalkMgmtDb
In the Object Explorer, expand the Databases, BizTalkMgmtDb, Tables and find the dbo.adm_OtherBackupDatabases table
Right-click that table and, from the menu that appears, select Edit Top 200 Rows. As you are in Edit mode, you can add a new row which will contain the information about the BizTalk360 database.
In the last row, which now only shows NULL values, enter below values
DefaultDatabase: BizTalk360
DatabaseName: BizTalk360
ServerName: <Name of the SQL Server Instance which contains the BizTalk360 database>
BTSServerName: <Name of the SQL Server Instance which contains the BizTalk360 database>
Hit Enter to save the record in the table
The BizTalk360 database is now part of the BizTalk Server backup job. The last step we need to do is forcing a full backup, to make sure that also incremental backups can be created.
Start making backups
We are almost there; we have seen how the BizTalk360 database has been prepared to accommodate the BizTalk Server backup job. In the previous step, we have added the BizTalk360 database to the BizTalk Server backup job. In this last step, we will force a full backup, to make sure that after that, also incremental backups can be created. By default, a full backup will be created once every 24 hours; Incremental backups will be created, by default, every 15 minutes.
Perform below steps to force a full backup:
In SQL Server Management Studio, under the BizTalkMgmtDb, expand Programmability and expand Stored Procedures
Scroll through the Stored Procedures until you have found sp_ForceFullBackup
Right-click that Stored Procedure and, from the menu that appears, select Execute Stored Procedure… As the Stored Procedures doesn’t need any parameter values, just click OK
If the Stored Procedure has been executed successfully, the next time the BizTalk Server backup job runs, it will perform a full backup
There are a couple of ways to check whether the backups are really being created. You can:
Check the output of the BizTalk Server backup job (in SQL Server Management Studio)
Check if the backup files have been created (in Windows Explorer)
Check the output of the BizTalk Server backup job
To perform this check, perform these steps:
In SQL Server Management Studio, you need to navigate to the SQL Server instance which contains the BizTalk Server backup job
Next, expand SQL Server Agent
Right-click the Backup BizTalk Server job and select View History
Check if the backup files have been created
To check the availability of the backup files, you firstly need to check where these files are located. Follow the below steps, to find that location and then check the actual location:
In SQL Server Management Studio, you need to navigate to the SQL Server instance which contains the BizTalk Server backup job
Next, expand SQL Server Agent
Double-click the Backup BizTalk Server job
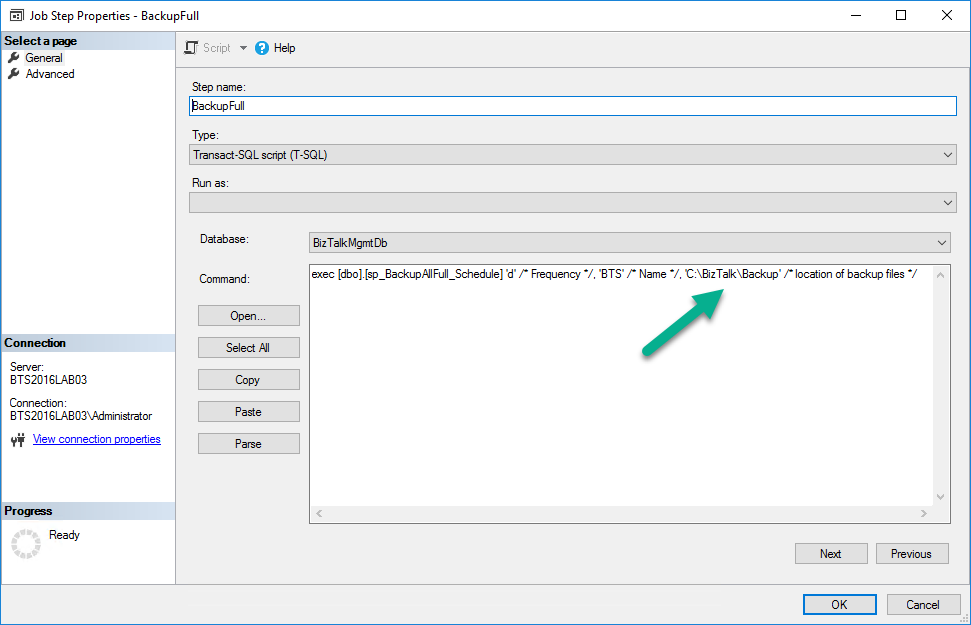
In the Job Properties dialog which appears, under Select a Page, select Steps
Now, under Job step list, double click BackupFull
In the Job Step Properties dialog, at Command, scroll to the right to find the backup path
Copy the backup path and close all dialog screens
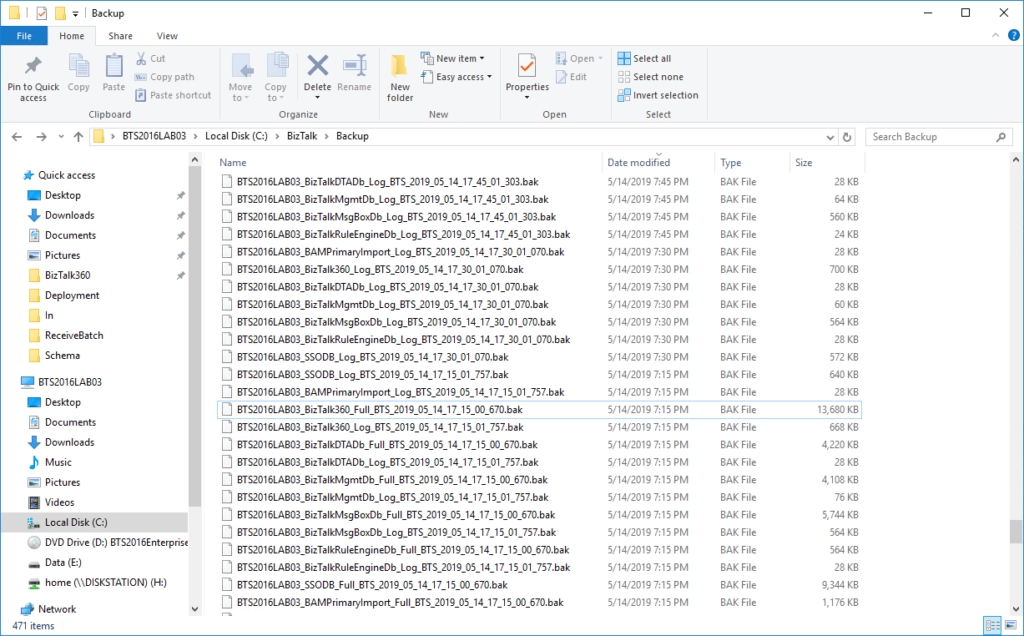
Next, open a Windows Explorer and paste the backup path in the Address bar
Now the backup files should show. Although we only checked the backup path for the full backup files, this folder might also contain the backup files of the incremental backups.
Conclusion
The BizTalk360 database contains valuable information about, amongst others, your monitoring configuration and the people who have access to BizTalk360. If in case of a disaster, you need to easily restore a backup of your BizTalk360 database, you need to have a recent backup of that database. The BizTalk Server backup job creates such backups. In this article, we have seen how to extend the BizTalk Server backup job to incorporate the backup of the BizTalk360 database.
Do you feel difficult to keep up to date on all the frequent updates and announcements in the Microsoft Integration platform?
Integration weekly update can be your solution. It’s a weekly update on the topics related to Integration – enterprise integration, robust & scalable messaging capabilities and Citizen Integration capabilities empowered by Microsoft platform to deliver value to the business.
If you want to receive these updates weekly, then don’t forget to Subscribe!
This will be the first blog post in a series of articles that I will do on this topic addressing some of the real case scenarios that we may face daily:
How can we easily export a binding file from a BizTalk Application?
How can we easily export a binding file from a specific assembly?
How can we easily export a binding file from a list of assemblies?
How can we easily export a binding file from a Receive Port?
How can we easily export a binding file from a Send Port?
And many more
The today blog post will be about: How can we easily export a binding file from a BizTalk Application?
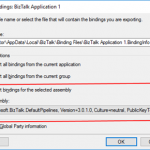
Exporting a BizTalk Server Application binding is, at first sight, a simple and quick task that can be done using the BizTalk Server Administration Console:
Click Start, click All Programs, click Microsoft BizTalk Server 20xx, and then click BizTalk Server Administration
In the console tree, expand BizTalk Server Administration, expand the BizTalk Group, and then expand Applications
Right-click the application whose bindings you want to export, point to Export, and then click Bindings…
On the Export Bindings page, in Export to file, type the absolute path of the .xml file to which to export the bindings
Ensure that Export all bindings from the current application is selected, and then click OK
But even in simple tasks, we may encounter challenges that require us to perform some monotonous and boring manual operations that consume some of our precious time and are always subject to failures.
The steps that I described above only generate the binding files from that specific environment, maybe or normally this all start in development, but we also will need to generate the same bindings for production and for that we normally need to open the binding file and replace/fix the differences for each different environment… which is normally a tedious operation. What we need to replace is mainly:
the URI’s – it should be fixed, but it is not mandatory. If you know what you are doing, you can fix them directly on the environment after you import the Binding
the host instances – not mandatory, if you have the same host and host instances names across all your different environments (as best practices will tell you to do)
the NT Group Name associated in the Services (Orchestrations) – according to securities best practices you shouldn’t use the same BizTalk Groups in different environments, so in this case, if you follow this best practices, you need to change these parameters in your binding file
Normally, everyone changes the URI’s but neglecting the other parameters may be causing problems during the Binding import.
So, the question is: Is there any way that we can do to improve this experience? And the response is that yes, all of this can be fully automated by using, for example, PowerShell scripts.
Again, I could fully automate this Binding generation for each environment, but let’s keep it simple and address what is mandatory and easily forgotten. In this sample let’s see how I can easily:
Generate a Binding file for 3 environments DEV, QA and PRD:
Changing the NT Group Name for each different environment;
To finalize these sessions resources shared, at least for now because I’m still waiting for other resources to get available. Here is one that I forgot even to mention in my blog that I was speaking at that event: the MVPDays Microsoft Flow Conference 2018 that toked place online on December,12 of last year (http://www.mvpdays.com/?page_id=11493). This was my first session about real case scenarios using PowerApps and Microsoft Flow.
About my session
Session Name: How we use Microsoft Flow and PowerApps: Real cases scenarios
Session Overview: We know that all business problem can be solved with a variety of technologies and different solutions. However, sometimes developing that type of solutions has traditionally been too costly and time-consuming for many of the need’s teams and departments face, especially those projects that are internally for organizations to use or for a short time period. As a result, many of these projects or solutions will be on the shelf or in the imaginary of the collaborators.
They are in Dynamics 365, Office 365, on premises, on the cloud… they are everywhere, and they are fantastic! Developers can do it; IT can do it… you can do it!
Microsoft Flow and PowerApps, sometimes together sometimes isolated are here to help you, and in this session, we will show you real live scenarios on how we use these two technologies in our customers and internally at DevScope.
Slides and Video
MVPDays Microsoft Flow Conference 2018 | How we use Microsoft Flow and PowerApps: Real cases scenarios