When you are working with API’s and Logic Apps and there is lots of rows of data involved you will sometimes come up with the following problems:
An API often pages the data once you go beyond a certain number of records
When you want to insert lots of rows with a Logic App into SQL you will usually have a loop which iterates over a dataset and does inserts
This takes a long time to execute
There is a cost implication to your implementation when you pay for each action
I recently had a scenario in this space and used quite a cool approach to solve the problem which I wanted to share.
Scenario
The scenario I had started in Shopify. When I add products & collections to my online store in Shopify I wanted to have a daily extract from Shopify to synchronise these new product/collections to my Azure SQL database which I use for reporting with Power BI.
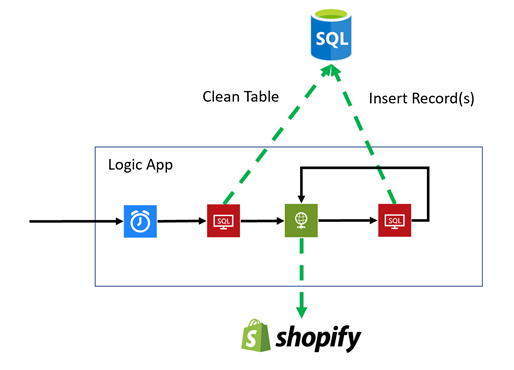
To achieve this I would have a Logic App with a nightly trigger which would take the following actions:
Clean the table of which product is in which collection
Extract all products in collections via the Shopify API
Insert them all into the SQL table
The end result is I have a table which has all of the products in each collection listed for my analysis.
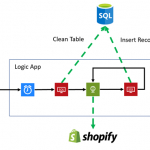
At a high level the scenario looks like the below diagram:
Implementation
As I mentioned above the problem is two folded here, when we query Shopify there many be thousands of products so we need to use a paging approach to query their API, secondly I want to insert into SQL in batches to try to minimise the number of action calls on SQL to improve performance and reduce cost.
Lets look at how I did this.
Paging API calls to Shopify
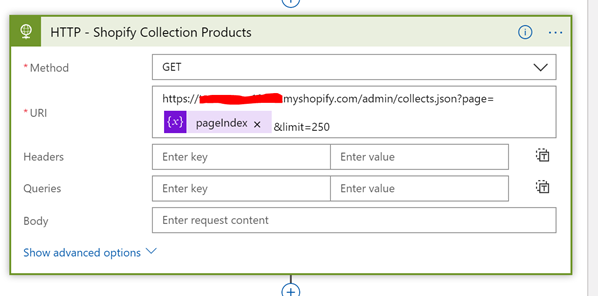
When it comes to the Shopify API you are able to execute a GET operation against the collection and it will return the products within it. If you have lots of products you can get them in pages. I chose to get 250 per time and you need to pass a page index to the API as a query parameter. The below picture shows you what a call to Shopify would look like with the paging parameters set.
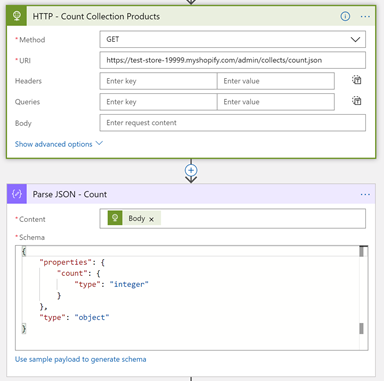
Once I can make this single call I can then use a loop around the call to Shopify, but before I do this I need to know how many pages there are. I can do this by executing a GET against the collections API with the count extension on the url. This will return me the number of products in collections. You can see this below.
From the response I can parse the count and then I would set a variable which is the number of pages which I will work out with a calculation of dividing the number of products by the number of products I will get per page. I will also add 1 to this so I get 1 more page than the count incase the division is not a whole number. The calculation is shown below.
Now I know the number of pages I can implement the loop where I will increment the page index each time until we have matched the number of pages. Within the loop we will get the next page of data from the API as shown in the picture below.
SQL Json Insert
It would be possible to just call the insert action for SQL in the logic app but if there are say 10000 products then the loop will do 10000 iterations which will take quite a while to run and also there is a cost associated with that. I wanted to look at options for inserting the data in batches. If I could insert the entire page returned from the API as a batch then with my 250 records at a time I could reduce the 10000 iterations down to 40. That should be a lot less time and a much lower cost.
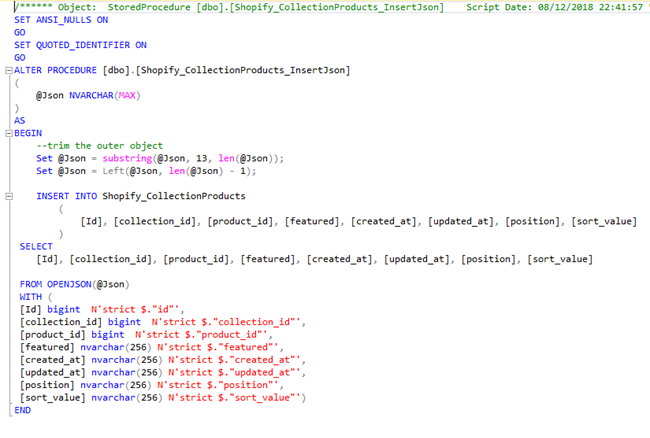
To do this I developed a stored procedure where I passed the entire JSON string from the API response to the stored procedure as an NVARCHAR(max) parameter. In the stored procedure I was fortunate that the format of the json in this case was very table/row like making it easy to do this insert. I used SQL’s OPENJSON feature and was able to insert the entire page of data from the API in a simple insert statement as you can see in the SQL below.
Summary
Once it was all put together I was able to run my Logic App to refresh my SQL database each night and the process took 10 seconds to copy across 2500 records. This took 10 iterations of the loop.
That’s a nice and easy to support and run Logic App which does a nice job in this case.
There are simple BizTalk Server installations and then there are some quite annoying BizTalk Server topologies and complex configurations which tend to give rise to the appearance of diverse types of errors: SQLNCLI11 ole db provider not found in the system. It’s one of the most recent I’ve found.
Let me contextualize the appearance of this error.
To simplify I have 5 machines in my environment:
2 SQL Server’s in a cluster and SSO Master Secret Server in a cluster
2 BizTalk Server’s
And 1 IBM WebSphere MQ Server and with only BizTalk Server 2016 MQSeries Agent installed
I successfully installed:
BizTalk Server 2016 Cumulative Update 5 (CU5) in the SSO Master Secret Server’s
And BizTalk Server Feature Pack 3 with CU5 on BizTalk Server’s
Nevertheless, while I was trying to install BTS2016 CU5 on the MQ Server I got the following error:
Ole db providers : SQLOLEDB, MSDataShape, ADsDSOObject, MSDASQL, MSDASQL Enumerator, SQLOLEDB Enumerator, MSDAOSP
SQLNCLI11 ole db provider not found in the system.
TLS1.2 support requires SQL Server 2012 Native client 11.0 must be installed on all BizTalk machines. Install SQL Server Native client 11.0 before applying the update.
To download and install Microsoft SQL Server 2012 Native Client 11.0, see this Microsoft Download Center webpage. https://www.microsoft.com/en-us/download/details.aspx?id=50402&751be11f-ede8-5a0c-058c-2ee190a24fa6=True
Aborting installation of this update.
Please try after installing SQL Server 2012 Native client 11.0.
Cause
Unfortunately, to install BizTalk Server CU5 and I guess previous ones there is this default requirement that you need to have: SQL Server 2012 Native client 11.0 installed in the server.
In fact, for the BizTalk Server 2016 MQSeries Agent to work properly this component is not required. This is a validation requirement of the CU5.
Solution
The solution is quite simple:
After you install the SQL client you will be able to successfully apply the BizTalk Server 2016 CU5.
Author: Sandro Pereira
Sandro Pereira lives in Portugal and works as a consultant at DevScope. In the past years, he has been working on implementing Integration scenarios both on-premises and cloud for various clients, each with different scenarios from a technical point of view, size, and criticality, using Microsoft Azure, Microsoft BizTalk Server and different technologies like AS2, EDI, RosettaNet, SAP, TIBCO etc. He is a regular blogger, international speaker, and technical reviewer of several BizTalk books all focused on Integration. He is also the author of the book “BizTalk Mapping Patterns & Best Practices”. He has been awarded MVP since 2011 for his contributions to the integration community. View all posts by Sandro Pereira
There is something special when you find a solution or possible solution to an annoying error message (for not using another type of language) and this is one of these cases: There is a problem with this Windows Installer package!
This error occurred each time my team was trying to install a BizTalk Application on a non-developer environment: Test or QA. And the full error description was:
There is a problem with this Windows Installer package. A program run as part of the setup did not finish as expected. Contact your support personnel or package vendor.
And “Contact your support personnel or package vendor”? What a ****, It is me! I am the support personnel and package vendor/creator… you still write these kinds of error messages?
Cause
Unfortunately, this error may be caused by several reasons, but some places may tell you that this problem can be related to:
The package is actually corrupted, you should export again and import it – not really like to a happen or solve it
The fact of the destination location does not exist – that is not true, because the installation will create the directories;
Invalid drive letter – again it is not true because the MSI will not go further on the wizard if that happens
To correctly diagnose the problem and find the cause of the problem you should consult the Event Viewer of the BizTalk Server in which you are trying to install the MSI. Normally you will find more details about the cause of the error.
The most common will be:
The Installation Path that you are providing in the wizard along with the name of the assemblies will have more than 256 characters.
By default, the installation folder will be:
C:Program Files (x86)Generated by BizTalkname of the BizTalk Application
That is:
46 characters for the default folder “C:Program Files (x86)Generated by BizTalk”
Adding, more or less, 15 characters for the BizTalk Application name folder
Will give you a total of 195 characters to be used in the assembly’s names. Which normally is enough.
Solution
Once again, in this case, the solution is very simple:
·Change the installation folder to a small path like:
“C:BizTalkAppsAppName”
By providing a small path, my team was able to successfully install the MSI.
Author: Sandro Pereira
Sandro Pereira lives in Portugal and works as a consultant at DevScope. In the past years, he has been working on implementing Integration scenarios both on-premises and cloud for various clients, each with different scenarios from a technical point of view, size, and criticality, using Microsoft Azure, Microsoft BizTalk Server and different technologies like AS2, EDI, RosettaNet, SAP, TIBCO etc. He is a regular blogger, international speaker, and technical reviewer of several BizTalk books all focused on Integration. He is also the author of the book “BizTalk Mapping Patterns & Best Practices”. He has been awarded MVP since 2011 for his contributions to the integration community. View all posts by Sandro Pereira
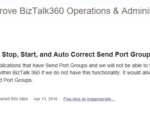
We are super excited to welcome our new release version of BizTalk360, v8.9.5. Here is a blog which explains the new feature introduction of Send Port Groups Monitoring in BizTalk360 v8.9.5.
One of the most powerful and overlooked features in BizTalk Server is Send Port Groups, helps to route a single message to more than one destination. A Send Port Group is a collection of send ports that BizTalk Server can use to send the same message to multiple destinations in one configuration. Now, you can monitor Send Port Groups in BizTalk360.
Customer Feedback
As you already know, Monitoring is the core functionality of BizTalk360. With this functionality, you can monitor all the BizTalk artefacts except the Send Port Groups in the earlier versions of BizTalk360.
In BizTalk360, we aim at improving the product and adding new features based on customer feedback and business scenarios. The Feedback portal is one such platform for the customers to provide their suggestions, which can be voted upon by other customers if they feel that these ideas fit in their business requirements as well. It’s based on the priority of voting; the features and enhancements get picked up for development. One such feedback was Send Port Groups monitoring on BizTalk applications.
Hence, we have chosen Send Port Groups monitoring for one of the features in this release.
Send Port Groups Monitoring in BizTalk360
Send Port Groups is a “key” feature of BizTalk Server’s “Publish and Subscribe” architecture, where a publisher can have more than one subscriber.
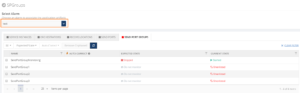
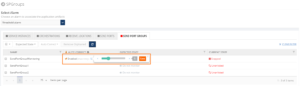
User Scenario: Let’s say you need to map an inbound XML document to three different outbound formats and send each outbound document to a different system. All that’s required is a Send Port Group and a simple Filter Expression. The Send Port Group handles the Filter Expression with each Send Port using its own map! If any of the three transmissions fail, you can resubmit the failed message without resending the other two documents. The user may have one or more Send Port Groups. It can be hard to monitor your Send Port Groups manually. Now with the support of BizTalk360, you can monitor the Send Port Groups easily! In BizTalk360, we have included the Send Port Groups for monitoring for each BizTalk Application. The user can monitor the Send Port Groups by mapping with the alarm as below.
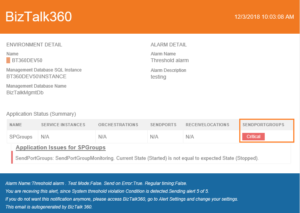
The Send Port Group can go down for some situation; you can monitor the artifact in such situation by configuring the expected state in BizTalk360. When the current state is not equal to expected state, the user will get notified through an alert, as shown below.
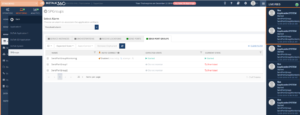
The same error and status will be displayed in the Monitoring dashboard and in the Errors and warning section as seen below.
Auto Healing functionality for the Send Port Groups
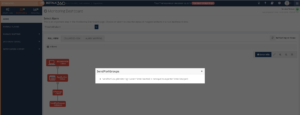
By any chance, when the Send Port Group artefact goes down for some specific reason, you need not to log in to the BizTalk server to make it up again. BizTalk360 Auto Correct feature will get it back to the expected state automatically with the Auto correct option. For this, the user needs to enable Auto Correct for the configured Send Port Groups.
If in case the system is not able to Auto Correct Send Port Groups to its expected state i.e., when all the attempts to auto correct have failed, then the user will receive a down alert. For each attempt, the user will get notified with the detailed status information of auto correction operation that has happened on a Send Port Group. With this information, the user can get a clear picture of what is happening with the state of the Send Port Group.
User Scenario: In BizTalk, the user cannot Start or Stop the Send Port Group from “unenlisted’ state when all the associated Send Ports are in “Unenlisted” state.In such scenario, there is a chance that the auto-healing may get failed to heal the Send Port Group from the “unenlisted” state to expected state and the auto correct attempts will get failed since the associated Send Ports gets “Started” or “Stopped” state.
Once all the maximum attempts failed, then the user will get intimated through down alert as “Maximum auto corrects attempts have been exhausted”.
Intelligent auditing
BizTalk360 has very good intelligent auditing capabilities that will help administrators to find out “Who did what in the environment”. When the auto-healing is successful, it gets tracked at the Send Port Group level under “Application Activities” in Governance and Auditing section.
Live Activity Recorder
BizTalk360 has excellent Live activity tracking feature which helps you to govern user actions efficiently without compromising on regular activities. You can view the Live recording of all the user activities through the “Live Feed” on each successful auto healing of Send Port Groups.
This feature will be available in our upcoming release of BizTalk360 v8.9.5. Stay tuned to monitor and maintain the Send Port Groups easily through auto healing functionality.
This week I installed on a BizTalk Server 2016 environment Host Integration Server 2016 (HIS), and to my surprise, I was receiving this quite unusual and annoying error: String was not recognized as a valid DateTime.
Each time I try to open the HIS Configuration Console.
Nevertheless, this error did not occur the first time I ran the configuration console, in other words, after I install the HIS, the first time I executed the Configuration console everything worked ok. Even, if I close and open again, everything was still working fine. The problem only occurred once I actually configure something.
This error only occurred If:
I configure let’s say all the HIS features;
Close the HIS Configuration console
And then try to open the Configuration console again
Cause
As far as I know, there is no other reason, this is a bug!
Solution
The solution is very simple:
Install Host Integration Server Cumulative Update 1
But in fact, there is already Host Integration Server Cumulative Update 2 available so I will recommend you installing this one instead:
After installing HIS CU2, everything worked as expected.
Author: Sandro Pereira
Sandro Pereira lives in Portugal and works as a consultant at DevScope. In the past years, he has been working on implementing Integration scenarios both on-premises and cloud for various clients, each with different scenarios from a technical point of view, size, and criticality, using Microsoft Azure, Microsoft BizTalk Server and different technologies like AS2, EDI, RosettaNet, SAP, TIBCO etc. He is a regular blogger, international speaker, and technical reviewer of several BizTalk books all focused on Integration. He is also the author of the book “BizTalk Mapping Patterns & Best Practices”. He has been awarded MVP since 2011 for his contributions to the integration community. View all posts by Sandro Pereira
Happy to introduce my first guest blog author: Peter Vervoorn from Virtual Green. Peter is a very experienced integration specialist. He has been working in ICT since 1995 and was a co-founder of Axon Olympus (now part of the Codit Group). Until his sabbatical in 2014 he headed the team of consultants at Axon Olympus as Technical Director. During his sabbatical in Thailand, he lost over 50 kilos and currently, he divides his time between Thailand and The Netherlands. He is a specialist with (Microsoft) Integration Tools and Technologies like BizTalk Server, Windows 10 IoT, Node-RED and is also involved in developing industrial automation prototypes.
Peter reach me with this funny, a bit unusual but quite interesting scenario: Calling multiple Disassemblers in a Receive pipeline, and I challenge him to be my first guest blog author on my blog. Challenge that he gladly accepted.
Situation
You receive a zip file, containing several files to extract. The extracted files should be disassembled too. (Possibly because they are in flat file format, or you want to call the XmlDisassembler to set the message type.)
Problem
Although the disassemble stage in the receive pipeline can contain multiple components, only the first component (matching the message) will be executed.
Solution
Create a new disassembler component, which will handle calling the sequential disassembler components.
The implementation of the Disassemble method is very easy, just call the initial component in the sequence.
The GetNext method is where it becomes a bit more interesting. Here we would have to extract all the messages from the first stage and feed them to the second stage. Note that it is not possible to create a single instance for the second stage and keep feeding it messages; each message requires its own instance of the component.
To do this, we have to create a new instance of the second stage component. Then we set the required properties (e.g., with values from the property bag.) Then we call the Disassemble method on the component. Next, we call GetNext to retrieve all messages and queue them.
The remainder of the implementation is for dequeening the messages.
Code
In the sample code below, all the usual methods (Load, Save, Validate, etc.) are not shown. Only the two relevant methods are shown. Also, all the plumbing has been removed for brevity/clarity.
[ComponentCategory(CategoryTypes.CATID_PipelineComponent)]
[ComponentCategory(CategoryTypes.CATID_DisassemblingParser)]
[System.Runtime.InteropServices.Guid("YOUR-GUID-HERE")]
public class MultiDisassembler : IBaseComponent, IPersistPropertyBag, IComponentUI, IDisassemblerComponent
{
    private ExtractorComp extractPC = new ExtractorComp();
    private Queue<IBaseMessage> messages = null;

    public void Disassemble(IPipelineContext pContext, IBaseMessage pInMsg)
    { extractPC.Disassemble(pContext, pInMsg); }

    public IBaseMessage GetNext(IPipelineContext pContext)
    {
        if (messages == null)
        {
            messages = new Queue<IBaseMessage>();
            IBaseMessage msgS1 = null;
            while ((msgS1 = extractPC.GetNext(pContext)) != null)
            {
                XmlDasmComp  xmlDasmPC = NewXmlDasmWithPropertiesSet();
                xmlDasmPC.Disassemble(pContext, msgS1);
                IBaseMessage msgS2 = null;
                while ((msgS2 = xmlDasmPC.GetNext(pContext)) != null)
                { messages.Enqueue(msgS2); }
            }
        }

        if (messages.Count > 0)
        { return messages.Dequeue(); }
        return null;
    }
    //...
    //Missing Code
}
Tips
You can add more stages, as required;
If necessary, you can inspect a message and choose to either enqueue it directly or use a different component to disassemble that message. (An example would be a zip file containing a mix of XML files and nested zip files)
In the above sample, all messages are queued when the GetNext method is called the first time. Another possibility is getting the next message in a just-in-time fashion. This requires a bit of additional work as you have to do additional housekeeping and handle possible empty messages.
Often you see a disassembler also implementing IComponent. This is not required if only the DisassemblingParser attribute is set.
THIS SAMPLE CODE IS PROVIDED “AS IS”, WITHOUT WARRANTY OF ANY KIND.
BizTalk Server Recipe: Calling multiple Disassemblers in a Receive pipeline (2 KB) Microsoft | TechNet Gallery
The pipeline component is available on BizTalk Pipeline Components Extensions Utility Pack project, that is a set of custom pipeline components (libraries) with several custom pipeline components that can be used in received and sent pipelines, which will provide an extension of BizTalk out-of-the-box pipeline capabilities.
Sandro Pereira lives in Portugal and works as a consultant at DevScope. In the past years, he has been working on implementing Integration scenarios both on-premises and cloud for various clients, each with different scenarios from a technical point of view, size, and criticality, using Microsoft Azure, Microsoft BizTalk Server and different technologies like AS2, EDI, RosettaNet, SAP, TIBCO etc. He is a regular blogger, international speaker, and technical reviewer of several BizTalk books all focused on Integration. He is also the author of the book “BizTalk Mapping Patterns & Best Practices”. He has been awarded MVP since 2011 for his contributions to the integration community. View all posts by Sandro Pereira
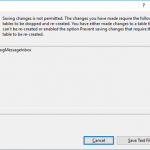
I was thinking in calling these post series “Note to myself”, only not to be always looking for these solutions whenever these problems not related to BizTalk Server or other integration products or technologies occur. But I decided to call it “A fish out of water” that basically is what I feel sometimes. And to start this post series I choose an occurrent “issue” that happens a lot when I’m trying to do something whit in SQL Server Management Console: Saving changes is not permitted.
The full warning message would be:
Saving changes is not permitted. The changes that you have made require the following tables to be dropped and re-created. You have either made changes to a table that can’t be re-created or enabled the option Prevent saving changes that require the table to be re-created.
This problem occurs when the Prevent saving changes that require the table re-creation option is enabled, and you make one or more of the following changes to the table:
You change the Allow Nulls setting for a column.
You reorder columns in the table.
You change the column data type.
You add a new column.
When you change a table so that you alter the metadata structure of the table, and then you save the table, the table must be re-created based on these changes. This may result in the loss of metadata and in a direct loss of data during the re-creation of the table. If you enable the Prevent saving changes that require the table re-creation option in the Designer section of the SQL Server Management Studio (SSMS) Options window, you receive the error message: Saving changes is not permitted. The changes that you have made require the following tables to be dropped and re-created.
Solution
To change the Prevent saving changes that require the table re-creation option, follow these steps:
Open SQL Server Management Studio (SSMS).
On the Tools menu, click Options.
In the navigation pane of the Options window, click Designers.
Uncheck (clear) the Prevent saving changes that require the table re-creation check box, and then click OK.
Author: Sandro Pereira
Sandro Pereira lives in Portugal and works as a consultant at DevScope. In the past years, he has been working on implementing Integration scenarios both on-premises and cloud for various clients, each with different scenarios from a technical point of view, size, and criticality, using Microsoft Azure, Microsoft BizTalk Server and different technologies like AS2, EDI, RosettaNet, SAP, TIBCO etc. He is a regular blogger, international speaker, and technical reviewer of several BizTalk books all focused on Integration. He is also the author of the book “BizTalk Mapping Patterns & Best Practices”. He has been awarded MVP since 2011 for his contributions to the integration community. View all posts by Sandro Pereira
Do you feel difficult to keep up to date on all the frequent updates and announcements in the Microsoft Integration platform?
Integration weekly update can be your solution. It’s a weekly update on the topics related to Integration – enterprise integration, robust & scalable messaging capabilities and Citizen Integration capabilities empowered by Microsoft platform to deliver value to the business.
If you want to receive these updates weekly, then don’t forget to Subscribe!
Feedback
Hope this would be helpful. Please feel free to reach out to me with your feedback and questions.


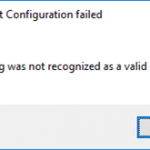
 Configuration Console: String was not recognized as a valid DateTime")