by bchesnut | Jan 11, 2016 | BizTalk Community Blogs via Syndication
Published by: Bill Chesnut
This blog post is to go along with my Integration Monday talk: http://www.integrationusergroup.com/biztalk-continuous-integration-continuous-deployment/ and is designed to start people thinking about Continuous Integration and Continuous Deployment for their BizTalk Solutions, later post will cover the methods and tools.
What is Continuous Integration & Continuous Deployment
CI & CD mean a number of thing to different people and technologies, for BizTalk I think CI & CD means 3 things: Automating Build, Testing and Packaging, Making Release an easily repeatable process and Reducing Human involvement.
If we look at the the 1st one, Automating Build, Testing and Packaging, these 3 components have never been real easy with BizTalk, you can manually do each of these on a BizTalk developer workstation, but automating all or part of this process has taken a great deal of effort. At Mexia we have chosen to use the BizTalk Deployment Framework (BTDF) from Codeplex because it goes a very long way towards fixing the problems with BizTalk packaging and deployment, which we will look at in later posts.
The 2nd item to me is the hardest one with BizTalk if you have not automated the process, if one developer creates a deployment package (without BTDF) and then another developer creates another deployment package, it is very likely that they will be slight differences and the quality of the deployed code will suffer, I myself have even had these type of issues when the process to create a deployment package becomes more than a couple of pages of instructions, it is very prone to errors. With BTDF (or the tool of your choice) and automation this can become an easily repeatable process with consistent outcomes.
The final item it something that most BizTalk project teams with be acutely aware of, losing a developer for part or all of a day to do a release or even to make some simple configuration changes, which has a flow on effect with the team falling behind in the work for the next delivery milestone. Again if tools are used to remove the release configuration from the developers responsibility and the automating of the package creation the developers can concentrate on what developer do, develop.
Why Continuous Integration & Continuous Deployment
Many of the reason for Why do CI & CD are also defined in What is CI & CD, but I think the greatest reasons for spending the time to setup CI & CD are: consistency of delivery, reduced time to deliver and getting the developers out of the configuration loop. The easier that the build, test, package and deploy process is the more often teams will be willing to do releases, which will benefit everyone involved in the project.
The bottom line is the easier the process to more often it will be done and the more often it is done the better the quality of the final solution.
What’s Next
This post is designed to be the 1st of a series around BizTalk CI & CD, the next post will be hands on with the tools, below is the list of what I plan to cover in this series of posts, I will update the lists with links as I publish those posts:
Thanks for your time and I look forward to helping people on their BizTalk CI & CD journey
by community-syndication | Jan 11, 2016 | BizTalk Community Blogs via Syndication
DocumentDB is a highly scalable, NoSQL document database service in Azure. On azure.microsoft.com you can find a lot information about DocumentDB. For example how you can create a DocumentDB or how to build your first app. But in a “real life” scenario (for example in project for a customer) this information is probably not enough or even relevant because the samples are often console applications and maybe you want to create a Mobile or a Web App. Often you also need to modify the data from the client or add meta data to it. For example a creation date or an order status. Therefore its good practice to create a custom Web API to handle the inserts, updates, deletes and data retrievals. There you have complete control on the object that is sent by the client. But how do you do that if you want to store the data in DocumentDB? In that case it can take quite some time to find the additional info that you need. Therefore I created an API App to show how you can insert, update, delete or get a customer order and how to add additional (meta data) to the orders! The following sample can easy be modified for other type of objects.
Prerequisites
First you have to create a DocumentDB database and a collection inside it. The easiest way to do that is in the Azure Portal. This blog post doesn’t show how to do that because you can also find that information in “How to create a database for DocumentDB” on the Azure website. The result is similar like below:
Steps
This post also doesn’t give an intro on how to create an API App but rather focuses on the part that is specific for DocumentDB, (Here you can find more information on how to create an API App.)
Create an Order
|
|
First create a Data Access Layer (DAL) helper class that stores the order in DocumentDB. The order that is sent to the API App from the client is put in a server order object that has extra properties like OrderStatus and CreationDate. This construction makes it possible to create properties on the order that are not visible for the client or for example read only for the client. When an object is stored in DocumentDB is automatically a guid created for the object. This guid is sent back to client and can be used to retrieve the order.
|
public async Task<string> CreateOrder(ClientOrder order)
{
    string id = null;

    //Create a server order with extra properties
    ServerOrder s = new ServerOrder();

    s.customer = order.customer;
    s.item = order.item;

    //Add meta data to the order
    s.OrderStatus = "in progress";
    s.CreationDate = DateTime.UtcNow;

    //Get a Document client
    using (client = new DocumentClient(new Uri(endpointUrl),
    authorizationKey))
    {

        string pathLink = string.Format("dbs/{0}/colls/{1}",
        databaseId, collectionId);

        ResourceResponse<Document> doc = await client.
        CreateDocumentAsync(pathLink, s);

        //Return the created id
        id = doc.Resource.Id;
    }

    return id;
}
.csharpcode, .csharpcode pre
{
font-size: small;
color: black;
font-family: consolas, “Courier New”, courier, monospace;
background-color: #ffffff;
/*white-space: pre;*/
}
.csharpcode pre { margin: 0em; }
.csharpcode .rem { color: #008000; }
.csharpcode .kwrd { color: #0000ff; }
.csharpcode .str { color: #006080; }
.csharpcode .op { color: #0000c0; }
.csharpcode .preproc { color: #cc6633; }
.csharpcode .asp { background-color: #ffff00; }
.csharpcode .html { color: #800000; }
.csharpcode .attr { color: #ff0000; }
.csharpcode .alt
{
background-color: #f4f4f4;
width: 100%;
margin: 0em;
}
.csharpcode .lnum { color: #606060; } |
| |
| Create a POST method in the API App Controller class to post a new order to the API App. Call the helper class to insert the order in DocumentDB and return the generated id (guid) to client. |
public async Task<IHttpActionResult> Post([FromBody]ClientOrder order)
{
    OrderResult result = new OrderResult();

    try
    {
        OrderManager mgr = new OrderManager();
        string id = await mgr.CreateOrder(order);

        if (id != null)
        {
            result.Id = id;
        }

        //Return a HTTP 200 with the created id
        return Ok(result);
    }
    catch
    {
        return InternalServerError();
    }
}
.csharpcode, .csharpcode pre
{
font-size: small;
color: black;
font-family: consolas, “Courier New”, courier, monospace;
background-color: #ffffff;
/*white-space: pre;*/
}
.csharpcode pre { margin: 0em; }
.csharpcode .rem { color: #008000; }
.csharpcode .kwrd { color: #0000ff; }
.csharpcode .str { color: #006080; }
.csharpcode .op { color: #0000c0; }
.csharpcode .preproc { color: #cc6633; }
.csharpcode .asp { background-color: #ffff00; }
.csharpcode .html { color: #800000; }
.csharpcode .attr { color: #ff0000; }
.csharpcode .alt
{
background-color: #f4f4f4;
width: 100%;
margin: 0em;
}
.csharpcode .lnum { color: #606060; } |
| |
| You can test the API App with the test page that is automatically generated with Swagger. |
|
| |
Check in the Azure Portal with the Document Explorer if the order really is stored in DocumentDB.
Below you can see that the server object with additional properties is stored. |
|
| |
| |
Read an Order by Id
|
|
Create a method in the DAL helper class the get the order by its generated id. There are several ways to get data from DocumentDB. You can use a SQL query but in the sample below is LINQ used.
|
public ServerOrder GetOrderById(string id)
{
    ServerOrder order = null;

    //Get a Document client
    using (client = new DocumentClient(new Uri(endpointUrl),
    authorizationKey))
    {
        string pathLink = string.Format("dbs/{0}/colls/{1}",
        databaseId, collectionId);

        dynamic doc = client.CreateDocumentQuery<Document>(pathLink).
        Where(d => d.Id == id)
        .AsEnumerable().FirstOrDefault();

        if (doc != null)
        {
            order = doc;
        }
    }
    return order;
}
.csharpcode, .csharpcode pre
{
font-size: small;
color: black;
font-family: consolas, “Courier New”, courier, monospace;
background-color: #ffffff;
/*white-space: pre;*/
}
.csharpcode pre { margin: 0em; }
.csharpcode .rem { color: #008000; }
.csharpcode .kwrd { color: #0000ff; }
.csharpcode .str { color: #006080; }
.csharpcode .op { color: #0000c0; }
.csharpcode .preproc { color: #cc6633; }
.csharpcode .asp { background-color: #ffff00; }
.csharpcode .html { color: #800000; }
.csharpcode .attr { color: #ff0000; }
.csharpcode .alt
{
background-color: #f4f4f4;
width: 100%;
margin: 0em;
}
.csharpcode .lnum { color: #606060; } |
| |
| Create a GET method in the API App Controller class to get the order by its id. Call the DAL helper class to get the order from DocumentDB and return the server order to client. The NotFound() en Ok() methods are used to return the necessary status code to the client. |
public IHttpActionResult Get(string id)
{
    OrderManager mgr = new OrderManager();
    var order = mgr.GetOrderById(id);

    if (order == null)
    {
        return NotFound();
    }
    return Ok(order);
}
.csharpcode, .csharpcode pre
{
font-size: small;
color: black;
font-family: consolas, “Courier New”, courier, monospace;
background-color: #ffffff;
/*white-space: pre;*/
}
.csharpcode pre { margin: 0em; }
.csharpcode .rem { color: #008000; }
.csharpcode .kwrd { color: #0000ff; }
.csharpcode .str { color: #006080; }
.csharpcode .op { color: #0000c0; }
.csharpcode .preproc { color: #cc6633; }
.csharpcode .asp { background-color: #ffff00; }
.csharpcode .html { color: #800000; }
.csharpcode .attr { color: #ff0000; }
.csharpcode .alt
{
background-color: #f4f4f4;
width: 100%;
margin: 0em;
}
.csharpcode .lnum { color: #606060; } |
| |
| The Swagger test page makes it easy to test the API App but you can also use other tools like Postman to test your API App. |
|
| |
| |
Update an Order
|
| Create a method in the DAL helper class to update the order in DocumentDB. At first you needed a SelLink to update or delete an object in DocumentDB but in that case you first have to query for the document if you only have an id. This is not necessary anymore because now you can also create an Uri. In the example below is still searched first for the order with a query. |
public async Task<string> UpdateOrderById(string id, ClientOrder order)
{
    string result = null;

    //Get a Document client
    using (client = new DocumentClient(new Uri(endpointUrl), authorizationKey))
    {

        string pathLink = string.Format("dbs/{0}/colls/{1}", databaseId, collectionId);

        dynamic doc = client.CreateDocumentQuery<Document>(pathLink).
        Where(d => d.Id == id)
        .AsEnumerable().FirstOrDefault();

        if (doc != null)
        {
            ServerOrder s = doc;
            s.customer = order.customer;
            s.item = order.item;
            s.ModifiedDate = DateTime.UtcNow;

            //Update document using self link.
            ResourceResponse<Document> x = await
            client.ReplaceDocumentAsync(doc.SelfLink, s);

            result = x.StatusCode.ToString();
        }
    }

    return result;
}
.csharpcode, .csharpcode pre
{
font-size: small;
color: black;
font-family: consolas, “Courier New”, courier, monospace;
background-color: #ffffff;
/*white-space: pre;*/
}
.csharpcode pre { margin: 0em; }
.csharpcode .rem { color: #008000; }
.csharpcode .kwrd { color: #0000ff; }
.csharpcode .str { color: #006080; }
.csharpcode .op { color: #0000c0; }
.csharpcode .preproc { color: #cc6633; }
.csharpcode .asp { background-color: #ffff00; }
.csharpcode .html { color: #800000; }
.csharpcode .attr { color: #ff0000; }
.csharpcode .alt
{
background-color: #f4f4f4;
width: 100%;
margin: 0em;
}
.csharpcode .lnum { color: #606060; } |
| |
| Create a PUT method in the API App Controller class to update the order. Call the DAL helper class to update the order in DocumentDB. |
public async Task<IHttpActionResult> Put(string id, [FromBody]ClientOrder order)
{
    try
    {
        OrderManager mgr = new OrderManager();
        string result = await mgr.UpdateOrderById(id, order);

        if (result == null)
        {
            return NotFound();
        }

        return Ok("Order updated");
    }
    catch
    {
        return InternalServerError();
    }
}
.csharpcode, .csharpcode pre
{
font-size: small;
color: black;
font-family: consolas, “Courier New”, courier, monospace;
background-color: #ffffff;
/*white-space: pre;*/
}
.csharpcode pre { margin: 0em; }
.csharpcode .rem { color: #008000; }
.csharpcode .kwrd { color: #0000ff; }
.csharpcode .str { color: #006080; }
.csharpcode .op { color: #0000c0; }
.csharpcode .preproc { color: #cc6633; }
.csharpcode .asp { background-color: #ffff00; }
.csharpcode .html { color: #800000; }
.csharpcode .attr { color: #ff0000; }
.csharpcode .alt
{
background-color: #f4f4f4;
width: 100%;
margin: 0em;
}
.csharpcode .lnum { color: #606060; } |
| |
| |
Delete an order
|
| Create a method in the DAL helper class to delete the order in DocumentDB. In the example below is an Uri created to directy delete the order by its id. |
public async Task<string> DeleteOrderById(string id)
{
    string result = null;

    //Get a Document client
    using (client = new DocumentClient(new Uri(endpointUrl),
    authorizationKey))
    {
        var docLink = string.Format("dbs/{0}/colls/{1}/docs/{2}",
        databaseId, collectionId, id);

        // Delete document using an Uri.
        var x = await client.DeleteDocumentAsync(docLink);

        if (x != null)
        {
            result = x.StatusCode.ToString();
        }
    }
    return result;
}
.csharpcode, .csharpcode pre
{
font-size: small;
color: black;
font-family: consolas, “Courier New”, courier, monospace;
background-color: #ffffff;
/*white-space: pre;*/
}
.csharpcode pre { margin: 0em; }
.csharpcode .rem { color: #008000; }
.csharpcode .kwrd { color: #0000ff; }
.csharpcode .str { color: #006080; }
.csharpcode .op { color: #0000c0; }
.csharpcode .preproc { color: #cc6633; }
.csharpcode .asp { background-color: #ffff00; }
.csharpcode .html { color: #800000; }
.csharpcode .attr { color: #ff0000; }
.csharpcode .alt
{
background-color: #f4f4f4;
width: 100%;
margin: 0em;
}
.csharpcode .lnum { color: #606060; } |
| |
| Create a DELETE method in the API App Controller class to delete the order. Call the DAL helper class to delete the order in DocumentDB. |
public async Task<IHttpActionResult> Delete(string id)
{
    try
    {
        OrderManager mgr = new OrderManager();
        string result = await mgr.DeleteOrderById(id);

        if (result == null)
        {
            return NotFound();
        }

        return Ok("Order deleted");
    }
    catch
    {
        return InternalServerError();
    }
}
.csharpcode, .csharpcode pre
{
font-size: small;
color: black;
font-family: consolas, “Courier New”, courier, monospace;
background-color: #ffffff;
/*white-space: pre;*/
}
.csharpcode pre { margin: 0em; }
.csharpcode .rem { color: #008000; }
.csharpcode .kwrd { color: #0000ff; }
.csharpcode .str { color: #006080; }
.csharpcode .op { color: #0000c0; }
.csharpcode .preproc { color: #cc6633; }
.csharpcode .asp { background-color: #ffff00; }
.csharpcode .html { color: #800000; }
.csharpcode .attr { color: #ff0000; }
.csharpcode .alt
{
background-color: #f4f4f4;
width: 100%;
margin: 0em;
}
.csharpcode .lnum { color: #606060; } |
| |
Conclusion
|
I really like DocumentDB because it’s a very powerful database. You don’t have to create tables anymore in the database because you store the entire JSON object in a collection. That makes it easier for developers. It’s also incredibly fast so that’s all great but as always there also a couple of things that I miss. What I really like about SQL Server is the SQL Server Management Studio and that is something you don’t have that for DocumentDB. Sure, you can do a lot of things in the Azure Portal but it doesn’t give the same user experience. (There are also some open source initiatives like Azure DocumentDB Studio) Another good thing about SQL Server is the documentation. You have a lot of documentation about SQL Server. Maybe this is because the Microsoft team are still developing new features in it.
In the meantime you will have to read the Azure blog posts to keep track of all the new stuff in DocumentDB!
Download the API App sample on:
code.msdn.microsoft.com
|
| |
| |
| |
| |
| |
| |
| |
| |
| |

by Tomasso Groenendijk | Jan 11, 2016 | BizTalk Community Blogs via Syndication
When you create a Web API you can use it for your own applications but maybe you also want to expose it to the outside world. In that case you probably want to change the behavior of the Web API. For example add security or hide properties. You can use BizTalk to create a virtual service in front of your Web API to modify the behavior but is that the smartest choice? Because BizTalk writes every message that it receives a couple of times to the MessageBox database. This increases heavily the execution time and especially with Web APIs it’s important to have a really low execution time!
Another option is to use Sentinet from Nevatech to create a virtual service in front of your Web API.
The virtual service runtime in Sentinet can also be extended with custom messages processing. Sentinet provides a number of build-in message processing components but it is also possible to create custom message processing components.
Let’s have a look at the following example where an Order Web API is used inside an organization to process orders. This Web API must also be exposed to external customers to show the status of an order but if an error occurs in the Web API or in a background process, the OrderStatus property must be modified that the order is still in progress and the ErrorMessage property with the error must not be shown to the customers. Furthermore the output of the Web API must be in XML instead of JSON.
The following steps in Sentinet are necessary to make it work:
- Add the REST service (or API) to the the Sentinet Repository
- Create a Virtual Service
- Add custom Pipeline Processing
- Test the Virtual REST Service
Sentinet makes it really easy to modify the response of a Web API. You only have to create a Virtual Service in front of it and add custom Pipeline Processing! Especially if you are already familiar with XPATH and XSLT, the example above doesn’t take long to implement.
Download:
Sentinet version 4.5
by Nick Hauenstein | Jan 10, 2016 | BizTalk Community Blogs via Syndication
I’m finally settling back into the swing of things as we kick off the year 2016! It has been quite a relaxing break, spending Christmas and New Year’s with my family out in the woods of Snohomish, WA. Since getting back to the office, I’ve been catching up on quite the backlog of emails. Among them was an email that called out a file that was uploaded to the Microsoft download site at the end of last month – the long awaited BizTalk Server Roadmap for 2016 or should I say the Microsoft Integration Roadmap (more on that to below).
Continued Commitment to BizTalk Server
The document opens up with a bullet pointed summary of the core takeaways (I for one appreciate that it leads with the TLDR):
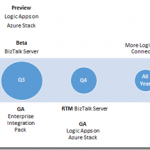
- Continuing commitment to BizTalk Server, with our 10th release of BizTalk Server in Q4 2016.
- Expansion of our iPaaS vision to provide a comprehensive and compelling integration offering spanning both traditional and modern integration requirements. Preview refresh in January 2016 and General Availability (GA) in April 2016.
- Deliver our iPaaS offering on premises through Logic Apps on Azure Stack in preview around Q3 2016 and GA around end of the year.
- Strong roadmap and significant investments to ensure we continue to be recognized as a market leader in integration.
- The next release of Host Integration Server is planned on the same timeline as BizTalk Server below.
That’s right; 2016 is the year where we start to see Microsoft’s integration investments in the cloud start to pay dividends on-premises – with two complementary offerings that each offer their own approach to solving integration challenges while still ensuring that you can build mission critical BizTalk Server integrations on the latest Microsoft platform. Though Microsoft is expanding the integration toolbox beyond just BizTalk Server, the focus is still firm on Integration, and the tools are built on proven platforms with a proven infrastructure.
BizTalk Server 2016 New Features
So what can we expect in BizTalk Server 2016?
- Platform alignment – SQL 2016, Windows Server 2016, Office 2016 and latest release of Visual Studio.
- BizTalk support for SQL 2016 AlwaysOn Availability Groups both on-premises and in Azure IaaS to provide high availability (HA).
- HA production workloads supported in Azure IaaS.
- Tighter integration between BizTalk Server and API connectors to enable BizTalk Server to consume our cloud connectors such as SalesForce.Com and O365 more easily.
- Numerous enhancements including
-
- Improved SFTP adapter,
- Improved WCF NetTcpRelay adapter with SAS support
- WCF-SAP adapter based on NCo (.NET library)
- SHA2 support
- Host Integration Server “2016”
-
- New and improved BizTalk adapters for Informix, MQ & DB2
- Improvements to PowerShell integration, and installation and configuration
I don’t know about you, but I’m fairly excited to see this listing. With the death of SHA1 certificates this year, it’s good to see SHA2 support finally coming into BizTalk Server 2016, if for nothing else, then for SHA2 a BizTalk Server 2016 upgrade is going to be a must.
Also, notice the tighter integration between BizTalk Server and API connectors. That’s fantastic! One thing that Logic Apps do really well is provide friendly connectivity to SaaS endpoints. One thing they don’t do as well is content-based correlation and long -running transactions. One thing that BizTalk Server doesn’t do too well is provide friendly connectivity to SaaS endpoints (there is generic REST connectivity, but you’re going to be wishing that you would have built/bought/downloaded an adapter once you start going down that road). One thing that BizTalk Server does really well is content-based correlation and long-running transactions. Here we’re seeing the best of Azure App Service Logic Apps meeting the best of BizTalk Server. That should make anyone happy.
An Integration Taxonomy
One interesting thing found in the roadmap is a brief discussion of an integration taxonomy that makes a distinction between “Modern Integration” – which is usually SaaS and web-centric, based in the cloud, and within the realm of Web and mobile developers — and “Enterprise Integration” – which includes support for industry standards (e.g., X12, EDIFACT, etc…), targets mission critical workloads, and caters more towards enterprise integration specialists.
In a way, this sets the context for the two core integration offerings of BizTalk Server and Logic Apps – defining the persona that might gravitate towards each. However, Logic Apps will offer an Enterprise Integration Pack for the pro developer that wants the power of BizTalk Server with the elasticity of a PaaS offering.
Where Is This Going?
Well, you might be reading this because you’re passionate about Logic Apps; you might be reading this if you’ve been working with BizTalk Server since the year 2000. Either way, you’re in the business of doing integration. MIcrosoft isn’t interested in building up cliques of developers, but instead catering to all while providing an easy to use location agnostic (cloud/on-prem) rock solid, highly scalable platform for mission critical integration.
The focus is on evolving capabilities, it doesn’t matter what brand name is slapped on the side of it (whether it’s Logic Apps, Power Apps, or BizTalk Server), Microsoft is committed to making the world of enterprise integration a better place!
by Daniel probert | Jan 7, 2016 | BizTalk Community Blogs via Syndication
Recently I was asked by a client: how do I deploy an API App or a Logic App to a Virtual Network (VNet)?
If you’ve ever used BizTalk Services (MABS) then you’ll know one of the biggest limitations with MABS was that it didn’t support VNets: a lot of companies create VNets, and hook them up to their on-premises network, so that their Azure environment becomes a secure extension of their on-premises network.
VNets can also be set to only allow trusted connections from external users through the use of firewalls, network appliances or network configuration.
At the date of writing, there is currently no support for running Logic Apps in a VNet (yet, but watch this space) but there is for the other parts of Azure App Service (AAS): the problem is solved through the use of App Service Environments (ASEs).
Introduction to App Service Environments (ASEs)
ASEs have been around for a while (they previewed in April 2015, just after AAS went into preview, and Logic Apps/API Apps were announced) but there hasn’t been too much coverage of them, hence my client’s question. ASEs are part of Azure App Service.
An ASE is effectively a private deployment of all the VMs and services needed to run your AAS apps. Instead of running on either shared VMs (Free and Standard Plans) or dedicated VMs in the public portions of your subscription, ASEs give an entire deployment of everything needed to host AAS apps but in a VNet – with the added benefit that you get a lot of control over the scale up/scale out options.
When you create an ASE it *has* to exist in a VNet: you can’t create one outside of a VNet. The VNet is either created for you (with default values) or you can select a pre-existing VNet when you create the ASE.
Configuration of an ASE can look a bit daunting, but it becomes easier if you think of it as your own set of virtual servers, with a set of front-end servers and 3 groups of processing servers running in your VNet. All of the supported AAS goodies (web apps, api apps, etc.) are deployed onto these servers, and you get to control the number of servers available to handle load.
Servers are grouped into either Front-End, Worker Pool 1, Worker Pool 2, or Worker Pool 3.
You can set the number of instances per group – so the default is for a front-end group with 2 servers, and single worker pool group with 2 servers, plus one allocated IP address. Note that these aren’t the actual number of instances assigned to your API App (or Web or Mobile) when you deploy it – this is the just the number of instances that exist in the group that can be used. When you deploy your AAS app, you choose which group it uses.
In ASE terminology, each group is known as a pool, and the servers as instances: so if you want two servers running on a worker process group, you’d have two worker pool instances running in your worker pool.
Technically, each pool instance is a compute resource: you can have a maximum of 55 compute resources spread across your front-end pool and worker pools, and a maximum of 10 IP addresses e.g. 5 front-end instances, and 2 worker pools each with 25 instances (the Azure portal has some pretty nifty code in it which adjusts the ratio on the sliders as you adjust the numbers!).
ASEs are part of the Premium tier, which means they can get expensive: even at the default settings the per hour cost is reasonably high, even with nothing running in the ASE and no storage. As you add more instances, or more pools, the price per day increases.
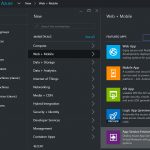
How to create an ASE
The option to create an ASE can be found under Web + Mobile, right under the Logic App item, when you click New in the Azure portal:
When you select App Service Environment you’ll be given the option to give it a name, select or create the Resource Group the ASE will belong to, select or create a VNet, and choose scaling options:
On this screen you specify:
-
Your ASE name – note that your ASE is given a name on the domain p.azurewebsites.net – you’ll have to make your ASE name unique amongst all other ASE names.
-
The subscription your ASE will be created in.
-
The Resource group your ASE will belong to (this can be a new one or an existing one).
-
The Virtual Network/Location for your ASE (by default a new VNet is created for you, but you either choose an existing VNet, or change the options of the default VNet that is created).
-
Scalability i.e. how many pools and pool instances you want.
Note the information box that indicates it will take a minimum of 2 hours to create your ASE – this is accurate, as I’ve found from experience.
Selecting the Scale option shows this screen:
Here you can specify what pricing tier you want to use for your pools (each pool can be set to a different pricing tier, although the Front End Pool must be at P2 at minimum).
After this, you can set the number of instances in each pool, and how many IP Addresses you need.
If you select one of the tier options for a pool, you’ll see a screen like this:
What this lets you do is set the number of cores available for each of your instances i.e. the number of cores for each of your virtual servers.
Looking at those numbers, and knowing the defaults for an ASE, you can see that the default settings will cost you a minimum of £272.70/month (about US$400/mo), and that’s without any additional storage or traffic charges.
Note: ASEs can be expensive, but they’re in the Premium tier for a reason: they’re designed to handle very high load (if necessary) for customers that need an isolated environment within a virtual network e.g. 50 8-core virtual servers. Plus, there’s one thing you can do with ASEs that is difficult to do otherwise: you can provide automated geographic redundancy (more on this later).
After you click the Create button, Azure goes off and creates your ASE – this will take a minimum of 2 hours.
How to deploy an API App to an ASE
OK, so now you have your shiny new ASE – how do we deploy an API App to it? Well this is the really easy part: Your ASE will show up in your list of Locations when you create your API App (as long as you select the correct subscription).
For example, if I create an instance of the BizTalk Flat File Encoder, my location happens to automatically default to the ASE I created earlier:
Note that we now have a new option available – Worker Pool Size. This lets us select the worker pool to use with the API App (remember setting up Worker Pools when you created the ASE?). You use this to select which worker pool you want to use (i.e. Worker Pool 1, Worker Pool 2, etc.).
Also, I note that you can select an existing resource group, or create a new one, although the facility to choose an existing one wasn’t working correctly at the time of this post.
If we select the Location option, we can see that the ASE appears in the list of locations:
Benefits of deploying API Apps or Logic Apps to an ASE
The two main benefits of an ASE are these:
-
Ability to deploy to a VNet.
-
Ability to scale worker instances beyond that which is available in AAS outside on an ASE.
The VNet argument should be easy: if you have an on-premises network which you are connecting to Azure (either by VPN or ExpressRoute or similar), then an ASE allows you to both access your AAS apps from your on-premises servers as well as allowing your AAS apps to access on-premises server – no hybrid connectivity or service bus relay needed! Plus you can use network security groups to restrict traffic access to your AAS apps on an IP level.
The ability to scale is essential if your workload is going to go beyond the capabilities offered by vanilla AAS: up to 55 dedicated compute resources, each with up to 8 cores. The ability for your ASE to autoscale as demand requires it is also essential for enterprise apps.
Why can’t we add Logic Apps to an ASE?
When ASEs first came out, there was a bit of confusion about whether Logic Apps and API apps were supported: the initial announcements indicated they were, but there appeared to be no way of adding API Apps and Logic Apps to ASEs. That has changed, with the official guidance now updated to indicate that Web Apps, Mobile Apps, and API apps are all supported, but not Logic Apps.
Given that Logic Apps are still in preview, this is perhaps not surprising – and I wouldn’t be surprised if we find Logic Apps gaining ASE support before the GA of Logic Apps next year (perhaps even during one of the earlier updates mentioned in the Logic Apps Roadmap).
Further Resources
There’s a wealth of information from Microsoft on ASEs – here’s a partial list, including a very cool use of geographic scaling using multiple ASEs: