by community-syndication | Oct 14, 2015 | BizTalk Community Blogs via Syndication
This post is intended to consolidate some basic principles about Flat File Schema Wizard First of all, BizTalk Flat File Schema Wizard is a template inside Visual Studio that allows you to converting Flat File into XML message, which BizTalk can understand, in a graphical a simple manner. That basically supports two types of text […]
Blog Post by: Sandro Pereira
by stephen-w-thomas | Oct 14, 2015 | Stephen's BizTalk and Integration Blog
I am excited to be part of creating the cofficia Pluralsight BizTalk Learning Path.
This consists of just over 34 hours of hard core BizTalk training brought to you by Mall Milner, Mohamad Halabi, Dan Toomey, and I.
Learning path course sequence:
BizTalk 2006 Fundamentals
Advanced BizTalk Server 2010
Intro to BizTalk Server 2013 Enterprise Service Bus (ESB) Toolkit
BizTalk Server 2013 from Ground Up: An End to End Scenario
What’s New in BizTalk Server 2013
Using Functoids in the BizTalk 2013 Mapper
Total – 34h 15m
So if you find yourself not being able to sleep at night or on 3 long 12 hour flights around the world, it is well worth the 34 hours to master your BizTalk skills
Remember: you can always watch Pluralsight courses in up to 2x speed. That would cut the time down to almost 17 hours!
I still have a few no credit card required, 30-day unlimited free trial Pluralsight memberships available! If interested, just fill out the form here http://www.biztalkguru.com/30-day-pluralsight-free-trial-request/

by community-syndication | Oct 14, 2015 | BizTalk Community Blogs via Syndication
After some requests from the community, I decided to update my Microsoft Integration Stencils for Visio 2013 stencils with an additional of 60 new shapes, making ate the moment a total of 361 shapes that will help you to visually represent Integration architectures and solutions diagrams in a simple and beautiful way. Some of the […]
Blog Post by: Sandro Pereira
by noreply@blogger.com Steef-Jan Wiggers | Oct 12, 2015 | BizTalk Community Blogs via Syndication
In two weeks time I will head out to North America. My first stop will be Calgary to visit my friend Kent Weare. My MVP buddies Saravana Kumar and Michael Stephenson will join me as we will be speaking during the Azure Hybrid Integration the 30th of October at Microsoft Calgary.
The Azure Hybrid Integration will be a full day with Kent, Saravana, Michael, myself and Darren King from Microsoft speaking on the following topics SaaS connectivity, IoT, Hybrid SQL Server, BizTalk administration & operations and Two Speed IT using Microsoft Azure.
The free event takes place on October 30th, 2015 at the Calgary Microsoft office. You can find more details here.
After this event we will head out to Redmond for the yearly MVP Summit. This is a multi-day event that is hosted in Bellevue and at Microsoft headquarters in Redmond, Washington. All the MVP in the world that are able to come will be there to connect with fellow MVP’s and the various product groups.
I look forward to both events as it will enable me to engage fellow MVP’s, the integration community in Canada and to learn more about the future road maps of integration, Microsoft Azure and direction of Microsoft itself. The IT world around me is changing rapidly and for personally I am noticing it as my projects change from an on premise integration- to hybrid solution focus.
For those people that register for the Calgary event, I am looking forward to meet you and to have some interesting discussions.
Cheers,
Steef-Jan

by community-syndication | Oct 9, 2015 | BizTalk Community Blogs via Syndication
Following one of my last speaking engagement in the Porto.Data Community Meeting about Flat Files: How to process Flat Files documents (TXT, CSV ) in BizTalk Server where I address some of the following topics: How to process Flat Files documents (TXT, CSV ) in BizTalk Server. What types of flat files are supported? How […]
Blog Post by: Sandro Pereira
by community-syndication | Oct 6, 2015 | BizTalk Community Blogs via Syndication
I’m not an expert in XSLT, nor am I a fan of it. But although my feeling for XSLT (which I’m sure is mutual) are cold and hostile at best, I recognize it as sometimes the only solution to the problem. Recently, I’ve come across two scenarios where it was the only way to solve the problem, and since I spent way too much time on it, I thought it be a good idea to share it. If not to anyone else, at least to myself as I don’t want to do this again
The first scenario we had to send a file to a destination, and the consumer of the message requested that we’d use specific prefixes for the namespaces. BizTalk Server sets these namespaces for us starting from ns0, ns1ns*. There isn’t built in way for us to control this, and given the complexity of hieratical structures from different namespaces I can understand why.
However in my case, as I said, the consumer of the message required the namespace to be set to “tns”. My first approach was to create a pipeline component and use the XmlTranslatorStream which comes as part of the Microsoft.BizTalk.Streaming. The XmlTranslatorStream allows derived classes to intercept XML node translation through virtual methods such as TranslateStartElement.
    public class XmlNamespaceHandlerStream : XmlTranslatorStream
    {
        string _fromPrefix;
        string _xmlNamespace;
        string _toPrefix;

        protected override void TranslateStartElement(string prefix, string localName, string nsURI)
        {
            if (prefix == _fromPrefix && nsURI == _xmlNamespace)
                base.TranslateStartElement(_toPrefix, localName, nsURI);
            else if (nsURI == _xmlNamespace)
                base.TranslateStartElement(null, localName, null);
            else
                base.TranslateStartElement(prefix, localName, nsURI);
        }

        protected override void TranslateAttribute()
        {
            if (this.m_reader.Prefix != "xmlns")
                base.TranslateAttribute();
        }
        /// <summary>
        /// Intercepts the processing of the XML stream and changes prefixes from
        /// a specific namespace to a new prefix.
        /// </summary>
        /// <param name="input">Inbound message stream. Eg inmsg.BodyPart.Data</param>
        /// <param name="fromPrefix">The prefix to be changed. Eg ns0</param>
        /// <param name="xmlNamespace">whatever namespace is associated with the fromPrefix</param>
        /// <param name="toPrefix">Name of the new prefix</param>
        public XmlNamespaceHandlerStream(Stream input, string fromPrefix, string xmlNamespace, string toPrefix)
            : base(new XmlTextReader(input), Encoding.Default)
        {
            this._fromPrefix = fromPrefix;
            this._toPrefix = toPrefix;
            this._xmlNamespace = xmlNamespace;
        }
    }
The TranslateStartElement is called for every XML element, and if the prefix (and namespace) is the same as the one I like to change, I proceed with changing the prefix. To process the message in a pipeline component, I simply use like this:
inmsg.BodyPart.Data = new XmlNamespaceHandlerStream(
    inmsg.BodyPart.GetOriginalDataStream(),  // Inbound stream
    this.FromPrefix,  // Property of pipeline component
    this.XmlNamespace,  // Property of pipeline component
    this.ToPrefix);  // Property of pipeline component
The good thing with this approach is that it’s done with a streaming pattern. However, the problem was that it moves all namespace declarations except the one I want to change from the root element to each element using it. This might not be a problem if the message is small, but in my case the message contained 100.000+ person elements. The inbound flat file format was about 20Mb and the original output using ns0 as prefix was close to 80Mb. After I changed the namespace prefix using the XmlTranslatorStream it was more than 140Mb. The additional namespace declarations added approximately 75%.
So although my intensions were good, I was forced to fall back to sworn enemy, mr XSLT:
<?xml version="1.0" encoding="utf-16"?>
<xsl:stylesheet xmlns:xsl="http://www.w3.org/1999/XSL/Transform"
                xmlns:msxsl="urn:schemas-microsoft-com:xslt"
                xmlns:var="http://schemas.microsoft.com/BizTalk/2003/var"
                exclude-result-prefixes="msxsl var s0 userCSharp" version="1.0"
                xmlns:cmn="http://somenamespace/CommonInformationInt"
                xmlns:s0="http://schemas.microsoft.com/BizTalk/2003/aggschema"
                xmlns:ns0="http://somenamespace/Person"
                xmlns:tns="http://somenamespace/Person"
                xmlns:fi="http://somenamespace/FileInfo"
                xmlns:ci="http://somenamespace/CustomerInfo"
                xmlns:userCSharp="http://schemas.microsoft.com/BizTalk/2003/userCSharp">

  <xsl:output method="xml" indent="yes"/>

  <xsl:template match="ns0:PersonInfo">
    <tns:PersonInfo
        xmlns:xsi="http://www.w3.org/2001/XMLSchema-instance"
        xmlns:xsd="http://www.w3.org/2001/XMLSchema">
      <xsl:apply-templates select="@*|node()"/>
    </tns:PersonInfo>
  </xsl:template>

  <xsl:template match="ns0:*">
    <xsl:element name="tns:{local-name()}">
      <xsl:apply-templates select="@* | node()"/>
    </xsl:element>
  </xsl:template>

  <xsl:template match="cmn:*">
    <xsl:element name="cmn:{local-name()}">
      <xsl:apply-templates select="@* | node()"/>
    </xsl:element>
  </xsl:template>

  <xsl:template match="@ns0:*">
    <xsl:attribute name="tns:{local-name()}">
      <xsl:value-of select="."/>
    </xsl:attribute>
  </xsl:template>
  <xsl:template match="node()">
    <xsl:copy>
      <xsl:apply-templates select="@* | node()"/>
    </xsl:copy>
  </xsl:template>
  <xsl:template match="@*">
    <xsl:copy/>
  </xsl:template>
</xsl:stylesheet>
I then used a pipeline component for do the transformation using the XslCompiledTransform class:
// Using a VirtualStream to limit memory resources from being used.
var outStream = new VirtualStream(VirtualStream.MemoryFlag.AutoOverFlowToDisk);

XmlTextReader xmlTextReader = new XmlTextReader(inmsg.BodyPart.Data);
XslCompiledTransform xsl = new XslCompiledTransform(false);

MemoryStream stream = new MemoryStream(Encoding.Unicode.GetBytes(Resources.[YOUR EMBEDDED XSLT DOC]));

XmlTextReader xsltTextReader = new XmlTextReader(stream);
XsltSettings settings = new XsltSettings(true, true);
xsl.Load(xsltTextReader, settings, new XmlUrlResolver());

xsl.Transform(xmlTextReader, new XsltArgumentList(), outStream);

outStream.Position = 0;
inmsg.BodyPart.Data = outStream;

inmsg.BodyPart.Charset = "utf-8";
return inmsg;
The second scenario was about sending information to a destination where the receiver of the message could not handle the entire message at once. So we had to split the message in chunks of 50.000 person records per message.
Again I turned to my sworn enemy. This time I created two templates with identical match attribute setting and a template mode attribute (“group” or “person”) depending on depending on if I was going to create a new group element or add the person element to the existing group.
I used the position() XPath function to determine the current count of Person elements, and a modular expression to determine if a group should be created.
<?xml version="1.0" encoding="utf-16"?>
<xsl:stylesheet xmlns:xsl="http://www.w3.org/1999/XSL/Transform"
xmlns:msxsl="urn:schemas-microsoft-com:xslt"
xmlns:var="http://schemas.microsoft.com/BizTalk/2003/var"
exclude-result-prefixes="msxsl var s0" version="1.0"
xmlns:ns0="http://schemas.microsoft.com/Sql/2008/05/Types/Views/dbo"
xmlns:ns1="http://p.PersonInserts"
xmlns:s0="http://schemas.microsoft.com/Sql/2008/05/ViewOp/dbo/Person">
<xsl:output omit-xml-declaration="yes" method="xml" version="1.0" />
<xsl:template match="/">
<ns1:PersonInserts>
<xsl:apply-templates select="/s0:SelectResponse" />
</ns1:PersonInserts>
</xsl:template>
<xsl:template match="/s0:SelectResponse">
<xsl:apply-templates select="//ns0:Person[position() mod 50000 = 1]" mode="group" />
</xsl:template>
<xsl:template match="//ns0:Person" mode="person">
<ns0:Person>
<ns0:customId>
<xsl:value-of select="./ns0:customId"/>
</ns0:customId>
<ns0:Identifier>
<xsl:value-of select="./ns0:Identifier"/>
</ns0:Identifier>
<ns0:firstName>
<xsl:value-of select="./ns0:firstName"/>
</ns0:firstName>
<ns0:lastName>
<xsl:value-of select="./ns0:lastName"/>
</ns0:lastName>
</ns0:Person>
</xsl:template>
<xsl:template match="//ns0:Person" mode="group">
<Group>
<xsl:apply-templates select=". | following-sibling::ns0:Person[position() < 50000]" mode="person"/>
</Group>
</xsl:template>
</xsl:stylesheet>
HTH
Mikael
Blog Post by: wmmihaa
by stephen-w-thomas | Oct 5, 2015 | Stephen's BizTalk and Integration Blog
A little over 2 years ago I released a set of PowerShell scripts for auto creating a full Multi-Server BizTalk 2013 Domain inside Azure IaaS. I spent 100’s of hours on these scripts to get them working correctly. You can view my session at TechEd 2013 US online for more details.
I have made updates to these scripts and updated them to support BizTalk 2013 R2 and SQL 2014. These scripts will automatically created a clean isolated 2 BizTalk Server 2013 R2 Domain using SQL 2014. All domain user accounts are auto created. BizTalk group and host settings are created. The only manual intervention that is needed is to log into each server and run a PowerShell script. In less than an hour you can have a fully configured BizTalk 2013 R2 Domain! And since it is scripted, you can create a clean environment from scratch anytime you need one.
Note: Running these scripts will created Virtual Machines inside Windows Azure. You will be charged for the Virtual Machines. Make sure you understand the costs before running these scripts.
Why not use an Azure Resource Manger Template for this? Great question! I tried. I spent about 40 hours trying to port these scripts into an Azure Resource Manger Template with no success. I was unable to get the BizTalk and SQL Servers to join the domain. Azure Resource Manger PowerShell has a new set of commands that I could of used, but they are in the process of changing – so for now keeping the scripts as-is seemed the best course of action.
You can review and download the updated scripts on MSDN – Automatic Multi-Server BizTalk 2013 R2 Domain Creation PowerShell Scripts for Azure IaaS. If you like the scripts please rate them with a 5-star.
To run the scripts inside Visual Studio 2013 / 2015 do the following:
- Download them from MSDN – they are inside a Visual Studio 2013 Solution
- Open Visual Studio as an Administrator and open the Solution
- Update 3 values inside variables.ps1 It is the top 3 variables in the file.
- Update the top variable inside MAIN_MASTER.ps1 It is the first variable in the script.
- Right-click on MAIN_MASTER.ps1 and select "Execute As Script". Wait about 45 minutes.
- Log into BizTalk 02, open C:\BizTalk_Provisioning\ReadMe.docx. Follow the instructions. Do not close the Remote Desktop session. The PowerShell window will open and close right away. See details below.
- Log into BizTalk 01, open C:\BizTalk_Provisioning\ReadMe.docx. Follow the instructions. Wait about 10 minutes. Note that you have to run the last command twice. See details below.
To run the scripts through PowerShell IDE dot he following:
- Download them from MSDN – they are inside a Visual Studio 2013 Solution
- Open Main_Master.ps1 and variables.ps1 inside PowerShell IDE, make sure to open PowerShell IDE as an Administrator
- Update 3 values inside variables.ps1
- Update the top variable inside MAIN_MASTER.ps1
- Run MAIN_Master.ps1 as an Administrator
- Once complete, Log into BizTalk 02, open C:\BizTalk_Provisioning\ReadMe.docx. Follow the instructions. Do not close the Remote Desktop session. The PowerShell window will open and close right away. See details below.
- Log into BizTalk 01, open C:\BizTalk_Provisioning\ReadMe.docx. Follow the instructions. Wait about 10 minutes. Note that you have to run the last command twice. See details below.
This download contains the following scripts:
- MAIN_Master.ps1 – This is the main scripts that calls all the other scripts that do all the work.
- MAIN_RemoveVM.ps1 – This script will remove and delete everything created inside the domain.
- MAIN_SaveMoney_StopAll.ps1 – This script to turn off all the VM’s in the domain. You need to update 1 value in this file to run it.
- MAIN_SpendMoney_StartAll.ps1 – This script to turn on all the VM’s in the domain. You need to update 1 value in this file to run it.
- variables.ps1 – Core variable file, you need to update 3 values in here.
- Various other helper scripts and files
Detailed Post Script Configuration Steps (this is outlined in the ReadMe.docx downloaded to each server)
On BizTalk 02:
- Once the PowerShell scripts are complete log into the BizTalk 02 server with the domain admin account.
- Open a PowerShell windows as Administrator.

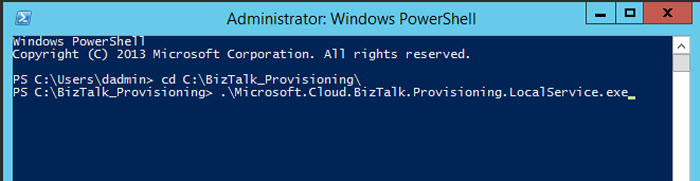
- Change directories as follows “cd c:\BizTalk_Provisioning”
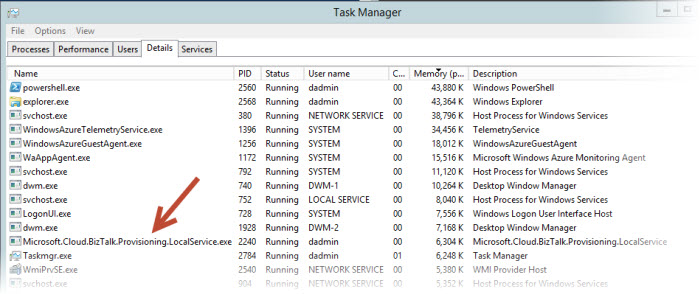
- Run the following command “MicrosoftCloudProvisioningLocalService.exe” – you should see this running as a service.
- Leave the Remote Desktop Session open and go to the BizTalk 01 Server.
On BizTalk 01:
- Once the PowerShell scripts are complete and the service is started on BizTalk 02, log into the BizTalk 01 server with the domain admin account.
- Open two PowerShell windows as Administrator.
- In the first window, change directories as follows “cd c:\BizTalk_Provisioning”
- Run the following command “MicrosoftCloudProvisioningLocalService.exe” – you should see this running as a service.
- In the second window, change directories as follows “cd c:\BizTalk_Provisioning”
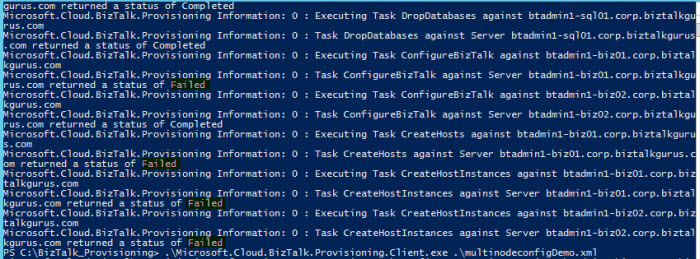
- Run the following command “.\Microsoft.Cloud.Provisioning.Client.exe .\multinodeconfigDemo.xml” – you should see several pop-up windows. This should fail.

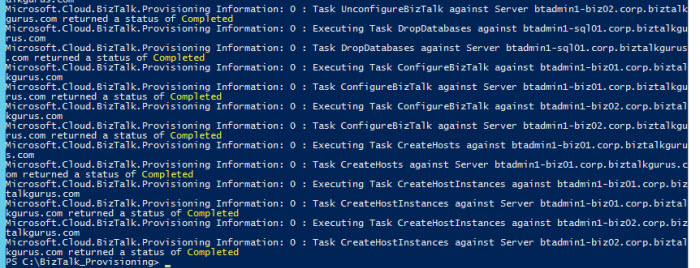
- Run the following command again “.\Microsoft.Cloud.Provisioning.Client.exe .\multinodeconfigDemo.xml” – you should see several pop-up windows again but this time it should Complete.
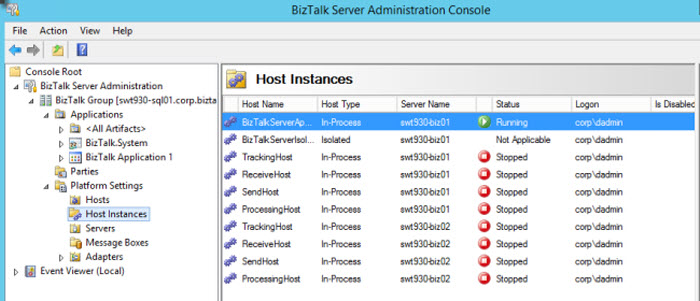
- The end result is a fully configured, multi-server BizTalk Domain inside Windows Azure!
Make sure you use the provided scripts to start, stop, and remove the artifacts created. I look forward to your feedback!