by community-syndication | Dec 26, 2012 | BizTalk Community Blogs via Syndication
In the previous post I showed how to configure the Exception Management Framework in the ESB toolkit to route BizTalk fault messages to SQL Azure. In this post I want to create a portal to show the BizTalk errors to a user. As always, there are several ways to do this. SharePoint Online seems like a nice option because it already has building blocks to connect with Azure and you don’t have to worry about authorization, credentials, etc. It’s included in Office 365 and is a cloud-based service. I’m not a SharePoint developer but on iLoveSharePoint.com already is a great article about connecting SQL Azure to SharePoint Online so let’s see if it can be converted to my example!
Steps
To use data from a SQL Azure database, you have to create an External List by using Business Connectivity Services (BCS) and Secure Store. BCS connects SharePoint to external data, and Secure Store enables user authentication for the data. By using an External List, you can display the contents of a table from SQL Azure in SharePoint Online.
The following tasks must be performed:
- Route fault messages from BizTalk to SQL Azure
- Create a Secure Store Mapping
- Create the External Content Type in SharePoint Designer 2013
- Create the External List in SharePoint Designer 2013
- Grant permissions to manage the ECT
| Route fault messages from BizTalk to SQL Azure |
See the previous post how to create the EsbExceptionDb database in SQL Azure that I’m going to use
in this example and how to route the fault messages from BizTalk to it. |
| |
| |
| Create a Secure Store Mapping |
| First map a SharePoint user or a SharePoint group to the SQL Azure account. |
| Go to the SharePoint admin center within Office 365. |
|
| |
| Click secure store. |
| In the ribbon, click New. |
|
| |
In the Target Application Settings section set the Target Application ID, Display Name, etc,.
In the Credential Fields section, enter the field names that you want to use for the user name and password of the external data system.
In the Target Application Administrators field, enter the name of a group or a list of users who
can edit this Target Application.
In the Members section, in the Members field enter the name of the group that will use the Target Application. |
|
| |
After you create the Target Application, you can enter the credentials that Secure Store uses to
access the external data. |
| Click Set Credentials. |
|
| |
In the Set Credentials for Secure Store Target Applications dialog box, enter the user name and
password of the SQL Azure account. |
|
| |
| |
| Create the External Content Type in SharePoint Designer 2013 |
| You can create an External Content Type (ECT) by using Microsoft Visual Studio, or by using Microsoft SharePoint Designer 2013. (Don’t use the SharePoint Designer 2013 Preview version!!!) |
| Start Microsoft SharePoint Designer. |
| Click the Open Site button to open the SharePoint Online site. |
|
| |
After the site opens, in the Site Objects tree on the left of the application window, click
External Content Types. |
| Select the External Content Types tab and in the ribbon click External Content Type. |
|
| |
In the External Content Type Information section of the page, change the Name and Display Name.
The Display Name is a friendly name for the ECT.
Select the hyperlink Click here to discover external data sources and define operations to open the Operation Designer page. |
|
| |
Click Add Connection to open the External Data Source Type Selection dialog box.
Select SQL Server to access the EsbExceptionDb database in SQL Azure. |
|
| |
In the SQL Server Connection dialog box:
Specify the Database Server, Database and the Name.
Select Connect with Impersonated Custom Identity.
In the Secure Store Application ID text box, type the Secure Store Application ID that stores
credentials for the target database. |
|
| |
To see a list of possible operations for the Fault table, right-click the table to open a shortcut menu.
Select a specific option such as New Read Item Operation Or just select Create All Operations. |
|
| |
Click Create All Operations to open a wizard, and then click Next.
Select Finish to accept the operations properties that you configured. |
|
| |
| |
| Create the External List in SharePoint Designer 2013 |
| On the ribbon, click Create Lists and Forms. |
|
| |
In the Create List and Forms for Faults dialog, type a meaningful name for the External List in the List Name text box.
Select a Read Item Operation from the list of Operations.
Enter the name of the SQL Azure database in the System Instance text box. |
|
| |
| |
| Grant permissions to manage the ECT |
| Set Object Permissions for the admins to manage the ECT. |
Go to the SharePoint admin center, and then click bcs.
Select Manage BDC Models and External Content Types.
Select the check box next to the name of the ECT that you just created, and then click
the Set Object Permissions.
Select Propagate permissions to all methods of this external content type.
Doing this overwrites any existing permissions. |
|
| |
Test the solution
When you now open your site and navigate to your new external list you will most likely get an error because SharePoint Online is not allowed to create an connection to SQL Azure.
|
| |
Go to the Azure Management Portal and select the EsbExceptionDb database.
Click on Manage allowed IP addresses to set the IP address of SharePoint Online. |
|
| |
Now you can navigate to your external list and view the BizTalk errors in the Fault table.
When you click on you can create a View to only see specific fields. |
|
| |
| Right click on a row and select View Item to see all the fields in the Fault table. |
|
| |
| Right click on a row and select Delete Item to delete an BizTalk error from the Fault table. |
|
| |
Conclusion
External Lists in SharePoint Online are a good choice if you only want to have a simple overview of the contents of the Fault table from SQL Azure. You do not need to have a lot of SharePoint development experience to generate the External List and the standard operations like View Item or Delete Item. It’s also very easy to create a view in SharePoint Online for the External List. If you want more functionality like resubmitting the BizTalk message, External Lists are not sufficient but in that case you can use SharePoint Apps!
Sign up for an Office 365 Developer Site:
http://msdn.microsoft.com/en-us/library/fp179924.aspx

by community-syndication | Dec 24, 2012 | BizTalk Community Blogs via Syndication
To start things off: Happy holidays! We are almost at the end of the year 2012. Before that is a fact I would like to one final story for BizTalk Community Series this year.
The story of today will be on my colleague from motion10 Sander Nefs. We have been collaborating on a few projects in the past and are currently working on a project at a big online retailer. Sander is a young and smart BizTalk professional. He has a blog on BizTalk for a few years now. From time to time he posts very useful information on BizTalk.
Sander is a BizTalk consultant at motion10. Like me he works on different BizTalk projects. He would describe his job as follows:
My job consists of involvement albeit architecting-designing/developing integration based solutions using BizTalk Server in basically all phases of projects, like POC’s, presentations, designs, implementations etc. (Unless you ask my parents, they will say I’m a PC doctor :).
Sander is usually involved in different phases of the project. During the project he more involved with the architecture, design and development. He considers this as a nice position to be in. It allows him to design and later validate that design of the solution. This helps in evaluating what works and what can be improved. In the future projects Sander plans to focus more on designing solutions with new technologies that are similar with BizTalk. In his last project he saw a lot of scenarios on how to apply patterns and components like the ESB Toolkit, which helped a lot in determining ideal solutions and capabilities of handling business requirements.
Sander has the following to say about BizTalk:
“I think BizTalk is a cool product, which allows you from day one to be productive starting. Besides that BizTalk is extremely flexible. I like to the idea of going to a customer, ask about their scenarios, lay-out the options and get into business without any headache because you know you bring a suite of useful facilities to the table which are reliable, fast, efficient and flexible, without any coding. You can develop and entire solution and now it just works, more power required. Let’s scale out, more logic required. Let’s define some rules, more logging/analysis required Let’s use BAM. The list goes on and on.”
And on his projects:
“When I was involved in integration projects before using C# and web services, a lot had to be custom developed, which is time-consuming, I’m still happy with BizTalk when a customer has a list of requirements and you have 3 days to prove that BizTalk is capable, until now. It certainly is.”
During his spare time Sander is very busy with sports. He at least swims and plays squash once a week. Tries other sports and is in for a challenge. For instance last summer he tried to master ’staying on a Wakeboard for a full lap’ at a cable runway. He succeeded and is determined to do it again next summer. Besides sports he likes to have a good time in the weekend like going out for drinks (e.g. Belgium caf%u00e9), clubbing, see a movie etc.
A final quote from Sander:
“To all readers I would like to say, thanks for taking the time to get better, read about experiences from others and I hope that you will be inspired to share your knowledge as well, as experience is what helps in getting better, quicker and making it easier go really dive into problems and solve them. I’m trying to share my experiences with the purpose to help myself and others and I hope that others will follow up on this.”
I would like to thank Sander for his time and contributions to the community.
Cheers, Steef-Jan
by community-syndication | Dec 23, 2012 | BizTalk Community Blogs via Syndication
I was recently watching an episode of the Cloud Cover show where Abhishek Lal was talking about some of the recent features that are available in SDK 1.8. One of the features that stood out for me was Queue to Queue transfers. A Queue to Queue transfer allows for a publisher to push content to a Queue. Next, the Queue that just received the message can now push it out to another Queue automatically.
This new capability supports a couple design patterns:
- Fan In – Where you have multiple systems publishing messages and you want to reduce the receiving endpoint surface down to a smaller number.
- Fan Out – Where you have a single source message that you want to disseminate to more parties
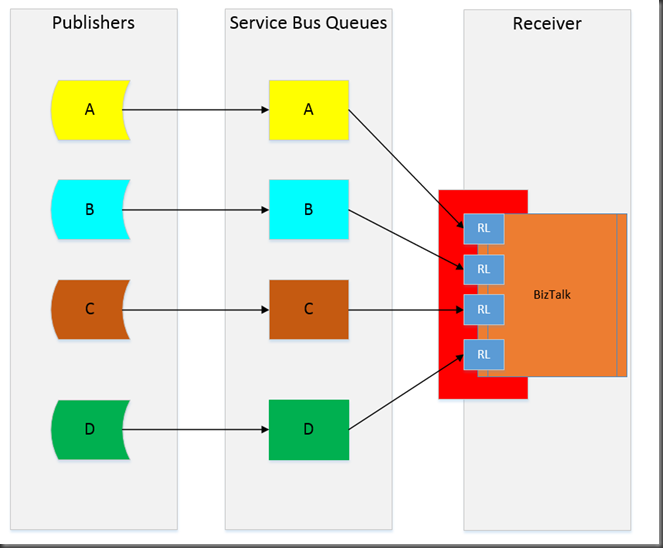
The focus of this post is the Fan In scenario. The diagram below describes the messaging pattern that we would like to enforce. In this case we have 4 publishers. Let’s pretend these are retailers who are now requesting more supply of a particular product. If we want isolation between publishers then we would create a queue for each Publisher. However, if we are interested in order delivery we now have race conditions that exist on the Receiver side. Since this is a BizTalk Blog, BizTalk is acting as my Receiver. Since we have 4 queues with 4 unique URIs this translates into 4 BizTalk Receive Locations (the blue RL boxes below). We do not have any control over when and how those messages are received. In my opinion this problem gets worse if we are building our own .Net client that is checking each queue looking for new messages. Even if we are trying to be “fair” about the way in which we check the queues for new messages we don’t have any assurances of in order delivery.
Let’s make our lives easier and let the Service Bus maintain the order of messages through Queue to Queue transfers and have a single endpoint that we need to consume from. It will also simplify our BizTalk configuration as we will only need 1 Receive Location.

Solution
Within Visual Studio I am going to create a Solution that has 3 C# console applications.

QueueToQueuePublisher Project
The core of the overall solution is the QueueToQueuePublisher project. Within it there are two classes:
- DataContracts.cs – contains our class that we will use as our PurchaseOrder
- Program.cs – is where we will create our Queues and establish our Queue to Queue forwarding.

DataContracts Class
If we further examine the DataContracts class we will discover the following object:
namespace QueueToQueuePublisher
{
public class PurchaseOrder
{
public string ProductID { get; set; }
public int QuantityRequired { get; set; }
public string CompanyID { get; set; }
}
}
Program Class
In Program.cs things get a little more interesting
using System;
using System.Collections.Generic;
using Microsoft.ServiceBus;
using Microsoft.ServiceBus.Messaging;
namespace QueueToQueuePublisher
{
public class Program
{
const string CommonQueueName = “CommonQueue”;
const string PubAQueueName = “PubAQueue”;
const string PubBQueueName = “PubBQueue”;
const string ServiceNamespace = “<your_namespace>”;
const string IssuerName = “owner”;
const string IssuerKey =”<your_key>”;
static void Main(string[] args)
{
TokenProvider credentials = TokenProvider.CreateSharedSecretTokenProvider(Program.IssuerName, Program.IssuerKey);
Uri serviceUri = ServiceBusEnvironment.CreateServiceUri(“sb”, Program.ServiceNamespace, string.Empty);
try
{
//*************************************************************************************************
// Management Operations
//**************************************************************************************************
NamespaceManager namespaceClient = new NamespaceManager(serviceUri, credentials);
if (namespaceClient == null)
{
Console.WriteLine(“\nUnexpected Error: NamespaceManager is NULL”);
return;
}
Console.WriteLine(“\nCreating Queue ‘{0}’…”, Program.CommonQueueName);
// Create Queue if it doesn’t exist.
//This Queue must exist prior to another
//Queue forwarding messages to it
if (!namespaceClient.QueueExists(Program.CommonQueueName))
{
namespaceClient.CreateQueue(Program.CommonQueueName);
}
// Create Publisher A’s Queue if it doesn’t exist
if (!namespaceClient.QueueExists(Program.PubAQueueName))
{
QueueDescription qd = new QueueDescription(Program.PubAQueueName);
//This is where we establish our forwarding
qd.ForwardTo = Program.CommonQueueName;
namespaceClient.CreateQueue(qd);
}
// Create Publisher B’s Queue if it doesn’t exist
if (!namespaceClient.QueueExists(Program.PubBQueueName))
{
QueueDescription qd = new QueueDescription(Program.PubBQueueName);
{
//This is where we establish our forwarding
qd.ForwardTo = Program.CommonQueueName;
namespaceClient.CreateQueue(qd);
};
}
}
catch (Exception ex)
{
Console.WriteLine(ex.ToString());
}
}
}
}
Within this class, the purpose is to:
- Create the Common Queue, if it does not already exist.
- If Publisher A’s Queue does not exist, create a new Queue Description and include the ForwardTo directive that will forward messages from the Publisher A Queue to the Common Queue. We will then use this Queue Description to create the Publisher A Queue.
- If Publisher B’s Queue does not exist, create a new Queue Description and include the ForwardTo directive that will forward messages from the Publisher B Queue to the Common Queue. We will then use this Queue Description to create the Publisher B Queue.
The Program.cs class that is part of this project only needs to run once in order to setup and configure our queues.
Publisher A Project
The purpose of this Project is very simple. We want to create an instance of a Purchase Order and publish this message to our Publisher A Queue.
using System;
using System.Collections.Generic;
using System.Linq;
using System.Text;
using System.Threading.Tasks;
using Microsoft.ServiceBus;
using Microsoft.ServiceBus.Messaging;
using QueueToQueuePublisher;
using System.Runtime.Serialization;
namespace PublisherA
{
class Program
{
const string SendQueueName = “pubaqueue”;
const string ServiceNamespace = “<your_namespace>”;
const string IssuerName =”owner”;
const string IssuerKey = “<your_key>”;
static void Main(string[] args)
{
//***************************************************************************************************
// Get Credentials
//***************************************************************************************************
TokenProvider credentials = TokenProvider.CreateSharedSecretTokenProvider (Program.IssuerName, Program.IssuerKey);
Uri serviceUri = ServiceBusEnvironment.CreateServiceUri(“sb”, Program.ServiceNamespace, string.Empty);
MessagingFactory factory = null;
try
{
PurchaseOrder po = new PurchaseOrder();
po.CompanyID = “PublisherA”;
po.ProductID = “A1234”;
po.QuantityRequired = 300;
factory = MessagingFactory.Create(serviceUri, credentials);
QueueClient myQueueClient = factory.CreateQueueClient(Program.SendQueueName);
BrokeredMessage message = new BrokeredMessage(po, new DataContractSerializer(typeof(PurchaseOrder)));
Console.WriteLine(“Publisher A sending message”);
myQueueClient.Send(message);
}
catch(Exception ex)
{
Console.WriteLine(ex.ToString());
}
}
}
}
Publisher B Project
This project is pretty much a carbon copy of the Publisher A Project with the difference being that we are going to send messages to our Publisher B Queue instead of the Publisher A Queue. I have included this project for completeness.
using System;
using System.Collections.Generic;
using System.Linq;
using System.Text;
using System.Threading.Tasks;
using Microsoft.ServiceBus;
using Microsoft.ServiceBus.Messaging;
using QueueToQueuePublisher;
using System.Runtime.Serialization;
namespace PublisherA
{
class Program
{
const string SendQueueName = “pubbqueue”;
const string ServiceNamespace = “<your_namespace>”;
const string IssuerName = “owner”;
const string IssuerKey = “<your_key>”;
static void Main(string[] args)
{
//***************************************************************************************************
// Get Credentials
//***************************************************************************************************
TokenProvider credentials = TokenProvider.CreateSharedSecretTokenProvider(Program.IssuerName, Program.IssuerKey);
Uri serviceUri = ServiceBusEnvironment.CreateServiceUri(“sb”, Program.ServiceNamespace, string.Empty);
MessagingFactory factory = null;
try
{
PurchaseOrder po = new PurchaseOrder();
po.CompanyID = “PublisherB”;
po.ProductID = “B1234”;
po.QuantityRequired = 300;
factory = MessagingFactory.Create(serviceUri, credentials);
QueueClient myQueueClient = factory.CreateQueueClient(Program.SendQueueName);
BrokeredMessage message = new BrokeredMessage(po, new DataContractSerializer(typeof(PurchaseOrder)));
Console.WriteLine(“Publisher B sending message”);
myQueueClient.Send(message);
}
catch (Exception ex)
{
Console.WriteLine(ex.ToString());
}
}
}
}
BizTalk
From a BizTalk perspective we are going to keep this very simple. We will simply create a Send Port Subscription and write a copy of any message that is retrieved from the Common Service Bus Queue to disk.
In order to configure a Send Port Subscription we need to first create a Receive Port and Receive Location. This Receive Location will connect to our ServiceBus Namespace and will be looking for messages form the CommonQueue only. As you may recall the messages that are sent to the individual Publisher A and B Queues will be forwarded to this Common Queue.
Also note, since I am not deploying any Schemas we want to use the PassThruReceive pipeline. If you specify XMLReceive then BizTalk will be looking for a schema that doesn’t exist.

Our Send Port will consist of using the FILE Adapter to write our messages to the local file system.

In order for our Send Port Subscription to work we do need to create a Filter based upon our Receive Port Name.

At this point we can enable our BizTalk Application.
Testing
In order to test our application we do need to make sure that the QueueToQueuePublisher console application is run. This will create our common queue and our two publisher queues. After running this application we should see the following within our namespace.

If we want to test our Queue To Queue forwarding we can simply create a test message in our pubaqueue and then receive the test message from our commonqueue.


Now that our Queue configuration has been verified we can run an instance of our PublisherA console application.

If we check our file folder that our send port is writing to we should see a new file has been written.

We can now perform the same actions with PublisherB.


Conclusion
As you can see the Queue to Queue forwarding is a pretty neat feature. We can use it for Fan In, as in our scenario, messaging scenarios that forces Service Bus to worry about in order delivery and simplifies a Receiver’s endpoint surface. Arguably it creates more configuration in the cloud so there may be a bit of a trade off in that regard.
Currently the only way to configure the ForwardTo property is through the Management APIs. There is currently no GUI that allows you to take care of this. But, without having any private knowledge, I am sure that this is something that Microsoft will address in a future update.
Something else to be aware of is that BizTalk has no understanding of ForwardTo. Nor would any other client of the Service Bus. This “configuration” is occurring outside of client configurations which is the way it should be. Any perceived complexities that exist should be abstracted away from systems that are communicating with Service Bus.


