by community-syndication | Oct 26, 2012 | BizTalk Community Blogs via Syndication
I have seen a lot of people searching for tools to simulate high CPU, Memory and Disk issues. Here are the tools I use
Simulate High CPU Usage
CPUSTRES.EXE is a tool you can use to simulate High CPU usage by an user mode process. Its available for download from the Windows Sysinternals website.
Here I have used CPUSTRES to simulate 50% CPU usage.
CPUSTRES also has options to change the priority of the threads it spawns.
Simulate High Memory Usage
To simulate high memory usage you can use the TestLimit tool from the Sysinternals website. TestLimit can be used to simulate a variety of memory leak issues. Here I am using TestLimit to reduce the Available memory on my machine.
Simulate High Disk Activity
SQLIO is a tool for benchmarking the I/O capacity of a given storage system. It can simulate sequential and random I/O and is usually used to test storage systems for SQL Server installations.
SQLIO is an useful tool that you can use to simulate high disk activity.
Simulate High Disk Usage
Another useful tool to simulate these issues is consume.exe. It ships with Windows SDK and can be used to consume resources like CPU, memory and disk. Here I am using consume.exe to simulate low disk space issues.
NOTE : Use these tools with extreme caution as they can freeze the machine you run them on and you might end up rebooting the machine.
Blog Post by: Shinva
by community-syndication | Oct 26, 2012 | BizTalk Community Blogs via Syndication
I fell into this trap earlier in the week with a mistake I made when configuring a service to send and listen on the azure service bus and I thought it would be worth a little note for future reference as I didnt find anything online about it. After configuring everything when I ran my code sample I was getting the below error.
WebHost failed to process a request.
Sender Information: System.ServiceModel.ServiceHostingEnvironment+HostingManager/28316044
Exception: System.ServiceModel.ServiceActivationException: The service ‘/——-/BrokeredMessageService.svc’ cannot be activated due to an exception during compilation. The exception message is: Generic: There was an authorization failure. Make sure you have specified the correct SharedSecret, SimpleWebToken or Saml transport client credentials.. —> Microsoft.ServiceBus.AuthorizationFailedException: Generic: There was an authorization failure. Make sure you have specified the correct SharedSecret, SimpleWebToken or Saml transport client credentials.
at Microsoft.ServiceBus.RelayedOnewayTcpClient.ConnectRequestReplyContext.Send(Message message, TimeSpan timeout, IDuplexChannel& channel)
at Microsoft.ServiceBus.RelayedOnewayTcpListener.RelayedOnewayTcpListenerClient.Connect(TimeSpan timeout)
at Microsoft.ServiceBus.RelayedOnewayTcpClient.EnsureConnected(TimeSpan timeout)
at Microsoft.ServiceBus.Channels.CommunicationObject.Open(TimeSpan timeout)
at Microsoft.ServiceBus.Channels.RefcountedCommunicationObject.Open(TimeSpan timeout)
at Microsoft.ServiceBus.RelayedOnewayChannelListener.OnOpen(TimeSpan timeout)
at Microsoft.ServiceBus.Channels.CommunicationObject.Open(TimeSpan timeout)
at System.ServiceModel.Dispatcher.ChannelDispatcher.OnOpen(TimeSpan timeout)
at System.ServiceModel.Channels.CommunicationObject.Open(TimeSpan timeout)
at System.ServiceModel.ServiceHostBase.OnOpen(TimeSpan timeout)
at System.ServiceModel.Channels.CommunicationObject.Open(TimeSpan timeout)
at Microsoft.ServiceBus.SocketConnectionTransportManager.OnOpen(TimeSpan timeout)
at Microsoft.ServiceBus.Channels.TransportManager.Open(TimeSpan timeout, TransportChannelListener channelListener)
at Microsoft.ServiceBus.Channels.TransportManagerContainer.Open(TimeSpan timeout, SelectTransportManagersCallback selectTransportManagerCallback)
at Microsoft.ServiceBus.SocketConnectionChannelListener`2.OnOpen(TimeSpan timeout)
at Microsoft.ServiceBus.Channels.CommunicationObject.Open(TimeSpan timeout)
at Microsoft.ServiceBus.Channels.CommunicationObject.Open(TimeSpan timeout)
at System.ServiceModel.Dispatcher.ChannelDispatcher.OnOpen(TimeSpan timeout)
at System.ServiceModel.Channels.CommunicationObject.Open(TimeSpan timeout)
at System.ServiceModel.ServiceHostBase.OnOpen(TimeSpan timeout)
at System.ServiceModel.Channels.CommunicationObject.Open(TimeSpan timeout)
at System.ServiceModel.ServiceHostingEnvironment.HostingManager.ActivateService(String normalizedVirtualPath)
at System.ServiceModel.ServiceHostingEnvironment.HostingManager.EnsureServiceAvailable(String normalizedVirtualPath)
— End of inner exception stack trace —
at System.ServiceModel.ServiceHostingEnvironment.HostingManager.EnsureServiceAvailable(String normalizedVirtualPath)
at System.ServiceModel.ServiceHostingEnvironment.EnsureServiceAvailableFast(String relativeVirtualPath)
Process Name: w3wp
Process ID: 8056
As recommended by the error message I checked everything about the application configuration and also the keys and eventually I found the problem.
When I set the permissions in the ACS rule group I had copied and pasted the claim name fornet.windows.servicebus.actionfrom the Azure portal and hadnt spotted the <space> character on the end of it like you sometimes pick up when copying text in the browser. This meant that the listen and send permissions were not setup correctly which is why (as you would expect) my two applications could not connect to the service bus.
So lesson learnt here, if you do copy and paste into the ACS rules just be careful you dont leave a space on the end of anything otherwise it will be difficult to spot that its configured incorrectly
by community-syndication | Oct 25, 2012 | BizTalk Community Blogs via Syndication
Great news – Jurgen
Willis and his team have worked hard to bring Microsoft’s
first V1.0 WF Workflow Hosting Manager.
It runs both as part of Windows Server and within Azure VMs also. It also is
used by the SharePoint team in 2013, so learn it once and you’ll get great mileage
out of it.
(I’m yet to put it through serious paces)
Some links to help you out
What
is it?
WF
Mgr 1.0 – Code Samples
The following main areas for WF improvements in .NET 4.5: (great MSDN
magazine article)
-
Workflow Designer enhancements
-
C# expressions
-
Contract-first authoring of WCF Workflow Services
-
Workflow versioning
-
Dynamic update
-
Partial trust
-
Performance enhancements
Specifically for WorkflowManager there’s integration with:
1. Windows Azure Service Bus.
So all in all a major improvement and we’ve now got somewhere serious to host our
WF Services. If you’ve ever gone through the process of creating your own WF host,
you’ll appreciate it’s not a trivial task especially if you want some deeper functionality
such as restartability and fault tolerance.
but. if you want to kick off a quick WF to be part of an install script, evaluate
an Excel spreadsheet and set results, then hosting within the app, spreadsheet is
fine.
Let’s go through installation:
Download from here
Workflow_Manager_BPA.msi = Best Practices Analyser.
WorfklowClient = Client APIs, install on machines that want to communicate to WF Manager.
WorkflowManager = the Server/Service Component.
WorkflowTools = VS2012 plugin tools – project types etc.
And we’ll grab the 4 or you can you the Web Platform Installer
The Workflow Client should install fine on it’s own (mine didn’t
as I had to remove some of the beta bits that were previously installed).
Installing the Workflow Manager – create a farm, I went for a Custom
Setting install below, just to show you the options.
As you scroll down on this page, you’ll notice a HTTP Port – check
the check box to enable HTTP communications to the Workflow Manager.
This just makes it easier if we need to debug anything across the wire.
Select NEXT or the cool little Arrow->
On Prem Service Bus is rolled into this install now – accepting defaults.
Plugin your Service Accounts and passphrase (for Farm membership and an encryption
seed).
Click Next -> to reveal.
As with the latest set of MS Products a cool cool feature is the ’Get PowerShell
Commands’ so you can see the script behind your UI choices (VMM manager,
SCCM 2012 has all this right through). BTW – passwords don’t get exported in the script,
you’ll need to add.
Script Sample:
# To be run in Workflow Manager PowerShell
console that has both Workflow Manager and Service Bus installed.
# Create new SB Farm
$SBCertificateAutoGenerationKey = ConvertTo-SecureString -AsPlainText -Force
-String ‘***** Replace with Service Bus Certificate Auto-generation key ******’ -Verbose;
New-SBFarm -SBFarmDBConnectionString ‘Data
Source=BTS2012DEV;Initial Catalog=SbManagementDB;Integrated Security=True;Encrypt=False’
-InternalPortRangeStart 9000 -TcpPort 9354 -MessageBrokerPort 9356 -RunAsAccount ‘administrator’
-AdminGroup ‘BUILTIN\Administrators’ -GatewayDBConnectionString ‘Data Source=BTS2012DEV;Initial
Catalog=SbGatewayDatabase;Integrated Security=True;Encrypt=False’ -CertificateAutoGenerationKey
$SBCertificateAutoGenerationKey -MessageContainerDBConnectionString ‘Data Source=BTS2012DEV;Initial
Catalog=SBMessageContainer01;Integrated Security=True;Encrypt=False’ -Verbose;
# To be run in Workflow Manager PowerShell
console that has both Workflow Manager and Service Bus installed.
# Create new WF Farm
$WFCertAutoGenerationKey = ConvertTo-SecureString -AsPlainText -Force
-String ‘***** Replace with Workflow Manager Certificate Auto-generation key ******’
-Verbose;
New-WFFarm -WFFarmDBConnectionString ‘Data
Source=BTS2012DEV;Initial Catalog=BreezeWFManagementDB;Integrated Security=True;Encrypt=False’
-RunAsAccount ‘administrator’ -AdminGroup ‘BUILTIN\Administrators’ -HttpsPort 12290
-HttpPort 12291 -InstanceDBConnectionString ‘Data Source=BTS2012DEV;Initial Catalog=WFInstanceManagementDB;Integrated
Security=True;Encrypt=False’ -ResourceDBConnectionString ‘Data Source=BTS2012DEV;Initial
Catalog=WFResourceManagementDB;Integrated Security=True;Encrypt=False’ -CertificateAutoGenerationKey
$WFCertAutoGenerationKey -Verbose;
# Add SB Host
$SBRunAsPassword = ConvertTo-SecureString -AsPlainText -Force -String
‘***** Replace with RunAs Password for Service Bus ******’ -Verbose;
Add-SBHost -SBFarmDBConnectionString ‘Data
Source=BTS2012DEV;Initial Catalog=SbManagementDB;Integrated Security=True;Encrypt=False’
-RunAsPassword $SBRunAsPassword -EnableFirewallRules $true -CertificateAutoGenerationKey
$SBCertificateAutoGenerationKey -Verbose;
Try
{
# Create new SB Namespace
New-SBNamespace -Name ‘WorkflowDefaultNamespace’ -AddressingScheme
‘Path’ -ManageUsers ‘administrator’,’mickb’ -Verbose;
Start-Sleep -s 90
}
Catch [system.InvalidOperationException]
{
}
# Get SB Client Configuration
$SBClientConfiguration = Get-SBClientConfiguration -Namespaces ‘WorkflowDefaultNamespace’
-Verbose;
# Add WF Host
$WFRunAsPassword = ConvertTo-SecureString -AsPlainText -Force -String
‘***** Replace with RunAs Password for Workflow Manager ******’ -Verbose;
Add-WFHost -WFFarmDBConnectionString ‘Data
Source=BTS2012DEV;Initial Catalog=BreezeWFManagementDB;Integrated Security=True;Encrypt=False’
-RunAsPassword $WFRunAsPassword -EnableFirewallRules $true -SBClientConfiguration
$SBClientConfiguration -EnableHttpPort -CertificateAutoGenerationKey $WFCertAutoGenerationKey
-Verbose;
Upon completion you should see a new IIS Site. with the ’management ports’ of in
my case HTTPS
Let’s Play
Go and grab the samples and have a play – make sure you run the samples as the user
you’ve nominated as ’Admin’ during the setup – for now.
Blog Post by: Mick Badran
by community-syndication | Oct 24, 2012 | BizTalk Community Blogs via Syndication
I have been doing a lot of work with NodeJS and Windows Azure lately. I am planning to write a series of blog post about the techniques required build NodeJS applications that leverage different Windows Azure components. I am also planning on deep diving…(read more)
Blog Post by: gsusx
by community-syndication | Oct 24, 2012 | BizTalk Community Blogs via Syndication
When creating BizTalk orchestrations, we also have some building blocks available to do exception handling. In this blog I’ll try to give a very brief explanation of the available building blocks for your orchestration. I won’t describe everything in detail, because this would lead us to far (and would give one massive blog post).
For exception handling in orchestration there are 3 shapes available:
- Throw Exception
- Scope
- Compensate
I want go in much details for the Scope and Compensate shapes. If you need more detailed description on how Exception handling can be used with these 2 shapes I would suggest reading this blog from Richard Seroter. And if this still doens’t answers all of your questions, let me know… than I can devote another post with a more detailed explanation on some aspects of the exception handling in orchestrations.
Throw Exception
Firstly we have the ‘Throw Exception’-shape. this one is the simplest of all shapes for exception handling.
Frankly, it does nothing more than it’s name suggests… It just throws an Exception, nothing more fancy. To achieve this you’ll need to follow these three simple steps:
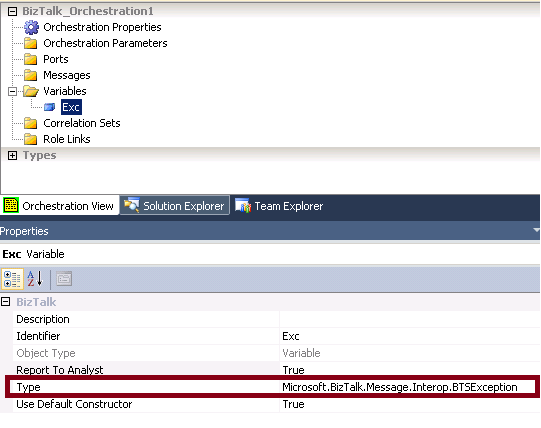
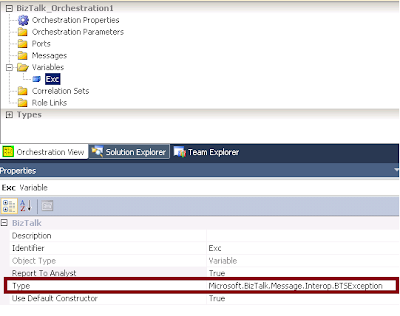
- Define a variable with the type set to any Exception class you prefer. In below example I’ve created an exception variable of type Microsoft.Biztalk.Message.Interop.BTSException
Note: The Report To Analyst property in the screenshot exists on many shapes. The property however has no influence on the behavior of your orchestration. I merely is a property used to integrate withe the Orchestration Designer for Business Analysts (ODBA) Visio plugin. If set to false, that shape will be considered as a low level detail that won’t be visible in the Visio Designer.
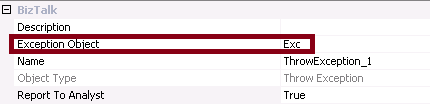
- Instantiate the variable and set any values according to the occured error
- Now use the Throw Exception shape and configure it ro use the Exception object you’ve created
Scope
Scopes are used for three reasons
- to configure transaction (long running or atomic)
- to handle exceptions
- to trigger compensating logic
For more info on the transaction types, I’ll refer to this blog from Sandro Pereira.
A scope shape can have one or more Exception handling blocks and/or one Compensation Block. The Transaction type you’ve chosen for your scope will define which of these blocks can be added. An atomic scope can only have a compensation block, and a scope configured with the transaction type non can only have an Exception block. While a long running scope can have both blocks.
For an overview of the possibilities, check the below screenshot.
Note that there could be more than one Exception block, but only one Compensation block added to a Scope
Exception handling block
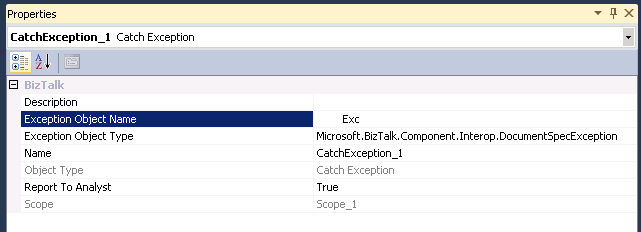
The Exception handling block is used to catch exceptions that occur inside the scope the block belongs to. The Exception Object Type in the properties of the exception block will define which Exceptions types will be handled by this Exception block.
When an exception occurs, the engine will check for the closest exception block that can handle this type of exception. The consideration of which exception block will be called is determined sequentially, just like in .NET. If no suitable exception handler is found, the default exception handles is triggered, and this means that the compensation blocks for all nested scopes will be called, after which the exception is rethrowed and the orchestration will become suspended.
Compensation block
Compensation is a way to correct or undo logical piece of work that have previously committed. An exception can occur in the orchestration afther succesfully executing all logic in the scope. In this case, the process might be in a state where it is logically incorrect. So the action already performed in a transactional scope need to be compensated… this can be achieved using a compensation block
If no compensation block is added, the default compensation will be performed. this means calling all compensation blocks of the nested scopes, starting with the most recently completed ones, just as with the default exception handler.
Compensate
The compensate shape can only be used inside of an exception handler. The explicit use of this compensate shape, allows us to specify the order of compensation execution ourselfs. So this can be used in cases the default order (starting from te most recently completed ones and working its way back) doesn’t fit.
1 compensate shape can only trigger 1 compensation block of a transaction. So the order must be defined using multiple compensate shapes, calling the compensation blocks in the desired order.
Remarks
by community-syndication | Oct 24, 2012 | BizTalk Community Blogs via Syndication
For a recent project I needed to send messages to BizTalk through an ASP.NET application. This blog post contains a streaming approach using the net.tcp WCF binding. Code and screenshots provided.
by community-syndication | Oct 23, 2012 | BizTalk Community Blogs via Syndication
Published By: Bill Chesnut
Recently Microsoft has added the Service Bus to the Preview (new) Portal and has added several new features, I will provide you with an introduction to the portal and the new features.
In the portal you can see all of the Service Bus name spaces that I have defined, which subscription they belong to and the location
If I select one of the name spaces, I can see all the Queues, Topics and Relays under that namespace, including the type, current size and max size
When I open a topic, you are presented the the Dashboard, showing the size and incoming messages, I also see some details about the topic down the right side, including “View Connection String”, the connection string now seem like the preferred method to connect to the service bus.
When I click on the “View Connection String” link, I am presented with the connection string, similar to the SQL Databases. I could then copy this string and use it to connect to my Service Bus Namespace.
When I select the monitor tab, I see more details about the size and incoming message activity, at the bottom of this screen there is a button to “Add Metrics” to see additional information
When I click on the “Add Metrics” button, here are the metrics I can add
if I expand the individual metrics I get a list of the subscriptions, this topic has 600 subscriptions, but there does not seem to be a way to scroll this list, there is a search feature on the title line.
When I select the Subscriptions tab, I get a list of all of the subscriptions, including the message count, which in the past has been difficult and time consuming to get. There is also a Create button, to create a new subscription
When I click the “Create” button I am present with the following 2 screen to create a subscription, but it does not seem to have anywhere to add the filter
The last one that I will look at is the Relay
When I select the Relays tab, you are presented with this screen, monitoring of the Relays are possible but you cannot create them from the Portal
Well I hope that this give you an introduction to the capabilities now available in the Preview Portal for working with the Azure Service Bus Queues, Topics and Relays.
More …
Tags: Service Bus,Azure,Preview Portal
by stephen-w-thomas | Oct 22, 2012 | Stephen's BizTalk and Integration Blog
The Windows Azure Storage API now have the ability to do cross account, asynchronous blob transfers. This means it is no longer required to download the blob in order to upload it to a different Windows Azure account. You can read all about this here.
Over the past few weeks I have been working with the Windows Azure Virtual Machine feature that is currently in preview mode. I talked in a past blog post and video about using the Gallery to create a BizTalk 2010 R2 CTP Virtual Machine.
The HUGE value I see here is we now have the ability to quickly and easily create Virtual Machines using a given Image or Virtual Hard Drive (VHD). We can even create our own custom Images that can be quickly distributed out to a large development team. VHDs created in Windows Azure can be downloaded and used locally and local VHDs can be uploaded to run inside Window Azure Virtual Machines. Related to that, keep in mind the bandwidth is charged for downloads and that it can take 3 hours or more to download a 30 GB VHD.
I have worked on several large scale development projects in the past and we have had full teams of people who in the beginning were responsible for creating and maintaining the developer image not to mention the internal IT resources required to support, for a limited amount of time, sometimes hundreds of new virtual machines. Add in the “corporate red tape” that is involved with getting new hardware and setting up a new Virtual Machine resulting in massive time (i.e. money) costs to projects.
Some of that time and money can now be saved with Windows Azure Virtual Machines!
Below I am going to walk through the steps in creating a custom, standalone VHD to be shared with developers for local, isolated development. I am creating a VHD and not an Image since this is an isolated Virtual Machine I do not need to join a Domain.
Fist off, why create an Image vs. a Disk (VHD). Shan McArthur has a great blog post on the difference between an Image and a Disk. To sum it up:
Windows Azure Image – is a syspreped version of Windows ready to be setup like a brand new install. You get to create a new Administrator password and you get a new machine name. This would be OK to connect to a domain but ensure the image does not have Machine Name specific items configured, like BizTalk. Creating an Image would require more work for the end user once they got it.
Details on how to create a custom image can be found here.
CRITICAL – I have found that once you sysprep and Capture an Image from an existing VHD, that VHD is now unusable. Kind of makes sense, since you did just sysprep it. You can always re-create a new Virtual Machine by using the new Image you just created.
Windows Azure Disk – is a an exact copy of a Virtual Hard Drive. The Administrator password is the same and so is the machine name. This works well for machines that will run as Stand Alone, not connected to a domain. This would work well to share an already running BizTalk VHD that is fully configured and ready for development.
If we wanted something connected to a domain we would go the Image route since they are syspreped. In this case, I just want to give someone a quick, working version of BizTalk 2010 ready to go so I am going with a Windows Azure Disk (VHD) route.
CRITICAL – The only reliable and repeatable way I have found to copy an Image or VHD is to ensure it does not have any existing leases. A lease is held when you create a Virtual Machine Image or Azure Disk from a VHD in Cloud Storage. Ensure you delete these Images and Disks before copying the blob – do not delete the underlying blob storage. Sometimes, these will get orphaned and you need to remove them using PowerShell. A assume these are all issues related to being a Preview Feature and will be resolved soon.
Below are the steps to create and transfer a VHD to another user. For simplicity, the user will be in the same data center. Cross data center copies are supported, they just take longer.
To help with the cross account copy, I am using my custom tool available here: Windows Azure Virtual Hard Disk (blob storage) Cross Account Copy, Lease Break, and Management Tool
Step 1: Create your Master VHD.
Start with using a custom or prebuild Image to create a new Virtual Machine. Once the Machine is setup like you wish, shut it down and delete the Virtual Machine. Then, inside the Portal Delete the Disk. Ensure you select the “Retain The Associated VHD” option to keep the underlying blob storage of the VHD.
Step 2: Set up the Source and Destination Windows Azure Storage Account Details in the Helper Tool. Download the tool here.
To enable more advanced features, set EnableRESTApi to True and set the Certificate Path and Source Windows Azure Subscription ID.
<!-- Enter the Source Storage Account Details here. -->
<add key="SourceStorageConnection" value="DefaultEndpointsProtocol=https;AccountName=NAME;AccountKey=KEY" />
<!-- Uncomment and Enter the Destination Storage Account Details here. To work with only one account leave commented out.
To copy to the same store set this to the same as Source Account above. -->
<add key="DestinationStorageConnection" value="DefaultEndpointsProtocol=https;AccountName=NAME;AccountKey=KEY" />
<!-- Select to enable REST API Advanced Features - Subscription ID and Certificate are Required for this feature. true | false -->
<add key='EnableRESTApi' value='true' />
<!-- Enter the full path to the -->
<add key='CertificatePath' value='C:\DemoFolder\AzureCerts\Cert.cer'/>
<!-- Your Windows Azure Subscription ID -->
<add key='SourceSubscriptionID' value='GUID' />
.csharpcode, .csharpcode pre
{
font-size: small;
color: black;
font-family: consolas, “Courier New”, courier, monospace;
background-color: #ffffff;
/*white-space: pre;*/
}
.csharpcode pre { margin: 0em; }
.csharpcode .rem { color: #008000; }
.csharpcode .kwrd { color: #0000ff; }
.csharpcode .str { color: #006080; }
.csharpcode .op { color: #0000c0; }
.csharpcode .preproc { color: #cc6633; }
.csharpcode .asp { background-color: #ffff00; }
.csharpcode .html { color: #800000; }
.csharpcode .attr { color: #ff0000; }
.csharpcode .alt
{
background-color: #f4f4f4;
width: 100%;
margin: 0em;
}
.csharpcode .lnum { color: #606060; }
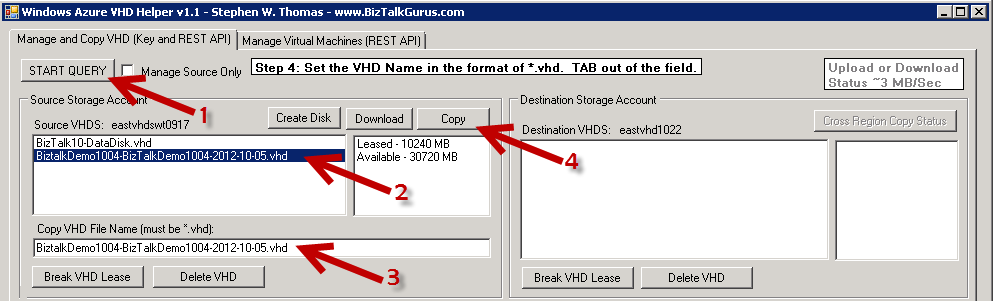
Step 3: Select the VHD to Copy to the Destination Storage Account.
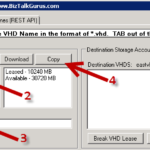
Launch the Helper Tool. Click on START QUERY on the top left. Select the VHD you want to copy. Note that only Available (i.e. blobs without a lease) can be copied with the tool. Rename the destination VHD if desired. Click on Copy.
If your VHD is Leased, that means it is used by an Azure Disk and could be used by a running Virtual Machine. Or it could be a known issue that leaves the VHD in a stuck state. If you know for sure the VHD is not used by an Azure Disk or Virtual Machine, you can select the VHD blob and click Break VHD Lease. You also have the ability to Delete or Download an VHD if you wish all using this Helper Tool.
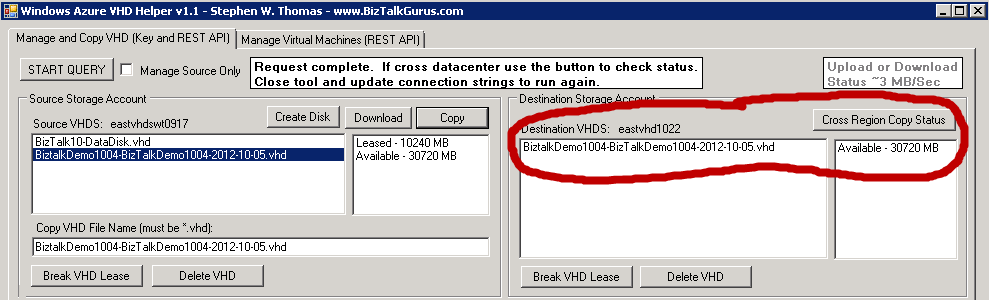
Step 4: See the results in the Destination Storage Account
At this point, if the copy was within the same datacenter it should take only a few seconds. A cross datacenter copy takes much longer. Once you have the VHD, create an Azure OS Disk inside the Portal and use that Disk as the OS Disk of a new Virtual Machine. Just make sure you know the log in account details for the VHD.
Step 5: Enjoy using your new VHD.
If you gave someone else your Azure Storage Key information make sure you regenerate it for security reasons.
Below is the code that is used to make the copy. This is using 1.7.1 of the Azure Storage APIs. At present, I am still working though checking the status of Cross Data Center copies. The method below returns the Copy ID, not the Request ID. The Request ID can easily be used with the API to check the status of a request. Still working on what to do with the Copy ID.
// This is the method that copies the selected VHD
// Account details are read from the App.config file.
// Source and Destination VHD are inputs on the Form.
// Container name is hard coded to vhds.
// If you want to copy to/from other containers just change this and remove the text validation on the Destination Blob Name.
internal void CopyVHD()
{
// Reads Configuration details from the App.config file. Needs a reference to Microsoft.WindowsAzure.Configuration.dll.
// Watch out of issues when using Copy and Paste from the portal. I pasted into Notepad first and that seemed to mess something up.
CloudStorageAccount sourceStorageAccount = CloudStorageAccount.Parse(CloudConfigurationManager.GetSetting("SourceStorageConnection"));
CloudStorageAccount destinationStorageAccount = CloudStorageAccount.Parse(CloudConfigurationManager.GetSetting("DestinationStorageConnection"));
// Create the blob client using the Accounts above
CloudBlobClient sourceBlobClient = sourceStorageAccount.CreateCloudBlobClient();
CloudBlobClient destinationBlobClient = destinationStorageAccount.CreateCloudBlobClient();
// Retrieve reference to a previously created container
// Rename "vhds" as needed. Can be used to read from any container.
CloudBlobContainer sourceContainer = sourceBlobClient.GetContainerReference(containerName);
CloudBlob sourceBlob = sourceContainer.GetBlobReference(lstBoxVHDSSource.SelectedItem.ToString());
CloudBlobContainer destinationContainer = destinationBlobClient.GetContainerReference(containerName);
// Created the container if it does not exist
CreateContainerIfNeeded(destinationContainer);
CloudBlob destinationBlob = destinationContainer.GetBlobReference(txtNewVHDName.Text);
// Logic added to check if a security token has already been created
if (!hasSecurityToken)
{
// Create a permission policy, consisting of a container-level access policy and a public access setting, and store it on the container.
BlobContainerPermissions destinationContainerPermissions = new BlobContainerPermissions();
// The container-level access policy provides read/write access to the container for 1 day.
destinationContainerPermissions.SharedAccessPolicies.Add("imageCopyPolicy", new SharedAccessBlobPolicy()
{
SharedAccessExpiryTime = DateTime.UtcNow.AddDays(1),
Permissions = SharedAccessBlobPermissions.Write | SharedAccessBlobPermissions.Read
});
destinationContainerPermissions.PublicAccess = BlobContainerPublicAccessType.Off;
sourceContainer.SetPermissions(destinationContainerPermissions);
// This gets the token needed for cross-account copies. This is not needed to copy into the same account.
globalSecurityToken = sourceContainer.GetSharedAccessSignature(new SharedAccessBlobPolicy(), "imageCopyPolicy");
// Set the Global Variable
hasSecurityToken = true;
}
// This does the copy using the StartCopyFromBlog method in the 1.7.1 SDK.
string copyID = destinationBlob.StartCopyFromBlob(new Uri(sourceBlob.Uri.AbsoluteUri + globalSecurityToken));
}
.csharpcode, .csharpcode pre
{
font-size: small;
color: black;
font-family: consolas, “Courier New”, courier, monospace;
background-color: #ffffff;
/*white-space: pre;*/
}
.csharpcode pre { margin: 0em; }
.csharpcode .rem { color: #008000; }
.csharpcode .kwrd { color: #0000ff; }
.csharpcode .str { color: #006080; }
.csharpcode .op { color: #0000c0; }
.csharpcode .preproc { color: #cc6633; }
.csharpcode .asp { background-color: #ffff00; }
.csharpcode .html { color: #800000; }
.csharpcode .attr { color: #ff0000; }
.csharpcode .alt
{
background-color: #f4f4f4;
width: 100%;
margin: 0em;
}
.csharpcode .lnum { color: #606060; }
by community-syndication | Oct 22, 2012 | BizTalk Community Blogs via Syndication
Published by: Bill Chesnut
One of the preview feature that Microsoft release in June 2012 was the Virtual Network Preview, before this the only choice for connection your Azure services to your on-premises resources was Azure Connect. Azure Connect was a good solution for point to point connections, but had several limitation around domain controllers and windows clustering.
With the June 2012 release of Azure Virtual Networking we were now able to connect a set of Azure services to our on premises network via an IPsec VPN. In the preview there is only a subset of 2 hardware vendors devices supported, Cisco and Juniper, but there have been some blog posts detailing how to setup the Virtual Networking to Microsoft TMG server. Not having access to a hardware firewall supported by Azure Virtual Networking, I decided to give the TMG solution at try. I attempted to use the TMG server from our Mexia Infrastructure, but being located behind another firewall that does not allow IPsec VPN connectivity, it would not connect. I then embarked on installing TMG on my home network as a virtual machine, actually not as difficult as you would expect, I had prior experience with both TMG and its predecessor ISA.
I was then able to establish the VPN, but ended up with having to enable the NAT feature on the IPsec VPN and only able to communicate in one direction, from Azure to my on premises machines. For the tests I was planning this was good enough. I then created a virtual machine in the Azure Virtual Machine preview and select a subnet that I had created during the virtual network configuration on the Azure side. I was then able to join the new machine to my domain and logon with my domain credentials, 1st hurdle solved.
I next created a small application that loaded a number of BizTalk Tracking database (the only database I had with a reasonable number of records in it) records into a dataset, I then ran the test on the machine with the SQL server for BizTalk. The results for the local SQL server were as I expected sub second response for 1000 records. I then tested it on another machine in the same network and other than the initial connection taking just under a second longer, the other results were almost the same as being on the SQL server. The next test was running the same test on the Azure Virtual machine, the test program was using windows authentication so that worked perfectly since the Azure Virtual machine was domain joined. The test results were a bit slower than I expected, the initial test was about 8 times slower than being on the SQL Server, which amount to 8 seconds to retrieve 1000 records, after the initial retrieval it did drop down a bit but only to the high 5 seconds low 6 seconds. Not impressed with the speed, I tried retrieving 10 records, that dropped the time to around 1.5 seconds, So it seem that the biggest factor is actually moving the data. Given that I am on a standard ADSL2 connections, that could account for some of this delay.
For me these test have highlight several issues, some related to the virtual networking and other related to the fact that the Azure Data Centre is not located in Australia. First, I think there needs to be a wider range of devices both hardware and software supported for the Virtual Networking, I can understand how this is going to be a support nightmare, but at least publish the required setting and have some addition diagnostics when things don’t work. I have actually found a couple of under $500 ADSL2 routers that look like they support the same configuration as I used for TMG, now to just get my hands on one of them.
Secondly, I think the amount of data that is going to need to traverse the connection between your on premises data centre and the Azure Virtual Network is going to be the key factor to being able to build a responsive and usable hybrid solution, I also think that SQL data sync will need to be an integral part of any hybrid solution.
Lastly I am disappointed in the latency, encountered getting from Australia to any of the Azure Data Centres, I did a quick test from a virtual machine I have hosted in the US by Rackspace and the latency to the 4 US Azure Data Centres was at most 1/3 for the latency from Australia and in one case it was almost internal network latency of under 3 ms. I don’t think this is an unsurmountable challenge for Australia, but we are going to have to do our hybrid solutions smarter and more efficient that the developers in the US and Europe.
More …
Tags: Virtual Network,Azure,Azure VM

by community-syndication | Oct 22, 2012 | BizTalk Community Blogs via Syndication
SOAPUI is a great free tool that helps you to frame up request messages generated based on a service’s metadata and use them to callon HTTP based SOAP services as well amongst other advanced features. One of the most common questions I have been approached for recently is how to use SOAPUIto call on a […]
Blog Post by: Johann