
by community-syndication | Mar 19, 2010 | BizTalk Community Blogs via Syndication
On Monday I had the opportunity to present the MIX 2010 Day 1 Keynote in Las Vegas (you can watch a video of it here). In the keynote I announced the release of the Silverlight 4 Release Candidate (we’ll ship the final release of it next month) and the VS 2010 RC tools for Silverlight 4. I also had the chance to talk for the first time about how Silverlight and XNA can now be used to build Windows Phone 7 applications.
During my talk I did two quick Windows Phone 7 coding demos using Silverlight – a quick “Hello World” application and a “Twitter” data-snacking application. Both applications were easy to build and only took a few minutes to create on stage. Below are the steps you can follow yourself to build them on your own machines as well.
[Note: In addition to blogging, I am also now using Twitter for quick updates and to share links. Follow me at: twitter.com/scottgu]
Building a “Hello World” Windows Phone 7 Application
First make sure you’ve installed the Windows Phone Developer Tools CTP – this includes the Visual Studio 2010 Express for Windows Phone development tool (which will be free forever and is the only thing you need to develop and build Windows Phone 7 applications) as well as an add-on to the VS 2010 RC that enables phone development within the full VS 2010 as well.
After you’ve downloaded and installed the Windows Phone Developer Tools CTP, launch the Visual Studio 2010 Express for Windows Phone that it installs or launch the VS 2010 RC (if you have it already installed), and then choose “File”->”New Project.” Here, you’ll find the usual list of project template types along with a new category: “Silverlight for Windows Phone”. The first CTP offers two application project templates. The first is the “Windows Phone Application” template – this is what we’ll use for this example. The second is the “Windows Phone List Application” template – which provides the basic layout for a master%u2011details phone application:
After creating a new project, you’ll get a view of the design surface and markup. Notice that the design surface shows the phone UI, letting you easily see how your application will look while you develop. For those familiar with Visual Studio, you’ll also find the familiar ToolBox, Solution Explorer and Properties pane.

For our HelloWorld application, we’ll start out by adding a TextBox and a Button from the Toolbox. Notice that you get the same design experience as you do for Silverlight on the web or desktop. You can easily resize, position and align your controls on the design surface. Changing properties is easy with the Properties pane. We’ll change the name of the TextBox that we added to username and change the page title text to “Hello world.”

We’ll then write some code by double%u2011clicking on the button and create an event handler in the code-behind file (MainPage.xaml.cs).

We’ll start out by changing the title text of the application. The project template included this title as a TextBlock with the name textBlockListTitle (note that the current name incorrectly includes the word “list”; that will be fixed for the final release.) As we write code against it we get intellisense showing the members available. Below we’ll set the Text property of the title TextBlock to “Hello “ + the Text property of the TextBox username:

We now have all the code necessary for a Hello World application. We have two choices when it comes to deploying and running the application. We can either deploy to an actual device itself or use the built%u2011in phone emulator:

Because the phone emulator is actually the phone operating system running in a virtual machine, we’ll get the same experience developing in the emulator as on the device. For this sample, we’ll just press F5 to start the application with debugging using the emulator. Once the phone operating system loads, the emulator will run the new “Hello world” application exactly as it would on the device:

Notice that we can change several settings of the emulator experience with the emulator toolbar – which is a floating toolbar on the top right. This includes the ability to re-size/zoom the emulator and two rotate buttons. Zoom lets us zoom into even the smallest detail of the application:

The orientation buttons allow us easily see what the application looks like in landscape mode (orientation change support is just built into the default template):

Note that the emulator can be reused across F5 debug sessions – that means that we don’t have to start the emulator for every deployment. We’ve added a dialog that will help you from accidentally shutting down the emulator if you want to reuse it. Launching an application on an already running emulator should only take ~3 seconds to deploy and run.
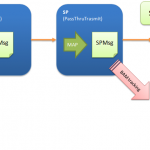
Within our Hello World application we’ll click the “username” textbox to give it focus. This will cause the software input panel (SIP) to open up automatically. We can either type a message or – since we are using the emulator – just type in text. Note that the emulator works with Windows 7 multi-touch so, if you have a touchscreen, you can see how interaction will feel on a device just by pressing the screen.

We’ll enter “MIX 10” in the textbox and then click the button – this will cause the title to update to be “Hello MIX 10”:

We provide the same Visual Studio experience when developing for the phone as other .NET applications. This means that we can set a breakpoint within the button event handler, press the button again and have it break within the debugger:

Building a “Twitter” Windows Phone 7 Application using Silverlight
Rather than just stop with “Hello World” let’s keep going and evolve it to be a basic Twitter client application.
We’ll return to the design surface and add a ListBox, using the snaplines within the designer to fit it to the device screen and make the best use of phone screen real estate. We’ll also rename the Button “Lookup”:

We’ll then return to the Button event handler in Main.xaml.cs, and remove the original “Hello World” line of code and take advantage of the WebClient networking class to asynchronously download a Twitter feed. This takes three lines of code in total: (1) declaring and creating the WebClient, (2) attaching an event handler and then (3) calling the asynchronous DownloadStringAsync method.
In the DownloadStringAsync call, we’ll pass a Twitter Uri plus a query string which pulls the text from the “username” TextBox. This feed will pull down the respective user’s most frequent posts in an XML format. When the call completes, the DownloadStringCompleted event is fired and our generated event handler twitter_DownloadStringCompleted will be called:
The result returned from the Twitter call will come back in an XML based format. To parse this we’ll use LINQ to XML. LINQ to XML lets us create simple queries for accessing data in an xml feed. To use this library, we’ll first need to add a reference to the assembly (right click on the References folder in the solution explorer and choose “Add Reference):

We’ll then add a “using System.Xml.Linq” namespace reference at the top of the code-behind file at the top of Main.xaml.cs file:

We’ll then add a simple helper class called TwitterItem to our project. TwitterItem has three string members – UserName, Message and ImageSource:

We’ll then implement the twitter_DownloadStringCompleted event handler and use LINQ to XML to parse the returned XML string from Twitter. What the query is doing is pulling out the three key pieces of information for each Twitter post from the username we passed as the query string. These are the ImageSource for their profile image, the Message of their tweet and their UserName. For each Tweet in the XML, we are creating a new TwitterItem in the IEnumerable<XElement> returned by the Linq query.
We then assign the generated TwitterItem sequence to the ListBox’s ItemsSource property:

We’ll then do one more step to complete the application. In the Main.xaml file, we’ll add an ItemTemplate to the ListBox. For the demo, I used a simple template that uses databinding to show the user’s profile image, their tweet and their username.
<ListBox Height="521" HorizonalAlignment="Left" Margin="0,131,0,0" Name="listBox1" VerticalAlignment="Top" Width="476">
    <ListBox.ItemTemplate>
        <DataTemplate>
           <StackPanel Orientation="Horizontal" Height="132">
              <Image Source="{Binding ImageSource}" Height="73" Width="73" VerticalAlignment="Top" Margin="0,10,8,0"/>
              <StackPanel Width="370">
                 <TextBlock Text="{Binding UserName}" Foreground="#FFC8AB14" FontSize="28" />
                 <TextBlock Text="{Binding Message}" TextWrapping="Wrap" FontSize="24" />
              </StackPanel>
           </StackPanel>
        </DataTemplate>
     </ListBox.ItemTemplate>
</ListBox>
Now, pressing F5 again, we are able to reuse the emulator and re-run the application. Once the application has launched, we can type in a Twitter username and press the Button to see the results. Try my Twitter user name (scottgu) and you’ll get back a result of TwitterItems in the Listbox:

Try using the mouse (or if you have a touchscreen device your finger) to scroll the items in the Listbox – you should find that they move very fast within the emulator. This is because the emulator is hardware accelerated – and so gives you the same fast performance that you get on the actual phone hardware.
Summary
Silverlight and the VS 2010 Tools for Windows Phone (and the corresponding Expression Blend Tools for Windows Phone) make building Windows Phone applications both really easy and fun.
At MIX this week a number of great partners (including Netflix, FourSquare, Seesmic, Shazaam, Major League Soccer, Graphic.ly, Associated Press, Jackson Fish and more) showed off some killer application prototypes they’ve built over the last few weeks. You can watch my full day 1 keynote to see them in action. I think they start to show some of the promise and potential of using Silverlight with Windows Phone 7. I’ll be doing more blog posts in the weeks and months ahead that cover that more.
Hope this helps,
Scott
by community-syndication | Mar 17, 2010 | BizTalk Community Blogs via Syndication
Host Integration Server is by default configured to use ‘smart multihoming’. When using smart multihoming, the Host Integration Server (HIS) will send all his available IP addresses to the clients. The SNA client will use the address from the list with addresses received from the server that is closest to its own subnet or IP address.
In some scenarios smart multihoming can cause some problems. What if one of the IP addresses received from the HIS server is not reachable (e.g. an IP address that is used to link to a separate network)? In that case the client will try to connect to one of the other address received from the HIS server. This only happens after a delay (default 45 seconds). After the delay the client will connect to the IP address that connects successfully.
This delay when connecting to the server is not a desired behavior.
How do we fix this?
On the client we can disable smart multihoming. To do this, make sure that this registery key ‘ReadjustMultihomedAddresses’ is set to ‘NO’. If the key does not exist, create it. The location of this registry key should be: ‘HKEY_LOCAL_MACHINE\System\CurrentControlSet\Services\Snabase\Parameters\SnaTcp’.
If smart multihoming is disabled on our client, the new behavior is as follows: the client will try to connect to a server IP address in the order as the client received them from the server. Again, this causes problems… What if the IP address that is not reachable appears first in the list? We will again see a long delay when connecting to the server. Luckely we can fix this!
Host integration server uses the network bindings to determine in what order to present its IP addresses to the client. You can find the network binding on the ‘Network Connections’ sceen, ‘Advanced’ menu option, ‘Advanced Settings…’, then ‘Adapters and Bindings’ tab. On that tab page, every network connection is listed and we are able to change the order in which they appear. Adapt the order to your needs (reachable IP’s first!!!). Host Integration Server will use the order specified here to send it’s IP list to the client.
Now that both steps are done (disable smart multihoming AND change the network bindings on the server), the client will no longer experience a delay when connecting to the HIS server.
Peter Borremans
by Richard | Mar 17, 2010 | BizTalk Community Blogs via Syndication
Update 2012-03-28: This bug was fixed in the CU2 update for BizTalk 2006 R2 SP 1. Further details can be found here and here.
Update 2010-04-12: Seems like there is a patch coming that should fix all the bugs in SP1 … I’ve been told it should be public within a week or two. I’ll make sure to update the post as I know more. Our problem is still unsolved.
Late Thursday night last week we decided to upgrade one of our largest BizTalk 2006 R2 environment to recently released Service Pack 1.aspx). The installation went fine and everything looked good.
… But after a while we started see loads of error messages looking like below.
Unable to cast COM object of type 'System.__ComObject' to interface type
'Microsoft.BizTalk.PipelineOM.IInterceptor'. This operation failed because the
QueryInterface call on the COM component for the interface with IID
'{24394515-91A3-4CF7-96A6-0891C6FB1360}' failed due to the following error: Interface not
registered (Exception from HRESULT: 0x80040155).
After lots of investigation we found out that we got the errors on ports with the follow criteria:
-
Send port
-
Uses the SQL Server adapter
-
Has a mapping on the port
-
Has a BAM tracking profile associated with the port
In our environment the tracking on the port is on “SendDateTime” from the “Messaging Property Schema”. We haven’t looked further into if just any BAM tracking associated with port causes the error or if only has to do with some specific properties.
Reproduce it to prove it!
I’ve setup a really simple sample solution to reproduce the problem. Download it here.
The sample receives a XML file, maps it on the send port to schema made to match the store procedure. It also uses a dead simple tracking definition and profile to track a milestone on the send port.
Sample solution installation instructions
-
Create a database called “Test”
-
Run the two SQL scripts (“TBL_CreateIds.sql” and “SP_CreateAddID.sql”) in the solution to create the necessary table and store procedure
-
Deploy the BizTalk solution just using simple deploy from Visual Studio
-
Apply the binding file (“Binding.xml”) found in the solution
-
Run the BM.exe tool to deploy the BAM tracking defintion.
Should look something like:
bm.exe deploy-all -definitionfile:BAMSimpleTestTrackingDefinition.xml
-
Start the tracking Profile editor and open the “SimpleTestTrackingProfile.btt“ that you’ll find in the solution and apply the profile
-
Drop the test file in the receive folder (“InSchema_output.xml”)
The sample solution fails on a environment with SP 1 but works just fine on a “clean” BizTalk 2006 R2 environment.
What about you?
I haven’t had time to test this on a BizTalk 2009 environment but I’ll update the post as soon as I get around to it.
We also currently have a support case with Microsoft on this and I’ll make sure to let you as soon as something comes out of that. But until then I’d be really grateful to hear from you if any of you have the same behavior in your BizTalk 2006 R2 SP1 environment.
by community-syndication | Mar 16, 2010 | BizTalk Community Blogs via Syndication
Last week we released a Billing Preview that provided a usage summary to help customers prepare for when billing begins in April. Usage statistics in this billing preview are consistent with our new Connection-based billing for the AppFabric Services Bus that we announced in January. A key feature of this model allows customers to purchase Connections individually on a pay-as-you-go basis, or in Connection Packs if they anticipate needing larger quantities.
To provide greater insight into the Billing Preview and the options available to customers, a member of our team created an Excel-based calculator that converts usage numbers into costs. The calculator also allows customers to see how much their usage would have cost with each of the different reserved pack options.
While we hope customers find this tool quite useful, please do note that it is being provided only as a courtesy and is not guaranteed against possible bugs. The calculator also does not guarantee the amount of future bills.
You will find the calculator in an attachment to this post.
The Windows Azure platform AppFabric Team


